


Avanti83
-
Posts
1,282 -
Joined
-
Last visited
Content Type
Profiles
Forums
Events
Posts posted by Avanti83
-
-
Google Jeep bolt pattern size and you'll get a good idea of what to look for. You are looking for 114.3mm or 4.5".
Also be sure that if you have Positraction you get pretty close in size. Posi's don't do well with different size wheels installed.
-
Has anyone had good or bad interaction with George Dmitsas from Olympus Avanti out of Chicago?
I've bought from George on a few occasions at the SB swap meets but nothing by mail order. Neat guy to talk to about Avanti's and parts availability. He did have good prices on hog troughs but haven't checked lately. Also has SS fuel tanks but a bit pricey if one is a CASO but possibly not when compared to other suppliers.
-
Try W-I-L-D-F-E-L-R, second from last letter is an L not i
-
Interesting discussion, appreciate the photos. Does not look like an easy job.
I have a couple of questions regarding the photo of the cut-off rear portion (extension) of the cowcatcher in place...
- the holes in the side of the cowcatcher don't line up with holes in the frame, I assume the radiator support needs to be jacked-up a bit to raise the body to be able to line up the holes?
- There appear to be what look like rivet heads on the surface of the cow-catcher extension on either side of the "long through-bolt"... are they rivets, and if so, what are they holding?
In the final fit the holes line up with the frame.
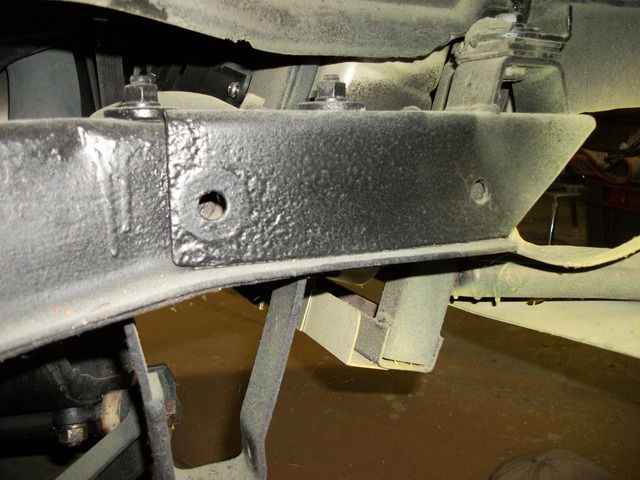
The previous photo looks out of place but what it shows is the inside of the spacers in the frame that keep the frame from distorting as the bumper bolts are tightened.
Good catch on the rivets. They are in the frame and the bracket has holes for them. The body bolt and shims need to be removed to pull off the mount. The first move was to raise the mount to clear the rivets. Upon further review, I supported the front of the bodywhen I removed the cow catcher. The photos above a a couple of years old. The one above is recent.
It's a bit of a bother to remove the assembly but I wanted to have the option of closing up the holes or adding cold air ducting later in that area.
Bill (wildfelr) is correct that it could be cut off without removing it and lights or other options could be mounted on the remaining portion.
Bill --- BTW -- you could text me the photos and I'll add them to the post. Bob
-
Picture of the "Cow catcher mod".
This is the measurement of the portion of the mount left after I cut the mounting end off.
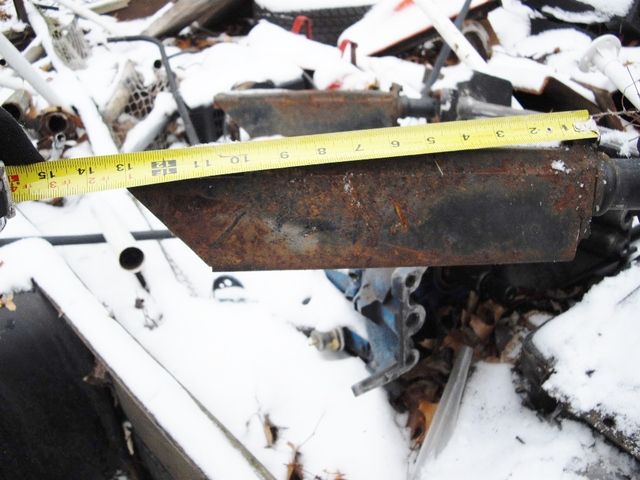
The part of the mount I used resting on the frame
The above shot of the mount showing all the bolts and/or holes involved. If you have all four bolts out, the mount should move forward. It can take a fair amount of force as it's a fairly tight fit and rust can develop between the frame and mount.
Bob
-
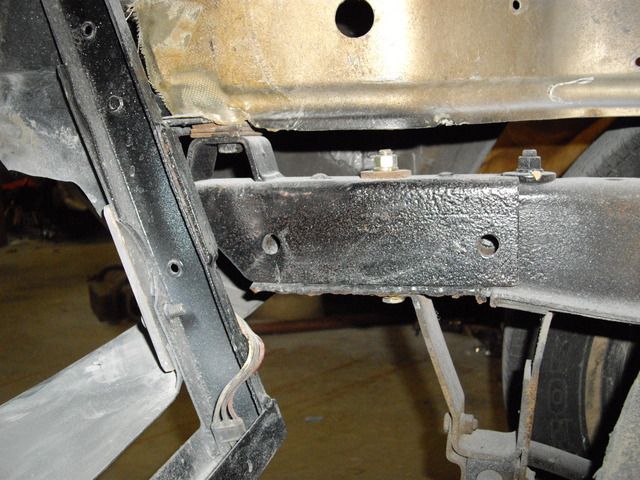
Look closely and you will see that the back portion provides support for the radiator. I cut the back portion off at an angle just in front of the radiator and bolted it back in. There are also larger holes in the grill area that you may wish to deal with. It is a major improvement in appearance. My 74 is in the polebarn, if you need a picture or two of my modification I can get them..
-
Chevy's will fit without shimming the body if you use the right parts.
Agree ^^^^^. The first point of interference is usually the front crankshaft pulley with the bellcrank assembly. Chevy made a ton of different diameter crankshaft pulleys so one needs to chose the one that gives clearance. Remember to match the other pulleys, particularly the water pump with the CS pulley.
The other point of interference is the oil pan to bellcrank steering assembly. Again, Chevy has a wide variety of dimensions for the front of the oil pan. One could use a hammer but I just find the pan I need at a swap meet or parts supplier and move on.
Of course the other issue is the drivers side exhaust manifold but that's been beat to death.
-
thanks for all the advice. I'll start snooping around to see what's out there in my area. A guy at work races a buick grand national & keeps up with where all the rear wheel drive stuff hides these days. I like the idea of making the fewest "changes" from stock as possible. That's why the 200 sounded better, but being a typical caso, what ever bargain I come across will influence the direction..... I've got a spare drive shaft, so I'll be able to keep the original in it's original form.
Mike Sal
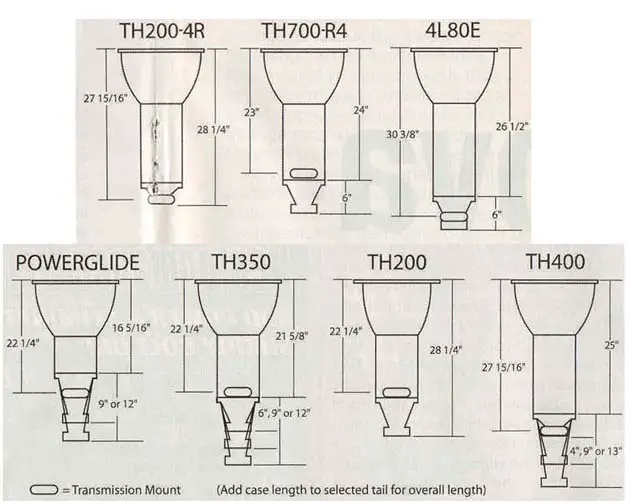
If he has a 200 from those, great tranny. Continue to be aware that both 200 and 700 were offered in the later 80-83 Avanti's so both should fit without any unreversible changes. You will need a shifter change or mod, tranny frame mount change and driveshaft (which you have discussed) with either. The tranny frame mount is about as easy a fab as you'll find in an Avanti. Also be sure the BOP engine mount configuration on the 200 also has the SBC setup to bolt it to the SBC block.
Note the rear mounting points and total installed length on each trans. I keep sounding like I'm humping the 700 which I'm not but the choice is more complicated than most posters seem to appreciate.
BTW, wildfelr does have a nice setup in his Avanti. Rode in it and it performs well.
Good luck, you'll appreciate the change. Bob
-
I would be interested in seeing your pics, but we're still in the "dumb phone" phase of our lives. If you can email them, my address is miso7@wabash.net.
BTW, where do you guys mount tranny coolers? I would think (hot) air management is an important consideration with these cars.
thanks,
Mike S
Scrolling down this post a few comments will give you the complete list of 200 installs.
http://67-72chevytrucks.com/vboard/showthread.php?t=426846
Don't throw out the 700.4l60's as Bill suggested. There are a lot more of them, they came in more cars and trucks and in much newer models. As I said, I have a 2004R in my 83 built to stage II specs with a 4:10 rearend and it's fine. But remember the 700 was the standard install for large cars and 1/2 ton trucks with rear gears up to at least 3:73. My 54K has a 700 with a 3:42 posi that was standard issue in the 9C1 police special Caprices of the early/mid 90's.
It's irrelevant to me what you install but I want you to be aware of the options available to you. Being you have the ability to install them I saw a great piece of advice in the SDC forum on finding a tranny. One member said he cruised the Pick n pulls until he saw a clean tranny in an old car which indicated it was probably a newer rebuild or install. A good used tranny should keep your install costs under $1000 and well worth the investment. Even if you pull a complete install from a car, Google TV cable adjustment to be sure it's correct. A bad adjustment will burn one up muy Pronto.
You can do the lock up by supplying a switched 12V source to the converter and energizing the lock up on Highway cruises. You'll remember to turn it off as you slow down to exit the expressway. I did that on my 200.
In the 700, OEM parts will let you go to a mechanical speedo drive for about $100 or less. I'm not sure that's an option in the 200. Google will be your friend there.
I added a Derale tranny cooler in front of the radiator, it's probably 9 X 12" or so.
Lastly, if you need a few shots of my install, the Avanti is currently on the hoist.
-
What are you willing to spend? Going to a rebuilt tranny with all the other changes necessary could go $3000 or so. For that money either the 200 or 700 are in play. 700 is longer and has a lower first gear as it was used to get heavy cars/trucks rolling. 200 was for smaller cars and is somewhat shorter than the 700 and a higher first gear. Avanti came with both so the choice is yours. My 83 has a built 200 but it had a 700 from the factory.
If you want to keep costs down, it would be a lot easier to find 700 in decent shape in a wrecking yard. The 700 also called a 4L60 later but about 92 they changed to 4L60E which had shifting controlled by the ECM. You can use any 700 except the E for your use. The later electric speedo can be converted to mechanical with OEM parts for about $100 or so. You also need to redo the tranny mount, shorten the drive shaft, add a TV cable to control shifting and add a way to lockup the converter if you don't use a special converter. You will also need to add cooling for the tranny if you car doesn't have it.
Shifter is different as is the quadrant. It's a nice upgrade but don't go in with your eyes closed. If you can't do it yourself which will keep costs down, either find a local mechanic familiar with chevy tranny exchange or go to Bowtietransmissions for a kit to add an overdrive tranny to something like a Camaro or Monte Carlo.
-
Lower brake fluid level and "a drop outside" would lead me to check where the leak is in the system. IIRC front reservoir = rear brakes and the rear is front.
If leaking at the M/C it's time to replace it. Wheel cylinder would depend on front or rear for rebuild or replacement. While you are at it, replace the flex hoses if they are original.
Get it up in the air high enough to check all cylinders and connections while you are at it. The system is 33 YO if it hasn't been rebuilt it's time for a good going over.
-
someone had posted an itemized check list for removal and replacement of th4oo with 700r4 would like to see it again so I can print it. He said it took him about an hour???
I'd be shocked if you could do it in less than 5 hours and I'll bet a few more. 400 removal, piece of cake but they weigh a ton. IIRC reinstalling the R4 will require you change the position of the tranny mount and possibly narrow it and drill new holes in it. Not hard but consumes time. You will need to hookup the shifter and I'm not sure if the old one will give you all the gears in the new OD unit. You need to change the shift indicator also.
You will need to hookup the TV cable as there was not one on the 400. Driveshaft needs to be shortened and balanced also. The R4 requires a way to lockup the converter if you chose to use one. I'd suggest you do unless you buy a trans/converter setup to not need it. You can use a simple 12v switched supply and lock the converter on the highway only. That's what I do.
Just some thoughts quickly, probably more I haven't thought of.
-
I was going to tap a larger hole but the entire puller thread left of the bolt is missing and the prongs that grab from the back are to big to get behind the wheel. I might try the glue a new thread into the hole and let it set before I try it again. Any thought on that working?
Thanks.
If worse come to worse, try a helicoil. Threads should be at least as strong as original. As a last gasp, these work great, and you can rent one for free at your FLAPS.

-
By the time that I figured shipping and repair in on a car with a salvage title, $5000 was about the most that I would go to buy the car.
Agree, If I had one less in the polebarn, I'd be tempted to bid at that price and repair it as unique daily driver. It would be a decent driver but I'll bet the passenger tail light is a bear to source.
-
Estimated $36,219 to repair by insurance.
Estimated value $35,350, wonder how much I should pay for the car?

-
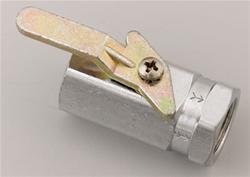
I am not a fan of electric valves on my fuel system even though I run an electric pump in everything I build.. If you can find a "latching" fuel valve that stays in either open or closed position without a constant voltage then I'd use that one. Generally fuel valves require constant voltage to stay in one position, either open or closed, be sure to specify if you purchase one.
I like the manual ones which won't fail and I use a "latching" relay on my main electric power line for theft protection. Your money, your choice However.
I do agree though to locate it back closer to the tank. Bob
-
Good point.
-
I agree that the other guy should pay for the repair but the reason I carry insurance is to get my car fixed no matter who's a fault. Wonder if he had insurance when it was wrecked.
I don't see why the Corvette guys couldn't fix it but there's a fair amount of damage and it won't be cheap. The whole quarter looks involved as well as the rear valence and front fender. Paint alone will be many thousands.
-
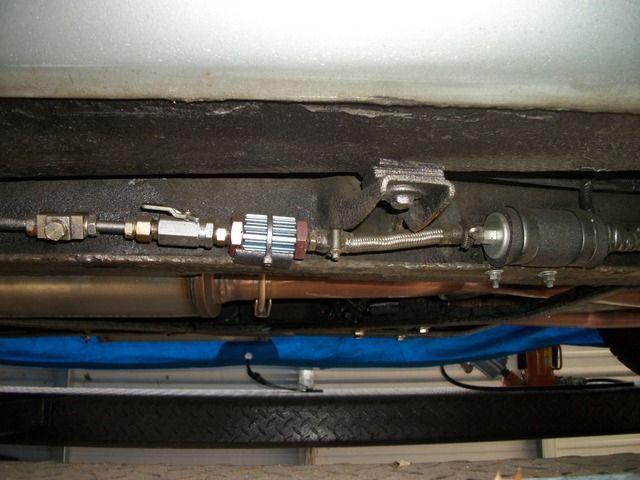
Thanks. I was hoping to find one with a remote operator such as one which is controlled by the ignition.
Where do you install yours?
This is the install on my 83 with a Holley EFI setup. If I had to do it over again, I'd put the valve between the fuel tank and the tee. I did that on my 74 but this will let me change the filters and fuel pump with the tank full.
-
I use these on all my classic? cars. http://www.summitracing.com/parts/ear-230501erl/overview/
Not the least expensive but I've never had a lead or problem in many years.
-
I was wrong about what was and was not working. The parking lights and turn signals work but when I turn the headlight on the front parking lights go off and the headlight won't come on but the taillights work fine.
Could that be the relay?
Looks like a perfect time to use a VOM or 12 v test light. Track voltage to and from the relay and at the headlights. That should tell you if it's a relay issue or ground. The test light is probably cheaper than a relay and you'll have it later if you need it. Then you can replace the correct part or connection.
I'd probably check the bulbs also. Do you have brights?
-
Keep in mind that you may be comparing "apples and oranges". You asked about Studebaker Avantis and Bob J's site tracks all Avantis (1963-2007).
But they are differentiated on his site so one just needs to select the appropriate sections. http://www.studebaker-info.org/avantix5.html
-
The price that it sold for does not appear (at least for me).
I did see two Studebakers at that auction and did not see the final sale/price for either.
The 50 starlight went for $24,200 IIRC,
-
Measure u-joint center to center distance, that will give a prospective buyer the info they need. Before you sell it, be sure the new one fits. If it's from an original Avanti then you should be good to go. There are a lot of Camaro shafts out there that are close to the Avanti length but a bit shorter.
Good luck, Bob
Hot Rod
in 1963-64 Avanti
Posted · Edited by Avanti83
It's been posted in several configurations on racingstudebakers.com From the Burke history through Dan to the current owner. A lot of tech pieces as it changed with each owner as well as the racing results with Dan.