


Avanti83
-
Posts
1,282 -
Joined
-
Last visited
Content Type
Profiles
Forums
Events
Posts posted by Avanti83
-
-
If you check the HP and more importantly torque ratings of either tranny, you will find you are above the stock rating of either one so you will need one that's built for your needs.
Before you go either way, talk to someone that know what they are talking about and get the trans with the best rearend ratio for your needs. Probably wouldn't hurt to upgrade your posi to a better setup too. If you don't have posi, don't worry about upgrading the rest. Not enough traction to cause issues.
It won't be cheap but if you are serious about what you have in power then put the best equipment and tires behind it and drive happily.
-
Just for grins, does it look like this. http://www.ebay.com/itm/1969-72-Chevrolet-Chevelle-Camaro-USED-power-steering-pump-w-bracket-pulley-/331670996445?hash=item4d3921c5dd:g:GfkAAOSwZQxW4JQb&vxp=mtrEbay or local swap meets should have what you need. GM used a variety of pump and bracket combos on the SBC's but not as many as one might think. IAC, the Avanti portion of the power steering remained the same until into the 80's so even if you can't find exactly what you have, most any GM pump from the 66-83 era should work so a lot of brackets will fit and work. I've bolted a fair number of various OEM power steering setups to SBC's and as long as the pulleys line up then a belt change is usually the only other item needed.
One thing to be aware of is a lot of the SBC installs also use a brace from the pump/bracket to the engine to strengthen the assembly. See if your setup needs one also.
Bob
-
Check the actual temperature of the system with something other than the gauge. If it's still in that range, I'd probably replace the thermostat with a 190/195 new one to be sure. I use 190/195 ones in all my SBC engines and 200 is not unusual in hot weather in mine. As far as a small margin, the new cars run 200+ normally. Makes for higher efficiency and if yours is a TBI injection engine it shouldn't cause any fuel issues.
I believe you also have a computer and if you go lower in engine temperature, it will not run as well because the computer will think it's running cold and adjust fuel and timing in response.
-
Thanks all, I found what I needed..
Just for posterity, what and where did you find it?
-
I always use a mini starter on my SBC's and also wrap the exhaust pipe in the engine compartment with DEI thermal wrap to reduce underhood heat. Remember that the SBC is now an old engine and,I'll bet that, most/all of the available starters available from your FLAPS are rebuilt. Rebuilds are not a bad thing but for what a rebuilt SBC starter costs, I'd question the quality of most inexpensive rebuilds.
You can find a mini starter and the wrap for well under $100.
-
Slow night so:
2 -front turn
2-headlight trim ring
2-headlight filler
2-Avanti script f/r
2-supercharged emblems
1-hood emblem
4-door handle pieces 2x per door
2-wiper trim
2-sail panel emblems
2-backup light trim
2-tail light housings
2-under bumper verticle trim
2-mirror bases
27 unless the radio antenna base has a diecast washer then 28.
Best I can do!
-
I am a new owner of a 1978 Avanti 2 and I have some questions for you more experienced owners:
1. Which vendors carry the most parts for these cars?
2. The 350 and the turbo 400 are standard GM and use nothing weird as they are in an Avanti?
3. Is there a good service chart for the car? Recommended Lubricants. grease points, etc.
4. The cruise control doesn't where can I find a good troubleshooting procedure?
5. Where is the fuse block?
6. There was restored a while ago, what are the general problem areas I should check out.
Thanks for your help, Steve
1 - Nostalgic motors, Wixom, Mi - Studebaker International - Jon Myers
2 - Stock as the SBC's they are bolted to. Rear end is Dana 44 though
3 - Owner Manual - Pretty much as any car of that era. I have a 74 manual
4 - Get the wiring diagram from Bob Johnstone http://www.studebaker-info.org/tech/Diagrams/aec/aec.html
5 - Under the dash - left side
6 - Drive the hell out of it and find out.
Bob
-
Now another question regarding the paint itself. Were the paints formulated for Studebaker / Avanti Motors, or did the use available colors the big 3 were already using? Our car is "Monterey Green" (don't have the paint code in front of me at the moment). Can I find out if this was a big 3 color, or do I have to have the body shop color match it & blend it up from scratch?
thanks,
Mike S
If you have a spot on the car that represents the color you want, just go to any good auto paint store and they will use their paint analyzer to get the formula from the spot. They will also be able to get the metallic content and type if the guy with the analyzer is any good.
Bob
-
There are corvette engines and then there were CORVETTE!! engines. The 2 1/2" exhaust were only supplied on a few engines and years IIRC. Usually they were on the HiPO 327's from the 60's. They are available aftermarket from a number of sources for under $60 usually.
I'd be surprised if yours were 2 1/2" unless somebody changed them.
-
I can't recall the exact number of SBC's I've owned and/or worked on in my 73 years but one thing I do recall, I've replaced a lot more bad starters than I have bad solenoids.
-
Posted this on the SDC site, so I thought I'd leave a link here.
http://forum.studebakerdriversclub.com/showthread.php?96514-Avanti-Paint-Removal-Suggestion
Bob
-
Still sounds like a starter heat soak issue. After you check all the connections, and you should as Charlie explained above, listen to hear if the solenoid is actuating but the starter is not turning when you have the problem. It would not be the first time a newly rebuilt starter was a POS right out of the box. I'd dig a bit deeper before I'd change to the Ford solenoid.
As an aside, I've been using ones like these on all my SBC's over the years. http://www.ebay.com/itm/SBC-BBC-CHEVY-3-HP-High-Torque-Mini-Starter-168-tooth-SDR0031-L-/361647909871?hash=item5433e52bef:g:~Q8AAOSwRgJXiT3X&vxp=mtr
Be sure to get the correct one for the # of teeth on your flywheel. There are two options.
Bob
-
Looks like we'll be back down in Feb, let me know if you still need a hand. My turn for lunch. Bob
-
Bill
Thanks for running point on the headlight conversions. I found these on the internet. The supplier is fairly well known for LED bulbs but I have no experience with their headlights.
One thought, take a look at the back of the bulb, there may be some interference issues to deal with in the bucket.
Here's a look at a ton of Ebay listings.
Bob
-
So, back to the subject at hand, does anyone know what type of pads were taped to the X beams at the factory?
When the rubber meets the road, so to speak. Why not just call Dan Booth at Nostalgic Motors in Wixom, Mi. If anyone knows the answer and can supply the parts , it will be Dan.
-
No plans on changing the springs or suspension. Removal of the shims and re-radius of the front wheel arches should be the bulk of the change needed. Newman/Altman raised the body, added a shim under the springs, and added a filler to get the new stance, I just plan on reversing their changes.
Keep us posted on your efforts. I've always liked the original rake. I pulled the shims from mine but just not enough change. Remember that there about 200# less in the front with the SBC.
IAC, I wish you success as I'm interested in what it took to accomplish.
Bob
-
Anybody have experience De-shimming an Avanti II? About to put the body back on the chassis of my 71 and plan on restoring the Studebaker stance. i was going to start with one at each mount point and adjust as necessary.
Interesting experiment. I'll be interested in what happens. If it has issues, I'd talk to Eaton spring or other manufacture to see what they recommend in an 1 - 1 1/2" lower coil spring that would still give a decent ride. Someone here or on the SDC forum may have done this and saved the inquiry.
As a last resort, you could cut a turn or so off the coil springs but I'm not a fan of this method.
-
Passenger side, Anyone got one? Or where can I find one. Mine is pretty loose and it looks to be pressed. Not sure how or if it can be fixed.
Dan Booth Nostalgic Motors, Wixom Mi.
-
Avanti83,
Was the inner fibreglass panel removed from your doors in the hinge area?
Normally you need to slide the hinge into place making the job extra painful.
If I have read your post correctly the inner panel has been removed allowing the hinge to open and close without removing the door all the time to add shims.
Thanks for the info
Pb
Been a while so I checked the 74 today, if you look at the slot in the door there is room for moving the hinge enough to add shims if necessary but it's a bit of a bother without question. IAC, my doors fit quite well after I put them in the correct position. I did need to slightly modify the lower corner of the latch side of the passengers door but that's not unusual with an Avanti.
Bob
-
The way I adjust the doors is to pull the striker and close the door. Loosen the hinges and start to shim and tape the door into the opening. When you have the gaps positioned and the door taped and shimmed where you like it, swing the hinges back into position. The secret is to shim the hinges so they are parallel to the door mounts. When the bolts are tightened, the door should be in place and the striker can be reinstalled and adjusted.
You need to have good hinges and a solid hinge mount on the door and body or you'll never get it adjusted properly.
This method sets the door where it should be and the shimming of the hinges maintains the required position. Any other way I have tried just has me chasing adjustment continually.
BTW, Support the car by the suspension, but no matter whether you have it on wheels or jacks, be sure the car is equidistant from the floor on all four corners.
This is the passenger door on my 74 that would not close when I purchased it and have since replaced the hog troughs.
Also remember that these are heavy doors and treat them as such. Be safe.
-
Measured the exhaust the other day and it currently has a 2" system with glass packs. Talked to Nastalgic and they seem to have both a stainless and aluminized steel system that will bolt right up to my heads that'll give me "true duels" front to back, eliminating the cross-overs and cat. It's a '74 Avanti design.
Should work fine. Post a couple of shots when you are done.
Custom 2 1/2" system on my 74 built locally http://forum.studebakerdriversclub.com/showthread.php?74295-74-Avanti-SBC-T-56-2-1-2-quot-Exhaust-System-and-Undercarriage
Silvertone 2 1/4" stainless system on my 83. http://forum.studebakerdriversclub.com/showthread.php?42662-Avanti-Stainless-(Silvertone)-Exhaust-Installation-Length-and-picture-warning
Bob
-
Have you talked to Don Simmons at Silvertone Exhaust systems, his ad doesn't show 75 to 83 but he should be able to build something. his # 519 485 1966. Another person with exhaust for the Avanti is Dan Booth,when Avanti motors left SouthBend, he bought all spares, and has advertised having parts. His # 800 AVANTIX. Lou Cote
My 83 has a Silvertone 2 1/4" stainless system modified to mate with the 2 1/2" Ram Horn "vette" exhaust manifolds. The cross over is gone and it has the true dual exhaust system. He may not list the 75 and on but it's possibly due to the use of a cross over headpipe which I'm not sure he makes.
The advice above is valid as it is best to talk to Don at Silvertone. He's also a great guy to talk to same as Dan from Nostalgic.
-
400-350-327-283 exhaust manifolds should be interchangeable during this era and should be able to be bolted to any cylinder head. There can be a difference in outlet OD however. Most are 2" but some are 2 1/2" OD. If your 76 has the standard Ram 2" manifolds the 350 system should bolt up. Check the exhaust manifold outlet OD to see what you need.
-
How long would it take to razor blade the paint off of the primer? It sounds like a tedious long job.
thanks,
Mike & Sonya
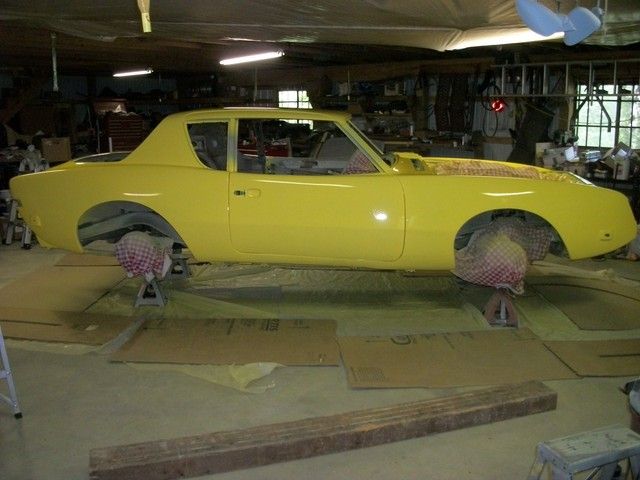
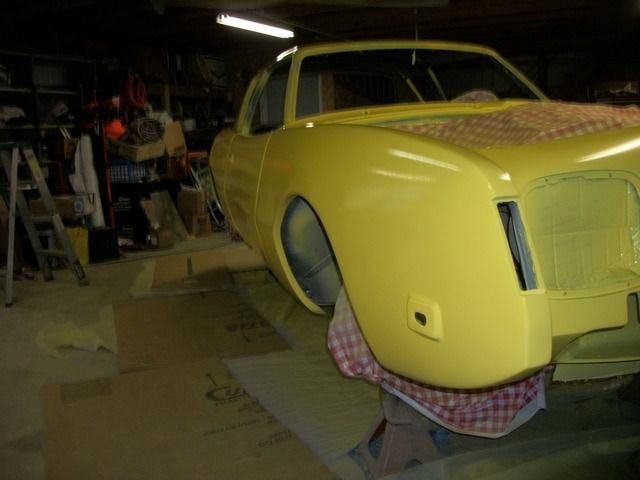
I did that with my 74 and the best I can figure it took better than 40 hrs. The 74 is not lacquer so my advice would be to buy on of these
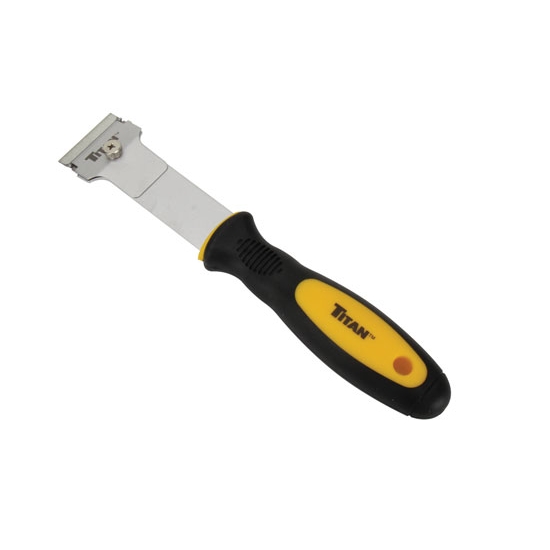
which I found at Home Depot and try a section. It was the best holder I found and along with 150 blades finished the job. That will tell you about how long it will take.
You will nick the glass quite a bit but I just sanded the body down lightly and sprayed on high build polyester. Just sanded it smooth while using about three gallons of polyester. After all that, I primed it again, sprayed on about four coats of Acrylic Enamel which have now been sanded with up to 1500 grit. Just 3000 grit to go and then two to three stages of polishing.
I don't even want to know the hours I have in it since I scraped of the paint but I sure know know why quality paint jobs go over $10,000 quickly.
Bob
battery for '63 R-1 Avanti
in 1963-64 Avanti
Posted
Google "3EE battery" and you'll find a good selection all the way up to a $359 AGM. Bob