


Avanti83
-
Posts
1,282 -
Joined
-
Last visited
Content Type
Profiles
Forums
Events
Posts posted by Avanti83
-
-
Replied to your other post.
-
Having done my 74 Avanti from about the shape of your current 63, I can appreciate the amount of work necessary. But I'm currently 78 and won't discourage you in your quest. Mine took about 6 solid years to complete from hog troughs and frame repair to complete body, interior, suspension and engine rebuild. I converted from a 4 speed to 6 speed but with an SBC so no big deal.
You'll want to add an avanti/lark clutch setup and let me recommend you switch to a hydraulic setup for the clutch. A go-to for transmission adapters is Fairborn Studebaker in Ohio. http://fairbornstudebaker.com/WP/
They show an adapter from 289 to GM automatics but I know there are a couple 5-speed's wandering around with their kits. Give them a call and discuss your needs from engine to trans conversions and, I'll bet they'll fix you up. Good folks.
Also think about converting to flanged axles in the rearend and also upgrading from the OEM to a high spline count. Again, Fairborn can help.
I did everything on my 74 from metal work to painting so that adds up in time. Farming out some of the work can shorten the time but add costs and the satisfaction of doing it yourself.
Good luck and keep us in the loop. If you have questions about certain modifications, I have a lot of pictures and posts I've done over the years.
Also acquaint yourself with Bob Johnstone's website for a ton of valuable information on repairs and modifications. Forum member Brad Bez name - brad - is in the restoration business and a quality reference here for questions.
Bob's website - for technical help go to the Tech Page logo on the left side of the page. https://www.studebaker-info.org/
-
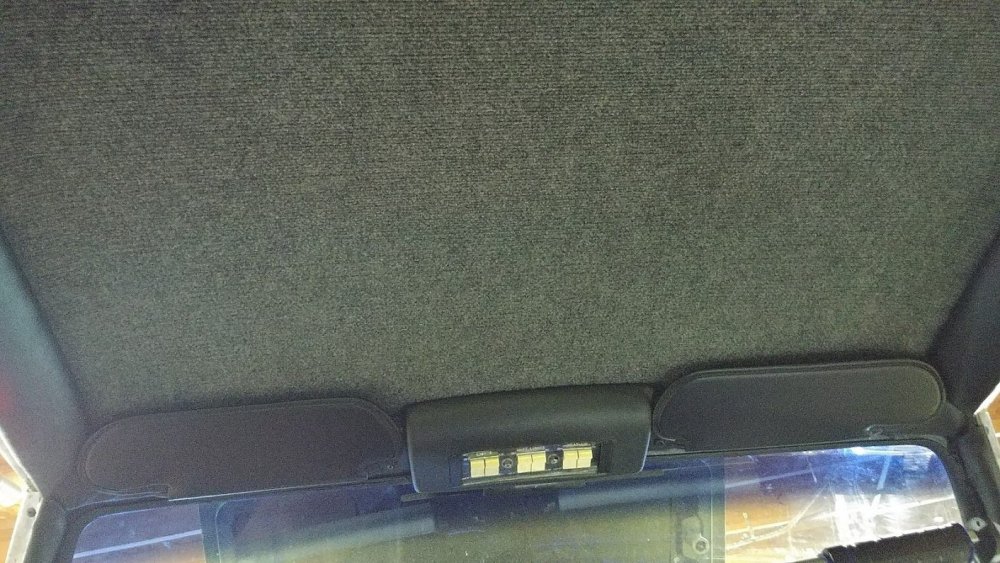
The area above and behind the rear seats are mostly fiberglass with the fuel tank located there and a rear shelf that is plywood. That would make mounting the upper belt mount securely a challenge. You could possibly add a steel mounting point and heavier wood bracing under the rear shelf to provide enough strength for the mount using the rear seat belts from a modern sedan.
-
9 hours ago, Zedman said:
Hi All-
Is it possible to fit a new cam into a Chevy engined Avanti II while it is in situ in the engine bay ? I have an 1981 305 which i believe have some 'suspect' bumpsticks. To be honest, I don't even know if mine is crook- I only ran the engine for 10 mins before tearing the car apart. The engine is in the frame but the body is off and I know I have a 'special' opportunity here. Frankly, though, I just wonder whether I really even need to do this job at all, just let it be and worry about it later- hence my original question.
Steve
Pulling the cam requires removing everything on top and the front of the engine. You probably have room to pull the cam but why not take the engine out, put it on an engine stand, check the bearing etc. and then reseal it with new gaskets at a minimum. Way easier to do out of the car.
Also a great opportunity to add a different engine as the 305's are a "bit" anemic. JMO
Lastly, pulling the engine out of an Avanti with the body on is not for the weak of heart, I've done a couple, so take advantage of this opportunity.
-
9 hours ago, Jred said:
Oh and yeah the car was running at around 220* on the test drive so I'm going to install a new thermostat when I do the coolant.
Looks like a very nice start to a long friendship. Take a HF digital thermometer with you to check temperatures as the gauges may/may not be accurate. Same with oil pressure. Also be sure to check the tires age as radials are known to get sketchy as they get older so you can drive appropriately.
The power trains in these cars are still the straight forward technology before computers so it should do well on the ride home.
Welcome and congratulations on your car.
Avanti!!
-
Shouldn't the drivers side be the mirror image of the passengers? That should provide an example and part numbers you can track back if all else fails.
-
As far as original, I can't help but in my 74 that has serious deviations from stock I used carpet from Menards with a tight pile.
-
Bill's idea above is an excellent way to remove it by cutting it off near the grill.
If you want it totally gone and return the car to the earlier style (no cowcatcher) you will need to remove it by unbolting it from the frame and pulling it out. You would then need to cut off the rear of the cowcatcher and put it back in place as it also serves as the front body support. The body will also need some repair to replace the fiberglass cut out to add the bumper.
You could try to cut the end off the support with it mounted but it's tight right there.
So you can see Bill's idea is much easier and works well but I wanted mine closer to original
You will also need another grill or repair yours with 1/8" stainless rod.
Frame end shot
-
Nope, even though I have a couple on site. The standard modern 15" steel wheel is about 20# so the non-radial wheel on the Avanti had to be less.
Happy Easter - back at yah!
-
I'll pick 16# #2
-
Yup! Just unscrew it but put a 1/4" pipe plug in it's place as there's still some fuel in the tank and it smells bad and makes a mess.
-
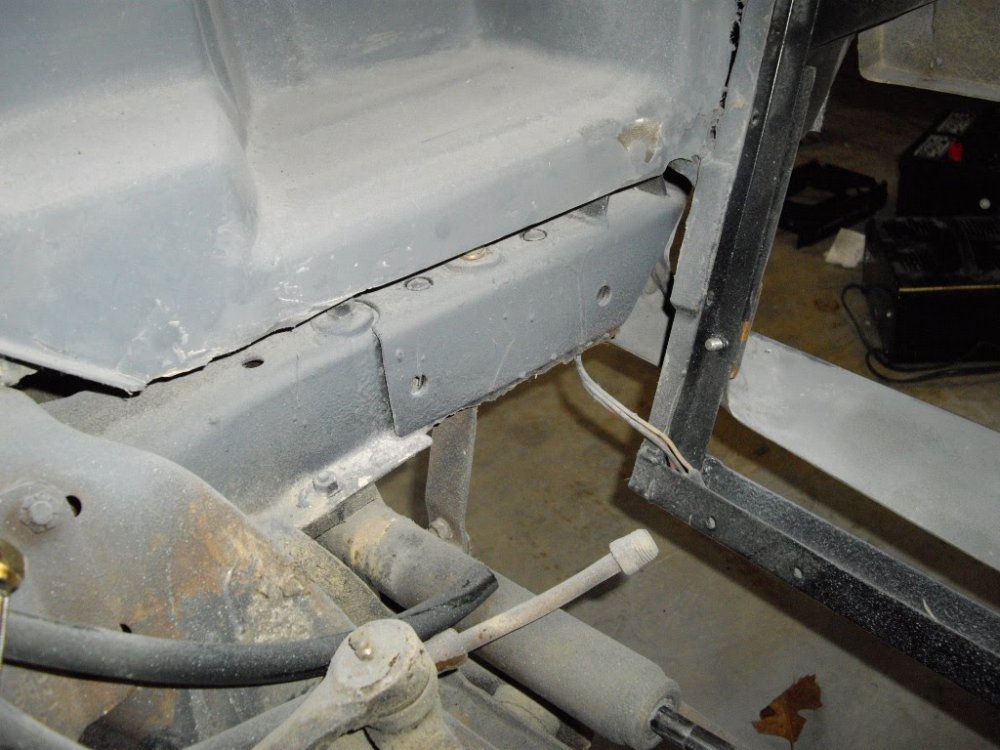
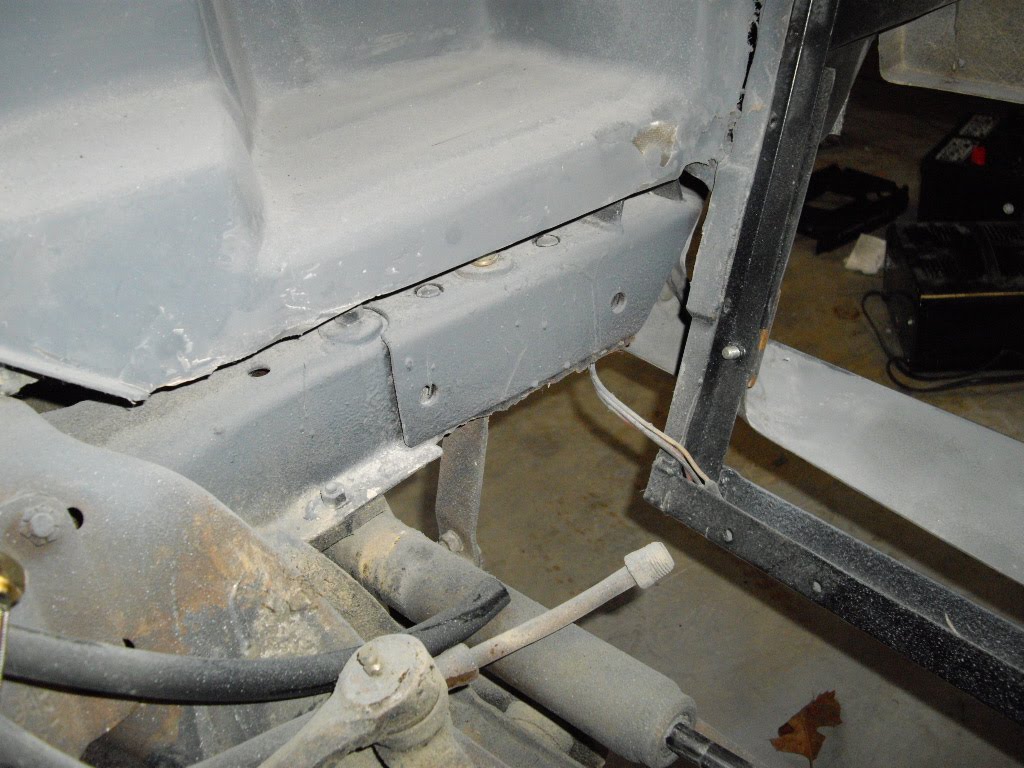
Searched my archives and found some more shots of the assembly. Here are a couple showing the upper mounting area. Disregard the shiny black bracket as it is mounted in the spot for the four speed linkage to activate the hydraulic linkage to the T56.


-
You could talk to the usual suspects, Myers and Nostalgic, but I'd also suggest that you ask over on the SDC website as they also fit some later Studebaker's. There's a lot more of them and someone can tell you what years and models and possibly have a set available.
You might also go through the Studebaker Vendors list and call a few that look promising.
https://www.studebakervendors.com/
As an aside, if you have the original mounting assembly in place the pedals/arms consist of a rod mounted to one of the pedal arms that passes through a sleeve in the mounting bracket and the other pedal mounts on that rod with some fasteners and shims. IIRC. You may only need the petals/arms and any missing hardware. It may be that you only need the brake petal as the clutch petal looks to be correct.
Hopefully this will help with you search.
-
I suspect that it's the same as earlier models due to using the same frame etc. This is an earlier discussion with a picture of my 74 setup if you don't mind a bit of photobucket shading on it. I can probably dig up a few pictures if necessary.
I would also suspect they are earlier origin assemblies but I do seem to recall that they have a larger pads than earlier. It might be easier to just match the metal pedal pad mount on the brake with the clutch pad mount. The clutch and brake use the same rubber pad.
This should give you an idea of the orientation of the pedals

-
Well done. You went a long way for lunch.
-
Bill
If all else fails, as you have the spout out you could shorten it and weld a 2" od pipe to it. That would also let you make a straight shot to the tank and use a standard 2" hose.
Bob
-
8 hours ago, 1inxs said:
You can go into pretty much any auto parts store and purchase new fuel filler neck hose. They sell it in random sizes. If I remember correctly, I just measured and cut it prior to installing.
I used 2" automotive hose that is resistant to modern fuels from the internet. The original has a slight bend and I had to remove the body filler neck to install install the newer type hose. Check your diameter to be sure my CRS hasn't kicked in on the size.
-
On 2/26/2021 at 10:57 PM, 57Wayne said:
Thanks! Was hoping to find another car that paired a GM sourced trans with the torque tube that was more common (still unusual) than a one only car! Ferrari 400 and 412 models used a turbo400 with a torque tube setup. Was thinking that if designed in the mid 80's the Avanti II might have used a 700R4.
Thanks again for the reply!
I'm not sure what you are asking but don't all mid-80's and up Corvettes came with a torque tube setup albiet the trans is rear mounted with swing axles.
-
Mcleod is still in business so I'd just contact them and see what that install needs. Haven't seen a B&B setup since I put an SBC in a 39 Ford 40 years back. Worked very well, though.
-
Same as the SDC FORUM.
Dana now Rostra Let me know if this doesn't work as I might have one if I look hard enough.
http://www.rostra.com/universal-aftermarket-cruise-control-by-rostra.php
-
1 hour ago, Jerry1963 said:
I am planning to install a new Tremec TKX 5 speed in my 63. I currently have a chevy 350 with a 350 turbo transmission. I have requested and received several conversion kit quotes, but all include high performance equipment and my conversion is for cruising and show. I don't need a scatter shield bellhousing, a $350 flywheel, a $400 clutch kit, or a $600 hydraulic clutch kit. If anyone has made this or a similar conversion I would appreciate any guidance.
Thanks, Jerry
T-56 behind a 383 SBC. It just bolted up but as you have an automatic you'll need the Avanti/Lark pedals. For my T56 I used all GM parts including the master/slave setup from a Camaro. Clutch's, flywheels, etc can all be ordered from any supplier and you can set your price for them. The higher the performance the higher the cost.
Just use the OEM bell housing but be careful some of the Camaro's tip the trans off center. I have a 5-speed OEM straight up housing bell setting in my polebarn depending on how close you are to Michigan.
You might also consider a hydraulic throwout bearing.
Here's my first post about the T56 install about the clutch pedal and hydraulics install. You will also need a different rear mount but that's easy and a different drive shaft. There are a couple follow up's to complete the install available.
MC mount -
One last caveat, use the five speed hydraulics, the T56 hooks up differently but the concept should be similiar.
-
I've done a number of steel bodies but not an Avanti but I think I would use the firewall mounts and the rear as Ed suggested. Hopefully Brad Bez will find this and comment on how he does it. If not, you could try to PM or email him.
-
Kerosene or other solvent needs to soften or dissolve the undercoating so it will take a fair bit. A total mess in my mind. I've used it to get the last of the undercoating when it's just a film and it kinda OK for that.
Try the heat method with a less than sharp scraper and only use as much heat as necessary before you get all jiggy with solvents. Plastic might work but most are made from olefins that soften at fairly low temps.
-
5 hours ago, IndyJimW said:
I replaced my fan and shroud with a FORD MUSTANG Flex-A-Lite Black Magic Xtreme Series Electric Fans 105401.
Perfect width and was about an inch short.
Good luck,
Jim Wood
Agree with Jim again. I used a Flex-a-lite Syclone with a custom shroud but Jim's setup would be much easier to fab and install. I also used a Derale 16749 fan controller and added a manual override switch just-in-case.

Oil pressure gauge not working correctly on 87 convertible
in 1984-91 Avanti
Posted
Traditional position for the SBC oil sensor is behind the head on the drivers side that can be accessed from above the engine. Look straight down to see it.
There is usually room to get a hand down to pull the wire and use a socket to remove the sender unless it's the large bodied one used on some engines. IAC, it can be removed.