


Avanti83
-
Posts
1,282 -
Joined
-
Last visited
Content Type
Profiles
Forums
Events
Posts posted by Avanti83
-
-
I'll check tomorrow
-
Check my reply in the parts wanted section you previously posted in.
-
I had a ratty one that I threw in my neighbors scrap pile a while back. It might still be there. I'll check if you're interested.
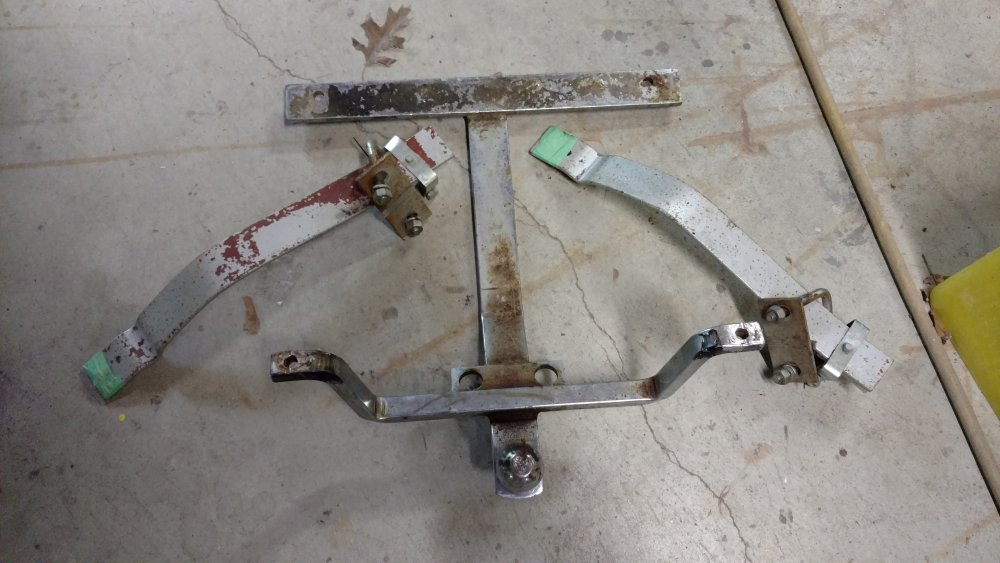
This is a shot from a while back.
-
It's possible that the fuel lines you describe are part of the vent system on top of the fuel tank. They are attached to the top of the tank in a couple of spots. You should be able to get at the hex fittings and unscrew them to get enough of the tubing out of the way. There are also a couple of studs on the tank that hold those lines up that have hex nuts holding the mounting brackets. IIRC
The fuel line is on the bottom center of the tank and feeds directly to the fuel pump along the frame and passes through a TEE fitting that will let you drain the tank if necessary.
-
Neat find, Just add the photos to a folder on your computer and hit choose files in the lower left. Find the folder and click on one to add it to the post.
If it's a major problem, email them to me and I'll post them.
-
That's currently a touch over $1600 US and if he has the correct front valance the entire structure across the front of the car will need to be replaced. Difficulty is the entire front needs to be removed properly, joint strips fabricated to join the new and old panels and the entire valence assembly aligned and re-adhered into position. There's a lot of fiddly involved to get it right but far from impossible. Not cheap to farm out either.
Parts prices are in-line if they are new or in excellent condition. Some of those parts are also not so easy to find and having everything could save a lot of time and hunting. Get the parts manual if you decide to go for it and be sure everything is really there.
IMO the round eyed ones are the best looking and I considered doing the same thing to my 74 but it needed so much other work that I never got around to it.
If it's your dream, go for it.
-
Studebaker International. Looks like you need a list of Stude Vendors.
https://www.studebakervendors.com/
The go-to vendors for Avanti's are Dan Booth @ Nostalgic Motors and Myers Studebaker but SI among many that handle a wide variety of Avanti parts.
-
The hog troughs hold several of the body mounts. Studebaker engineers seemed to think they are important enough to spend a fair bit of money designing and installing them. There are alternate ways to support the body but personally I'll stick with the original method.
Rule of thumb on HT replacement is $4-5K. Frame rust can be repaired if it's isolated to small vertical sections of the frame and/or the bottom plate. But unless you own this one, repair is not for the faint of heart, so as suggested above, Run.
-
If you want a spoiler that works - https://studebaker-info.org/Tech/Cooling/SOBradiator/sdc42115sobrad.html A fair number have done this mod.
-
Here's a list of vendors for Studebaker parts and services. I don't know how much it will help but check with Myers and Fairborn. If they don't have the parts, they will know where to get them.
-
10 hours ago, heyrob said:
Thanks, Lew, I appreciate the sanity-check. My life insurance provider might owe you a commission by the time this project is wrapped-up 🤣
I'll post a progress update this weekend (assuming the darn puller gets here in time).
I haven't seen it mentioned above but DO NOT lube the tapered section. It's meant to be reassembled dry.
-
On 8/26/2021 at 6:44 PM, JavierB said:
An update on the door:
What I did was mark where the door was and where the striker plate was, and then also mark a point a quarter inch higher. I removed the striker and loosened the door bolts, and used ratchet straps wrapped around the whole car, 2x4 pieces and some bits of old carpet to keep the door snug into the frame and then raised it a quarter inch out of alignment on the striker side. Tightened it all down, and now its perfect.
**I know this may not last** if there are other problems that are causing the sag, those may resurface. But it works for now, and I probably need to remove doors and all the weatherstrip when I paint, so we will see what happens then.
Highly recommend the ratchet strap method of keeping the doors snug, although it means you have to climb through the windows to get in and out of the car to tighten the bolts, it was the best solution for me.
Now on to the next thing. 🙂
Well done, whatever works is a great way to do it.
-
Personally, I'd pull the engine and put it on a stand to replace those plugs. You can then clean it if you want and/or examine the insides if you chose to do so depending on your knowledge of the engine. It should stay dialed in as long as you just put it back together with the same bellhousing. An excellent chance to clean and detail the engine compartment as an added bonus.
There will be close to 900# or more hanging there if you just raise the engine.
-
As said above, the casting number is 80-84 origin. The stamping shows V-flint, mi assembly in month- 05 on day- 18. The 3MT is tough to find.
For comparison my 83 is V10293MC. again Flint assembled on 10/29. Not sure of year. 3MC again unknown but would generally pertain to what it was destined for when installed in a vehicle.
Generally a decent engine to drive around with or providing boat anchorage. These 305's were never known as performance engines as it costs the same to rebuild a 350 as a 305 so most just met the demise when they needed rebuilding.
-
As I've said previously, The hinges can be removed after removing the door by unbolting them from the body. Four bolts IIRC.
Secondly, there is publication called the Avant Workshop Manual available at our vendors for a modest cost. The first two items under door alignment are
-remove door panel
-remover striker. They may know something about their cars and are a wealth of info on the in's and out's them.
-
I've never seen an SBC that didn't use an exhaust gasket. Ford tried that on some sixes in the 80's IIRC with not good results. Use a head gasket.
You should find a boss on the passengers side close to the front of the engine with numbers stamped into it. Those are much more important to determining engine ID.
Nasty Z28 has a great site for decoding SBC numbers. https://nastyz28.com/sbchevy/sblock.html
The 83 305 is a pretty generic engine used it most Chevy models in those years. Low HP but reasonably dependable. GM needed another decade to get the pollution controls in good nick.
-
7 hours ago, studegary said:
Yes, it matters. The striker/latch should only hold the door shut, not cause alignment. The door alignment should be correct without a striker/latch being there.
That's why you see so many beat up non-functioning strikers on old cars.
-
By shimming the door, I mean use any combination of wood and cardboard between the door edge and the door opening. Easier to do with the seat out. Just keep adding shim material along the bottom and both sides until the door is positioned centered in the door opening. Then tape it in place to hold it both centered in the opening and aligned with the outside of the car. Then shim and tighten the door hinges.
The hinges can be removed with the door off then take out the bolts holding them to the body.
-
If the door drops 1/4" when opened then there's probably some wear or movement in the hinges. Remember these are long doors and to get 1/4" drop on the striker end only requires a small movement on the hinge end. I'd be sure the bolts mounting the hinge to the body are tight and there is no wear in the hinge pins before I'd readjust the door again.
I like to shim the door into alignment with the door hinge bolts out and the door taped into the position I want. I then add the spacer shims between the hinge and door and then bolt the door hinges into position.
Using the striker assembly for alignment will only cause excessive wear and early replacement.
-
Those are nice wheels. Good luck on the rebuild.
-
IIRC there are threaded studs on the bottom of the reservoir that are accessed from under the dash.
-
10 hours ago, 1inxs said:
2000 grit wet sandpaper, trigger spray bottle with clean water. One panel at a time using tri-fold sandpaper and an open hand thoroughly sanding lightly until the entire surface has been sanded. Rotate sandpaper and keep the surface and paper clean throughout the process. Follow up with a good compound using an orbital polisher and proper polishing pads. Stay away from your edges. This is the short version. I would recommend visiting your local detail supplier for products, tips and further guidance. Ask lots of questions and don’t proceed until / unless you are comfortable with the process. I would also recommend you do a trial run on an old used body panel to perfect your technique before you attempt the process on the Avanti.
Go to youtube, you are looking at cutting and buffing more than wet sanding. 1inxs is correct in you will need to be comfortable with the process, otherwise the cost of the equipment, polishing compounds and supplies will go a long way toward paying to have it done professionally. It's pretty easy to buff through the paint if you hit an edge or sharp contour line.
-
Looks a lot like my hi-tech spray booth. Your plan to go forward is solid but when you get the car in the air to replace the bottom plate (basically 4"X 1/8" plate steel) give the hog troughs a very close look. If they need some metal but are good nick generally, it's basically just sheet metal work.
-
Let me also suggest that you inspect the "hog troughs" and frame for rust. As you probably know these are the areas of the Avanti that are prone to deteriation and it's better to evaluate and repair before others fixes on the list as a complete repair could entail removing the body from the frame or cutting the rocker panels lose and then glassing them back in if the hog troughs need replacing.


Avanti trailer hitch wanted
in 1965-83 Avanti
Posted
This is it currently, rest is gone.