


WayneC
-
Posts
537 -
Joined
-
Last visited
Content Type
Profiles
Forums
Events
Posts posted by WayneC
-
-
For backspace, if 4 1/2" backspace fits, worst case you'd need 1/4" spacers on the wheel studs, which isn't optimum, but might
work. Stock wheels were 3 3/4" with 6" rim, Magnum 500 wheels were 4 1/8" and later wire wheels were 4", I think.
But, it seems to me the wheel width is an even more serious issue, as it may very well rub the wheel opening lip in the front, not to mention the frame, during turns, especially if you hit a bump at the same time.
Just for the heck of it, I went to the Coy website and didn't find a 19" wheel in that C67 style.
Here is a writeup done about wheel fitting, but it doesn't directly answer your question...
-
I don't really know, except that I know the power windows used a Ford motor, so it may very well have been Ford or a Ford supplier.
-
To get #7 (closest to firewall on driver side) I jack up the left front and with my upper body positioned below-left of the belhousing, I use a spark plug socket with a hex end (at the rachet end), placing the socket on the plug by hand and using a box wrench to turn the socket (ratchet box wrench would probably work even better than a regular box wrench, can't remember if I tried one). Remove the socket as soon as the plug loosens and turn it out by hand.
IIRC, I get #5 and the others from the wheel well by using a long extension on the ratchet.
-
Bob, I'd be interested in seeing the scraper that worked best for you.
Here's another video on razor-stripping:
And having a professional soda-blast the surfaces to remove paint is yet another method.
-
Have a look at this Corvette forum thread:
In addition to recommendations on chemical strippers, there is a link to a video showing razor blade stripping,
which has lately become a common method.
A Google search returned these paint references:
http://www.expresspaint.com/automotivetouchup/pc/GM-Damson-Plum-Firemist-Metallic-21p16764.htm
-
Seems to me it might be smarter to make new wheels in 16" format, because it's become difficult to find decent tires in 15" sizes.
Here's one that is similar in style:
https://www.newstalgiawheel.com/shop/product/vn470-salt-flats-painted
-
Re: post #4.... it's not clear to me what year Avanti's the replacement part pertains to, does anyone know?
It appears the part came from inside the PW motor, so did that include the original Ford T-Bird motor?
-
You sound as though you know a bit about carbs... have you tried looking down the primary throat while jazzing the throttle linkage? You should get immediate strong double streams of gasoline squirting into the throat when you pull the throttle linkage.
If not, the accelerator pump is bad. That's a pretty simple fix. You can purchase an accelerator pump separate from an entire rebuild kit, but it does require removing the top of the carb, and it's easy to drop bits & pieces into the intake manifold, so best to remove the carb and make the fix off the car; it's also possible to break/ruin gaskets when disassembling a carb that's been installed for some time.
Have a look at this link: http://www.camaros.net/forums/archive/index.php/t-67610.html
If you are mechanically inclined, it's fairly easy to do a complete rebuild on a quadrajet with instructions that come with the kit, and there are websites that have instructions, even videos on youtube; for example...
http://www.crankshaftcoalition.com/wiki/How_to_rebuild_a_Rochester_Quadrajet_4MV_carburetor
I rebuilt the quadrajet on my '80 last year, using a kit from this vendor:
Unfortunately, the website I referred to for rebuild instructions is no longer available, but generally the instructions that come with a rebuild kit are sufficient. Take a lot of digital pics as you disassemble the carb, in case you need to refer to them later.
Be especially careful removing/installing the fuel inlet tube fitting, because the large, fine-thread fitting is easy to cross-thread and if you chew up the threads on the carb body, there's no easy home repair to fix that.
Here are some quotes from a Corvette expert ("Lars") in 2002 regarding problems he's seen with Q-jets stumbling off idle:
Jammed accelerator pump check ball
Results in: Off-idle stumble or hesitation, hard cold-start.
Comments: This is a common problem in carbs that have been allowed to “dry out” for a while. Sediment in the bottom of the fuel bowl will lock up the check ball as if it were set in concrete. This will prevent any accelerator pump discharge.
Accelerator Pump Rod Installed in Wrong Hole in Pump Arm
Results in: Off-idle stumble or hesitation.
Comments: There are two holes in the accelerator pump lever arm for the lever arm rod to engage into: Inner and Outer. The outer hole produces a leaner pump shot, and can cause a lean stumble on engines requiring a robust pump shot. Corvettes and performance cars always used the rich, inner pump arm hole.
Jammed accelerator pump
Results in: Off-idle stumble or hesitation, hard cold-start.
Comments: This is becoming a common problem. The alcohol additives in modern fuels are not compatible with the materials used in many accelerator pumps (even some of the pumps in brand new carb kits). This causes the pump plungers to swell up and to seize in the pump bore. The spring on the pump shaft still allows the shaft to move up and down, making it look as if the pump is functioning. But the pump itself can be seized up solid in the bore with the shaft working just fine. To fix this, you must install a pump that is specifically compatible with alcohol.
Worn accelerator pump
Results in: Off-idle stumble or hesitation, hard cold-start.
Comments: Common on older carbs and on carbs that have been allowed to dry out (vehicles stored without being started through the entire winter season). The rubber plunger material will dry out and shrivel up, making the accelerator pump completely ineffective. The pump must be replaced. -
See posts #75 and #87
I agree, we've all done something similar.
-
I've not done this type of repair, but I also own a Corvette and I frequently peruse Corvette forums.
Recommendations depend on what areas are separating... around the edges, or the center cross-bracing.
Corvette hoods are produced as 2 panels (inner support structure and outer skin panel);
in this case those 2 panels are bonded at the factory with a bonding adhesive at the hood perimeter, and with scattered "gumdrop" spots of bonding adhesive between the center cross-bracing and the underside of the hood skin.
I know this one is generally recommended for full-surface bonding of panels on early corvettes (outer perimeter of hood):
http://www.oreillyauto.com/site/c/detail/EVC0/870/N0481.oap?ck=Search_N0481_-1_-1&pt=N0481&ppt=C0171
Others can be used:
Ecklers bonding adhesive: http://www.ecklerscorvette.com/catalogsearch/result/?q=bonding+adhesive&x=0&y=0
West System epoxy & hardener: http://tinyurl.com/2vfxxul
On the center cross-bracing, the failing gumdrops are removed and surface remnants sanded off completely; these are recommendations for gumdrop replacement adhesives:
3m 5200 marine adhesive
a variety of Liquid Nails adhesive in a caulking gun tube that says it is for use with fiberglass)
ask local automotive paint supplier for a quality "hood gumdrop adhesive"
3M black urethane windshield bedding compound
Thorough cleaning/sanding of mating surfaces is particularly important underhood, because oils and fuels may have contacted the surfaces.
-
It might be worth pulling the brake shoes on one side and installing the drum to see if it will rotate without the shoes. I know you said the drums slide over the shoes with just slight friction, but this is a fairly easy test to confirm the cause is definitely not the shoes. (it just doesn't seem likely that both drums would suddenly start rubbing on the backing plates just because they were R&R'd; more likely a shoe or a shoe adjustment piece/linkage has slipped out of its proper position/attachment)
Another test might be to shim the studs with very thin washers before installing the drum, to see if that frees the drum...
If so, eighth-inch shims for wheels are fairly common, perhaps the local FLAPS would have them for your bolt pattern (4 1/2"?), and thinner individual washer-shaped shims might be available as well, since they are common for disk brake caliper adjustment. But, hub shims might only be compensating for something that's out of position.
Might be possible to insert a long narrow strip of paper (maybe cut from a magazine cover) at the outer edge of the drum while installing the drum, then try to slide the paper around the perimeter after the wheel nuts are installed (no wheel) to see where/if interference occurs with the backing plate. But, I would think if you snug a drum down just enough that it barely drags, and rotate the drum a few turns, you might be able to discern rub marks on the backing plate when you remove the drums.
Here are a few hits I found with a Google search, but nothing really new in them...
http://forum.ih8mud.com/40-55-series-tech/693314-front-drum-bind-when-tightened-lug-nuts.html
-
I don't think I'd be beating on the backing plates, certainly not yet.
This is a dohh! guess: did you check to make sure the parking brake is not engaged?
More thoughts...
Is it possible there's some sort of indexing locator on the drum & hub to indicate the drum needs to be in a particular orientation with the hub (perhaps a raised bump on the hub that mates with a hole in the drum, or vice versa)? ...a mis-matched locator bump might cock the drum slightly and cause the drum to distort a bit when the wheel nuts are tightened. The Stude parts manual hub illustration on page 101 shows something on the stud circle that appears as though it could be a locator.
Have you tried installing one drum at a time and found it locks up with either drum (only one) installed?
You might read through the shop manual's rear brake section for clues and note things like making sure the shoes are engaged in the slots at the wheel cylinder.
If you didn't change the brake shoe adjustment, maybe try turning the brake shoe adjuster (top rear behind the backing plate) to loosen the fit (shoes further from the drum surface), install the drum and if the axle doesn't lock up, then adjust the brake shoes to be snug.
Maybe take the drums to a brake shop and have them checked for true and machined if needed (doesn't explain why it worked before removal, but is it possible drums were dropped on the garage floor after removal?)
-
...post #66 "Get it all buttoned-up and back on the wheels and on the ground about 8:30 last night."
conflicts with your statement that the car "was and still is on jack stands"
More food for your own thought...
Does it lock up if you snug the wheel nuts without a wheel & tire in place, or only with the wheels in place?
(eg, is the problem related to the drum/axle or the wheel/tire?)
Does it lock up when either side wheel is installed, but the opposite wheel is not installed?
(eg, is the problem on one side or both sides?)
What suspension bushings did you replace and what is their proximity to the wheels & tires?
Is it possible that there is some latitude in how/where the rear spring is attached to the axle (or difference in the width of any new bushings used) that could cause the spring or bushing to contact a tire sidewall?
Is it possible you reversed a bolt on re-installing something, and now the nut end is where the bolt head used to be, so the bolt end is sticking out too far and contacting something?
Did you replace any old U-bolts with new U-bolts that might be longer than the old ones?
Since this car is new to you...
Are these the same wheels & tires you originally removed (from the same axle)? eg, is it possible the former owner installed wheels with different offsets, front wheels vs rear wheels (or rim widths or even wheel size) and you've reversed them by installing a wheel on the rear that formerly was on the front, and now the wheel or tire sidewall is contacting something (like the backing plate or the rear spring)?
-
More thoughts...
Normally, front shoes are the shorter of the 2 shoes (less brake lining area), and/or sometimes narrower... is it possible you reversed the shoes when you re-installed them? There usually are raised "bumps" in the backing plate that properly position/align the shoes, so if you reversed wide and narrow shoes, you could cause interference between the drum and the wider shoe.
"Started the car, put it in reverse, no movement. Locked up tight."
...were the rear wheels back on the ground, or were you doing this while the car was still jacked off the ground? Posi rear ends give power to the wheel with the most traction, I'm not sure what they do when neither wheel has traction (equal power to both, or no power to either?). Yet, you do state that the wheel turns until the lug nuts are finger-tight, so it would seem that tightening the lug nuts is causing the stoppage (have you tried just pressing against the outside face of the drum without the nuts in place, while turning the drum, to see if that pressure prevents the drum from turning and perhaps learn by sound or feel where the rubbing or interference occurs
"Tried every combination of brake drums, wheel spacers, and wheels on both sides of the rear."
...Did that include placing the spacers inside of the drum rather than outside? (i.e. is it possible those spacers were inside the drum rather than outside... there may be marks or corrosion patterns that tell you where they were).
Seems like there ought to be a way to gently/incrementally snug the lug nuts, turning the drum each time, until it rubs something (just before it locks up), and then figure out by sound or feel what it's contacting (like perhaps the edge of the brake shoes) that keeps it from turning when the lug nuts are tightened further.
-
I could be 'way off on this, because it's been many years since I've taken the rear drums off myself, and I'm having trouble visualizing the parts, but my guess is that it might have something to do with the axleshaft to hub key.
I think there's only one spot where the key mates with the drum, otherwise the drum could possibly cock and jam on the brake backing plate when the wheel nuts are snugged (ie, the orientation of the drum on the axle shaft must be in a particular position, whereas the wheel can go on in any of 5 orientations). Take a drum off, look at the mating line circle around the axleshaft where it enters the axle housing (as best you can) and I think you should see the end of a key sticking out, which should mate with a keyway in the drum's center hole. Perhaps snugging the drum down (when the wheel lug nuts are snugged) cocks the drum slightly and causes it to drag/jam.
I could be very mistaken and the key/keyway is so obvious that it cannot be a problem and you know positively both drums are installed correctly, but it's the only simple explanation I can come up with.
-
Devildog, my notes say the rear brake cylinder kits are "Lockheed Wagner F8418" ... the "F8418" is likely an EIS industry standard part number that can be from multiple parts suppliers (Federal Mogul, Wagner, Bendix etc).
When I used Warren's link to Amazon, I found I had bought those same cylinders from Amazon back in 2009
and used them on my '80 Avanti.
-
See the schematic below (which illustrates a leak in the front brake line... ignore that leak for this discussion).
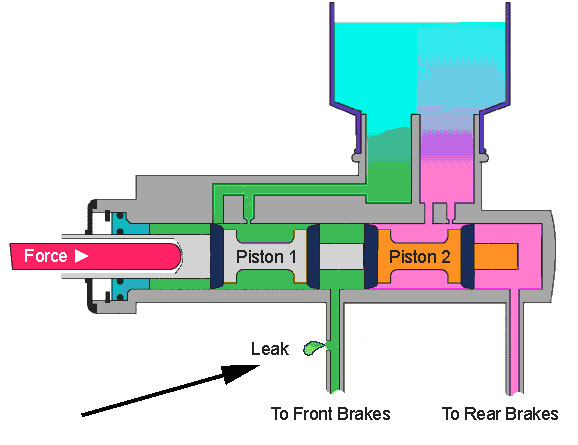
Seems to me that if only the front M/C reservoir loses fluid, then it should not be leaking to the booster unit... I believe there are seals on the M/C piston that would have to be leaking from either both (front & rear) chambers, or the rear chamber only, in order for fluid to leak through to the booster. I suppose it would be possible for the front reservoir to empty first, and then the rear, if all the piston seals were leaking.
Normally the front (smaller) reservoir services the rear brakes, so you might want to trace the rear brake lines looking for leaks rather than the front lines. You may also need to remove the rear drums to look for fluid that got past the brake cylinder seals inside the wheel (although you may see traces of the leak externally at the inside rim of the drum, or damp lines running radially out on the inner tire sidewall).
-
Devidog:
I believe it's the same kit as for a Jaguar E-type 2 1/8" bore (also used on Mark 2 Jags), but I think later XKE has a slightly larger bore (2 1/4"), which may require a different kit (or maybe not, I'm not sure).
I have a notation in my parts book that the front cylinder seal kit is Girling SP2556, about $40 for a 4-cylinder kit.
Probably any Avanti parts dealer can sell you the seal kits.
And just to muddy the water, here's an online vendor offering NOS front cylinders for $100 each
https://www.studebakerparts.com/studebakerparts/store/s/agora.cgi?product=brk4&cart_id=4704.31055
(Apple price to resleeve your old cylinder in brass and add new seals is $95, which arguably may be the better option in the long run)...
-
Just to add to the pictures, this is the M/C on my 1971 Avanti:
-
Got a quick and courteous reply from "Lazar" at Apple Hydraulics (for brass resleeving)...
"(a) Take the cylinders off, take the pistons out and send us empty cylinders for resleeving. We return them cleaned, resleeved to original bore size (2.125") and ready for reassembly which you do with a kit you provide. Cost: $60 each cylinder
(Send us cylinders as they came off the caliper (with pistons still in). We return resleeved, cleaned, and assembled with new OEM seal kit, ready to bolt back on the caliper. Cost $95 each cylinder
© Send complete calipers. We will do (on each cylinder, clean the middle part and re-attach the cylinders. Cost: $285 each caliper ($190 to do two cylinders plus $95 for extra work). Add $30 each for new cross-over line installed.
Turnaround time is one week here, in the shop. You get same parts back (not exchange). For shipping from Calif.we recommend flat rate priority mail, it is half the cost and half the time compared to UPS. See http://postcalc.usps.com/ " -
Warren, my proportioning valve doesn't look like yours. I don't think it's been changed, as the car is a 1971 and I purchased it in 1978, I think, with about 40k miles on it at the time; it looked entirely stock. It had an engine change in the mid 1980's, and frame-on restoration around 1990. I've never messed with the proportioning valve, and I've done most of the mechanical and electrical work on this car myself since I've owned it.
-
Thanks, Tony, I've heard of Apple Hydraulics.
Their website lists prices for brass resleeving of small-bore wheel cylinders at $50, or $85 to also rebuild with new seals.
I've sent them an email asking about prices on the Avanti cylinders; I'll post their answer here if they reply.
-
Just realized I never did mention that my Avanti is a '71. I also own an '80.
Gunslinger, after some research I read that proportioning valves can do more than just warn you, they can actually shut off the side of the system that lost brake fluid pressure (dunno if my Avanti valve does that). And, I suppose it's possible for the valve to go bad, cutting off fluid to the front brakes. Even if the valve is not bad, but had purposely cut off fluid because of a leak in the front brake system (when I first started work on it, I did find the left front flex hose fitting was leaking), I wonder what restores the valve to it's normal position once it's been activated? Possibly by using the method Bob uses to pressure-bleed brakes from the brake cylinder end, thereby pushing the valve back to it's normal position? I'm not sure if that explains why I'm unable to vacuum bleed, though, I do get fluid, but always laced with bubbles. Actually, I think the MityVac may be able to perform that same reverse pressure-bleeding method, since it has a switch to change it from vacuum to pressure; I need to check the booklet that came with it.
In an eBay search, the closest physical appearance match I could find for the valve is one for a 1969 Corvette, but it's not a perfect cosmetic match, and the Vette has front and rear disks. Next closest valve I found was for a '67 to '70 Mopar, but the overall shape is not as close as the Vette and I couldn't find a picture showing the front side of that valve. Considering the Avanti master cylinder was a Chrysler design, I would expect the proportioning valve might be a Chrysler part as well (although there are also a couple of Ford master cylinders that can be used as Avanti replacements by adapting the brake line fitting sizes).
-
Gunslinger, I overlooked this comment from you:
"Your car should have two blocks in the brake line...a distribution block which splits brake fluid to front and rear. You also have a proportioning valve which directs more fluid to the front than rear brakes since the front does most of the braking load. It's fixed, not adjustable so if there's a problem there it would have to be a clog in the line somewhere."
Actually there appear to be 2 pipes from the M/C, one to each side of the steel proportioning valve below the M/C, and 2 pipes coming out of the front of the proportioning valve, I assume one to the front brakes (with a junction block somewhere to send fluid to each front brake and each rear brake cyl). There is also a tube extending out of the front of the block with an electrical wire, I assume for a warning light. It is hard to see the block, I wish I had photographed it when I had the M/C out, but here is a photo of it installed...
window crank mechanism
in 1965-83 Avanti
Posted
Not necessarily.... when Stude went out of business they still had a large parts stock, probably ordered in large lots for expected mass production. Altman bought the factory and the parts along with the rights to produce the car; there may well have been enough parts to last for many years.
The Avanti power window switches of the 60's and 70's (maybe even early 80's) were also Ford parts, used on T-Birds.