


WayneC
-
Posts
541 -
Joined
-
Last visited
Content Type
Profiles
Forums
Events
Posts posted by WayneC
-
-
Most likely reason is a vacuum leak in the power brake booster unit. I had that problem (front brakes dragging) back in the 1980's with my '71 Avanti but I can't remember how I determined it was the booster.
One possible way to test is to find the vacuum hose from the intake manifold to the booster unit, disconnect it at the manifold and use a hand vacuum pump (with gauge) to apply vacuum to the booster vacuum hose and see if it holds the vacuum.
I sent the booster to "Booster Dewey" ... http://www.boosterdeweyexchange.com/dev/
-
It was a long time ago, designed for my Jaguar XJS, and may or may not be applicable in principle to an Avanti... but I'll try to address several of the questions posed:
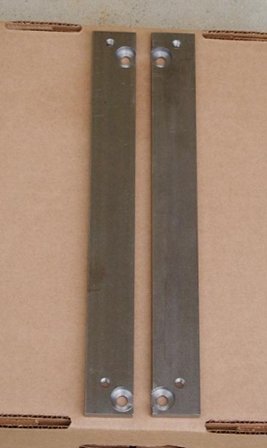
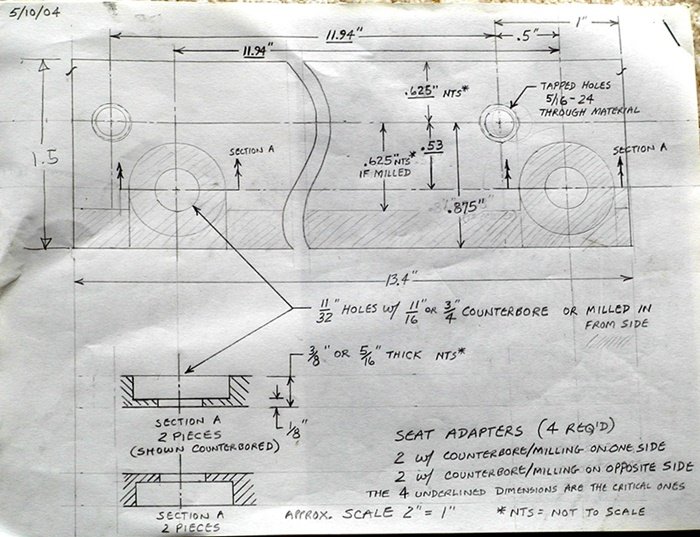
The material left on the adapter after counter-boring is 0.125", which is thicker than the material that retains the captured nut (in the floor) that the adapter bracket bolts to. In other words, the weak point is not my bracket/adapter, but the vehicle's original mounting points for the seat, so should not compromise safety.
My first job out of high school was as a draftsman, and I later spent time on the drawing board with Chevrolet during and after college... I realize not everyone understands drafting notation. My drawing was a representative sketch, not a real mechanical drawing. The orientation of the sketch/drawing is looking down on (top) of an adapter, with the middle of the adapter shortened (cut away) to fit it on the sheet of paper. Compare the drawing to the photo of the left & right brackets... the difference between left and right brackets is that the counter-bored holes are on opposite sides of the bracket.
The counter-bore is to recess the heads of the adapter-to-floor hold-down bolts so they don't interfere with the seat slider that bolts atop/onto a pair of adapters (left and right). Left and right brackets bolt to the floor, then the seat/slider is bolted to the brackets. Offsetting the bracket hold-down holes from the seat fastening threaded holes (towards the front of the bracket) would provide more space for the drivers legs, at the expense of rear passenger leg room, of course, but offsetting in the opposite direction could bring a shorter driver closer; I wasn't trying to change the driver position, so mine were only offset by 0.5", by necessity because if much closer the bracket hold-down and seat hold-down holes would interfere with each other.
There are many ways the adapters could have been lightened and streamlined, this was my version of quick, simple, and cheap
-
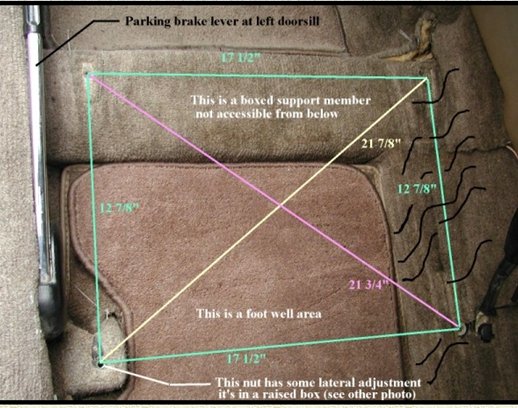
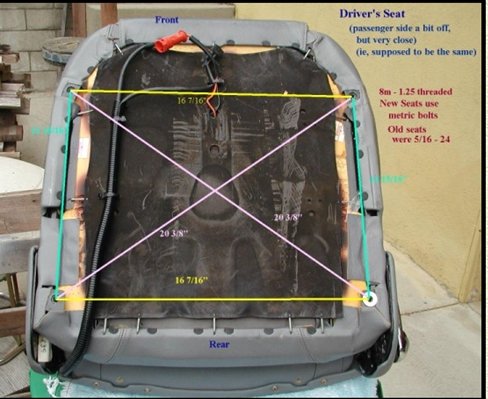
I owned an '84 XJS; when the leather seats got badly worn, I purchased a set that were in very nice condition from an XJS a few years newer than mine, thinking they were a direct fit, but to my dismay, they were not. So, I set about designing a set of simplistic adapters; the adapters would bolt to the old nuts in the floor (bolt heads recessed below the adapter surface) and the newer seats would bolt into the top surface of the adapter such that the seat slider would still work, the only caveat being that the seat would sit slightly higher (the thickness of the adapter, which needed to be about 1/8" thicker than the head height of the floor-mounting bolts). The adapters were rudimentary, simply 2 strips of 3/8" x 1-1/2" steel per seat (overkill, really), with countersunk holes to bolt the adapters to the floor and threaded holes for fastening the new seat's slider bolts; I had a metal shop do the machining for me, and I was overly-obsessed with keeping costs minimal, so simplicity was key,.
If I were doing it now, I'd use aircraft aluminum welded into an "H" design rather than a box, with possibly 2 cross-bars placed forward so as to allow accessible passenger foot space below the rear of the seat; I didn't know where to find aluminum stock back then before computer searches became so easy. These photos should give you an idea of how I determined the dimensions of the adapters:
-
Jim, its on page 27, lower right corner. Search doesn't seem to work for me.
-
That's interesting, their website doesn't seem to show them.
-
There are usually a few for sale on eBay as well, search "Avanti (shop, workshop, service) manual".... you want the one that says "Workshop Manual" on the cover.
About $40 to $50 shipped.
While you're at it, get an Avanti parts manual as well.
Some of the information won't pertain to the '83, but much of it will, and its all the information we've got, aside from vendors and a few websites.

-
I assume "none yet" means this will be your first Avanti.
I can't claim to be any sort of expert in inspecting an Avanti, but certainly there are some items that can be very expensive to remedy on any car, and it will depend on just how nice you require your Avanti to be...
the "hog troughs" are unique to Avanti... (long metal boxes beneath the rocker panels that support the body and adapt it to the Stude Lark frame used by Avanti's) the drains around the sunroof empty into the troughs, as does water that gets past the side window weather seals; the drain holes on the troughs tend to clog, and if the hog troughs are badly rusted, they will be very expensive to replace (minimum of $4k, likely much more if you don't do most of the work yourself). This item is probably the #1 Avanti deal-killer.
check (wherever you can) inside fiberglass panels (wheel well areas, nose panels) for old damage; broken inner fender panels around the battery is common. Look at door alignment/fit and make sure door hinges are solid.
Avanti sunroofs are notorious for de-laminating where they meet the body... not an expensive fix if you can do it yourself, but tedious work. There are write-ups about this repair on the net.
if it needs a repaint, prep for that may well uncover body damage that will need to be addressed (a recent thread on a corvette forum says quality paint jobs now run well upwards of $8k to $10k for single-stage epoxy paint to $20k+ for a show-quality job, depending on labor required to right all wrongs; automotive paint is extremely expensive); if its a "20-footer" and you're happy with that quality level, then no issue.
chrome plating is also very expensive (and pristine/new bumpers are prohibitively expensive), so bumpers and bumper guards need to be evaluated, along with light housings.
if the interior is not up to your standards, a whole new interior costs $$$$, probably $10k and up for a leather interior, and even more if you entirely replace the Avanti front seats.
A/C interior parts can be a PITA to R&R in order to make repairs
check every electrical item to ensure it works (all gauges, heater, A/C, power side windows, exterior/interior lights, turn signals, wipers, cruise, radio, antenna, tilt wheel, etc)
DO have your mechanic check the driveline visually and by driving the car (engine, transmission, differential, brakes, steering, springs, shocks, and use a lift to inspect the frame for any bad areas of rust corrosion or signs of a possible cover-up with undercoating, and for fiberglass damage on the underside); the kingpin suspension used in the front is a mystery to all but old mechanics, so hopefully he can check it for excess play.
Take it through a car wash and then inspect closely to see if water gets into the interior through the sunroof, or the windscreen seals, or wiper posts, or window seals; does it drain out of the doors or can you hear water sloshing inside them when you open/close them.
Obviously we all have different standards of what we want in a used car, just make sure the level of this one meets your standard.
Any car can be restored, but it's generally much cheaper to buy one that meets your standards than to buy one that doesn't and then try to bring it up to your standards.
Oh, and one last item: check for cracks in the frame in the area around the motor mounts.
-
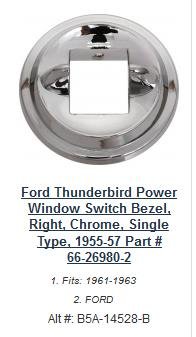
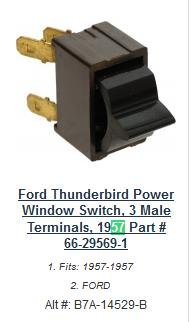
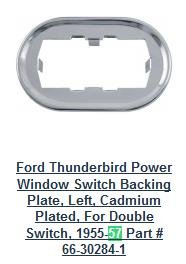
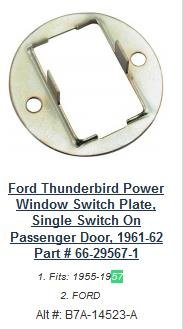
Here's something I came across during a Google search today:
https://www.macsautoparts.com/ford_thunderbird/electrical/switches/window-switches.html?limit=48
My notes say Avanti uses the 55-57 T-bird switches (dunno where I got that info), and the website above carries housings, switches, and retainers.
Does anyone have different info? If so, it would be nice if you could post that information for others to see.


.jpg.33f492234a1e596fc389f34c5acab9ef.jpg)
-
Its been too long since I did this operation, don't remember how I did it, I think I used a spring compressor that consisted of a threaded rod with hooks, not sure why the anti-roll bar (front stabilizer) would be an issue if the vehicle weight is sitting on the tires... but, dumb question: have you studied the procedure in the shop manual? (front suspension and steering, page 3)
-
You don't say what year your Avanti is.... I'm going to assume pre-84
Not really sure what your issue is, but it may be worth checking whether your spring is correctly positioned. I'm no expert, but I was curious and read the shop manual. I don't remember exactly what the A-arm sockets look like, but I would think the sockets keep the springs securely positioned/centered without touching the vertical sides of the lip of the A-arms.
According to the shop manual, the lower coil of both front springs (they have the same part number) have a notch in them (to denote the lower coil) and they need to be positioned so that the end of the lower coil of the spring is toward the engine and the coil end is perfectly aligned with the centerline of the lower control arm. So its possible the springs were improperly installed.
Look for shiny wear spots that might indicate the spring is rubbing something, and lubricate (oil) the areas where the springs meet the A-arms.
You said your symptom is squeaks, so likely lube/oil will quiet it down.
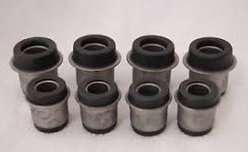
Beyond that, inspect the bushings holding the pivot pins on the control arms (common issue of wear) to see that they are intact and not cracked badly from old age & wear. Common symptoms of bad bushings: clunking noises, a vibrating steering wheel, steering pulling to the left or right.
Bushings look like this:
-
Here is some information I copied back in 2000, regrettably I didn't document who the author was... I apologize for that.
A short version of it appears in the Avanti Workshop Manual, gasoline section, page 4
Most fuel gauges work pretty much the same way: A sending unit in the tank has a float on an arm connected to a variable resistor. The Avanti gauge reads the resistance in a (red with white trailer) wire connecting the gauge to the sender. The gauge has 3 wires connected to it: 12v power from the ignition switch, a white ground wire, and the red w/ white trailer lead (sensing) wire to the tank sender. The sender, located atop the gas tank behind the rear seat and removable body panel, has attachment for a ground wire in addition to the sensing lead.
1) Check all the connections at the gauge and at the sender for loose or corroded connections.2) Use an ohmmeter to check the white grounding wires at the gauge and at the tank for continuity to frame ground.
3) Disconnect red w/white trailer wire at both the sending unit and the gauge and ensure the loose ends aren`t touching anything, then use your ohmmeter (in conjunction with a long test wire) to check the continuity from end to end; then check its continuity to frame ground: it should NOT have continuity to ground.
4) Disconnect the gauge to sender wire at the sending unit end; with ignition switch on, the gauge should now read `empty`; if not reading `empty` you will need to replace the gauge or have it repaired. If it reads `empty`, continue on.
5) Disconnect the gauge-to-sender wire at the sender; turn on the ignition, then connect the loose wire to the sending unit`s other (grounding) post: the gauge should now read `Full`; if it doesn`t read `full`, then the gauge is likely bad. If it does read full, then the gauge and the wiring appear to be OK and therefore the sending unit is likely bad.
6) You could verify that you have a bad sender by removing the sending unit from the tank and testing it with an ohmmeter to see if moving the arm smoothly through its travel alters the resistance smoothly between the two terminals. It may be possible to accomplish this arm movement in the tank using a long stiff insulated wire (to preclude any sparks) with a hook on one end to grab the arm... I haven`t tried it and frankly I doubt you can properly manipulate the arm this way .
-
Sorry, I'm not able to follow your descriptions. I don't have an '83. Your old battery had side terminals that used a 5/16th inch bolt, and the new battery has 3/8" threaded holes atop the battery for older-style battery posts, and you want to use your old side-mount cables atop the battery rather than on the side of the battery?
I'm confused.
A picture is worth a thousand words (as are links), annotated pictures are worth even more.
Would this help? (probably not, it sounds like you need 5/16 threaded holes for your old cables)...

-
Disclaimer: I am not a battery expert or an electrical engineer.
If you connect a charger to an Odyssey that is too far depleted, it will not take a charge. Dunno if that's always the case or if there are other circumstances that come into play. If you connect the Odyssey in parallel (plus-to-plus and negative-to-negative) with a lead acid battery using battery jumper cables (neither battery connected to the vehicle cables) and then connect the charger to one of the batteries, there's a good chance both batteries will charge (but it will take time, perhaps a day or more). I'm not sure, but I think if the Odyssey is not too far discharged, you can use a trickle charger normally to keep it fully charged ("topped off") in the car, like any other battery. I have no idea whether your slow precondition charge would work on a fully-discharged Odyssey.
Here are some links I found with a Google seearch:
http://www.odysseybattery.com/documents/ODYSSEY_Battery_Reconditioning_Charge_Procedure.pdf
http://www.hotrod.com/articles/hrdp-1009-how-to-charge-a-agm-battery/
-
Kevin, if you haven't owned an Odyssey battery before, be aware that if you ever are in a situation where the Odyssey has run down (discharged) completely, it needs to be slow-charged while wired in parallel with a normal lead/acid battery (using a pair of battery jumper cables). I didn't know that when I purchased my first Odyssey, and had a dead-battery situation about 18 months later; when my attempts to recharge it failed, I traded it in as a core to purchase a lead-acid replacement. Dooohhh, expensive lesson!!!! Found out about the parallel charging trick a year or so later (and I've always wondered if the shop where I traded it in was well-aware of that trick).
-
comment deleted
-
comment deleted
-
comment deleted
-
Sounds like Bubba was there... but then, I've been known to emulate Bubba myself, occasionally.
Here is a chart of battery sizes: http://www.batteryweb.com/bci.cfm
I am using size 24; 34 will fit , maybe even better (same as 24 except 1" shorter), as will any battery very close to those outside dimensions. The tricky part is the terminal type and location on the battery, which the chart does not address fully, and the battery hold-down clamp; you need one that spans the threaded hold-down posts and still clamps the battery body, so if you depart from the 24/34 battery width you are on your own to figure out a way to clamp the battery securely in place. Battery cables can, of course, be changed-out for cables with different (ie, side-mount) terminals, but then terminal clearances and cable lengths need to be determined.
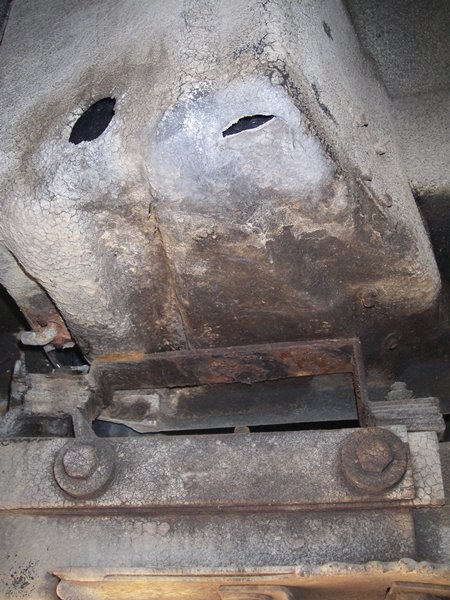
The other issue is that the fiberglass battery box (part of the fender) is not well supported on the bottom side and that heavy battery eventually cracks the fender. Lord only knows why Avanti Motors never adequately addressed that issue (apparently they employed no engineers). I added some support shimming atop the frame beneath the battery on several of my Avanti's over the years. Others have gone so far as to fit a metal battery box from another vehicle into their Avanti, bolted to the frame. If you go Bubba, some car battery boxes are little more than trays that bolt to the frame and clamp the lower edges of the battery. There was a thread on that subject a couple of years ago, with a description of a battery box grafted-in by SBCA96 (Tom), but apparently that thread must have gotten lost when the forum changed a few years back, but it is also available here:
Here is the underside of my '80 Avanti battery box, truly inadequate to the task of supporting the battery, and does not even attempt to secure the threaded rods holding the battery clamp; frankly I'm not sure if that metal support is original:
-
Do you know if you removed/dislodged the wire clip with the tool? It may be possible a previous owner installed the wire clip from the reverse direction and so the tool is not contacting the open ends of the clip.
Can you push the upholstery panel away from the handle enough to peek behind the handle to see if the wire clip is out/retracted or at least loose? Maybe a small and a flashlight mirror will help you to see.
https://www.youtube.com/watch?v=JvaQlh8If1s
Alternative methods:
https://www.youtube.com/watch?v=MIGVyGDuRdI
https://www.youtube.com/watch?v=psYYqQhWY2o
-
On 5/1/2018 at 4:25 PM, Cbitz233 said:
Gotta find the tool and then I'll have it off.
-
I don't own an '83.
But, play with the unit... usually back then the bass/treble and left/right balance were adjusted via levers behind the knobs (knobs are normally used for on-off/volume and tuning); however, its possible the lever adjustments are for front/rear rather than left/right).
In some radios the outer knobs had 2 positions (in and out) and when out they make different adjustments when turned (than they do when in), so gently tug/push on them to see if the shaft they are on snaps out and in (it should not take much force).
I think some, if not many, radios had both levers behind the knobs and push/pull knobs.
This page in the Jegs website seems to indicate the levers under the knobs are commonly used for fader/balance (in other words front/rear volume and left/right volume), but those illustrations look more like 60's radios than late 70's and 80's radios.
https://www.jegs.com/p/RetroSound/RetroSound-Radio-Knob-Sets/3619371/10002/-1
-
...or a sticky thermostat.
-
It will be a wide range, depending on what quality you want, leather (and what leather grade) or vinyl or cloth, everything (rugs, seats, dash, side panels, headliner, etc) or just the seats, professionally or you do the labor, etc, etc. $10k would not be out of line for a thorough quality professional job using leather.
Visit a few upholstery shops for estimates, or better yet, ask around at car shows when you see an interior you like and ask who did the work.
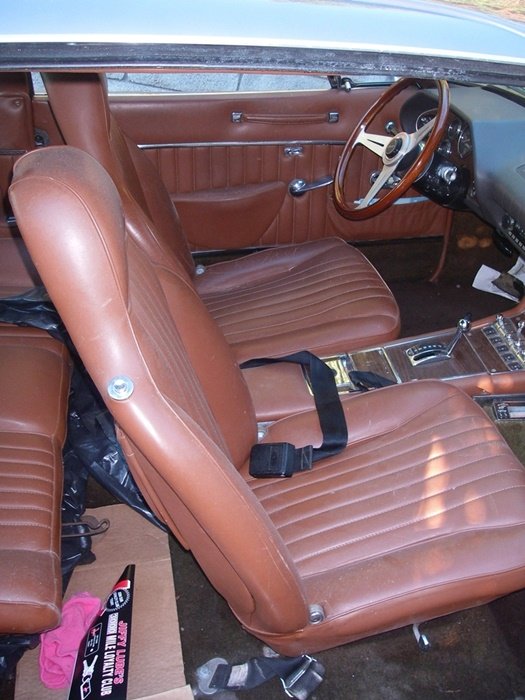
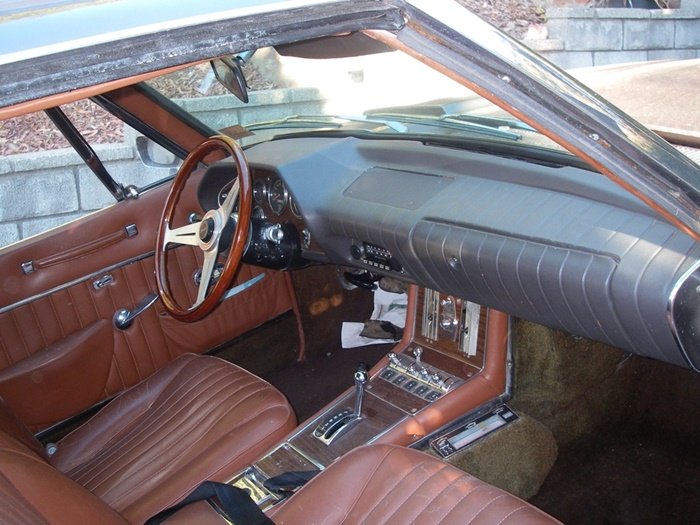
I had a complete Avanti interior done in leather back in 1987 (included all upholstered panels and headliner, but I'm not sure if carpeting was redone) and it cost me a bit over $3500... that's nearly $9000 in today's money, and it was a good price at the time, although in retrospect I could have chosen a more rugged leather.
http://cars.costhelper.com/car-upholstery-repair-cost.html
These pics were taken 20 years later (but not much mileage put on in those 20 years); the back seat is askew and paper on the floor because I was working on the fuel tank when these were taken. If I were to do it over, I think I'd find some big Mercedes Recaro buckets to replace the originals.
-
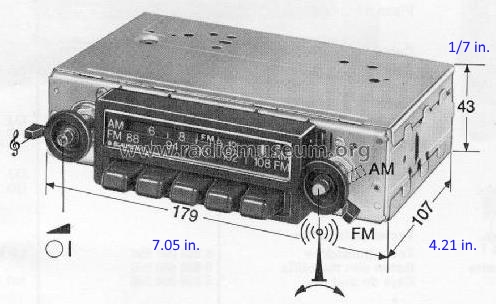
I don't have one out, but I can tell you that a common replacement for the stock radio back in the 70's was the Blaupunkt Frankfurt.
See illustration below for its dimensions (sorry, I goofed on the height, it should read 1.7 inches)
Radio removal
in 1965-83 Avanti
Posted
I don't have an answer, , but I'm sure it IS mounted on a bracket ...replaced my radio many years ago with a Blaupunkt so I know removal can be done (with a lot of frustrating wriggling and repositioning, and maybe even a slight amount of fiberglass removal to provide a slight increase in the size of the dash hole in selective locations... maybe the corners, can't recall exactly, and I think it can be removed from the passenger side console although some A/C hoses may need to be detached).
Here are several hits I found with a Google search:
https://www.studebakerparts.com/studebakerparts/store/s/html/pages/avantiam-fm.html
Please, you would be doing others a great favor if you document the removal with words and pictures as you go along, and post the method you find successful.