ronmanfredi
-
Posts
412 -
Joined
-
Last visited
Everything posted by ronmanfredi
-
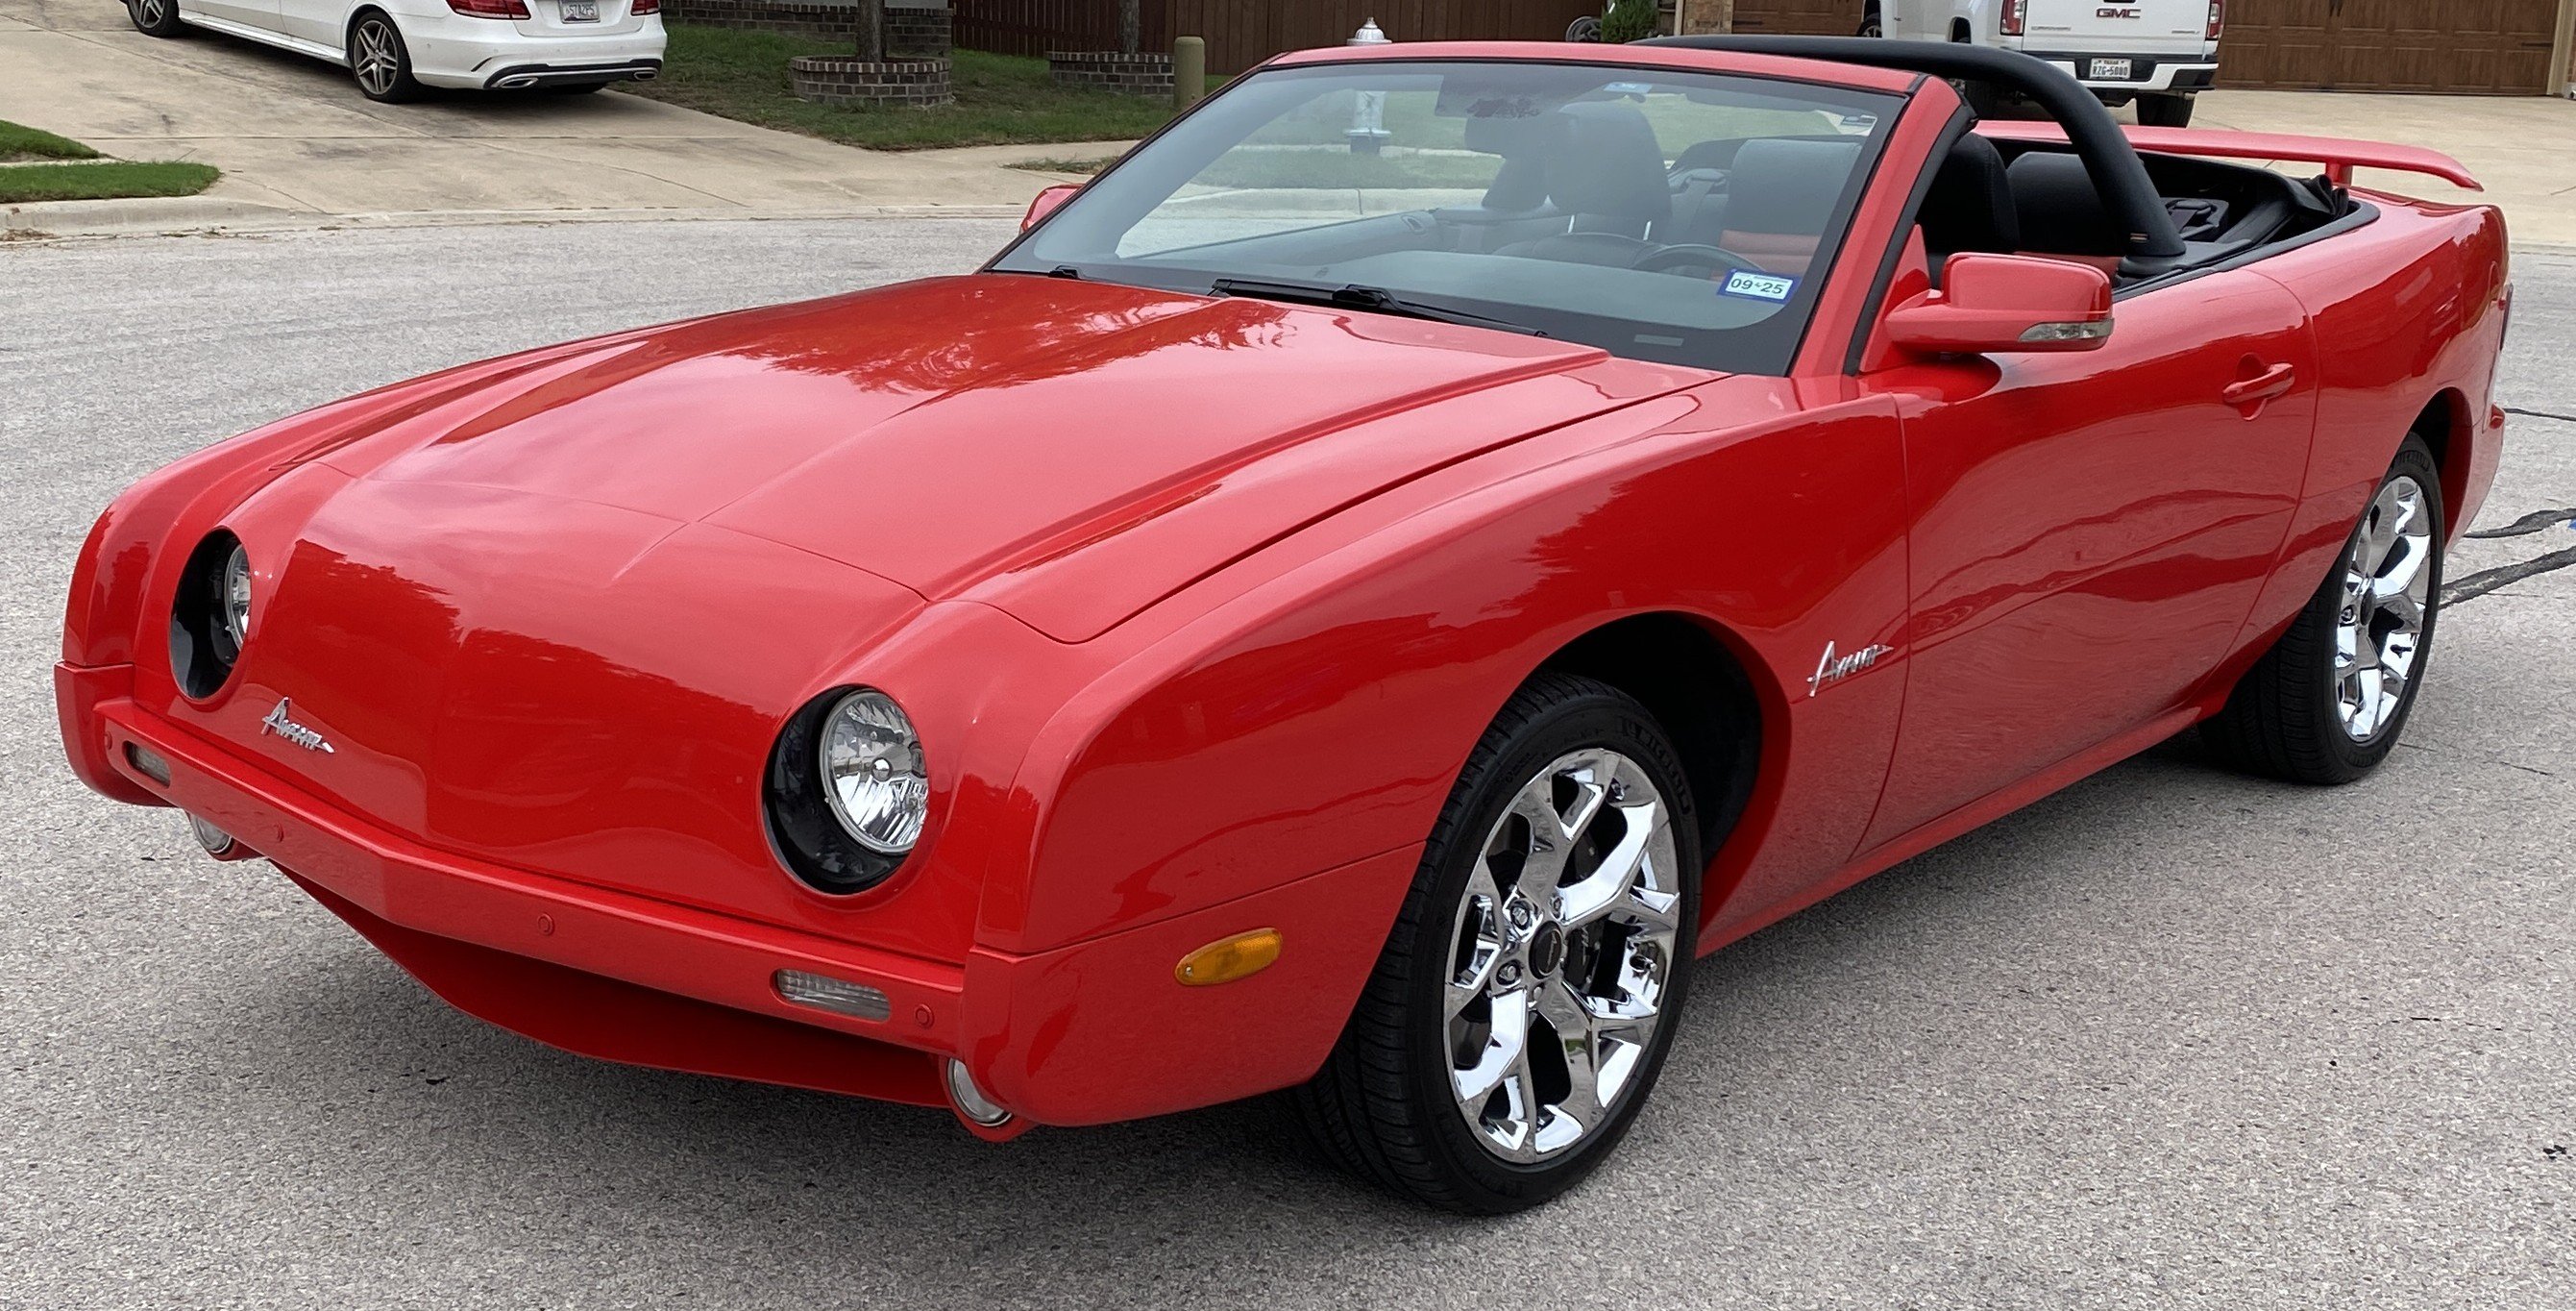
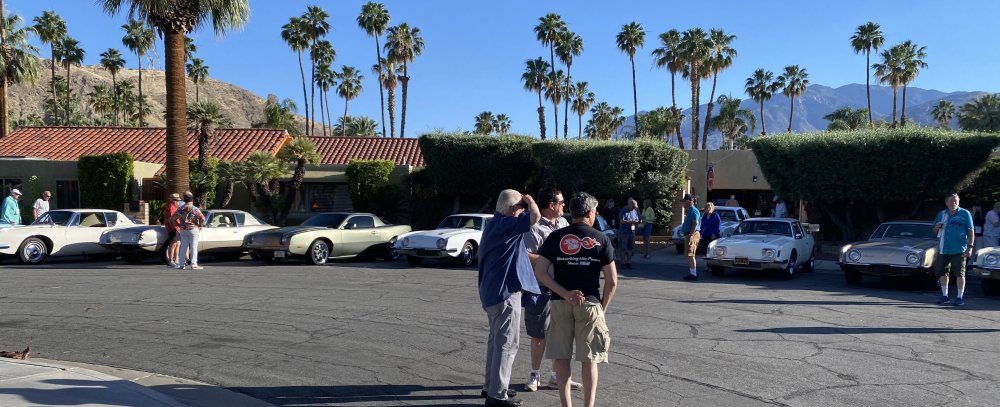
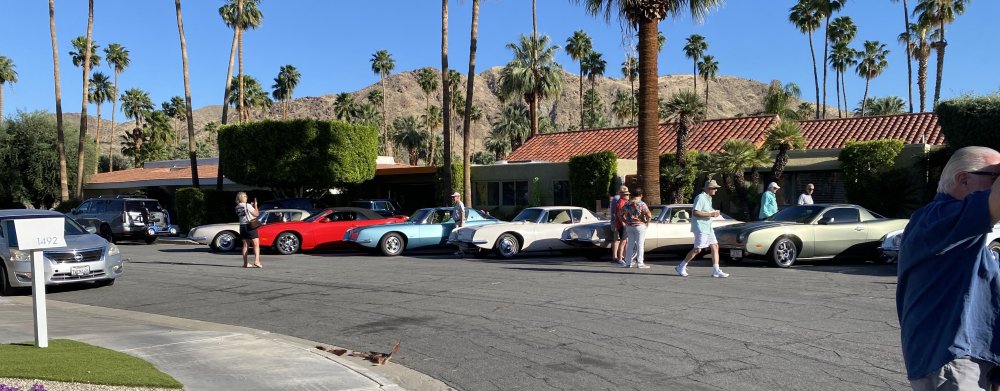
We will spend about right at $1000 for this week long vacation. Same as last year in Pennsylvania and the previous year in Detroit. For us it’s not just a car show, it’s a vacation with old and new friends, we love it. And next week we will go to Galveston Tx for 3 days to attend Mustang Week for the second year in a row. Our S197 based Avanti was a hit amongst the 1500 Mustangs that attended from all over the USA, Canada and Puerto Rico. Just think, 1500 Mustangs of all years and One Avanti! Talk about fun! June 2027, AOAI meet in South Bend, Indiana. We are hoping to bring our 1963 R2 plus our 2006 show car.
-
Oreillys auto parts sells the seal. It’s a Dana 44 and the part is shown under 1980 Avanti II in their software. You might as well get a cover gasket and do a full fluid change while you are there
-
We will be taking measurements on a 63 R2 to see if the 8” wide wheel will work on the rear and what the offset would have to be. The same goes for a 7” wide on the front. This will tell us if we can offer the staggered width sets or just the 7” wide. We can also determine the maximum tire size that will work as well.
-
Sold 4/4/26
-
According to a well known vendor who I'm working with, there has been a large number of inquiries on larger diameter wheels. 17" wheels will easily fit with the right tire size. We just have to verify the correct wheel offset and maximum tire size/width on both the front and rear.
-
Dinner #1 at a car collectors location.

-
We are here and it's exciting to meet new friends and catch up with old. Soon I will have some new news to share once everything is cemented. Sold the 89 Dolenz car that I restored today also. On trailering, I know a few of these are show cars. The owners spent a ton of money restoring them and one brought his from the east coast. There is no way that I would risk driving a car like that across the country! Last year on the way back from Pennsylvania, in very busy traffic, a car in front of us ran over a shredded truck tire sidewall which slammed into the lower front of our 06 show car. It took 8 days for me to repair the fiberglass and repaint the area. So it happens. As far as the cost of attendance goes, the few hundred dollars is nothing compared to the relationships and information that we get out of it. On another front, do you like the Halibrand wheels put on many 60s-80s Avantis but don't care for 15" wheels? Well I'll be working on a project as of today to have that style wheel made in 17". Once I get my 63 measured out to verify clearance, then we'll work on getting a quote to make them. Hopefully in 7" and 8" widths. (Front and rear if there is enough room) Stay tuned!
-
The heat barrier of decades ago didn't have the performance of today's barriers since the types of material used today didn't even exist back then.
-
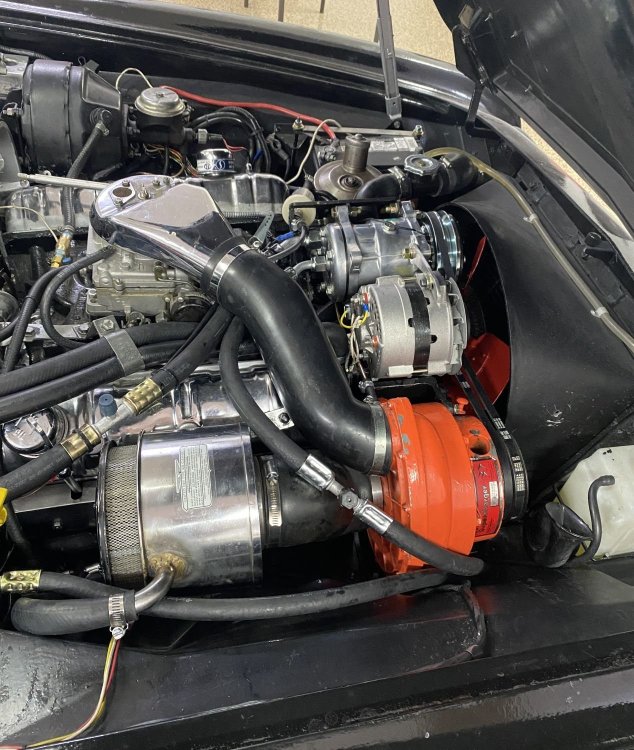
I'm building a 63 R2 with a new exhaust and A/C. I've also added heat protection material similar to Dyna mat on the entire floor, firewall and upper panel under the dash (I had the dash out for replacement). The console has been covered inside and out also. There is still a lot of heat coming through the "dyna mat" area of the floor above the exhaust system. Once the engine is at full operating temperature and running at a fast idle, the metal skin of the material becomes hot enough that you don't want to touch if very long. The problem areas are the front and rear footwell areas plus under the front seat. This is about a 15" wide area off of the console sides that are causing the problems. The console area is not radiating heat at this time. The problem is the average heat of 1200-1800 degrees coming off of the exhaust is easily penetrating the thin fiberglass floor. The solution is to either reduce the heat off of the exhaust or add another layer of heat reducing mat on the inside or underside of the floor. As a test, I added a second layer in a section of the floor to see what happens. Heat is reduced with that second layer, but still there. Full exhaust pipe wraps are not an option for several reasons. A company called Heat Shield Products offers a wrap that covers about 80% of an exhaust pipe and muffler, but leaves about an inch of the underside of the pipes exposed to prevent pipe cracking and any moisture caused corrosion. While not cheap, I'm willing to invest the money to get the heat under control. The other option is to add a heat barrier underneath the floor to reflect the heat away from the floor, which I'm looking at as an option. We will see how it goes.
-
We are coming.

-
More than one Avanti performance shop recommend Autolite AP85 Platinum spark plugs for an R2. That's what I run in mine.
-
The amount of change you are mentioning won't affect the caster enough to make a difference. Remember the king pin front end design of the early 50s wasn't set up for much caster. Shinny bias ply tires, lower speed limits and mostly non power steering cars ran zero to negative caster.
-
From the factory, the vent hose went from the top of the tank into the sail panel next to the rear window and looped around then dropping down to where it exited under the car. The loop was there to prevent fuel from escaping through that line when the tank was full due to gravity and some pressure.
-
Are you getting cold air out of the vents but the cars interior isn't cooling down OR is the air not cold coming out of the vents?
-
Smelling exhaust fumes inside car and can't find source
ronmanfredi replied to Jim S's topic in 1965-85 Avanti
The engine compartment is a heat trap and a lot of that heat escapes down the tapered entrance to the transmission tunnel. I removed the dash and gutted my 63 for customization and while I was there, I installed barrier everywhere including all of the console. -
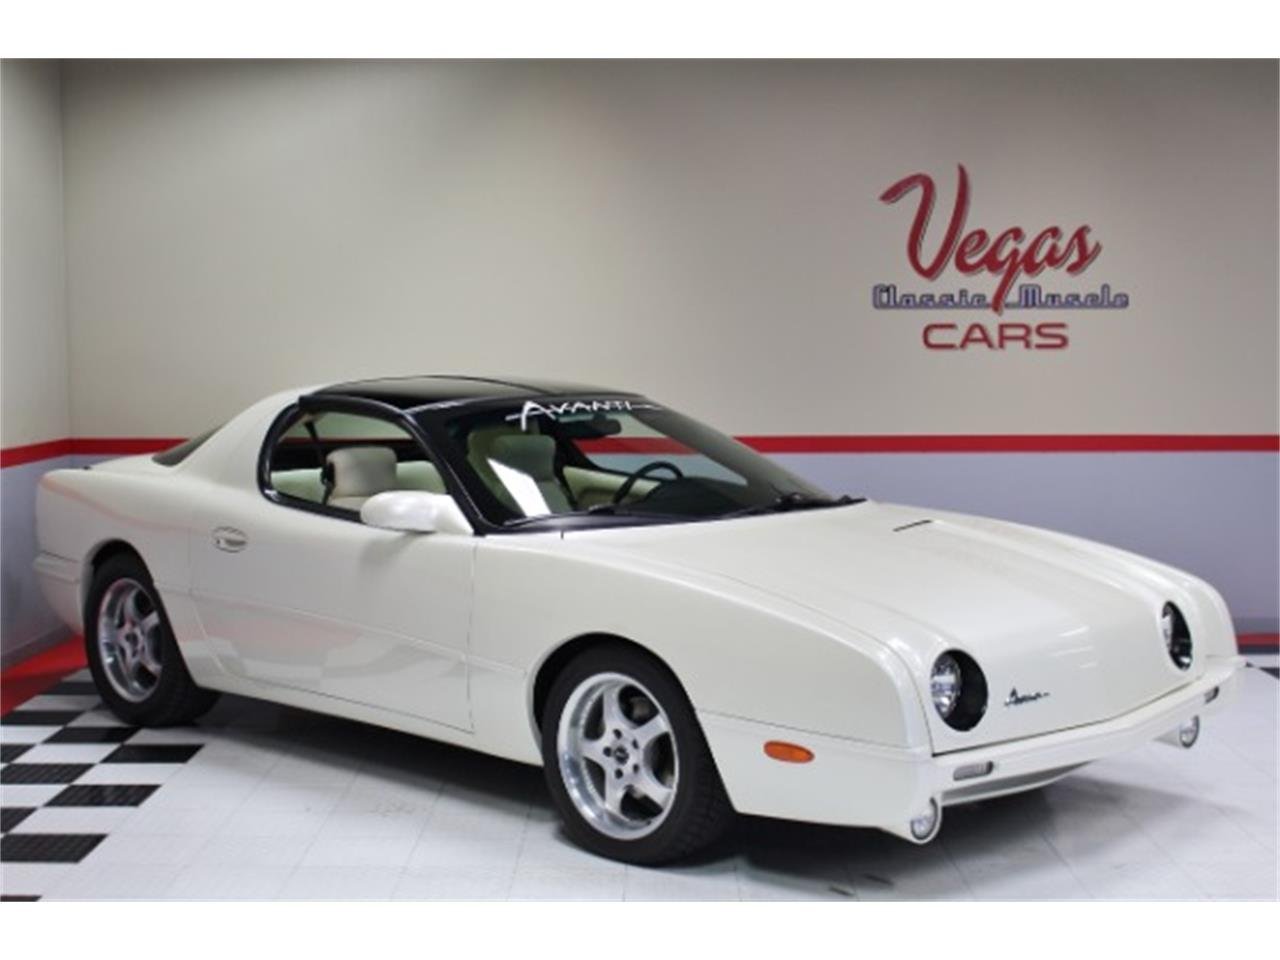
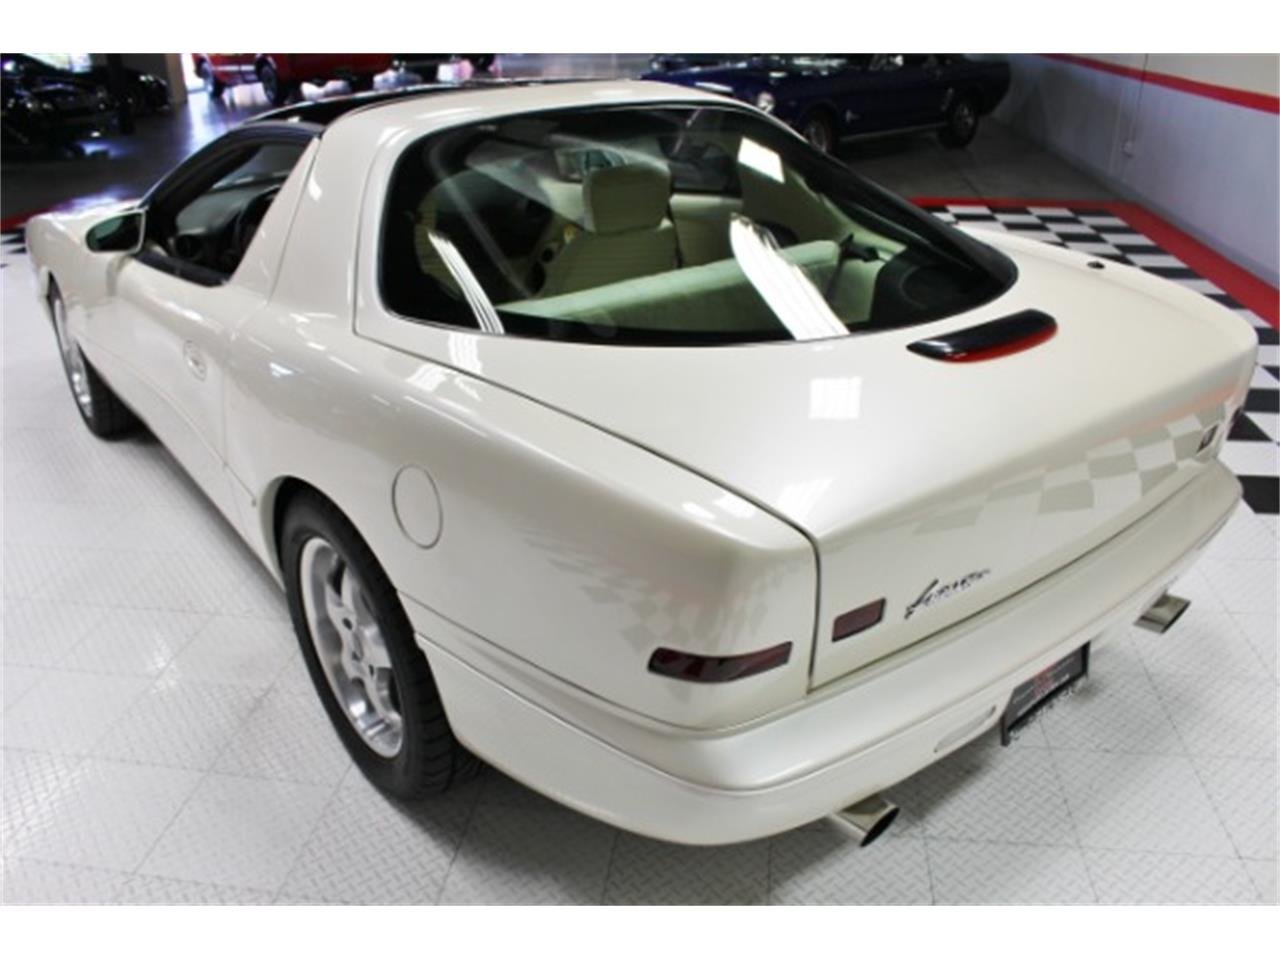
In my continued search for the 2000s cars, I located the only 2 T-Top cars that were produced with the Diamond Pearl White colors. There is a 2001 in Dallas Tx with 45,000 miles on it and I met with the owner last year to see this beautiful car. Now, I have made contact with the second car, a 2002 model which is in Bakersfield CA. The owner, who is now an elderly female, wants to sell due to age. The car is in immaculate condition with 15,000 original miles. It has been garaged its entire life and covered in the garage. She does start the car once a month and takes it on a cruise around town just to keep everything working. She has not been proactive in selling the car, so I offered to help her with this as much as possible. She knows how rare the car is (9 T-Tops were made) and she believes the car is worth north of $50k. Serious potential buyers are welcome to contact me and I'll work on connecting you with her. Attached are what the car looks like.


-
Colors were really a problem with the later models. My 2006 states "Furza Red" on the window sticker. We searched high a low and never found a Furza Red color code. Since you could pretty much select any color that you wanted, I'm guessing some of the color names were made up as they painted them. It's really not an issue since most all body shops today can match paint using a scanner. A local body shop did that for me when doing some paint work and supplied me with a quart of the paint and clear coat after the repair. The paint was a perfect match also.
-
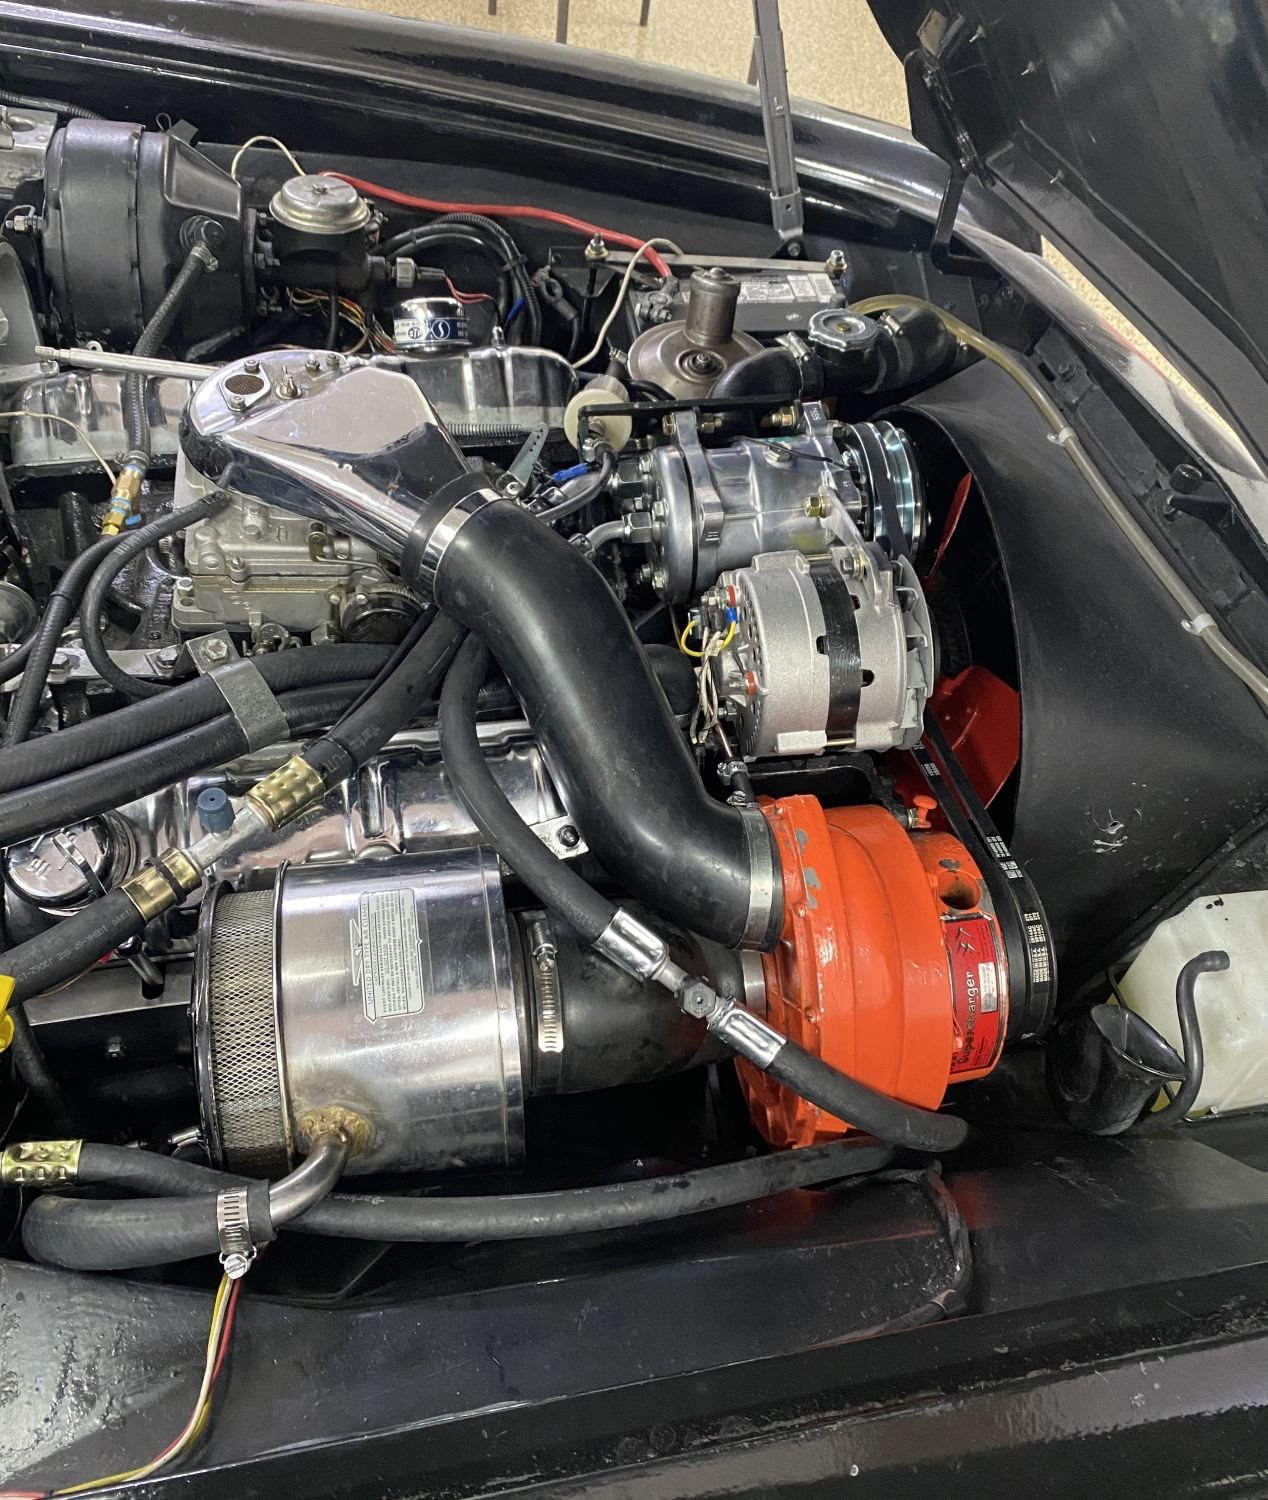
Black was the original color of the super chargers. The color was changed to Orange as the model year progressed.
-
ECM Removal and associated wiring harness....
ronmanfredi replied to SCPO-PD's topic in 1965-85 Avanti
It would be helpful to provide a photo(s) of the harness in question. -
The R2 Project, Instrument Cluster Upgrade
ronmanfredi replied to ronmanfredi's topic in 1963-64 Avanti
No, I bought a kit off of Amazon called "EASYGUARD EC004 Smart RFID Push Engine Start Button kit & Keyless Go System" for about $25. There are a ton of these cheap systems available or you can buy some for a few hundred dollars. I decided to go cheap with a kit that has a fairly high rating and see how it does. These kits can interface with later model key fob cars also. -
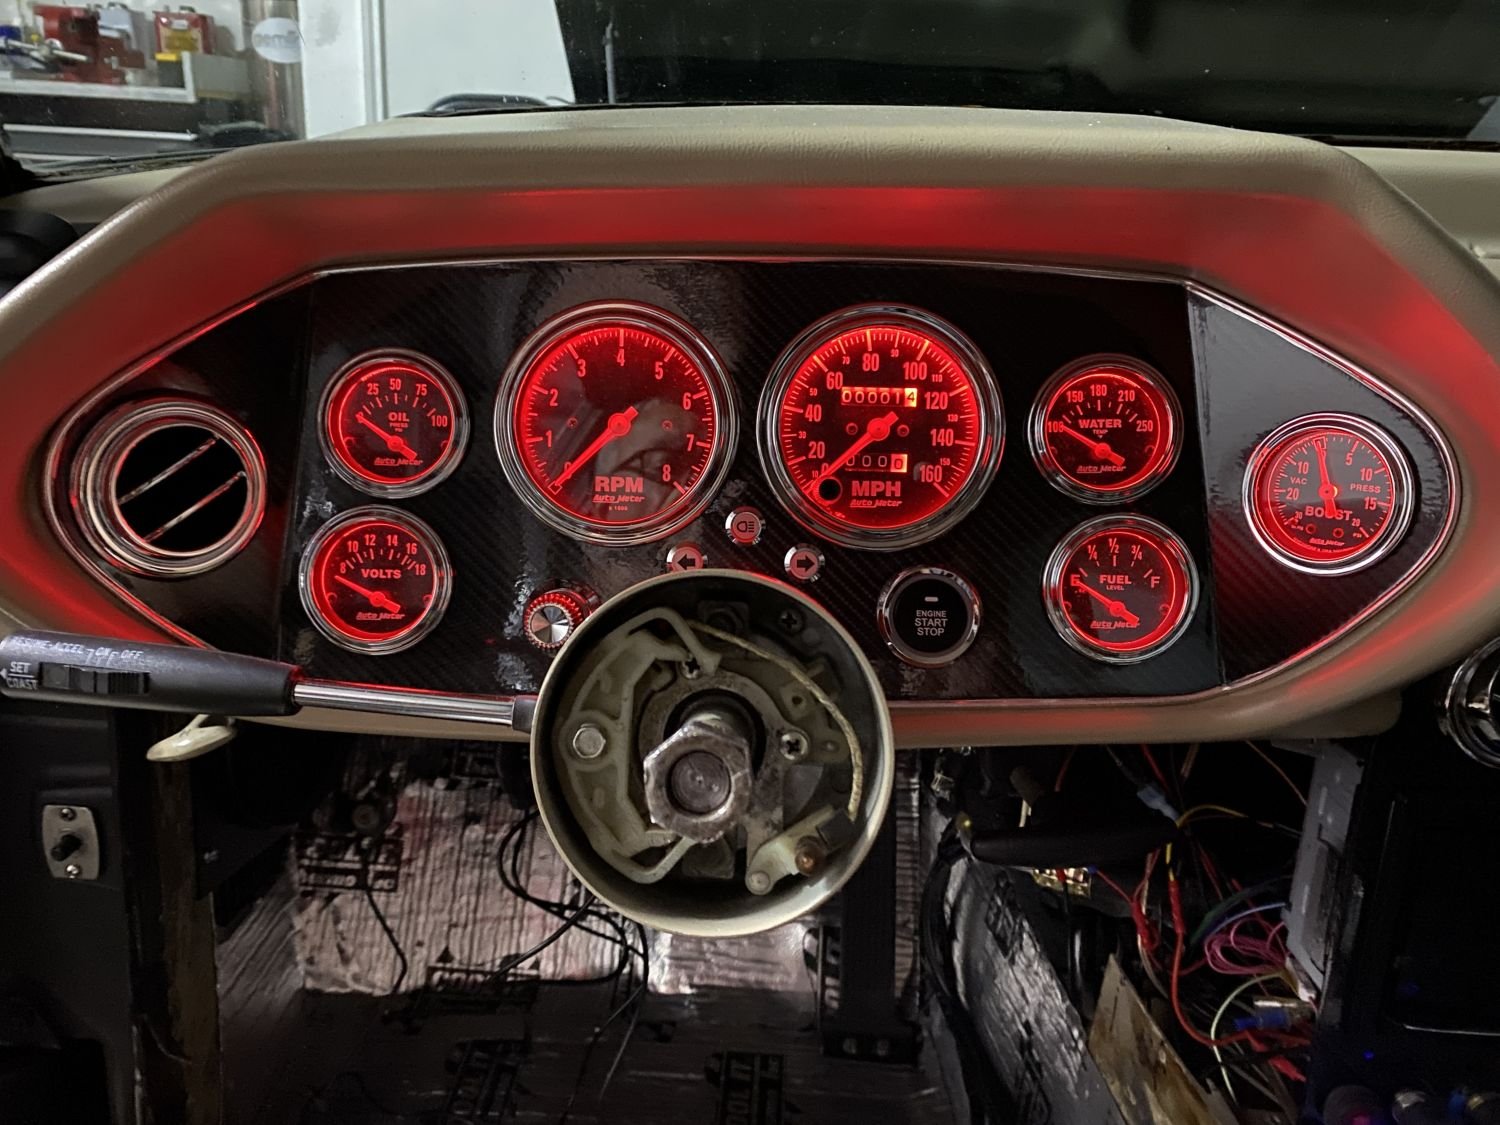
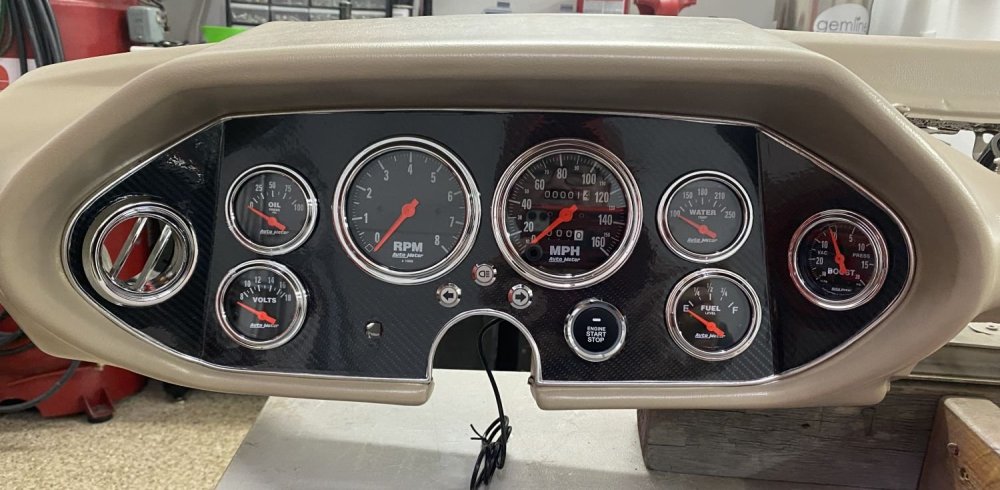
There were 2 gauges in the dash that were inoperative plus the lettering was a dirty yellow due to age when I bought the car. I had done a SW gauge upgrade on an 82 that I had and wasn't satisfied with the night illumination on those new gauges, so I decided to go with AutoMeter this time. They offer LED bulbs in several colors and I decided to add the Red ones to the new gauges as well. During this upgrade (which included a new dash pad among other improvements), I stripped the old paint off of the aluminum panel and installed a glossy carbon fiber wrap. (the wrap will be used in other dash/console related areas as well). In the 2 photos below, you will see 4 other changes. I replaced the amp meter with a volt meter. I added an A/C vent to the left side of the dash and replaced the ignition switch with a modern push button start button. The turn signal and high beam indicators are LED's too. To me, this modernized the dash yet also kept most of the original design elements. There will be a forth coming A/C article among others in the near future. We really like how the gauges turned out!

-
Yes and eventually front and rear Turner disc brakes.
-
I will add that the carb I worked on had been rebuilt by a well known vendor, looks brand new and was installed prior to my purchase of the car. My post was to show a how to improve the function of the carb on cold starts. A small investment and a short amount of time created the performance gain that I was looking for. If I wanted to replace the carb, I would move to a Sniper or other brand of Fuel Injection. Since I am making some other serious modifications to the car as we speak, I wanted to retain some of the stock components on the car like the fuel system, at this time. Stay tuned for more upgrades.....
-
I have a 35 page Carter Carb operation and user guide. In it, it states that if over choking occurs, then the operator needs to gun the throttle a few times until it clears out during warm up. So it seems like there was a known issue with this and for me, I'll always make the changes necessary to make improvements to my vehicle if possible and post the improvements to help others that are interested in the help. If you think that what I am doing is unnecessary or you don't agree, then you aren't going to like future posts on the evolution of my R2.
-
I was a carb/fuel injection specialist in the 70s and early 80s. All carbs need a choke pull off to prevent over enrichment AFTER cold startup. The choke on the carb works great. It closes completely at start and the heat rises correctly and opens the choke all the way up. But the 1-2 minutes that it takes to warm up enough to open the choke is where the over enrichment becomes a problem. I solved it once and for all. BTW, most other Carter AFBs come with choke pull offs. The model carb on my R2 is listed as one that does not. It's a simple thing compared to tuning 3 solex side draft carbs, which I can do and still have the balance and jetting tools to do.