ronmanfredi
-
Posts
341 -
Joined
-
Last visited
Content Type
Profiles
Forums
Events
Everything posted by ronmanfredi
-
I want to add a factory tilt column to my 63 Avanti. Does anyone have one they would part with or know where I could get one? Thanks!
-
I found a rebuilder for mine a couple of years ago, but the cost to repair it was around $500 due to the labor involved to disassemble it. I discarded it and went with a different radio.
-
Your rattle could be the vertical window channels that guide the windows on each end which may need replacing due to the felt being worn out. The outer weather strip at the top of the door is to prevent/reduce the amount of water that can enter the door from rain the inner to prevent the glass from rubbing on the inner door trim.
-

John Hull's book, "Avanti, the complete story".
ronmanfredi replied to aardvark's topic in 2001-2007 Avanti models
In your particular case, due to the year model and build location, John Hull should have the build sheet for your car. I know he charges for the information so you'll need to decide if you want to inquire about this with him. Also, a lot of the information that I put together came from John and Don Linder. The rest was done through research, which is ongoing also. -
The same goes with Dan Booth. He has a habit of quoting one price and then when you get the invoice it's much higher (like heart attack higher), so I now pin down the price with all the sellers.
-
John Hull's book, "Avanti, the complete story".
ronmanfredi replied to aardvark's topic in 2001-2007 Avanti models
I really don't know, maybe in his late 60s-70s. He recently built a new house and moved a few states away from his last location and mentioned he had dozens of boxes and filing cabinets of stored records that were being moved. He's always busy with projects to make money plus with AOAI and SDC so it's just what is a priority for him. -
I used him for all suspension parts on my old 82 model.
-
Most other sealants will prevent you from removing the panel again down the road. You need 3M 08578 and can get it from Amazon or most auto parts stores can order it.
-
And they work like a champ. Start the car and watch the corners of the hood move down...
-
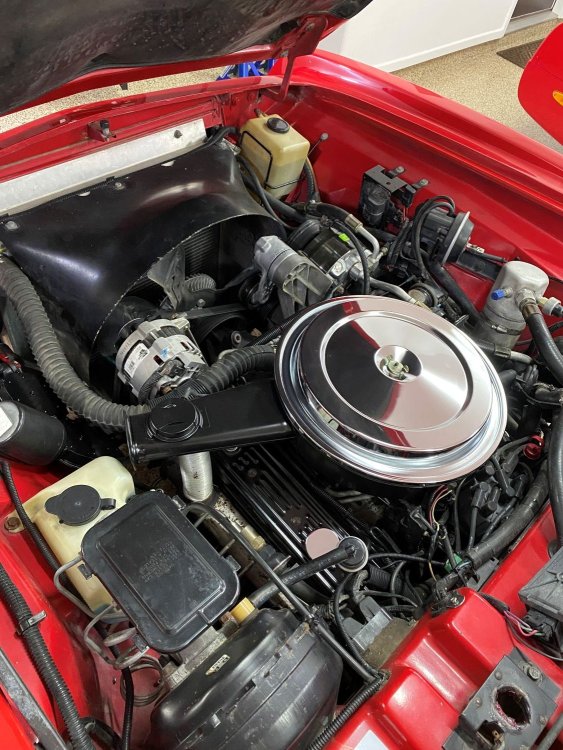
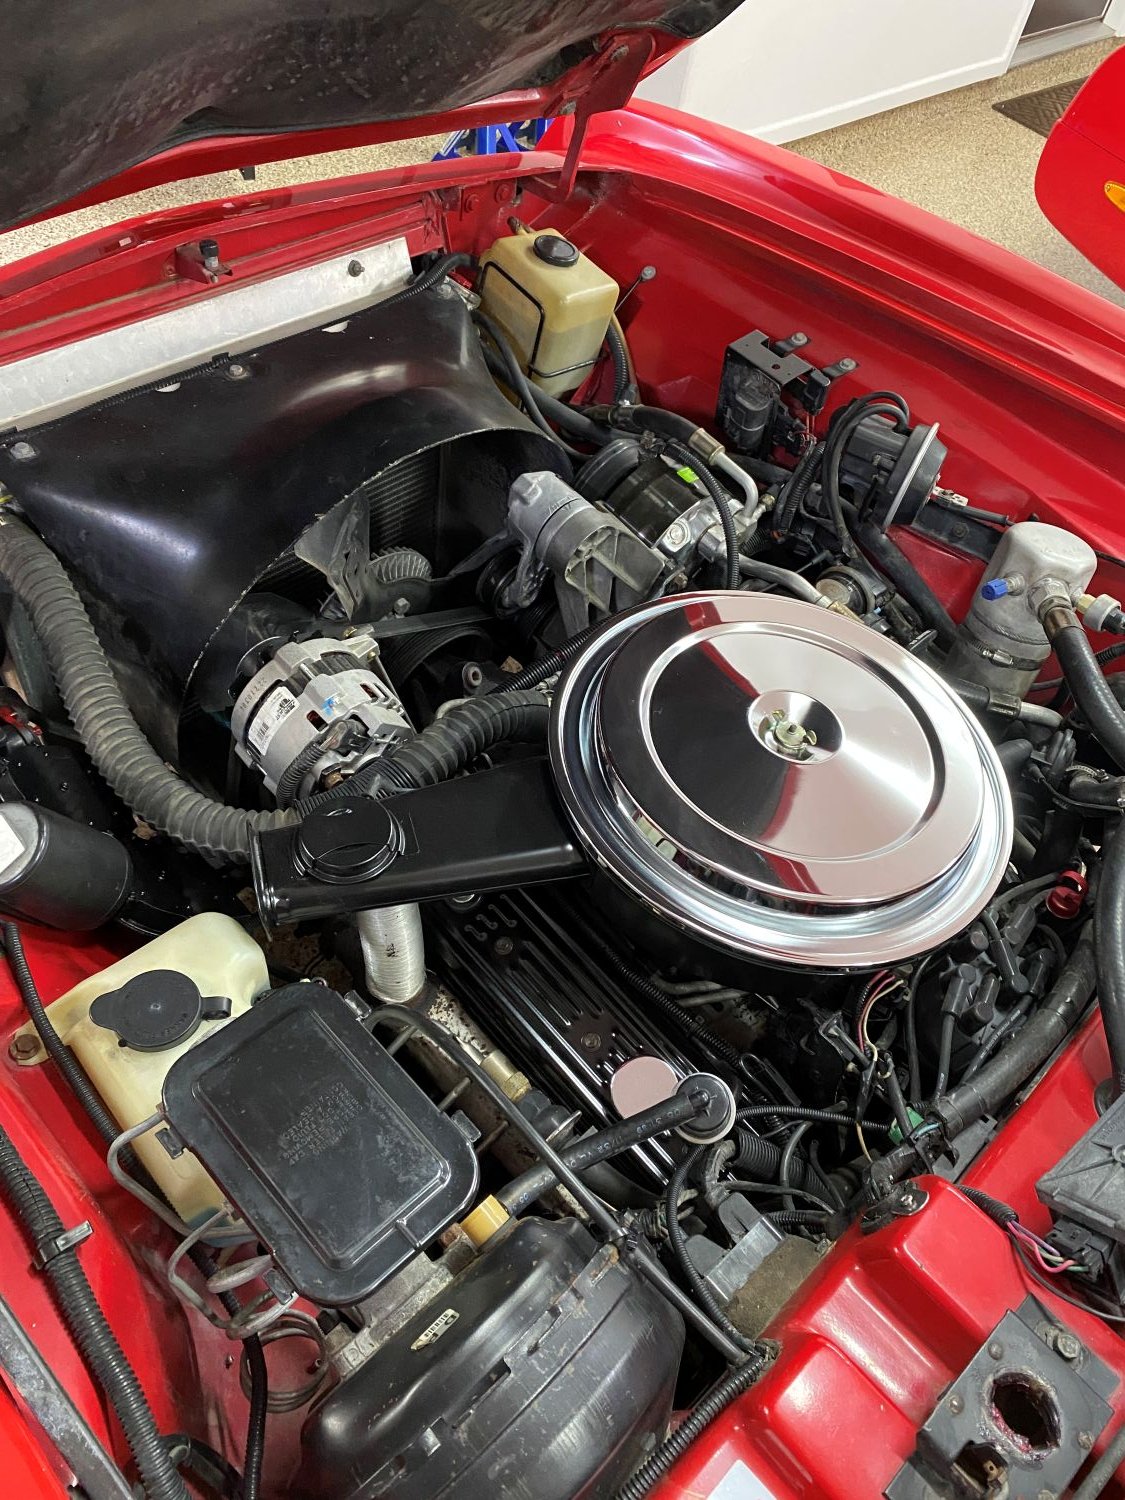
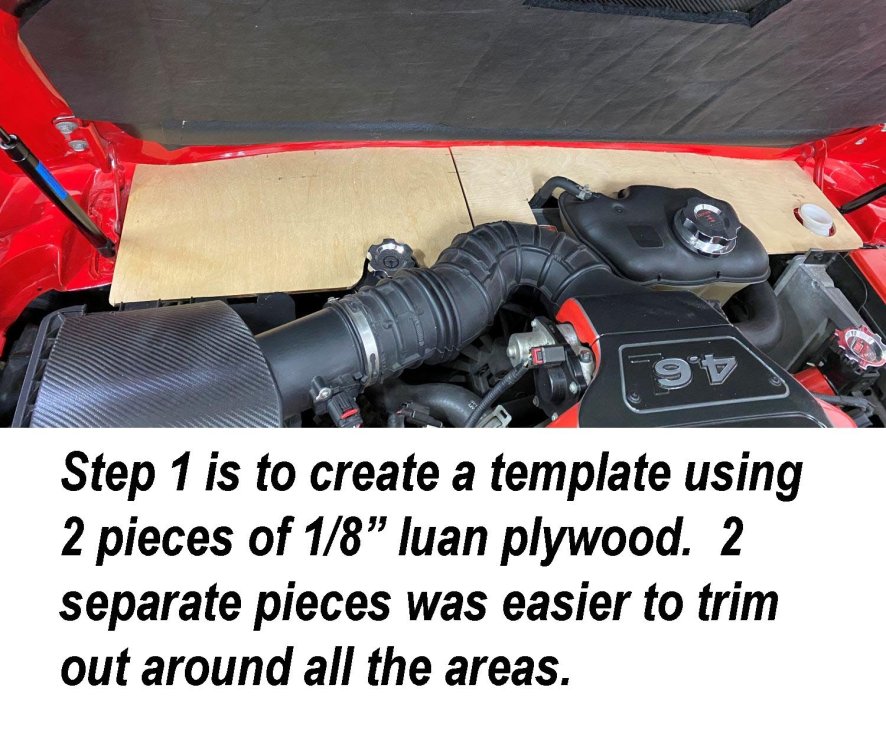
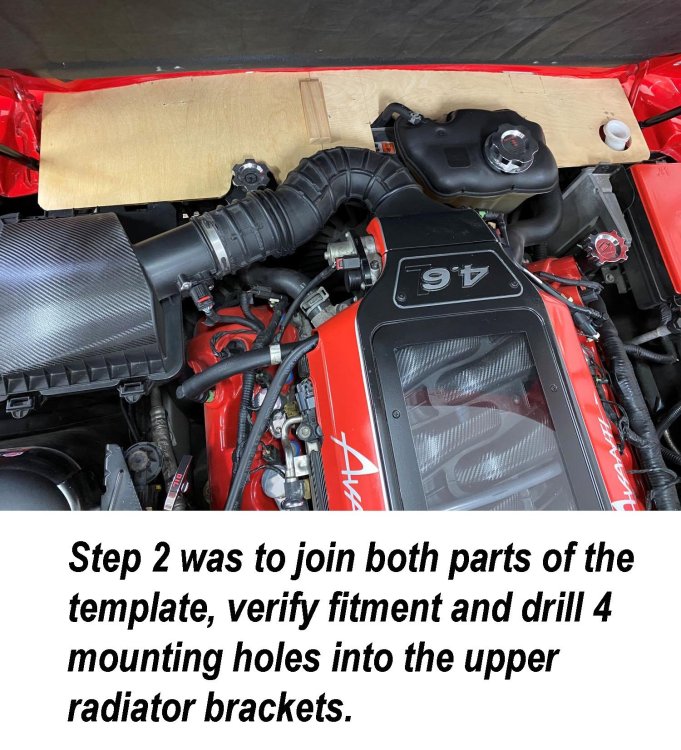
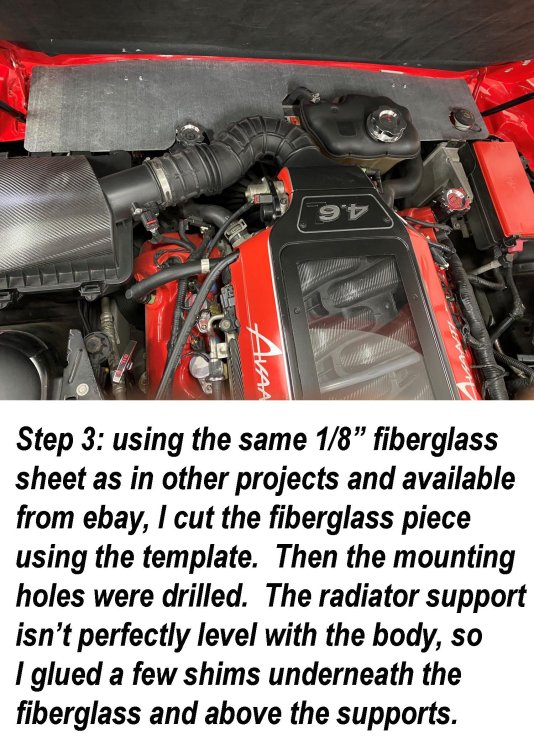
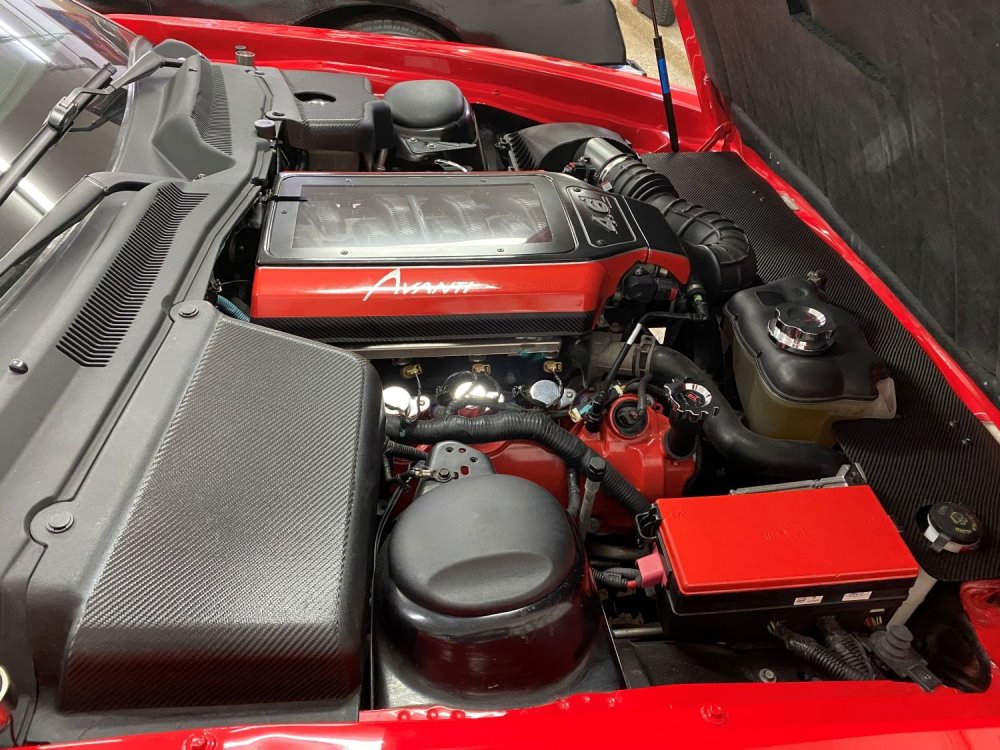
With the 2026 AOAI meet coming up in just a couple of months, I knew it was time to do one last engine compartment upgrade to our 2006 Avanti GT before we take it to Palm Springs. I’ve done a lot of appearance work under the hood yet there was one area around the top of the radiator that just didn’t look finished and that needed to be corrected. After opening and closing the hood a dozen times, I knew that I wanted a waterproof panel that was strong, that wouldn’t show in the front hood edge to front body nose gap when opened or closed. It also couldn’t go past the hood struts either. I wanted it to wrap around the individual parts mounted in the engine compartment, while not rubbing up against any part mounted to the engine. After measuring for the basic size, I cut two 12” x 22” pieces of 1/4” Luan plywood to create templates since I knew there would be several hours trimming, test fitting until everything looked right. Wanting them to be uniform in shape when joined together and being able to remove it if needed was another consideration. The Avanti front nose cap in front of the radiator has a lot of curves up and down, left and right that affected how level the piece would sit so test fitting and trimming was mandatory. And of course, the finished piece had to look good. While I was working on the final template layout, I order a sheet of 12” x 48”, 1/8” thick, epoxy based marine fiberglass off of eBay. The seller is a boat company who sells 1/8” – 1/2” thick panels cut to the buyers’ specs who I’ve used several times for flat panels. Here are a few photos of the process and the results.


-
John Hull's book, "Avanti, the complete story".
ronmanfredi replied to aardvark's topic in 2001-2007 Avanti models
When we started the AVX-2007 project, John mentioned that he was confident that he did have a lot more records of 2003-2005 models packed away in the dozens of storage boxes and cabinets. He just needs the time to locate and publish the info. On the records he doesn't have, he told me that he knew some other sources of records as well. It's all about what is a priority to him considering all the projects he is usually involved in. BTW, I do follow up with him about this a couple times a year. -
The Avanti II lines are on the passenger side and come from the fuel tank as rubber hoses to the metal lines in front of the right rear wheel. Leaks can occur in those old rubber lines, plus the filler neck hose. The rear seat and rear panel needs to be removed to get to those lines/hoses. Once there, I'd suggest replacing all rubber hoses and don't forget to seal the panel when reinstalling the rear panel with fresh dumdum. There are 2 rubber hoses at the fuel pump that need to be checked/replaced as needed.
-
John Hull's book, "Avanti, the complete story".
ronmanfredi replied to aardvark's topic in 2001-2007 Avanti models
1997: AVX1 Coupe and AVX2 Convertible Note: AVX2 was the only car built on the Camaro chassis 1998 AVX3 T-Top 2001 AV0001-AV0014 2002 AV0015-AV0037 2003 AV0038-unknown 2004 4 AV00xx Firebird cars located, 2 AV50xx SN95 cars located 2005 AV50xx, 3 SN95 cars located, 8 estimated production 2006 AV4001- 10 cars estimated, 10 located 2007 AV40xx-20 cars estimated, 10 located Several 2007 models were titled as 2006 models towards the end of production so the cars could be sold to the USA during closing so the Avanti VIN series is not sequential. -
Wipers and heater motor blowing fuse after running a minute or two.
ronmanfredi replied to Jim S's topic in 1965-83 Avanti
If it were me, I would first remove those components grounds and clean the terminals. Then remove the related harness plugs and clean the pins and sockets including the fuse box terminals. This would remove the common resistance areas of the electrical system. You can run an ohm meter from the negative side of the battery to the ground wire on each component to be sure the grounds are solid. If your car has the bulkhead harness connector, then be sure to clean those terminals. Now put a 10amp fuse in the fuse box and run the heater motor for several minutes. If it does fine, then turn it off and run the wiper motor (with the wiper blade arms removed) at high speed for several minutes. If in either case, the fuse blows, then the component needs repair/lube/replacing. I also do a temperature check on the related harnesses by holding the harness at the component while it's running. If the harness/wires are hot to the touch then you know you have a problem with resistance being caused by the component / wiring. -
They have the history, documents and photos. All consignment sellers use 12.5% as their basic markup. Then they add more as a buffer to provide them negotiating room. Lastly they look at current other similar cars for sale and adjust the price upwards if possible.
-
It's the Dolenz car that I recently restored. I consigned it to Gateway last week.
-
It's not a lense, it's the entire light assembly. Both of mine were broken and I was unable to locate where it came from since there weren't any markings on the light. I found an import light assembly off ebay which fit the car using the factory mounts. www.ebay.com/itm/234000006178

-
If the arm is made from fiberglass, then it can be repaired. Is the cover itself in good condition?
-
We need your 2001-2007 Avanti Information
ronmanfredi replied to ronmanfredi's topic in 2001-2007 Avanti models
Yes -
We need your 2001-2007 Avanti Information
ronmanfredi replied to ronmanfredi's topic in 2001-2007 Avanti models
Yes -
Curious .. do You shoot for authenticity or modification?
ronmanfredi replied to aardvark's topic in Avanti Pub
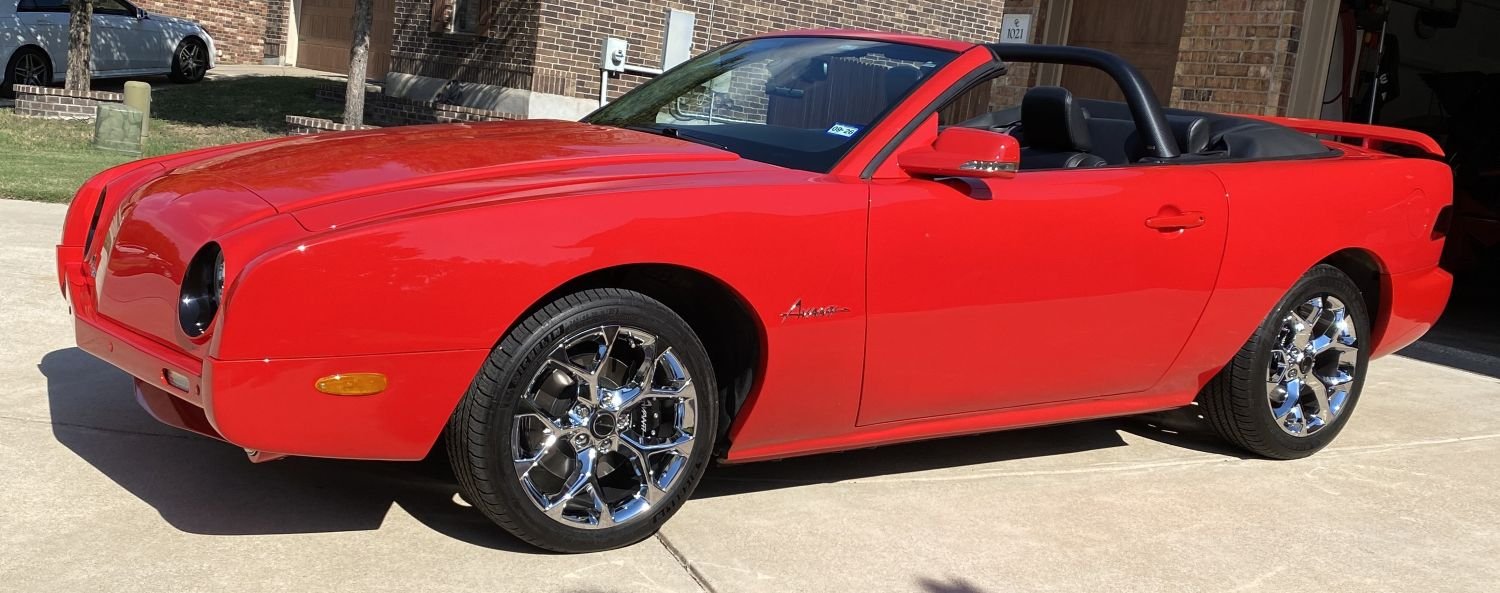
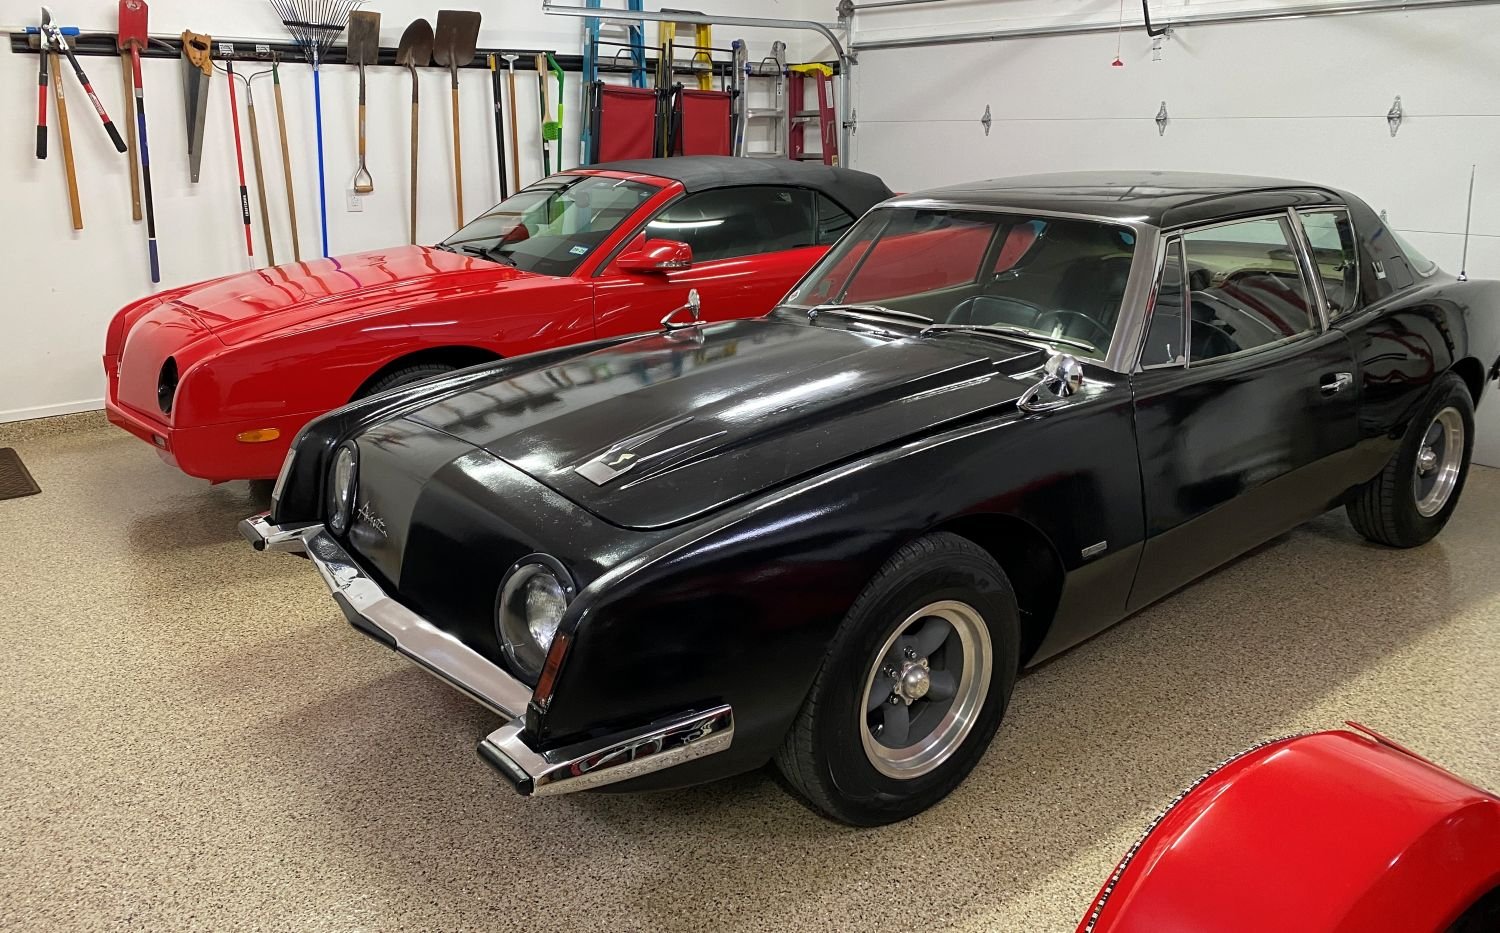
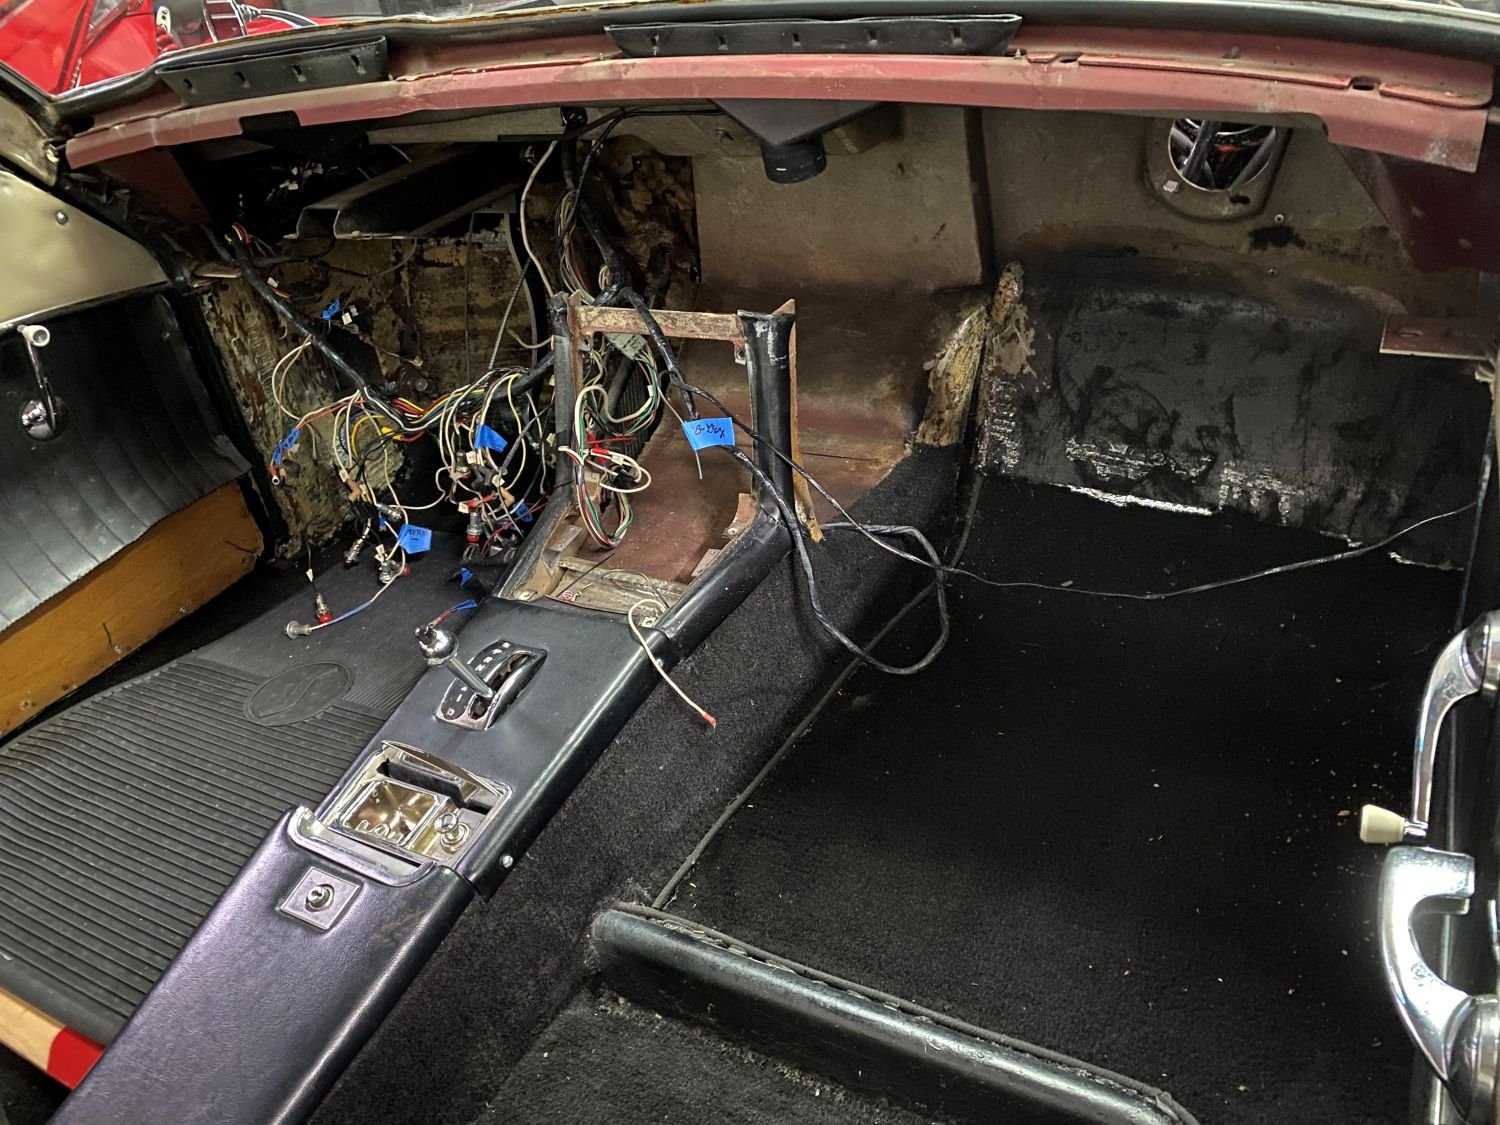
As an old but educated auto tech, I made the decision in my 20's (about 50 years ago) to never leave a car in original condition if I am going to build it for myself. I turbo'd my cars in the 70's, Nitrous in the 80's, Both in the 90's, Cars, Jet-Ski's Motorcycles and Boats. If I can make it faster, look cooler and add the tech of the day, then I'll usually do it. I'm not concerned about the resale value or what others think, but I usually get top dollar when I sell one of my vehicles. In the Avanti world, I've created a show winning 2006 Avanti, which has been given to my wife, restored an 82 and sold it, restored the Dolenz 89 (it's up for sale), and am now embarking on an early Vin 63 R2 project. I bought the R2 from an Avanti multi car owner, who started the ground up restoration but ran out of steam due to his age/health. The entire chassis, engine, BW auto transmission, brake and suspension had been rebuilt. New seat upholstery and main wiring harness installed. It has a good base to begin with. I have a vision for the car and will surprise many with the end result. Here is our 06 and R2 project:


-
I saw one of these at the vendor display during the AOAI/SDC dual meet. Now I want to purchase one in good to excellent condition.
-
We need your 2001-2007 Avanti Information
ronmanfredi replied to ronmanfredi's topic in 2001-2007 Avanti models
It's been a year since I posted this. So I'm asking again if anyone had recently discovered the whereabouts of any 2001-2007 Avanti's. We've seen some sold and were able to locate some of the owners, others we haven't. We know about the cars that belong to current AOAI members but there are so many non members cars that are still missing. I've read back years of AOAI magazines and discovered some cars, but the then owners are no longer members and we don't know what happened to their cars either. Any help would be appreciated! -
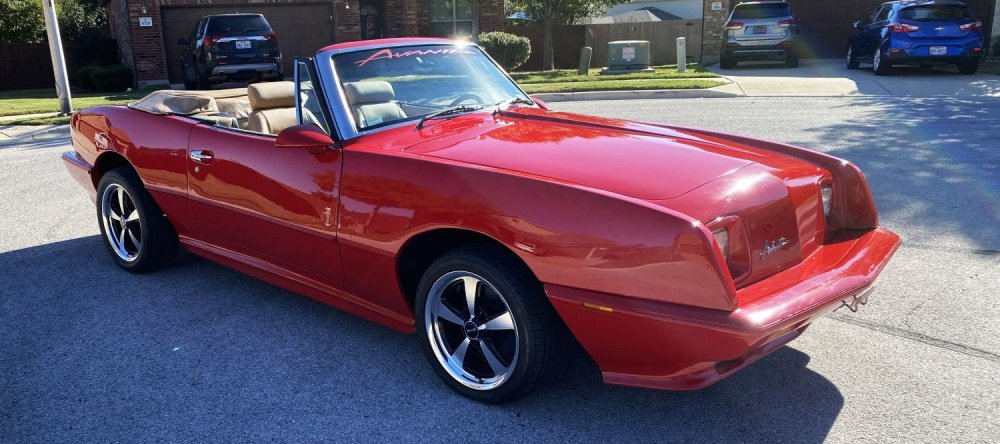
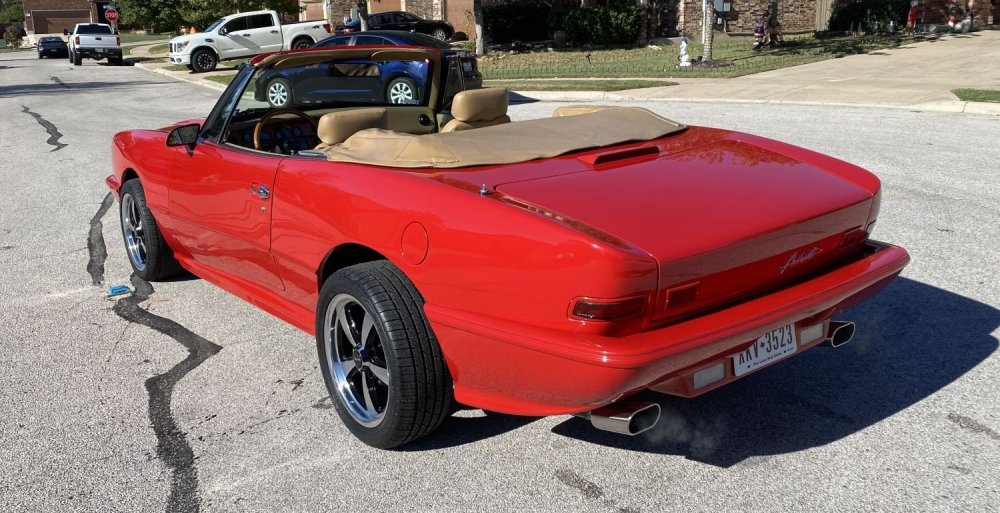
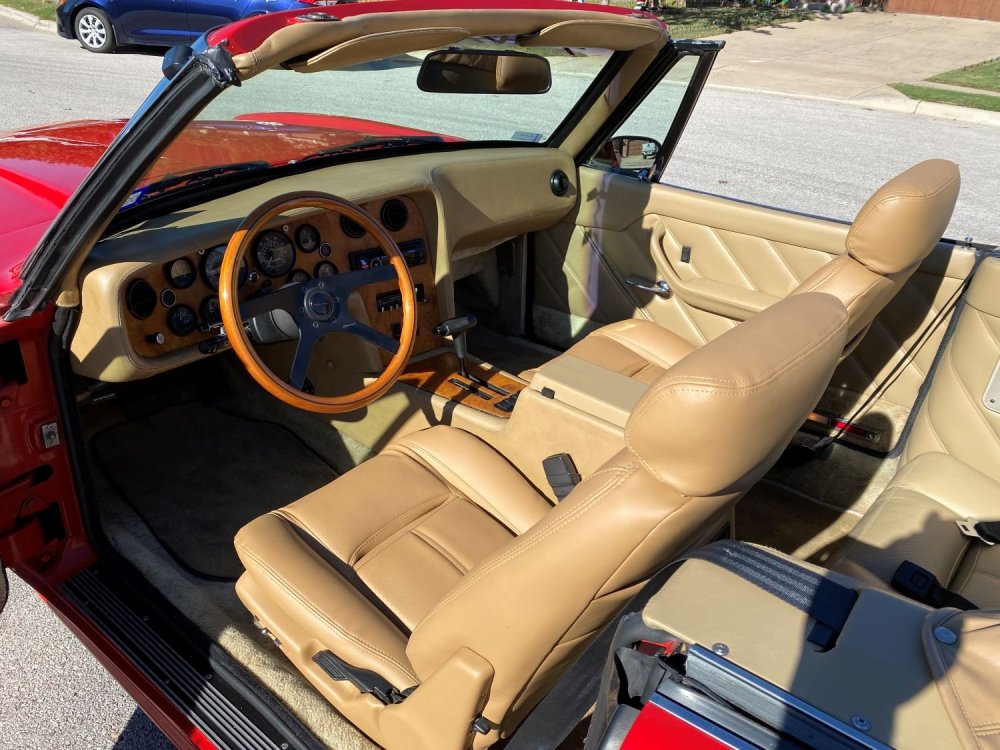
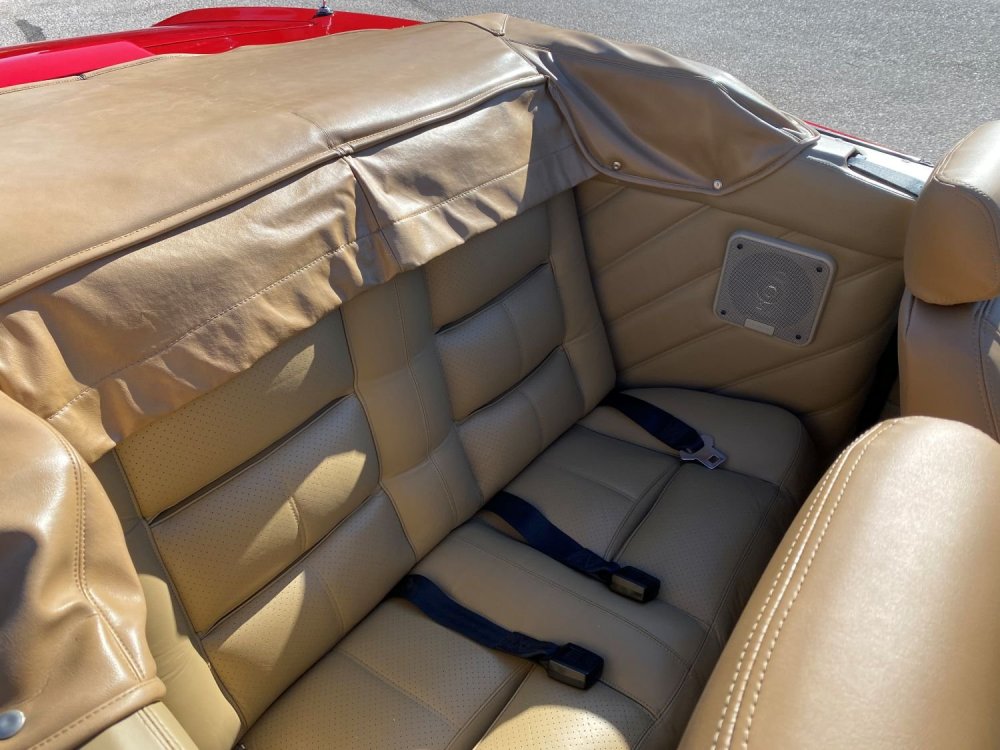
I have a 1989 Avanti Convertible that I rescued a few months back. Its original owner was Mickey Dolenz, the drummer of the band "The Monkeys" and includes a signed picture of the car when new. It was the second to the last Convertible made in the 80's with signatures of the assemblers on the back seat bottom. It pasted through 2 other owners and ended up with the grandson of Tom Larner, a big time Avanti Owner. It was driven regularly and has 139,000 miles on it. I have gone through the entire car to be sure everything is working correctly, had new upholstery installed on the front seat and cleaned up/treated the rest of the interior. The front end has been repainted to remove all paint damage. Tires, wheels, exhaust are all new. No Leaks. Consigned to Gateway Classic Cars of San Antonio, Tx