While fresh on my mind, I decided to write up some instructions on how to do this. You may want to have a shop do the charging part if not experienced with it. Total cost of the system was under $600. If you prefer original components, all the parts I removed are now for sale.
How to install modern air conditioning in a Studebaker Avanti
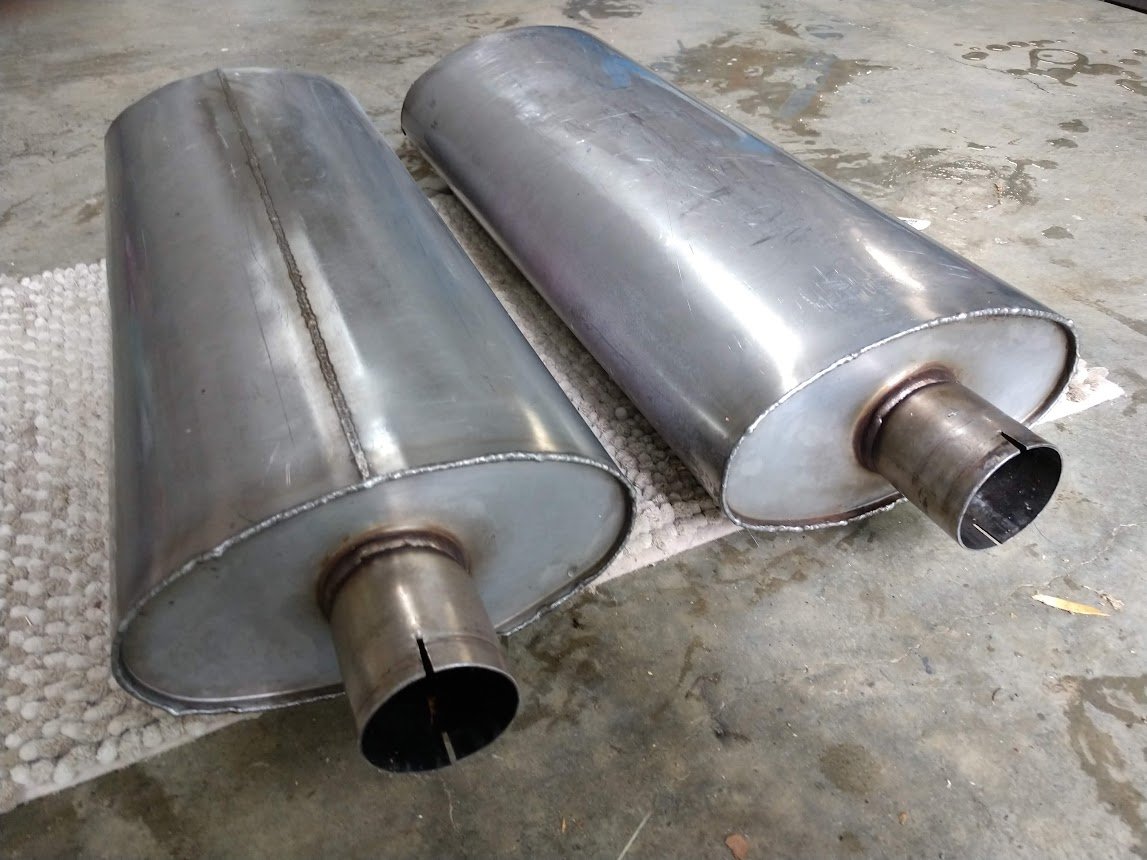
My ’63 R1 came with “factory air” (I put it in quotes because it is not on the production order and I think it was dealer installed- but exactly like factory air). I decided to pull the old parts, sell them to someone who wants authenticity and put in a modern, more reliable system. I noticed after pulling the evaporator that it appeared to be nothing more than an under dash unit from the era adapted to use inside the console. So I decided to adapt a modern system, similar to those found at Vintage Air. You can buy complete kits for a similar price on Amazon on Ebay, but they come with hoses. I elected to have the hoses made up.
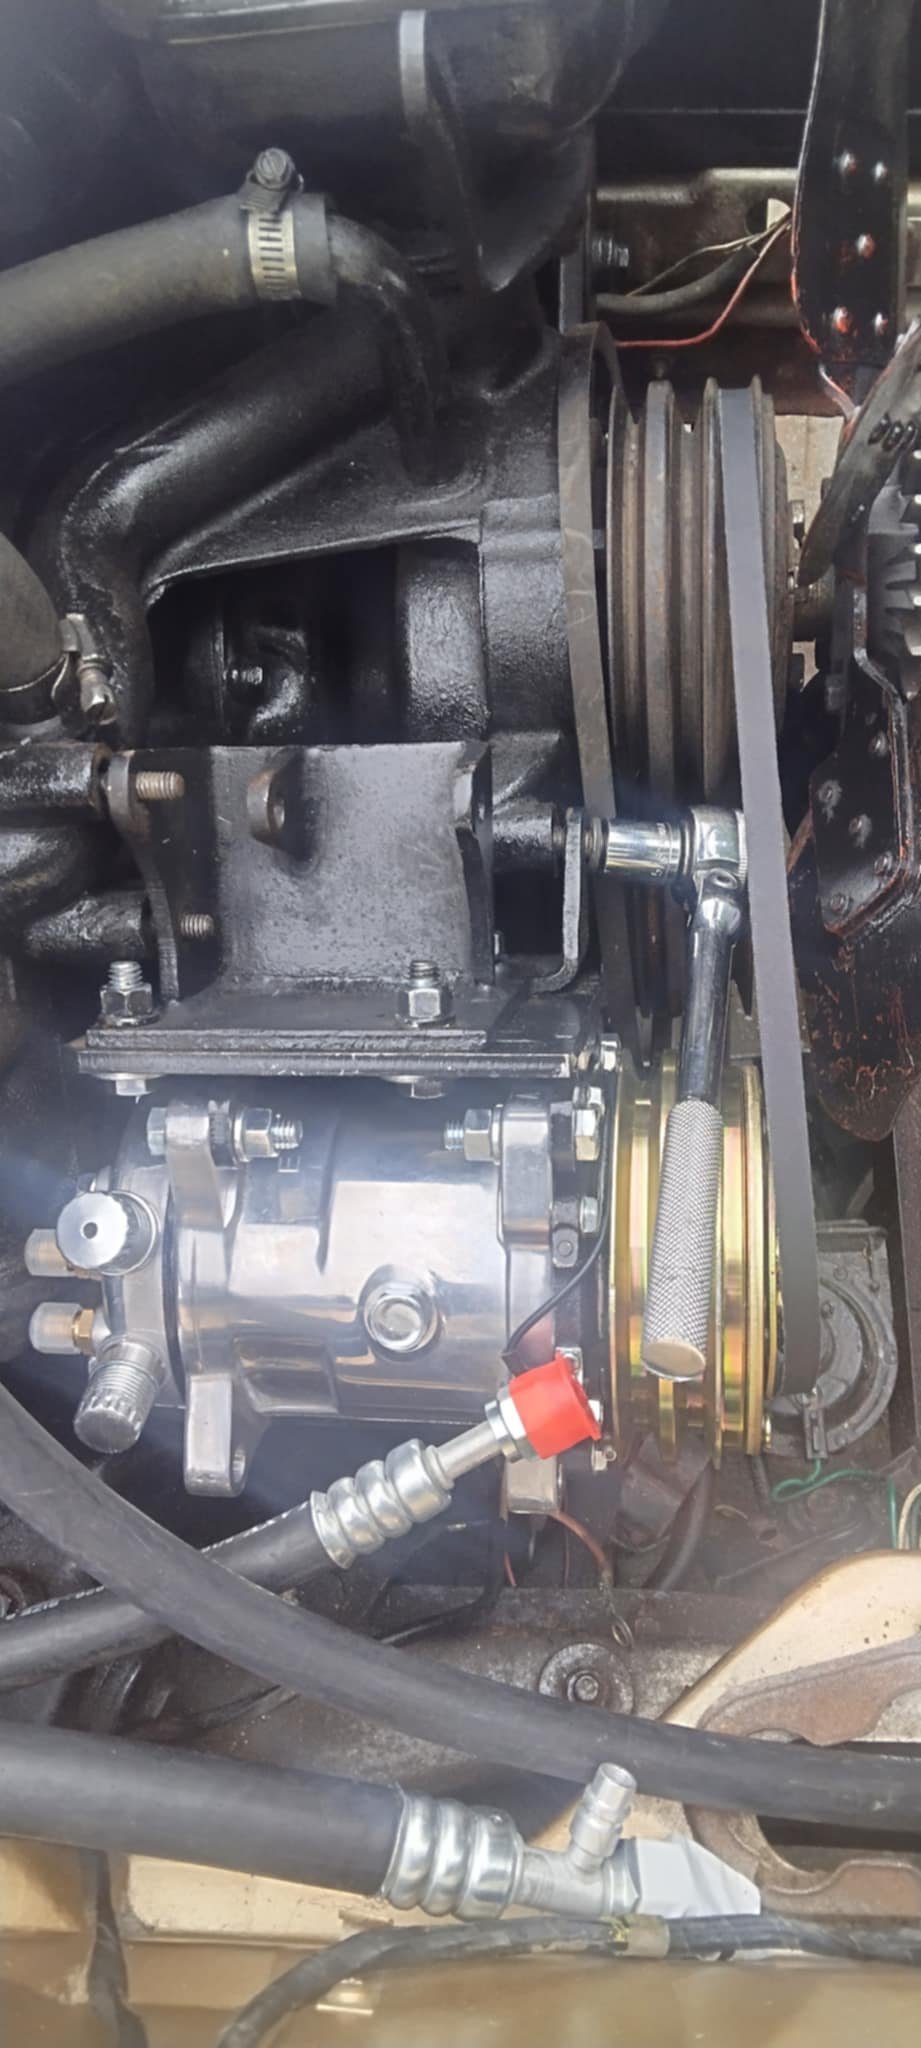
I found on evaporator on Amazon with very similar dimensions to the old unit and ordered it (about $80). Then I found a larger condenser unit (14 x 20) which is the same size as the Vintage Air unit that came in my Hawk (around $100) . The next major component is the compressor, and that one is easy. A company called Sanden has made many of the compressors found on all kinds of modern vehicles, and it’s known for it’s reliability and efficiency. Not being able to find an actual Sanden 508, I bought a clone from a company called Green that makes compressors for large trucks (around $140) . There are many different similar compressors on Amazon and Ebay, but I opted for the Green due to good reviews. I also purchased a “York to Sanden adapter” which bolts to your old bracket and allows it to accept the new compresser.
I then started pulling all the underhood components. First thing to do is pull the fan shroud and radiator, along with the hood. Once these are out of the way your endeavor will be MUCH easier. Here’s what to do:
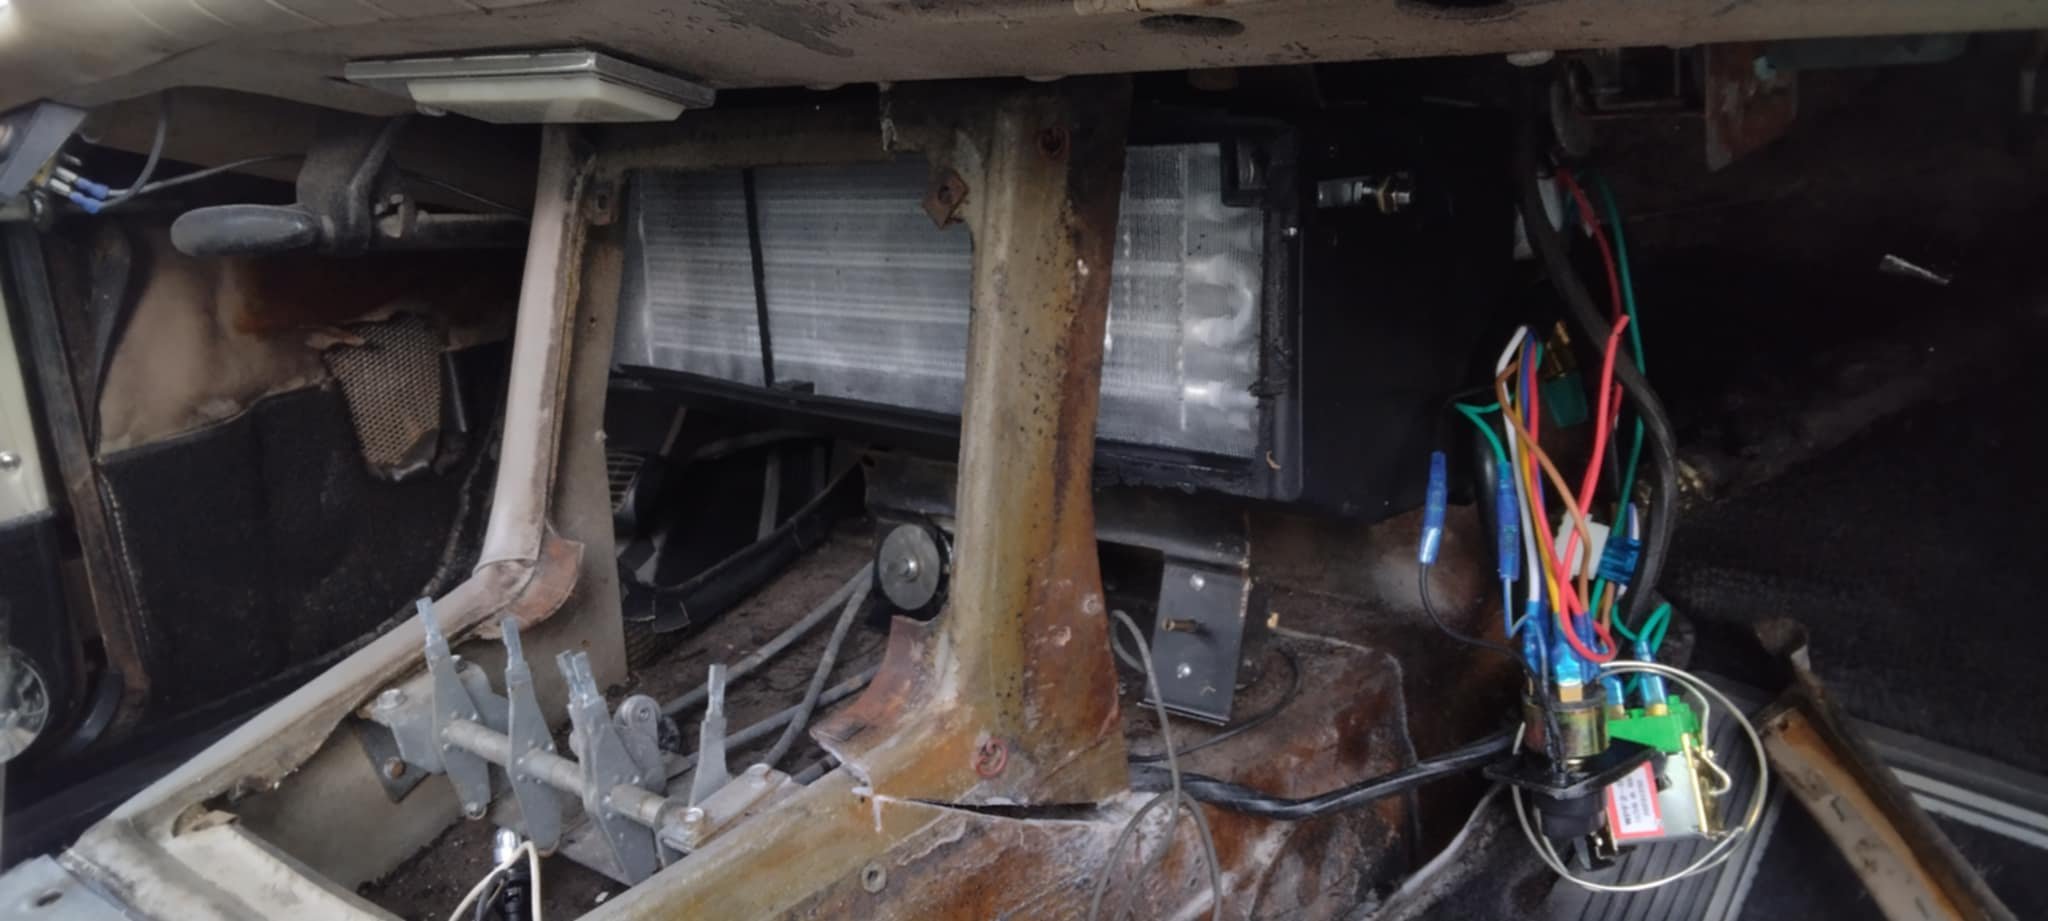
1). Assuming your car has A/C , remove the alternator, compressor, condenser and evaporator. The plate around the shifter and vertical console panel are removed to get the evaporator out. In addition, you need to cut out one of the vertical fiberglas supports behind the panel, then unhook the hoses and wiring and slide the unit out on the right side. This sounds drastic and at one point I hit the brakes on the project rather than do this. Turns out there was nothing to it, the support is lightweight, easily cut with tin snips and easily replaced with silicone glue . I have no idea how the original designers got i theunit in there, Nostalgic Motors calls for cutting the same piece to get it out.
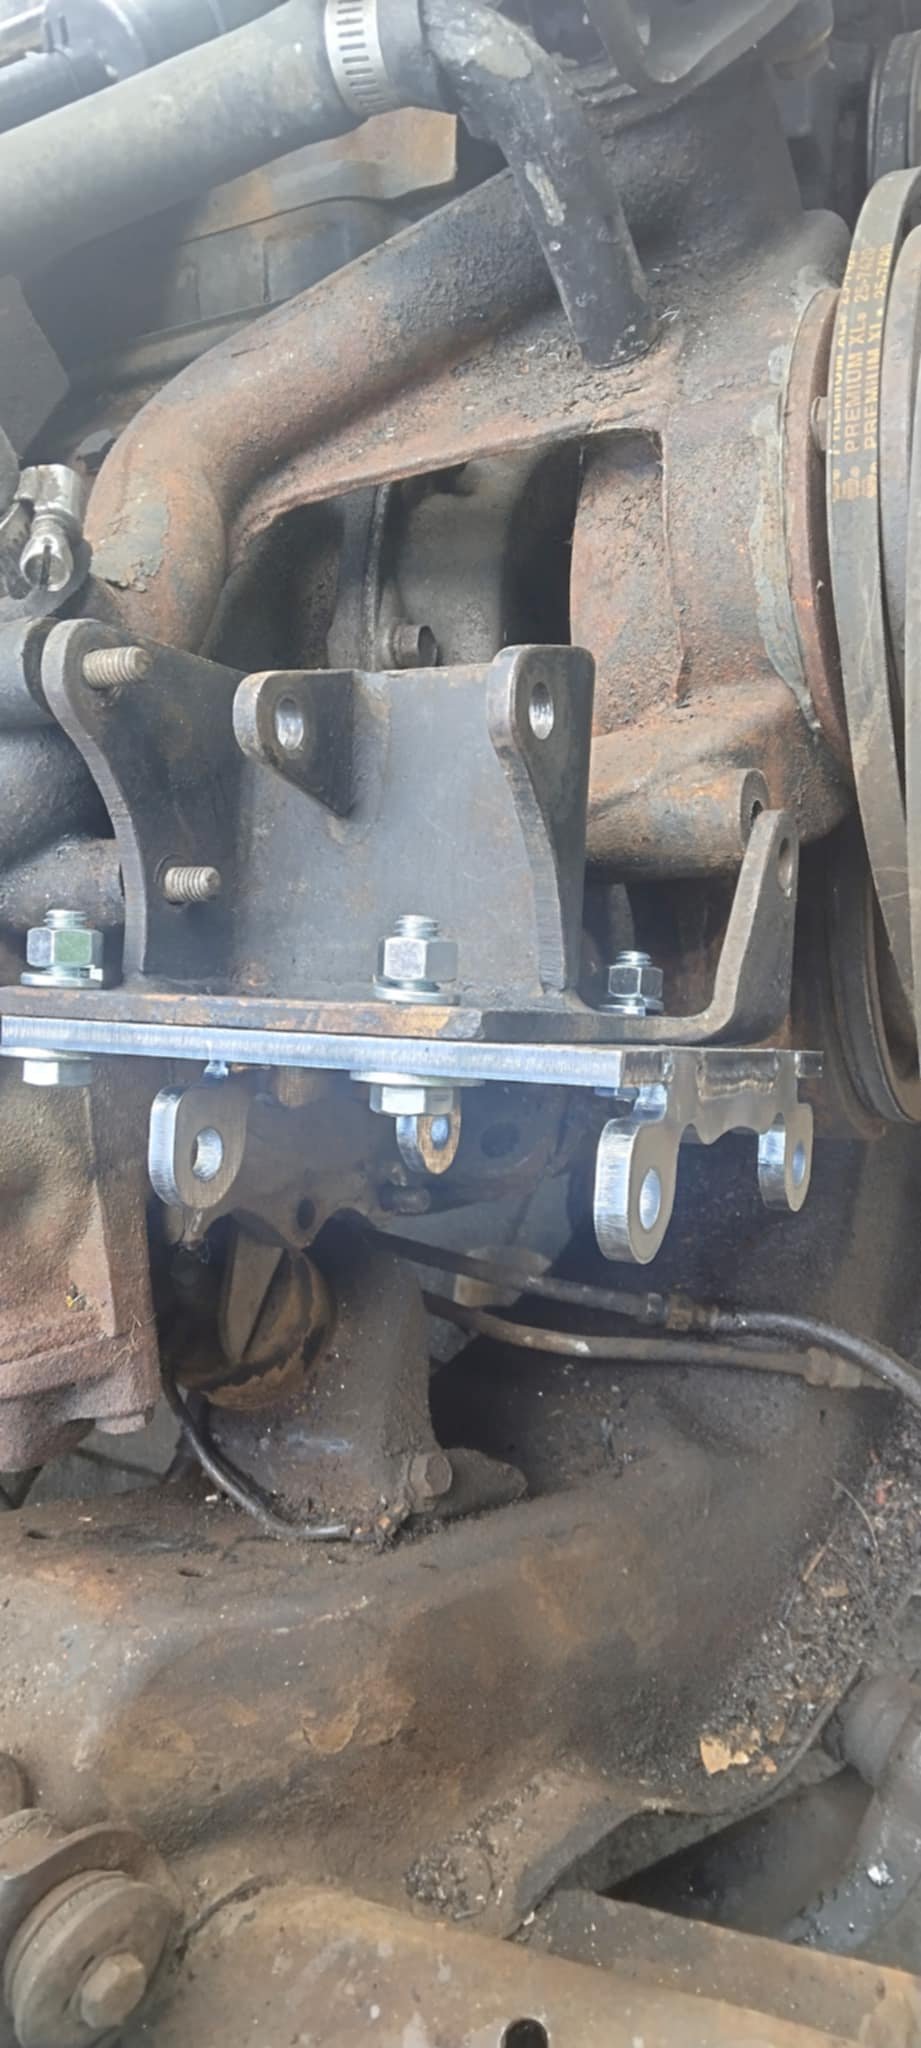
2) Remove the main bracket from the compressor. You won’t need the idler pulley or bracket. Now bolt the new Sanden type compressor to the adapter bracket with four bolts. Go to the parts store and ask for a 46” belt that is 7/16 wide. Your belt will either be this size or a bit longer, so trial and error will be needed. BE SURE each time you start to bolt in your alternator or compressor that the belt is already on it as you bolt it up. Don’t do what I did and find yourself removing it again and again. With no idler pulley, you must find the right size belt and let it tighten a bit as you tighten the bolts.
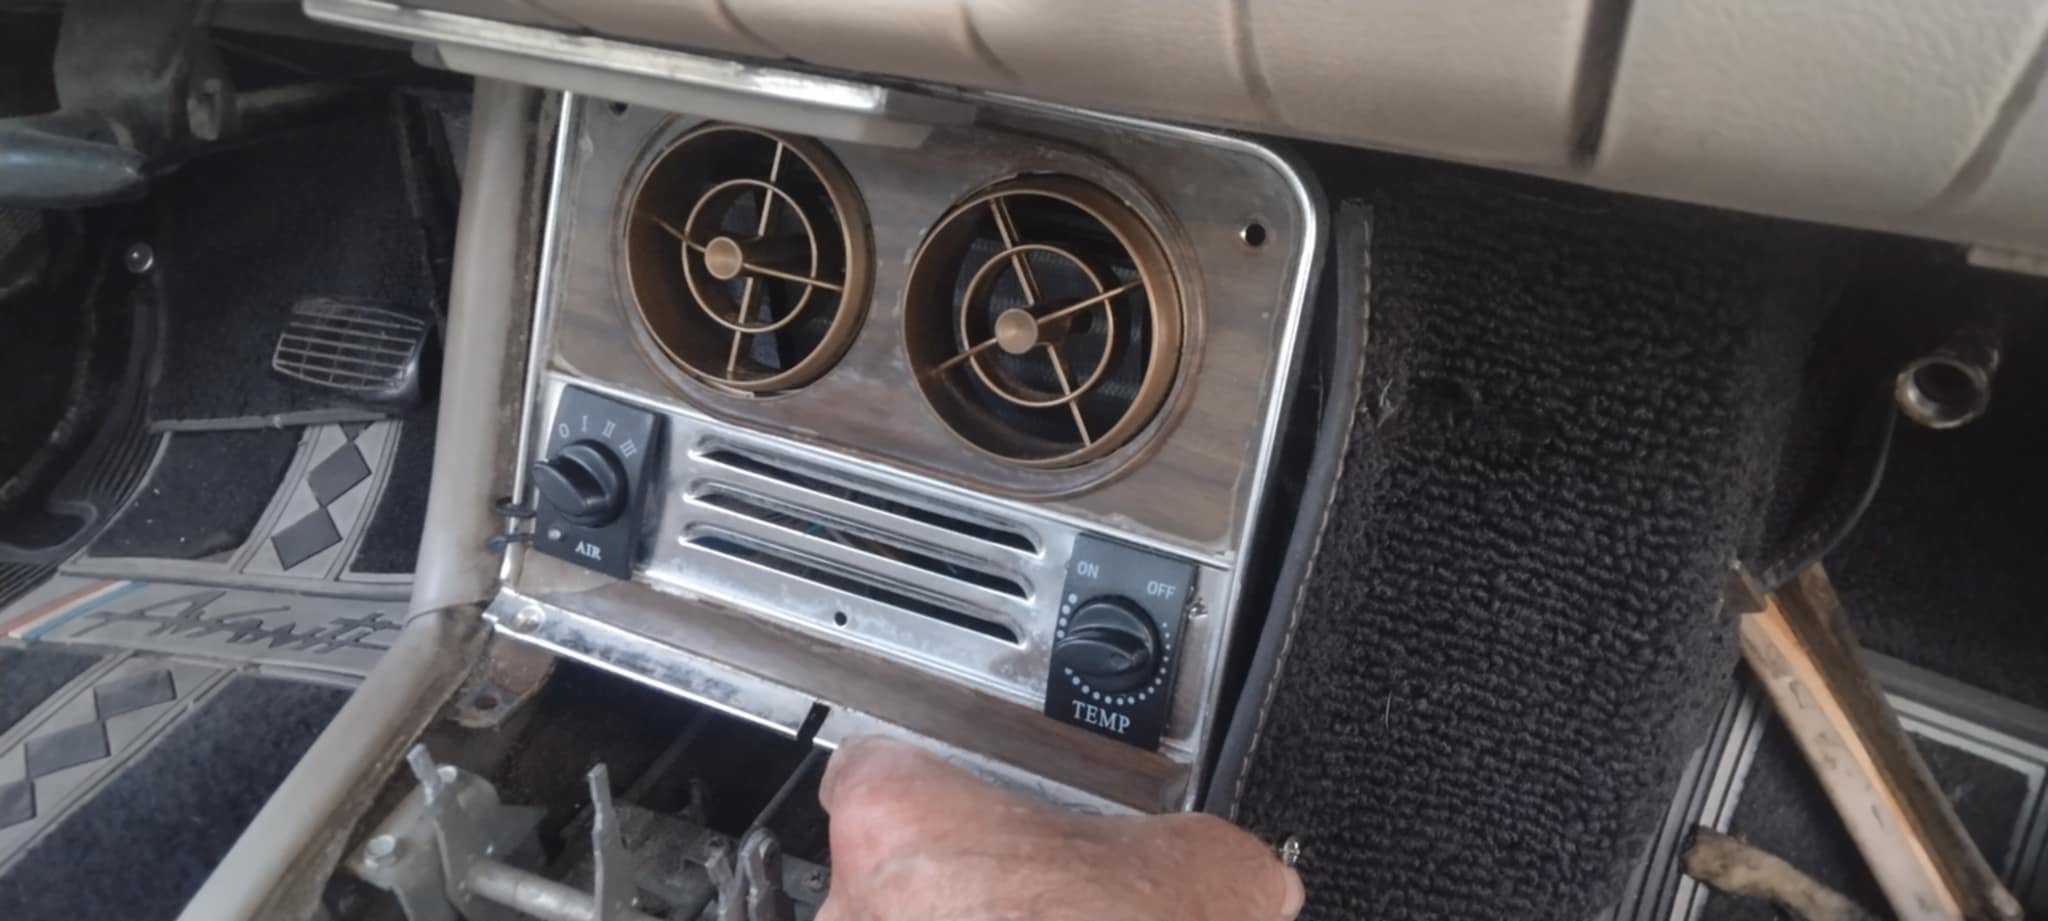
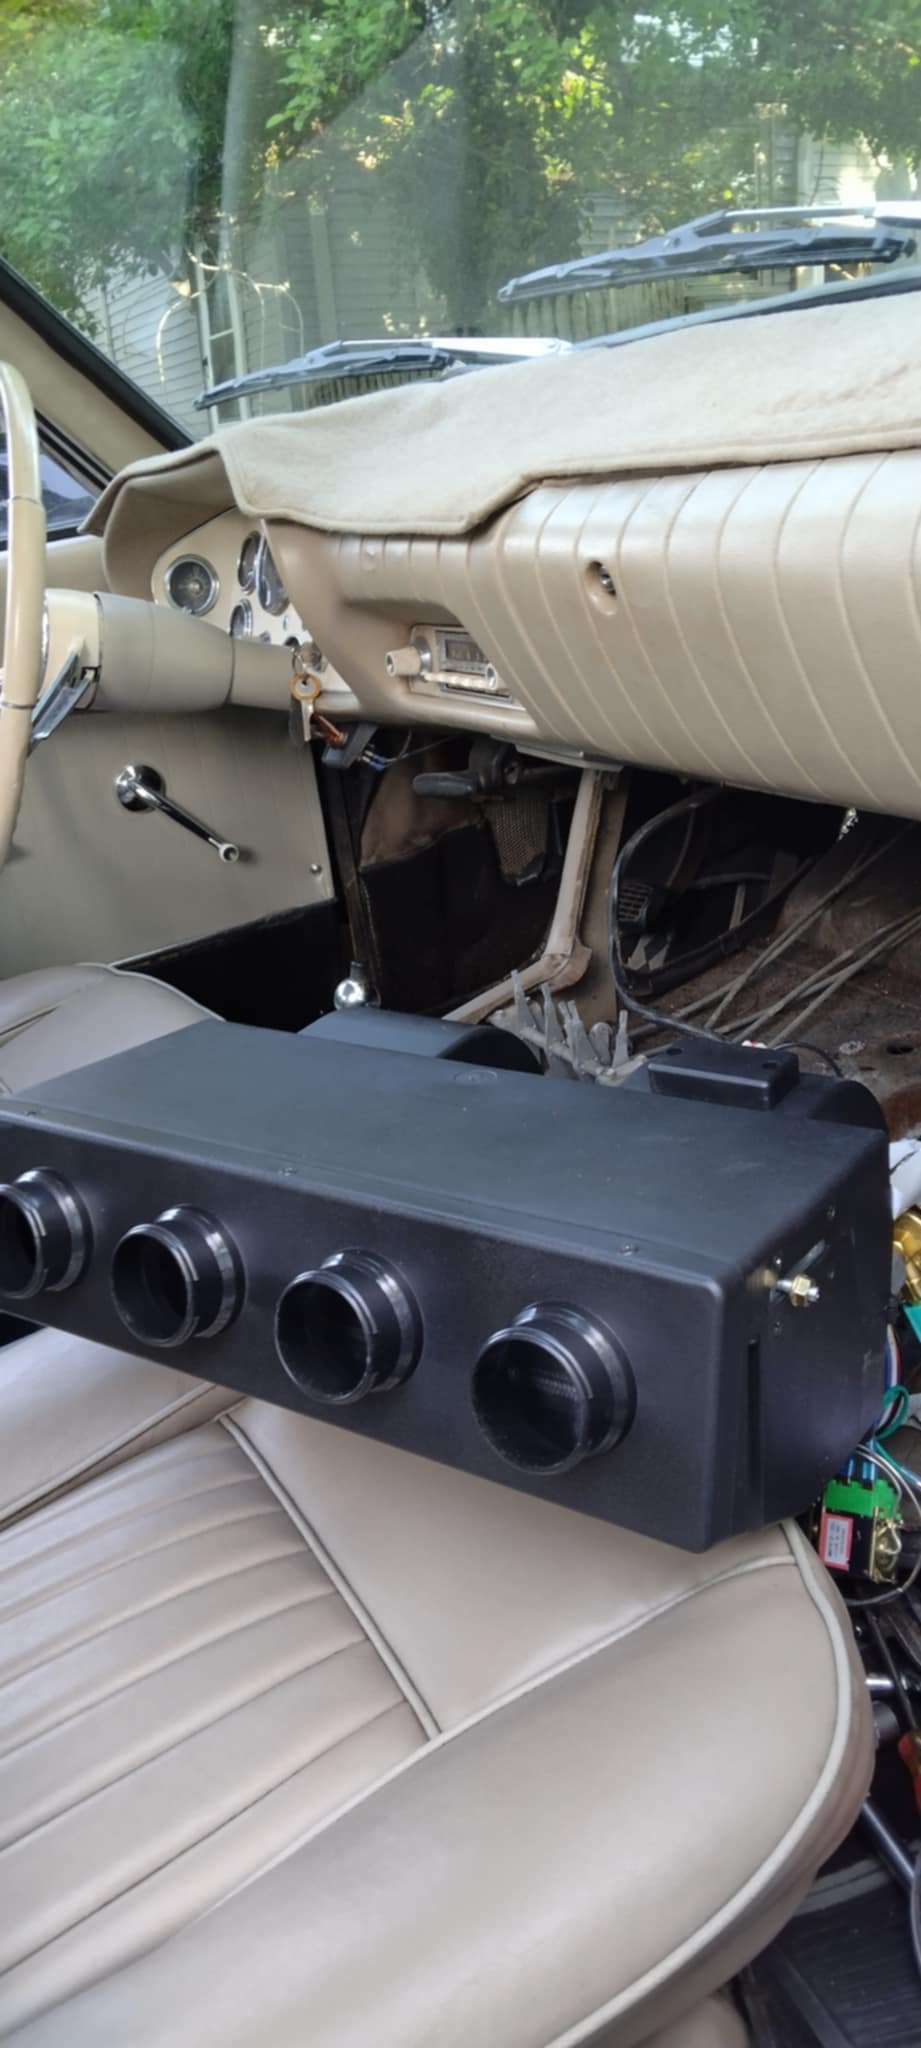
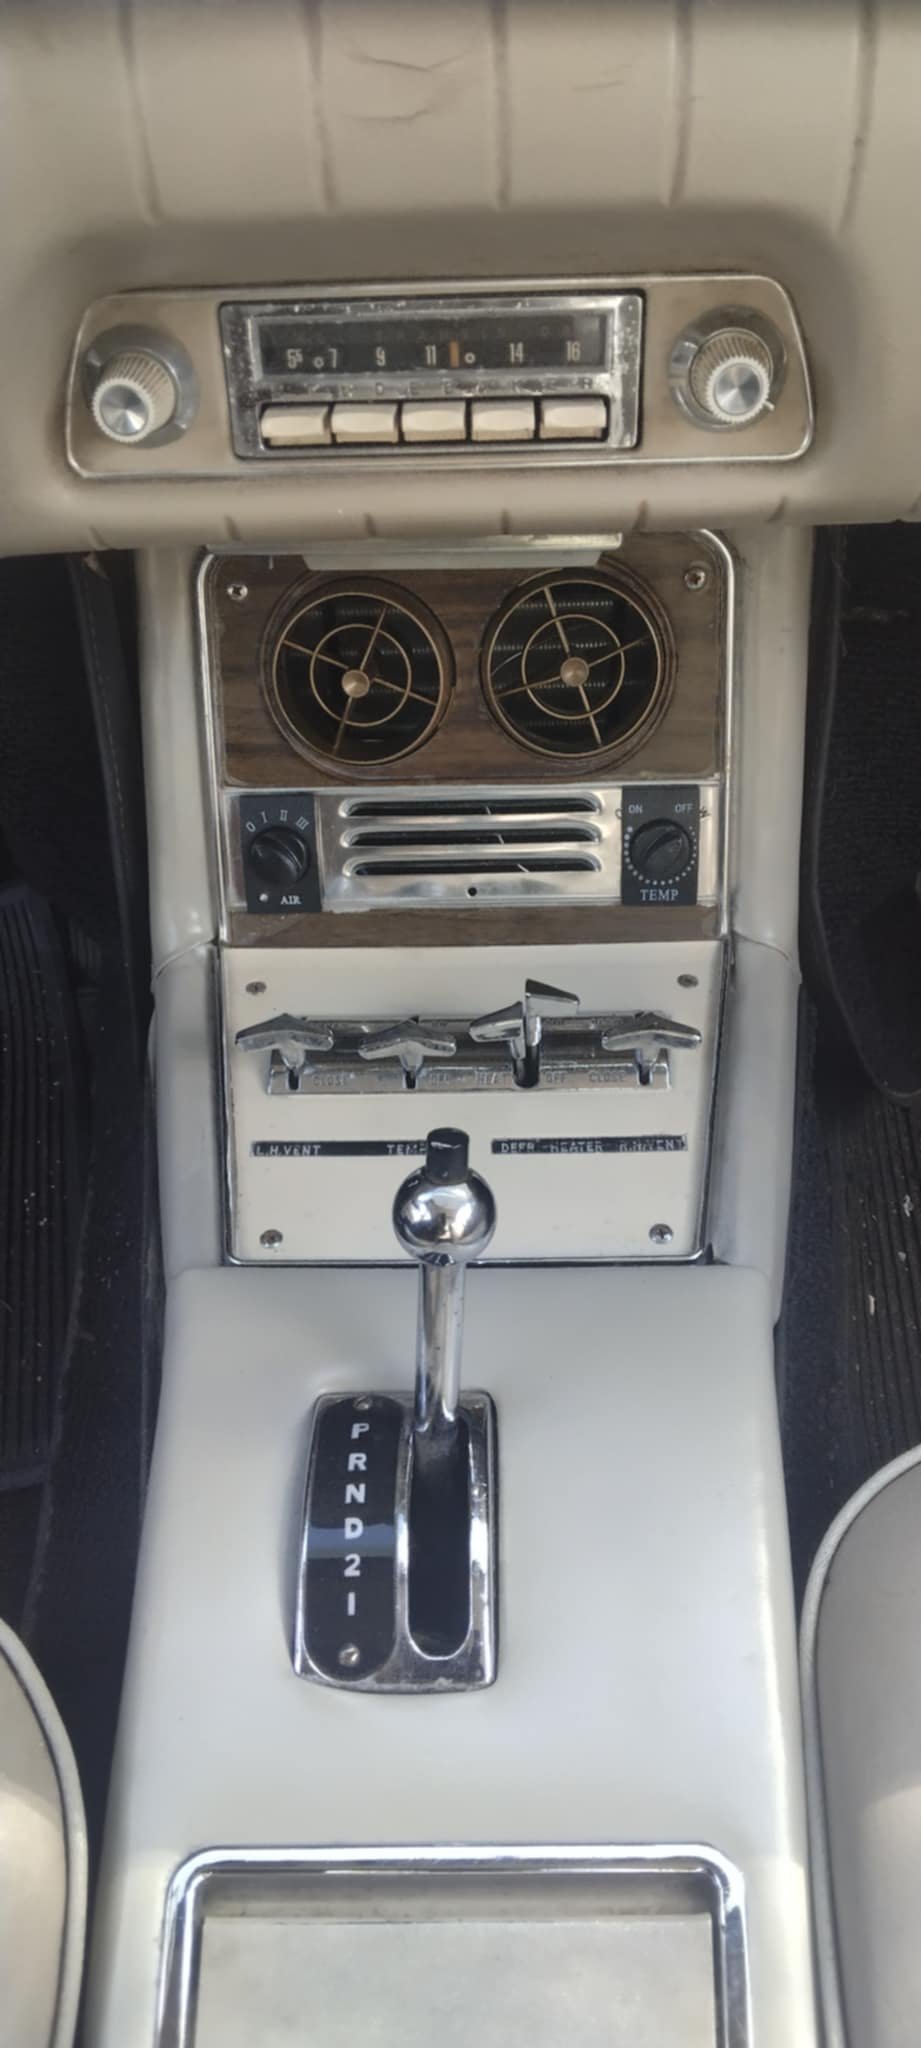
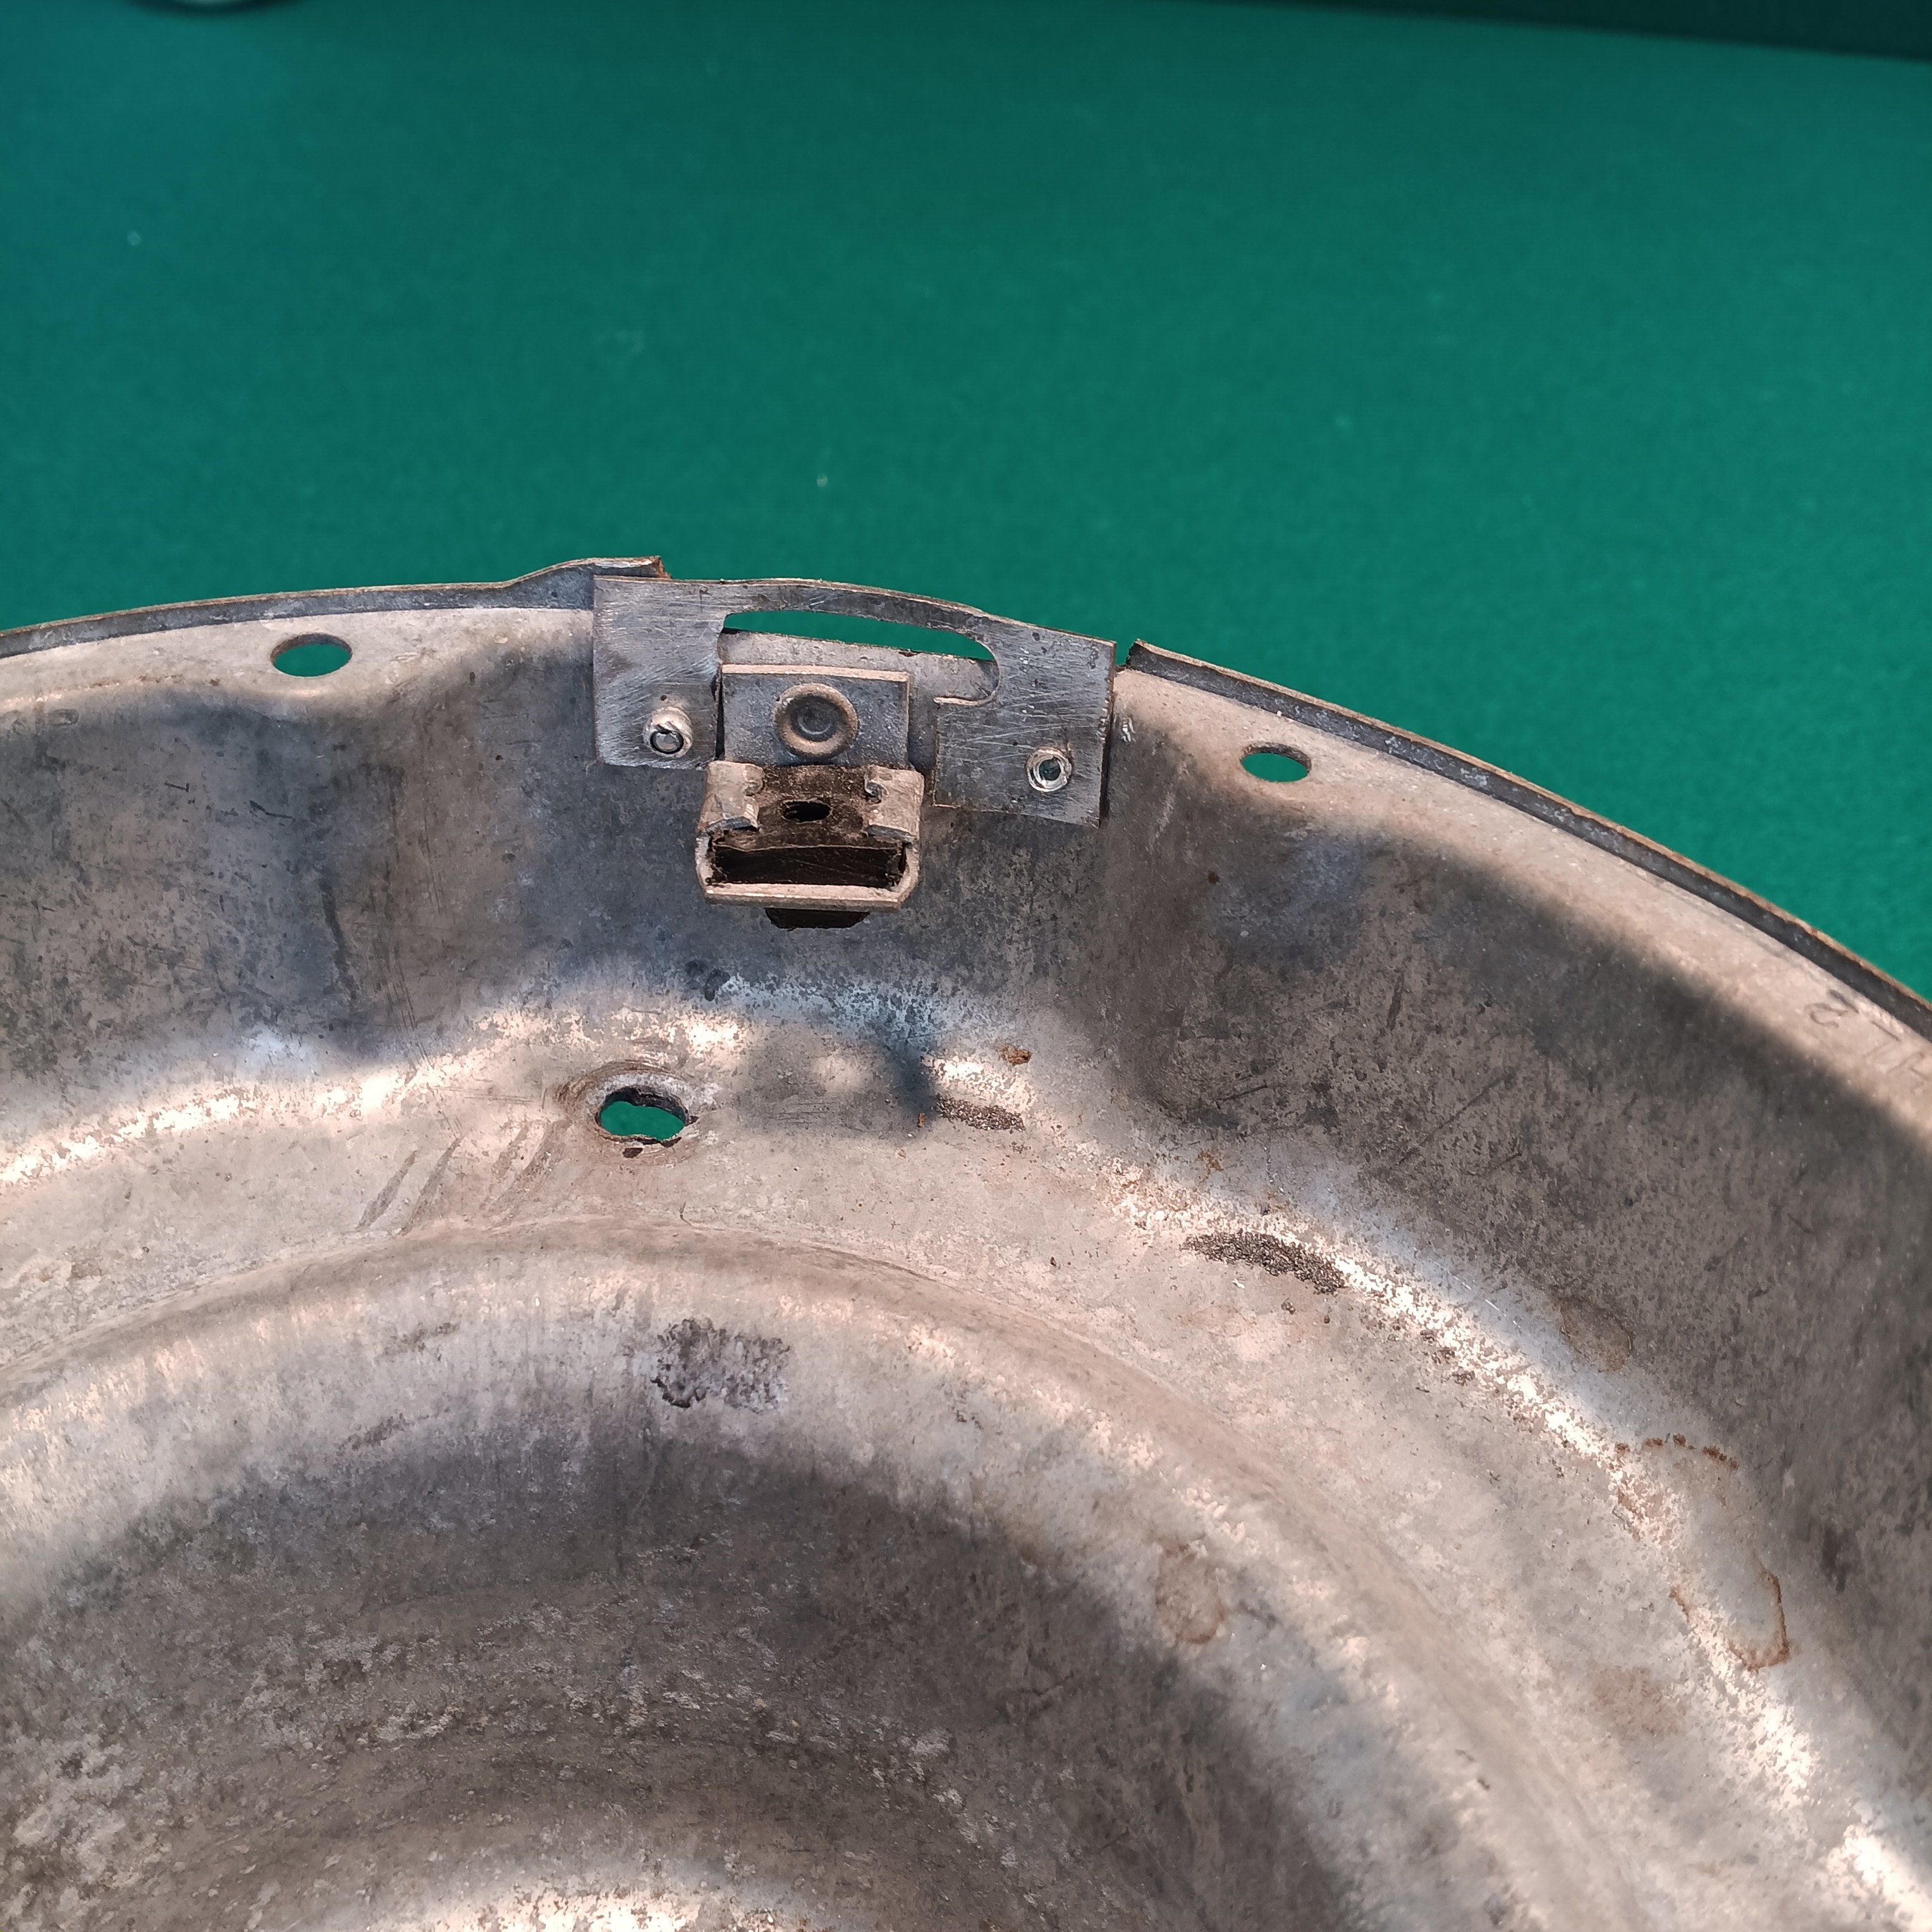
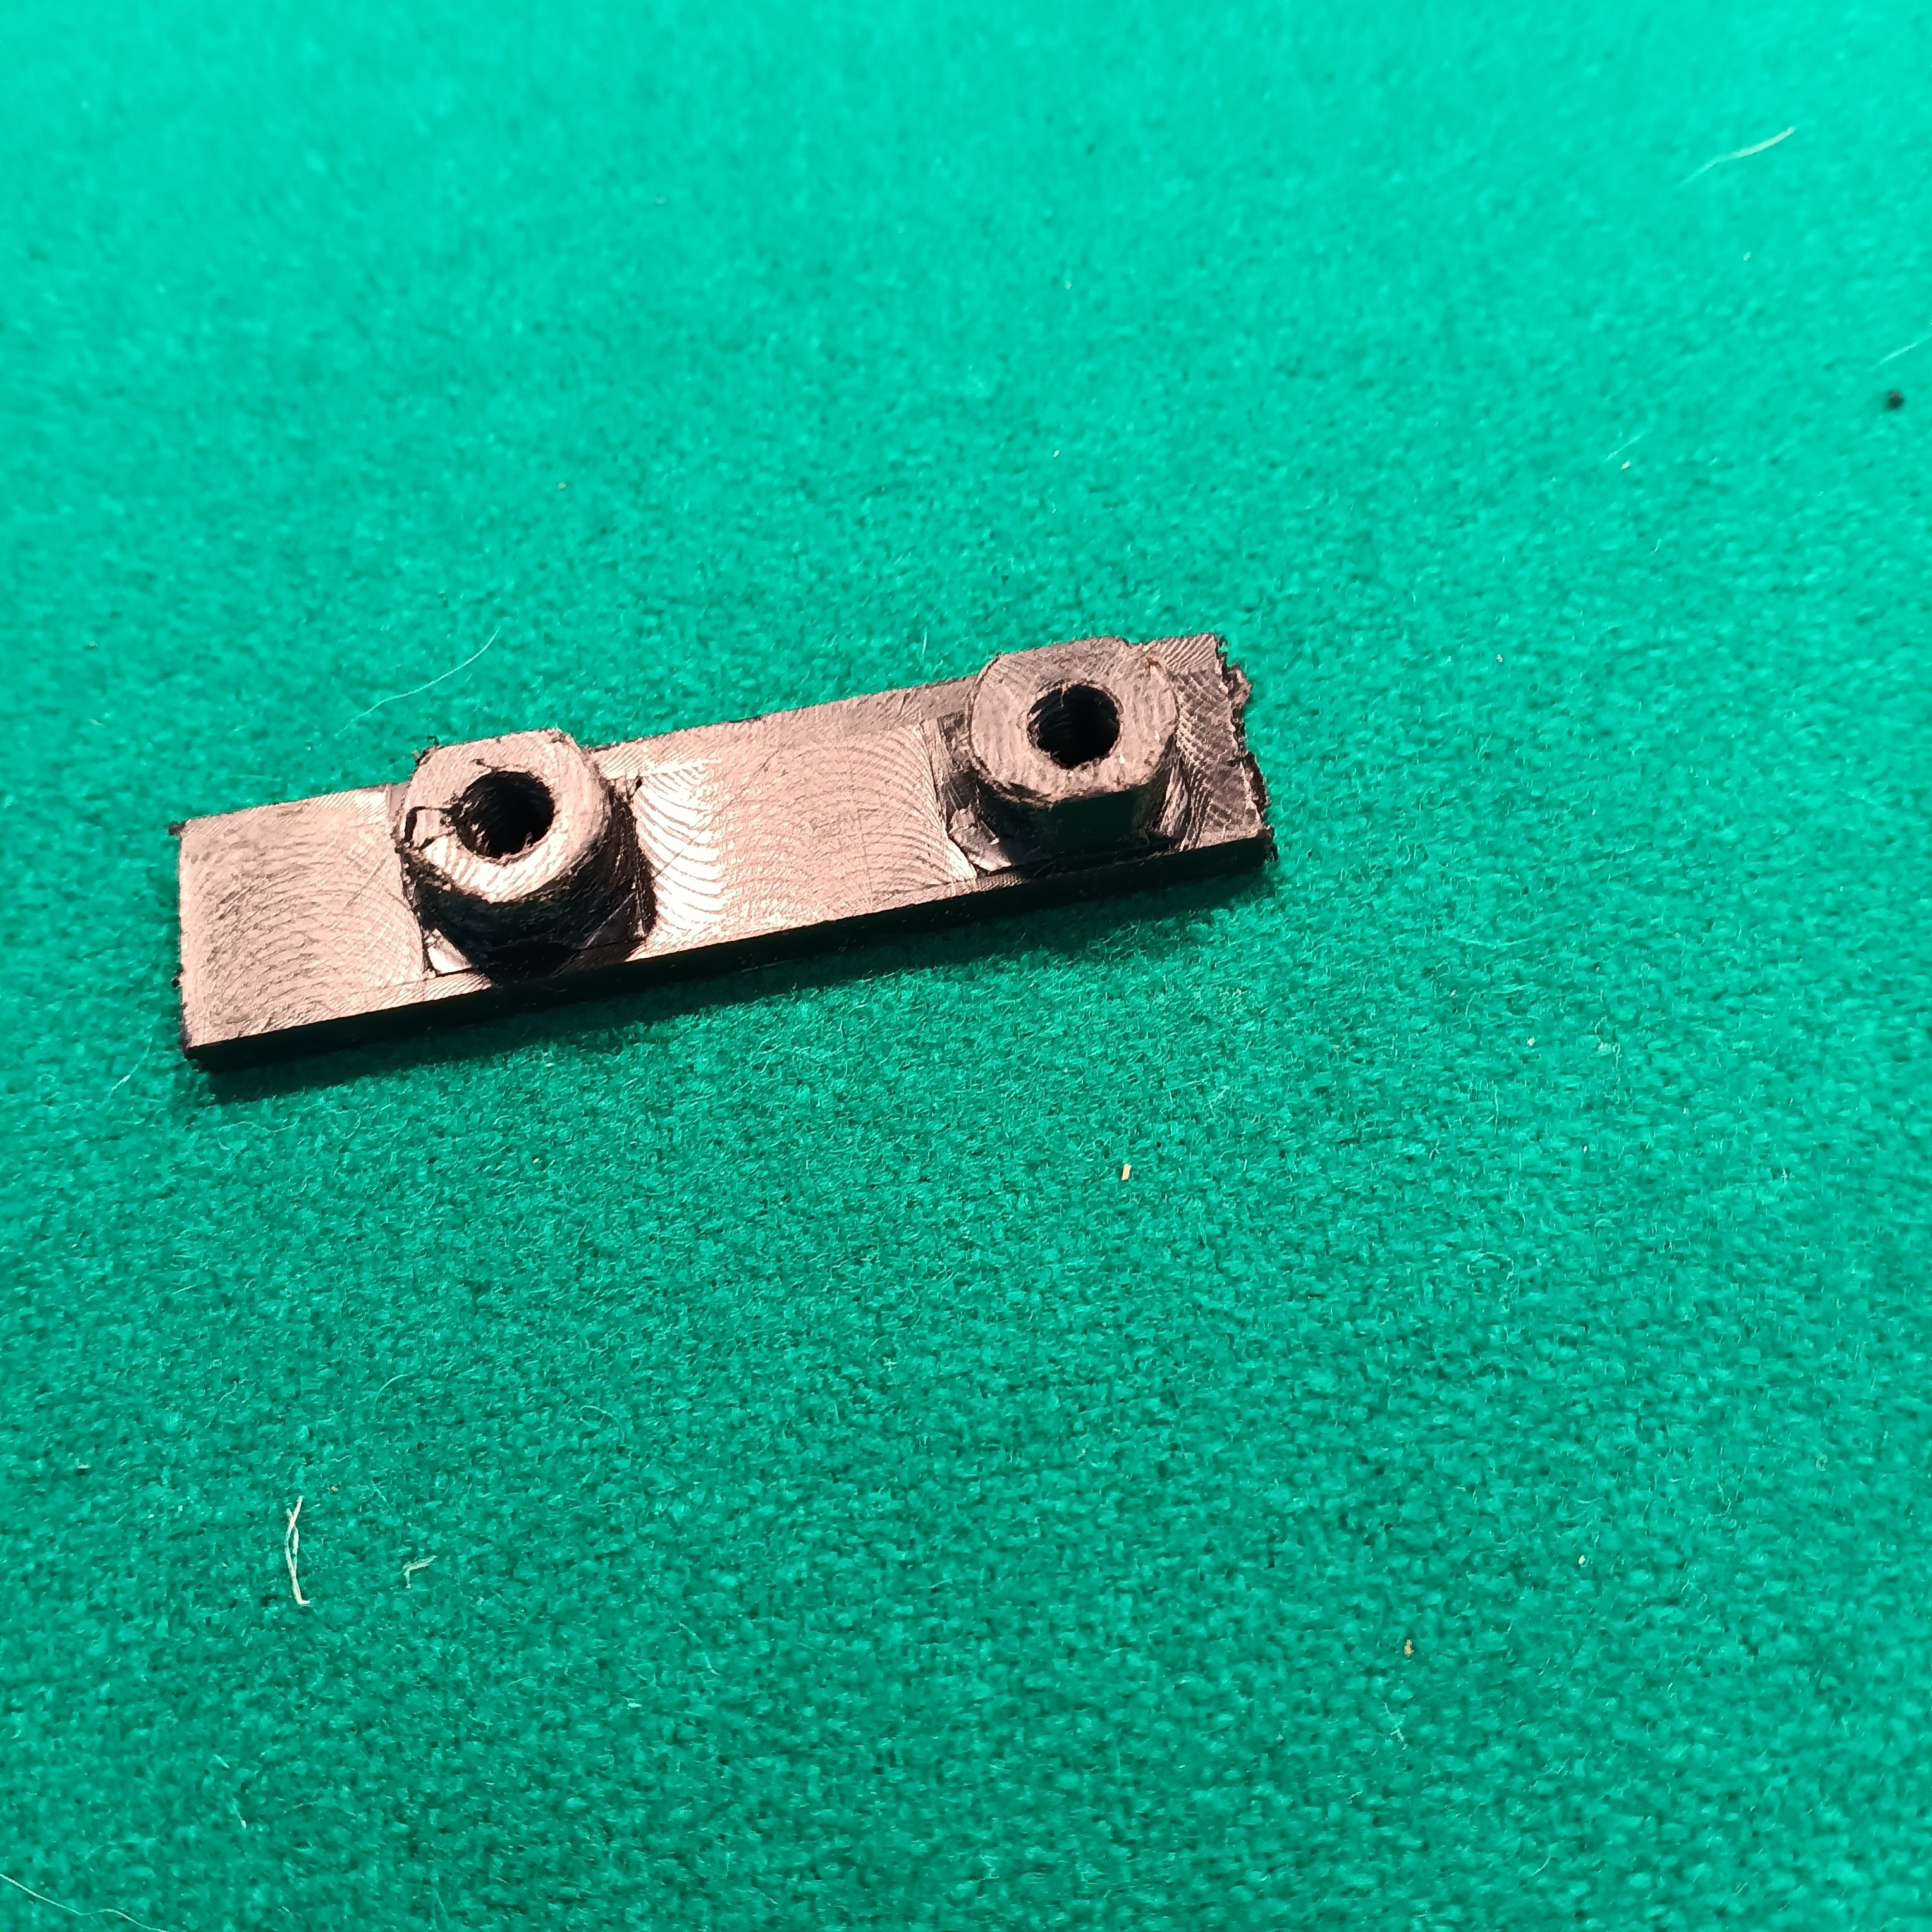
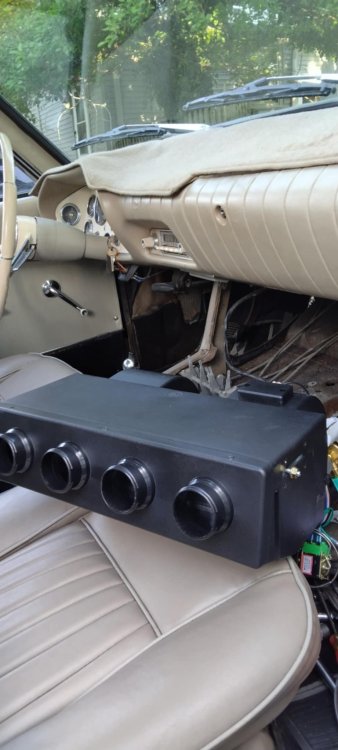
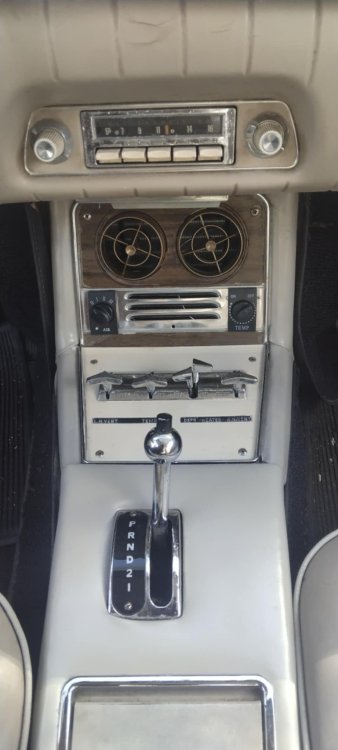
3) Remove the front fascia plastic plate with the four vent holes from the evaporator and discard. Now on the upper right and left side of the plastic housing, using an angle grinder trim an area about a half inch deep and 2” long. This will help it clear your vertical supports when installed. You may also have to trim a bit from the back of those fiberglas supports with a Dremel tool or metal shears. Using the supplied steel brackets, make right and left L shaped support brackets and bolt the unit to the original supports. Use the supplied drain line and T to drain the unit from the two drains on each side, T’ing and draining through the original drain hole. The rear of the unit can sit on the shelf in back of it, just make sure the front is high enough so that air exits through the existing vents and water drains rearward as it should. Now take your fan speed control , mount it in the left side of your faceplate and mount the thermostat on the right side. This is reverse of original (due to limited wiring length) so I decided to use the modern plastic escutcheon plates and knobs. You could easily use the original metal knobs if desired as they fit the same. Hook your red power wire to your original power wire and the green compressor wire to the existing wire from your compressor.
Using silicone rubber, glue the fiberglas support back in position and you are ready to reassemble the console (or you may want to leave it apart at this point, just in case something in there needs attention).
With the evaporator and compressor mounted, time to mount the condenser. Go to the local hardware store and get a pack of four 3” long steel mending plates with holes in them. Mount them to the evap coil, then hold it in front of the radiator and mark holes for mounting. There will be a layer of fiberglas and a layer of steel in the framework you are mounting it to. Be sure the coil is centered in the opening in front of the fan (which does not have to be removed for any of this).
You may want to take this opportunity, as I did, to address any issues with the water pump, fan clutch, fuel pump, thermostat, alternator, or any other normally hard to reach parts in the area. It’s also a good time to freshen up the engine compartment with fresh paint if needed,
With all the main components mounted, you’ll be needing hoses and a drier (often your evaporator will come with one). I chose to mount mine in the engine compartment instead of the inaccessible area next to the evap coil as the factory did. If available, get a drier with a sight glass.
Below are the specs I used to order hoses, except for length. In my case, all but one hose were about 37”. You will want to measure for length yourself because you may elect to mount the drier in a different place. Add an inch or two to each of your measurements. Too long you can deal with, too short means a trip back to the store. Remember that if you use one right angle and one straight end on a hose, no problem, but two right angles and they must be aligned with each other just right for hose installation- they cant be twisted much. So the guy at the hose place is going to ask. The fitting sizes should be the same as mine because these components are pretty much standardized. Take these specs and the hose lengths to a company that makes refrigeration hoses. Most large cities will have one. Or, you can buy kits online to make them up yourself, but they require a special tool to crimp the ends. I decided to leave it to the experts
All distances are visible rubber only. All fittings O ring type
#6- Liquid line- Drier (smaller sample fitting) to bottom of condenser ( smaller sample fitting) : Straight on compressor end, 90 degree condenser end
# 6 liquid line- drier - straight fitting (see smaller sample fitting) to evaporator (larger sample fitting) -90 degree
#10 suction hose- compressor (7/8-14) fitting straight with charging port, evap fitting 90 degree (see old large sample- O ring, NOT flare fitting)
# 8 discharge hose- compressor (3/4-16) with charging port, to condenser top (see larger sample fitting ) - 90 degrees both ends
.
Time to install the hoses. Use the provided illustration to install each hose in the proper location. Lubricate the O ring and tighten each fitting sufficiently. Torque specs are given for this, but I’m not sure how you put a torque wrench on a hose fitting, so I did it by feel. Remember that if not tightened enough, it may well leak.
Now go to one of the parts stores and “rent” a vacuum pump if you don’t own one. These companies will let you use many tools overnight for free, refunding your money when you bring it back. Vacuum pumps are one of those tools, and are quite expensive to buy. You’ll also need a set of HVAC gauges, available at Harbor Freight.
Find one of the many Youtube videos about charging a car AC system and it will help you with this part. First you will want to pull a vacuum on the system for a half hour or so and make sure it is tight. Close the valve on your gauge and wait. If vacuum holds an hour or so, you should be good (I let it sit overnight to be sure). These particular systems require about 28 ounces of freon, which you can get at your local parts store and add just like you would to any car- just make sure the system has been vacuumed down before. Add 12 ounces in liquid form with engine off, then turn can right side up and add the rest with engine running. Sitting the can in a pan of hot water will speed things up. The pressure switch installed on your drier and in series with the clutch power wire should supply power to the compressor once the initial liquid charge is added. NEVER open the red (high side) valve on the gauges, only the blue (low side) valve.
After charging the system and enjoying that stream of ice cold air, you can reinstall the kick panels and console. A bit of trimming may be required in the driver side kick panel, in the back as I recall.

 While fresh on my mind, I decided to write up some instructions on how to do this. You may want to have a shop do the charging part if not experienced with it. Total cost of the system was under $600. If you prefer original components, all the parts I removed are now for sale. How to install modern air conditioning in a Studebaker Avanti My ’63 R1 came with “factory air” (I put it in quotes because it is not on the production order and I think it was dealer installed- but exactly like factory air). I decided to pull the old parts, sell them to someone who wants authenticity and put in a modern, more reliable system. I noticed after pulling the evaporator that it appeared to be nothing more than an under dash unit from the era adapted to use inside the console. So I decided to adapt a modern system, similar to those found at Vintage Air. You can buy complete kits for a similar price on Amazon on Ebay, but they come with hoses. I elected to have the hoses made up. I found on evaporator on Amazon with very similar dimensions to the old unit and ordered it (about $80). Then I found a larger condenser unit (14 x 20) which is the same size as the Vintage Air unit that came in my Hawk (around $100) . The next major component is the compressor, and that one is easy. A company called Sanden has made many of the compressors found on all kinds of modern vehicles, and it’s known for it’s reliability and efficiency. Not being able to find an actual Sanden 508, I bought a clone from a company called Green that makes compressors for large trucks (around $140) . There are many different similar compressors on Amazon and Ebay, but I opted for the Green due to good reviews. I also purchased a “York to Sanden adapter” which bolts to your old bracket and allows it to accept the new compresser. I then started pulling all the underhood components. First thing to do is pull the fan shroud and radiator, along with the hood. Once these are out of the way your endeavor will be MUCH easier. Here’s what to do: 1). Assuming your car has A/C , remove the alternator, compressor, condenser and evaporator. The plate around the shifter and vertical console panel are removed to get the evaporator out. In addition, you need to cut out one of the vertical fiberglas supports behind the panel, then unhook the hoses and wiring and slide the unit out on the right side. This sounds drastic and at one point I hit the brakes on the project rather than do this. Turns out there was nothing to it, the support is lightweight, easily cut with tin snips and easily replaced with silicone glue . I have no idea how the original designers got i theunit in there, Nostalgic Motors calls for cutting the same piece to get it out. 2) Remove the main bracket from the compressor. You won’t need the idler pulley or bracket. Now bolt the new Sanden type compressor to the adapter bracket with four bolts. Go to the parts store and ask for a 46” belt that is 7/16 wide. Your belt will either be this size or a bit longer, so trial and error will be needed. BE SURE each time you start to bolt in your alternator or compressor that the belt is already on it as you bolt it up. Don’t do what I did and find yourself removing it again and again. With no idler pulley, you must find the right size belt and let it tighten a bit as you tighten the bolts. 3) Remove the front fascia plastic plate with the four vent holes from the evaporator and discard. Now on the upper right and left side of the plastic housing, using an angle grinder trim an area about a half inch deep and 2” long. This will help it clear your vertical supports when installed. You may also have to trim a bit from the back of those fiberglas supports with a Dremel tool or metal shears. Using the supplied steel brackets, make right and left L shaped support brackets and bolt the unit to the original supports. Use the supplied drain line and T to drain the unit from the two drains on each side, T’ing and draining through the original drain hole. The rear of the unit can sit on the shelf in back of it, just make sure the front is high enough so that air exits through the existing vents and water drains rearward as it should. Now take your fan speed control , mount it in the left side of your faceplate and mount the thermostat on the right side. This is reverse of original (due to limited wiring length) so I decided to use the modern plastic escutcheon plates and knobs. You could easily use the original metal knobs if desired as they fit the same. Hook your red power wire to your original power wire and the green compressor wire to the existing wire from your compressor. Using silicone rubber, glue the fiberglas support back in position and you are ready to reassemble the console (or you may want to leave it apart at this point, just in case something in there needs attention). With the evaporator and compressor mounted, time to mount the condenser. Go to the local hardware store and get a pack of four 3” long steel mending plates with holes in them. Mount them to the evap coil, then hold it in front of the radiator and mark holes for mounting. There will be a layer of fiberglas and a layer of steel in the framework you are mounting it to. Be sure the coil is centered in the opening in front of the fan (which does not have to be removed for any of this). You may want to take this opportunity, as I did, to address any issues with the water pump, fan clutch, fuel pump, thermostat, alternator, or any other normally hard to reach parts in the area. It’s also a good time to freshen up the engine compartment with fresh paint if needed, With all the main components mounted, you’ll be needing hoses and a drier (often your evaporator will come with one). I chose to mount mine in the engine compartment instead of the inaccessible area next to the evap coil as the factory did. If available, get a drier with a sight glass. Below are the specs I used to order hoses, except for length. In my case, all but one hose were about 37”. You will want to measure for length yourself because you may elect to mount the drier in a different place. Add an inch or two to each of your measurements. Too long you can deal with, too short means a trip back to the store. Remember that if you use one right angle and one straight end on a hose, no problem, but two right angles and they must be aligned with each other just right for hose installation- they cant be twisted much. So the guy at the hose place is going to ask. The fitting sizes should be the same as mine because these components are pretty much standardized. Take these specs and the hose lengths to a company that makes refrigeration hoses. Most large cities will have one. Or, you can buy kits online to make them up yourself, but they require a special tool to crimp the ends. I decided to leave it to the experts All distances are visible rubber only. All fittings O ring type #6- Liquid line- Drier (smaller sample fitting) to bottom of condenser ( smaller sample fitting) : Straight on compressor end, 90 degree condenser end # 6 liquid line- drier - straight fitting (see smaller sample fitting) to evaporator (larger sample fitting) -90 degree #10 suction hose- compressor (7/8-14) fitting straight with charging port, evap fitting 90 degree (see old large sample- O ring, NOT flare fitting) # 8 discharge hose- compressor (3/4-16) with charging port, to condenser top (see larger sample fitting ) - 90 degrees both ends . Time to install the hoses. Use the provided illustration to install each hose in the proper location. Lubricate the O ring and tighten each fitting sufficiently. Torque specs are given for this, but I’m not sure how you put a torque wrench on a hose fitting, so I did it by feel. Remember that if not tightened enough, it may well leak. Now go to one of the parts stores and “rent” a vacuum pump if you don’t own one. These companies will let you use many tools overnight for free, refunding your money when you bring it back. Vacuum pumps are one of those tools, and are quite expensive to buy. You’ll also need a set of HVAC gauges, available at Harbor Freight. Find one of the many Youtube videos about charging a car AC system and it will help you with this part. First you will want to pull a vacuum on the system for a half hour or so and make sure it is tight. Close the valve on your gauge and wait. If vacuum holds an hour or so, you should be good (I let it sit overnight to be sure). These particular systems require about 28 ounces of freon, which you can get at your local parts store and add just like you would to any car- just make sure the system has been vacuumed down before. Add 12 ounces in liquid form with engine off, then turn can right side up and add the rest with engine running. Sitting the can in a pan of hot water will speed things up. The pressure switch installed on your drier and in series with the clutch power wire should supply power to the compressor once the initial liquid charge is added. NEVER open the red (high side) valve on the gauges, only the blue (low side) valve. After charging the system and enjoying that stream of ice cold air, you can reinstall the kick panels and console. A bit of trimming may be required in the driver side kick panel, in the back as I recall.
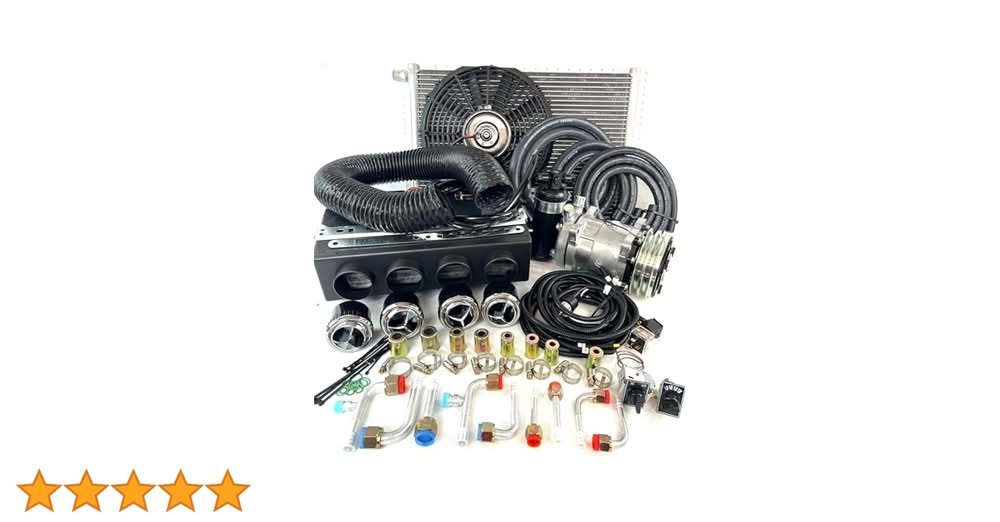


 cannontribe joined the community
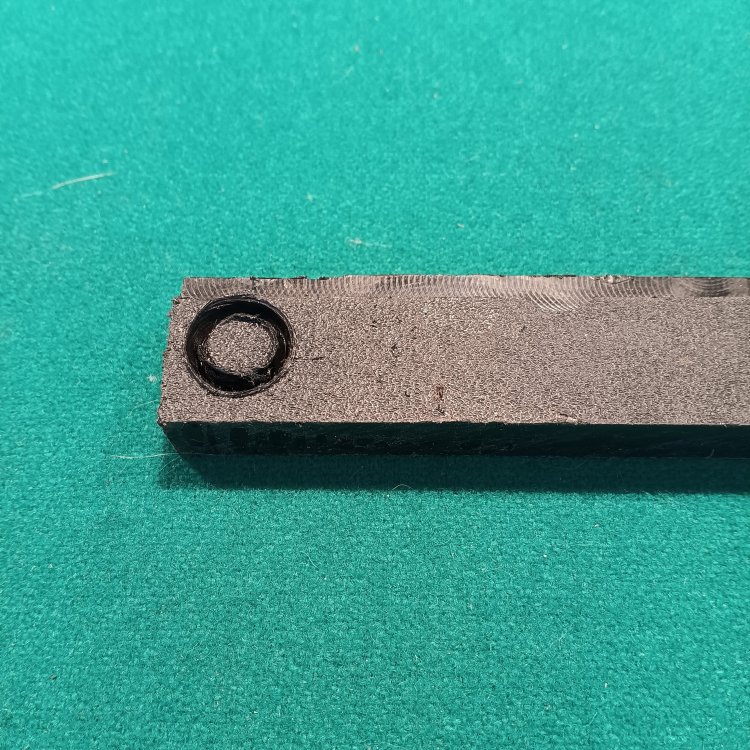
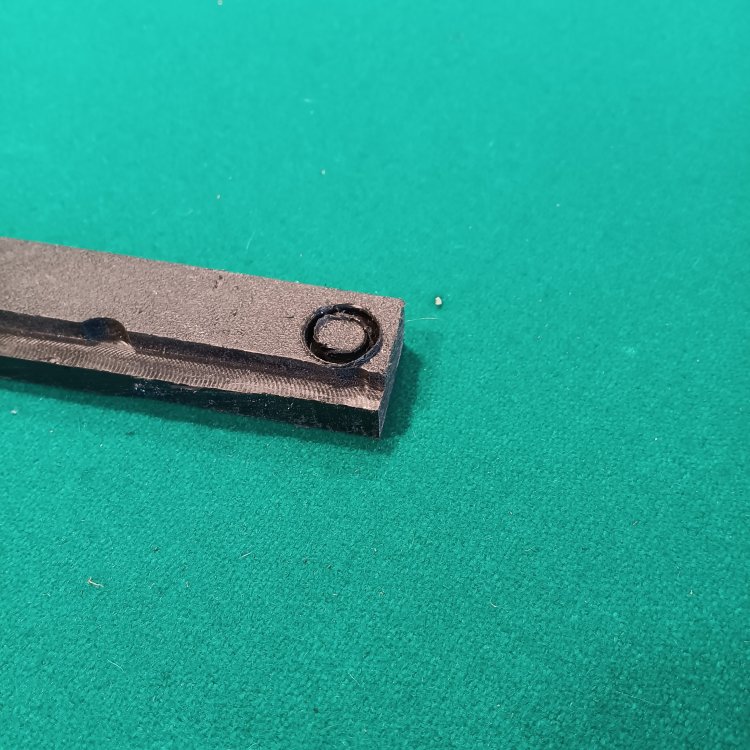


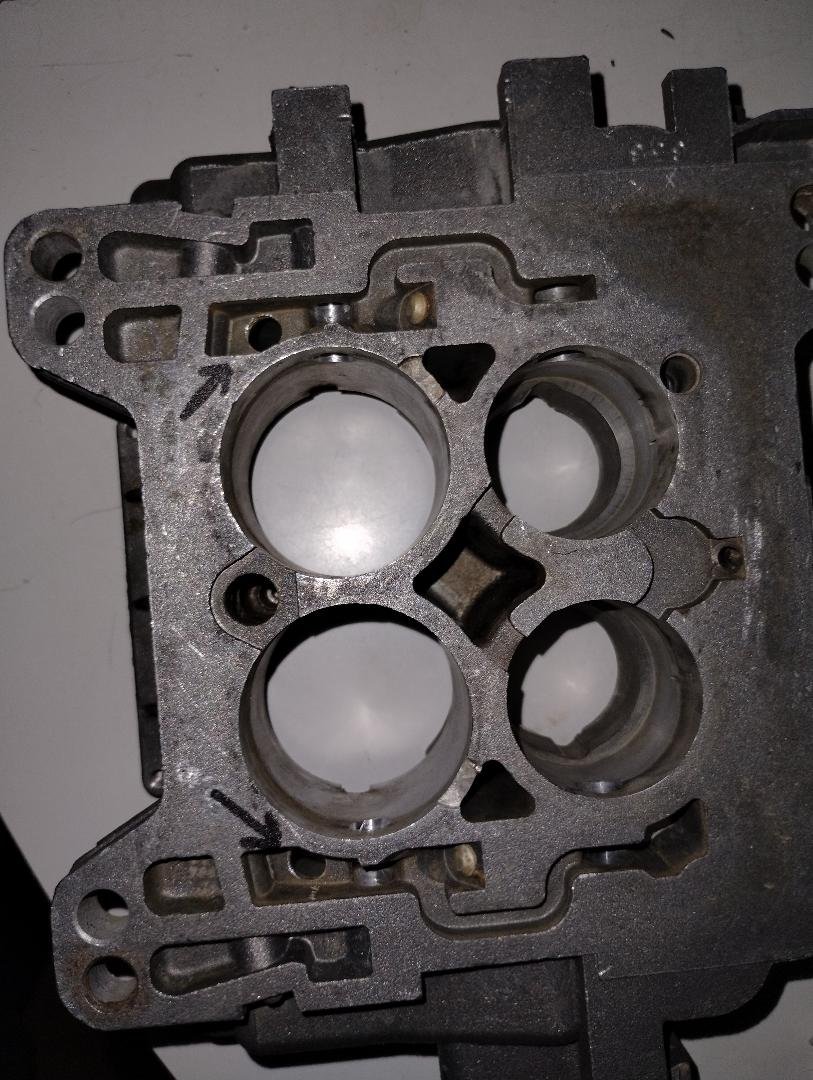
 I am confident that someone on this forum can help me with the below issue. I am working on a Carter AFB model 3725 for a 1964 R2 Avanti. It has two vertical holes drilled vertically into the carburetor from the bottom, into the "wells" where the air valve counterweights rotate (see two black arrows in photo below). These holes appear to be "field-drilled" (as opposed to "factory-drilled"), but perhaps this was done for a good reason . . . such as allowing accumulated gasoline to drain out of the counterweight wells before re-starting which could lead to a fire if the engine backfired. Maybe it was a field update in a factory service bulletin? I just want to be certain whether it is a good idea to plug them, or better to leave them "as-is", particularly since a blow-through supercharger is involved. I have performed plenty of "field updates" to carburetors in my career, so this is why I hesitate to just go ahead and plug them. Jeff