All Activity
- Yesterday
-
AD stated above he was able to find a shop that would tint them with the window installed.
-
The survey actually indicated 1.75%… I decided to round it off!!
-
Wow, that's what I want. Did they have to remove the glass to do it?
-
There were 1389 Avantis built during the 1962 calendar year. 2% would be 27 sold in 1962.
-
I am surprised that only ninety-some Avantis were sold in calendar year 1962 given that: 1) it was a new car, with all the excitement of a new car, and 2) the Avanti was introduced about mid-year 1962. That only 90-some Avantis were sold in 1962 speaks to the production difficulties Studebaker was having. So, the follow-on question might be how many Avantis were produced per month and then compare that to sales. Of course, that info is known and documented. --Dwight
-
I like it!
-
Sorry no Geoff…..See above.
-
Please explain. How master cylinder and ventilation works in its cover? Edit: I understand that when the fluid level changes during use, there must be breathing in the fluid space of the master cylinder. As I understand it, that's why there are also holes (vents) in the gasket. How about the cover?
-
Looks REALLY good!
-
Yes, 1962 saw the fewest Studebaker Avanti ‘new car’ sales! Breakdown….. 48% of new Avantis sold in ‘63 44% of new Avantis sold in ‘64 6% of new Avantis sold in ‘65 2% of new Avantis sold in ‘62 The above percentages were taken from a survey sent to purchasers of new Studebaker Avantis in 1966, by the firm of Morrison-Gottlieb. Although the response to this survey was “ Excellent “, not every buyer of a new Avanti responded to it… hence… the above percentages aren’t written in stone!
-
Thank you for your concise reply Bob. Yes, both my ‘83 and my ‘85’s seventeen digit ‘VIN’ number begin with 12AAV. And, of course, to register my Avantis the VIN number was the only identification number the Mass registry cared about. However, the OP of this thread, Brooks Barnes, asked where he could find an RQB number on his ‘85 Avanti and, lacking a better term, I referred to it as an internal (factory) sequence number, and it could be found on a steel plate affixed to the left ‘A’ pillar on his car. Apparently that plate is missing or obscured on Mr Barnes’s ‘85 Avanti… but I strongly feel that there was RQB4152 placed on that plate when his Avanti left Avanti Motors… as did apparently all other ‘85 Avantis have an RQB+ four digit internal sequence number. When Avantis began to be produced again for the ‘87 model year, the internal ‘RQB’ designation was gone and the seventeen digit VIN number, starting with 12AAV, or sometimes just AAV, began to be commonly used for rosters, etc…. Take care, Ed C
-
Hi, I was trying to reach you outside this venue, but all attempts failed... In defense of my position on the serial numbers, this effort was started in the mid 90's. Back then, I don't think anyone knew just how many cars, throughout the entire production span were still viable. It became "something to do" as they came through Ebay and similar venues. At some point, it became necessary to separate the major number groups, likely because the pages were getting too large to load with the 2400 baud modems. Not too many of us had internet at that time. The VIN number imprimatur was being thrown around in the late 60's but Avanti II's always seemed to duck the bullet with that and emission issues because the company was small enough to do that. I have to admit that, over the years, I wasn't much aware of which of the pre 1987 and earlier cars, had a 12AAV VIN number. I can say for certain that there are 81's with a 12AAV tag at the base of their windshield and the last 4 digits correspond to the RQB number. The earliest Avanti I know of in the listing with a "12AAV" vin is, 1981 RQB-3204 and there are likely earlier ones. (Most) Everybody used the old RQB-nnnn in their communications or business deals, but the "12AAV' came more to the fore when Kelly and Cafaro started dancing. I'll guess it was the last of the steel bumpers that pushed me to instantiate the "AAV-nnnn" to delineate cars after Blake sold the company and there was an RQC in there, to boot. The only major revisions ever done on these files were to allow me to run scripts to calculate the number and type, etc. Reformatting all this data again would be actually, only a slightly onerous task, so maybe a long cold spell next Winter, will be just the time. BobJ (avanti5011@gmail.com)
-
Probably 62. Not sure of any being titled as 1962.
- Last week
-
Well, that will help at registration time very much… It’s all that you really need to confirm your car’s “identity”!
-
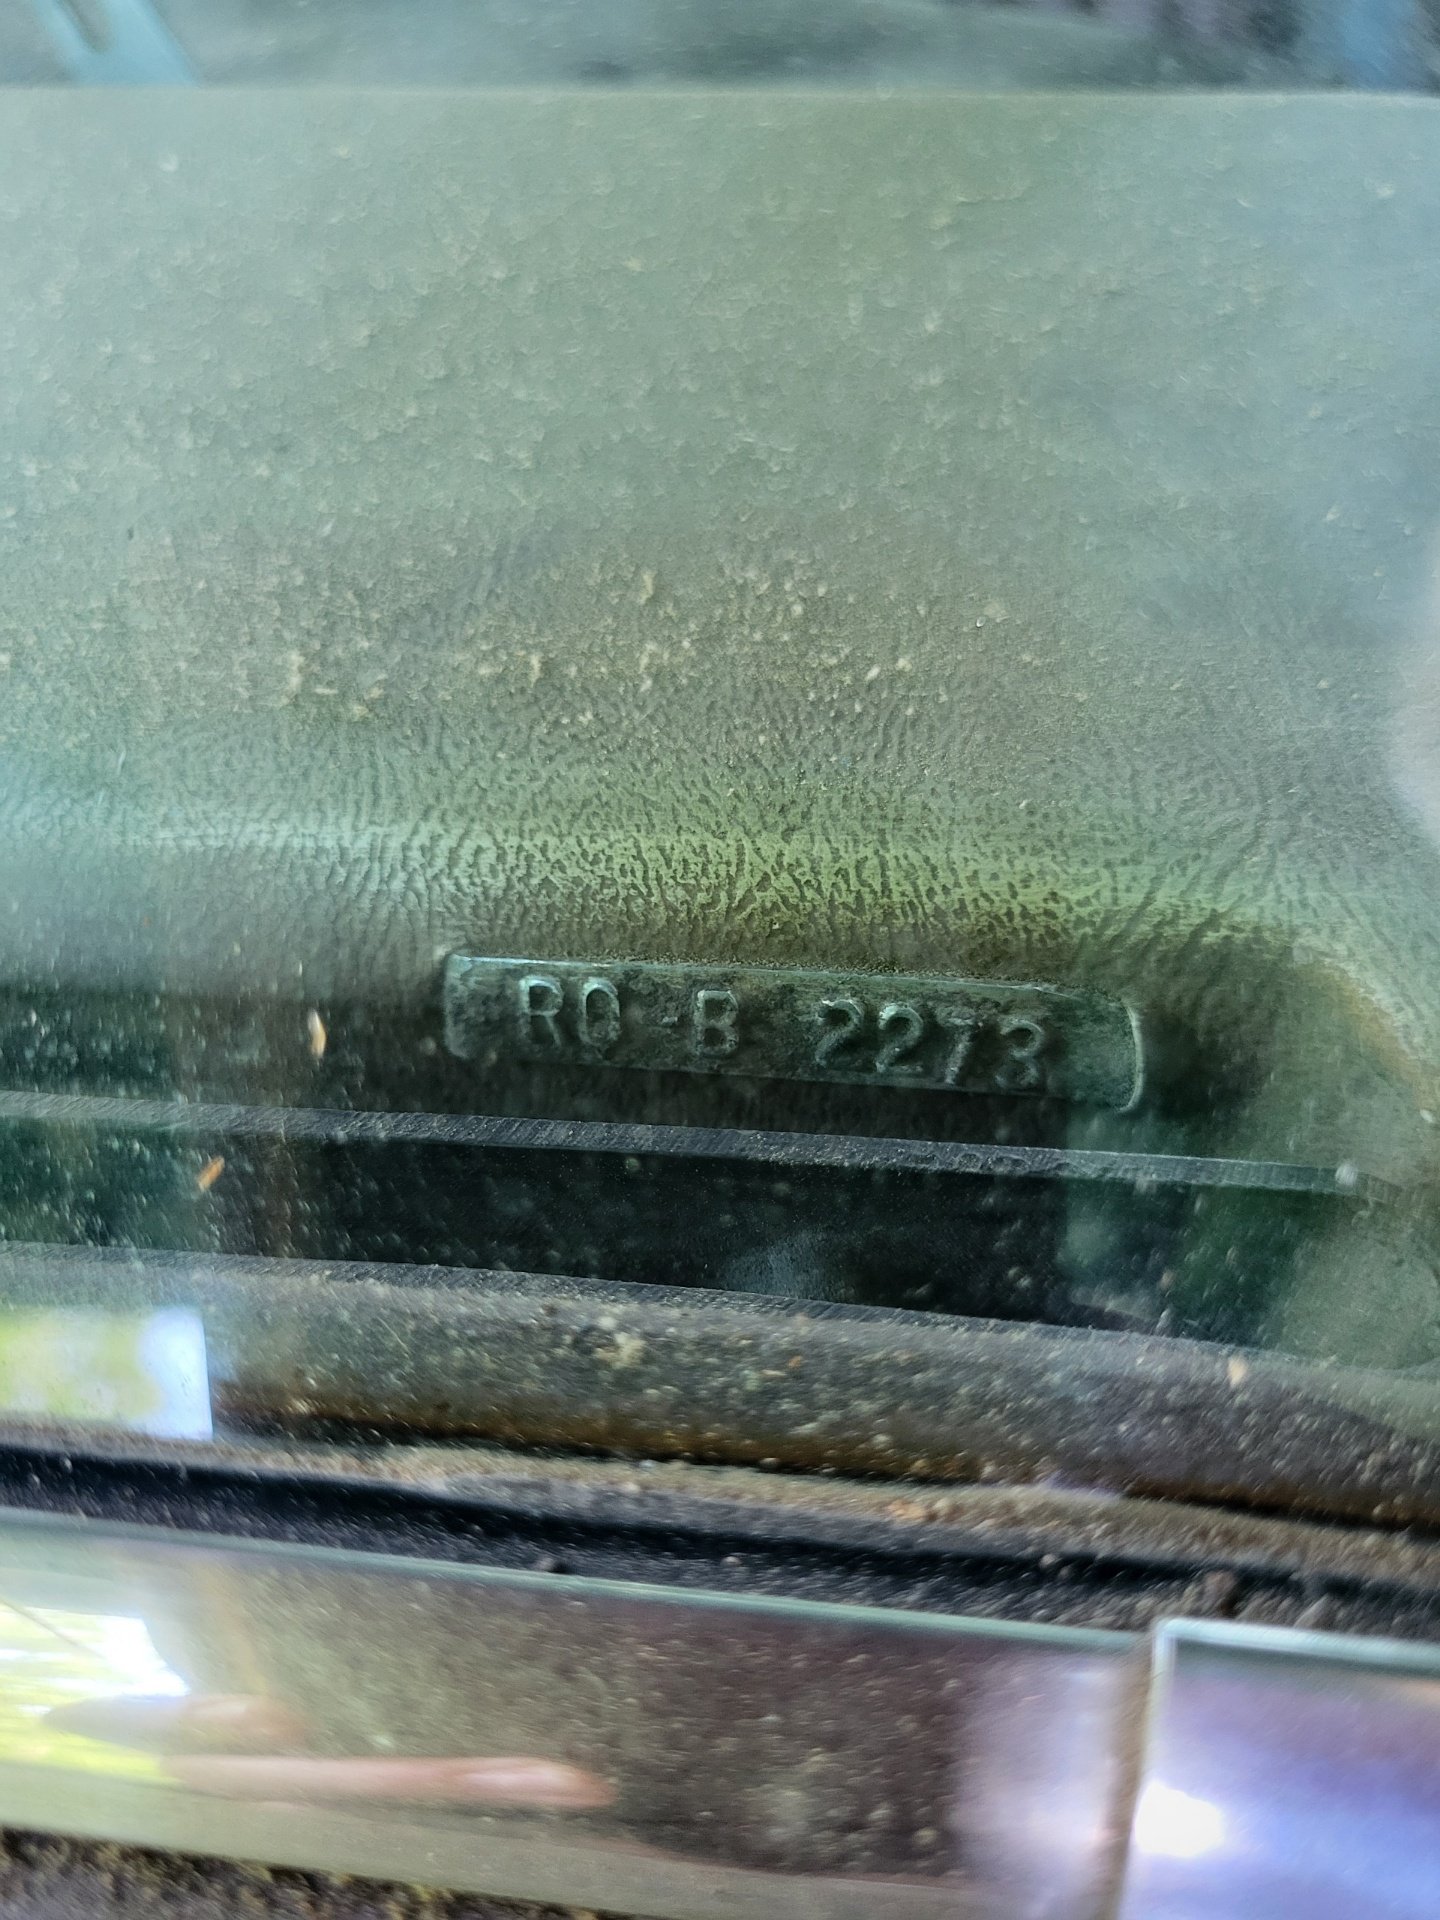
Finally found it.... ON THE DASH AT THE EDGE WHERE THE WIND SHIELD MEET THE FRAME

-
Here's my follow-up and hopefully final post on this thread. The tank was actually nearly full instead of 1/2, thus fuel was dripping from the fuel line with the carb off. The carb looked great inside, though nasty outside. It had been remanufactured sometime in the past, with new throttle bushings and the well plugs epoxied. The float was set correctly, and I found no damage to the needle or seat. Choke was functioning and I reinstalled the thermostat at the same setting as it was. So far, (knock on wood) the flooded starting condition is gone, and the car runs as good as ever. All I can figure is that there was junk on the needle or seat allowing any residual pressure in the line to flood the engine at shut off, yet was not big enough to cause an issue when running, because the engine was using more fuel than was leaking past the seat. Or maybe the float was weak. I installed a new float too. Anyway, so far, so good. Thanks for the ideas and advice!
-
The car may received body damage at one time…and repairs might have seen the plate removed…not replaced and the rivet holes fiberglassed over.
-
Mike, Yes the tinted windows do help help the air-conditioning and reduce the heat load in the interior. It's also important to make sure unwanted heat isn't getting into the passenger compartment through leaks in the firewall, poor vent seals, etc. Here's a few pictures~ -Adam DeRosa
-
1964
-
1962
-
Any other thoughts on this question?
-
I looked closely for the rivet holes .... nothing... very strange....
-
I don’t think your Avanti ll has a VIN……because the seventeen digit VIN’s were not applied to American cars until 1981….. Your car has a SERIAL NUMBER (RQB2273), and it should be registered under that number…. unless your State insists on applying a new seventeen digit number to your Avanti… It’s odd that you cannot find the factory metal serial number plate on the driver’s side ‘A’ pillar…. For whatever reason, a previous owner must have removed it….(It was only riveted on)….perhaps during a repaint?
-
It may seem strange I am looking for the VIN # when I am saying it is RQB2273,,,,, the Bill of Sale (no title provided at time of purchase) said it was RQB2273 and the last owner is deceased thus lost title. In SC you must have a Law Enforcement representative witness the VIN # to apply for a title when the title is lost.
-
Hey Gunslinger, now that I have got the door open, 1. I have checked below the top hinge on the A pilar. 2. under the lock post on the aft door opening on the lower B pillar, 3. Driver's side of the dash where the windshield meets the body. 4 under the fam motor on the passenger's side on the frame for the tag......... nothing in any place