


wdaly
-
Posts
345 -
Joined
-
Last visited
Content Type
Profiles
Forums
Events
Posts posted by wdaly
-
-
Should be same as '88 - pry off the console wood. It has spring clips on each (4) corner. Easiest way is to move shift lever to neutral. You can start at one end and reach your fingers in the shift-slot and pull up.
-
Hmmmm....... This (strange) thought occurs to me - with the headlights "ON" and the engine running try dimming the gauge lights and see what happens.
-
I had this same problem with my '88 over 10 yrs ago. Right now I can't seem to find the paperwork. Your transmission may not be the same as mine, but I went to my mechanic and he referred me to his 'go-to' trans shop. They immeadiately knew it was a 'well known' GM small part problem (that GM engineering changed later). $1000 and no trans problems since (and I occasionally tow a trailer). I'm thinking if you were to go to a Caprice Forum you may find a quick & easy answer!
-
My '88 is Stewart Warner but it has the 'original-type' fuel tank. You probably DO have a GM sending unit (considering your tank) and GM has used 0-90 ohm sending forever (0 = empty 90 = Full). I would think (if the location of your fuel gauge is not too hard to get to) remove the gauge and take some readings and/or see if the connections are secure at the tank location.
-
My '88 Coupe has the 'signed' steering wheel (built in Aug '88 I think - #367?)
-
danny:
I have an '88 Coupe and the rubber (from windshield post - to top of door opening - to rear pillar) is exactly the same as the Chevy Monte Carlo and is ONE piece. Note - some waterleaks can come from imperfect window alignment. Double note - if you have a lot of water on the floor below the dashboard the leaks may be coming from the windshield post (check that the windsheild post and windshield have NO gaps. My passenger-side post was totally rusted-out (tip - check the interior post leather for signs of something going on underneath the leather and foam padding)!
Bill
-
Roland
I purchased my 74 Avanti II from the original owner whom purchased it directly from Avanti Motors in South bend in 1974.
He wanted the car to drive and pull a boat trailer.
Here are a couple of shots of the towing setup installed by Avanti Motors.
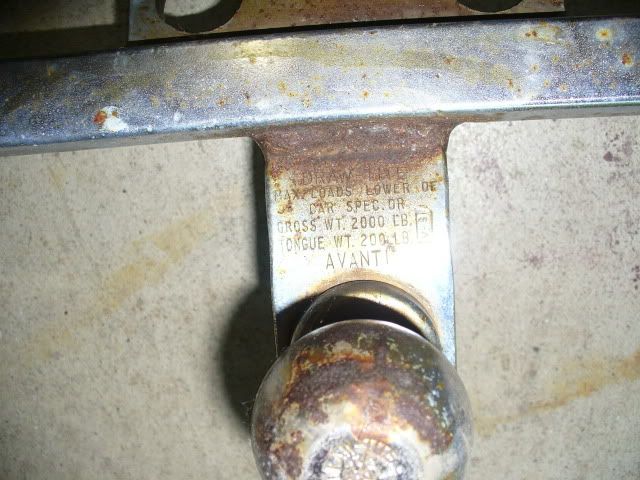

Let me know if you need more info.
Bob
A few years back I thought I'd finally get a hitch for my '88. Simple right? Just go to the hitch place and tell them to put a Monte Carlo hitch on - WRONG! The hitch guy said that my frame (was) a Monte UNTIL the Avanti factory cut-off some of the rear frame. I wound up going to a specialty welder (also does snow plow hook-ups) who fabricated one he rated at 2000# max. I have to say, whether I was hauling my small boat or currently my paint-matching enclosed cargo trailer - my fellow drivers are surprised to see a Sports Car with a trailer!!!
-
Sounds like the gear or the rollers inside the gear are bad. I had a new one get chewed up very quickly because the 3 bolts on the triangular pivot were long enough to catch the arms and cause them to bind consequently causing the gear to loose a couple of teeth. I used the shortest bolts I could find that still grabbed all the threads in the captured nut. There's very little clearance.
The gears are available new from Cardone I use my 76 Chrysler New Yorker as an application, same gear.
Thanks for the info and I know what you mean about those 'pivot' bolts. The problem unit is not that old and a re-built from one of our vendors (complete with K-Car motor attached). I'm seriously thinking of trying to switch over to "manual" operation, but I remember Jon Myers (in a mag article) saying it wasn't a good idea mechanically - I'm in the process of finding that article now.
-
I'm in the middle of rebuilding mine. The motor gear meshs with the regulator gear, either something is stuck or the gears are stripped. Are the 3 bolts mounting the motor to the regulator assembly tight? The motor/regulator is easy to get to and comes out as a assembly that can be test operated on the bench. Are you talking about the adjustment holes in the door for the pivot? Can you post some pictures?
Jim Wood
Sorry no pictures - would only show the door without the interior attached anyway. Yep, something is not 'meshing' and I don't feel like taking it all apart again. It's going to be a HOT Summer as I damaged the AC evap core when replacing the heater core last year!
-
This is sorta different. The switch & motor actually work! The motor runs and makes a 'clunking' noise. The window mechanism attached to the motor doesn't budge. In the past I have replaced the entire system with a rebuilt unit and all was fine. I have always felt that elongated mounting holes, particularly at the Pivot (3 bolts), cause the assembly to work erratically or not at all (NO MOTOR NOISE). I'm thinking for some reason that the motor is no longer internally connected to the 'crank'. Any ideas?
Bill
-
Hi Bill,
Please tell me more about moving the outside air intake to the front of the car. Sounds like a good project for next winter..When I replaced my blower mtr and fan speed control yrs ago I took the Max a/c door (yes, blue vac line) and rigged it to always stay open so I nebver pull outside air from under the car. I am in the Chicago N. suburbs and would like to see your car sometime.
Mike:
I'm originally from Skokie. We'll have to get together sometime. Basically, the outdoor air (instead of coming from a grille below the windshield) comes from an approx 5" round opening that has a metal screen for debris (NO Interior air filters in those days). This hole/opening is located underneath the passenger side wheel well covering (black) on the firewall, if you will. You have to take the tire off to start. Once 'inside' you can also see the front of the, what I'll call, metal adapter that connects the body with the body mounts.
Bill
-
Thanks Bill D.
I will remove the carpeted box under the dash on the pass side. I had this box off a fews back when I lost hi speed on the blower mtr. I replaced both the resistor assembly and the blower motor as long as I had the underdash box removed. At the time I was hoping for a way to get more volume from the blower motor. I have always thought it was weak. I have never had the radio out of the car, but that can't be too big a job.
Do you remember if there were 5 vac lines to the back of your dash control head? 1 source and 4 supply lines to the vac actuators? I am not sure what defines whether a car has the "Acme" system or not. A couple yrs after I bought the car the Avanti factory guys in Youngstown had me take the car to Goshen for the water valve problem you described. The Acme people confirmed the system was theirs. My car has the radial "R6" compressor without a high or low pressure cutout switch on the back of the compressor. I have been told this is not the typical GM compressor because it does not have the high and low pressure cutous in the back. Also, my 89 is the only 89 I have seen that has the a/c compressor on the driver side of the engine compartment. The other '89s I have seen have the compressor on the pass side of the engine compartment. Where is your compressor? Pass or driver side?
Hi Mike:
There are 5 vac lines including the 'source' line. I think the Blue one was used to OPEN/CLOSE the 'Intake" air door at the Blower box (might want to check that one - can you hear it open/close with operation of the push buttons?). The BLEND air Door is what I have been mentioning. If it is disconnected from the control cable it will 'spring' into a normally open position for HEAT, but IF you have absolutely NO hot water going to the Heater core it shouldn't really matter for test of AC concerns. A while back someone here mentioned moving the actual "air intake" with large diameter flexible hose in order to get cooler fresh air from the front of the car rather than from behind the passenger side wheel opening underneath the wheel well. I worked for me with cooler air all around! My AC compressor is on the driver's side and your Caprice-based unit should really be on the passenger side from pictures I have seen previously.
Good luck,
Bill D
-
I can't seem to find the cable you are referring to. I only see one cable attached to the temp slide control, and it is attached on the driver side of the lever, behind the control unit. The only place I can see up under or into the dash on the pass side is at the pass left knee area, up against the console. Through the small opening, in the picture attached, I can see the air box and a vacuum actuator can with a yellow vacuum line to it. This vac actuator gets vacuum delivered to it whenever the heat and defrost buttons on the dash control are pushed. Otherwise, in all other positions there is no vac to it. This actuator is sitting directly behind the radio, about 8" behind the dash front surface and 6" below the radio plane. When the vac line is removed from the actuator the system looses its ability to channel air to the floor. When connected this actuator seems to control air flow to the floor, in the defrost and heat modes. Is this in the area of the actuator where the cable or damper door you refer to should be? Or maybe where you are referring to as the passenger side is above the footwell area, where I need to remove the carpeted box covering the blower motor? Thank you
Mike
Actually, when you said ACME and Goshen I asaumed your '89 was the same as my '88. It may still be. You definitely must remove the passenger side carpeted section attached to the bottom of the dash to see the 'lever'. In addition, you can remove the radio and look and see if the 2nd cable is attached to the control (slide lever) HOT - COLD. I had the same problem as you (not very good COOL) until the AC shop determined that hot water was still going to the heater core even though they valve was off (apparently not 100% OFF) so they spliced in an actual shut-off valve onto the input hose and it worked! You seem to already have that situation under control so I thought I would mention the air box Door. I have totally removed this entire system in order to replace a bad heater core last year - you could say I dissected the part of the car (and NO, I would not want to do it again).
Bill D
-
Thanks Alberto. Good insight. I did shut off the gate valve on the hose, under the hood. I also clamped the hoses shut going from the engine compartment through the firewall, in case the valve was not operating properly. I still have the trouble where the system will not blow cold air from the a/c. With the valve under the hood turned off the system will blow "ambient air", little or no temperature change from the input air temperature. When I open the valve the air becomes heated. My trials and tribulations continue.
In addition to the Heater valve (hot water) there is also an Air Box Diverter control that should operate in conjunction with the 'Hot - Cold' dash lever. This control moves a door inside the air box from hot air to AC air (directly from the evap core). Check if this is disconnected or binding. Look right under the passenger side dash for a 'hook-like' control lever that should have a cable attached.
-
Last week I took the car out for a spin. When I got home the top would not go up. My son and I managed to get the top up by hand, it was very difficult. Dropped the car off at my mechanic, for him it seems to have worked. He may not have taken the top down all the way. This morning same thing. Top won't go up. I have to think the switch is bad. Has anyone had the same problem? Where can you get one of these switch? I was going to take the car to the Atlantic Zone Meet on July 14, but not without the top working. Could the power window switch replace the convertible top switch?
The 'so called' wiring diagram for this car's conv. top is basic (a switch & motor). This may sound really stupid - but it worked for me on my sunroof / the sunroof would not operate UNTIL I started the car and revved the engine a little while operating the switch and No Problem!
-
I got mine from Betty Booth at Nostalgic Motors. $75 The glass shop was pleased with it.
Charlie RQB3921
WHAT - would be the 'issues' with these gaskets? I'm concerned that I'm having difficulties with 'snapping' the stainless moldings on and that the bottom corners are slightly curved UP (not conforming with the windshield opening fence which is NOT curved at the bottom). I want a watertight seal. I don't want to put 'words' in your answers - just wondering IF different results with different suppliers is an issue. Oh, and is it really required to use 3M #8509 in the windshield channel (where the actual glass goes into the rubber gasket) cause it's really messy and makes it harder to work the rubber/stainless.
Bill

-
Bob...I know what happened with the brakes...or at least am sure of the problem.
I had been having a problem with my tail lights...they were staying on very dimly and running down the battery. It turned out the hydraulic stoplight switch had gone bad. I installed a mechanical stoplight switch under the dash and decided to eliminate the hydraulic switch under the hood. I could have simply pulled the wires from the hydraulic switch and taped them off...but noooo...I had to be thorough. I removed the switch and installed a bolt in its place. Removing the switch allowed some brake fluid to leak out....not a huge amount but some did leak. After installed the bolt with Locktite, I added brake fluid to the master cylinder. Again...not a lot but brought the level of that chamber to where it should be. I tested the brake pedal...seemed normal. Apparently a lot of air must have entered the system, but as I said, the pedal seemed normal.
It's been about a week since then and when I started the car...that's when the pedal went to the floor. All I can guess is there's so much air in the lines the brakes were useless. If I hadn't tried out the pedal when first having done it, it's possible I could have been driving when they failed, rather than in the garage...who knows?
If I had only closed the door first I would have had the car stopped like I did in the driveway by turning off the switch and could have had the car taken on a flat bed to a repair shop for bleeding the brakes to make sure that's what happened. Again...if only.
As far as repairs, I'll probably have the shop that rebuilt the car for me several years ago do the work. I know the owner and they specialize in Corvettes so they know their way around fiberglass. They replaced the other front quarter panel then so it shouldn't be a problem to do the other. My biggest concern is paint matching...it''s a pearlescent paint and that can be tough to match. It's gotta get done. I'll know more after talking to the insurance adjusters.
Soooooo, you're not going to Maaco

-
Yesterday my '70 was damaged...it was quite upsetting to say the least. I was about to leave for its first cruise-in of the season...when I put it in reverse the brakes failed! The pedal went right to the floor and the car took off backwards.
The rub...I have a bad habit of getting in the car, strapping in and starting the car before I close the drivers door. I was unable to pull the door closed fast enough before it hit the wall and peel the door all the way around to the front quarter panel. The sound of fiberglass splitting and cracking is not a pleasant one and it all seemed to go in slow motion though it happened very fast.
I pulled the parking brake...no help. The only way I got the car to stop was to simply turn the switch off and let it stop rolling.
I think I was making up swear words when I got out of the car and surveyed the destruction. The door itself appears ok, but the front quarter panel and inside supports and the hinges look like they all need replacement. I was so upset I considered taking the insurance payment and just selling the car for what I could get, but after cooling off I realized it's repairable. Just part of life...as my wife said it could have happened when on the road.
I don't know if it will be repaired in time for the AOAI meet in Gettysburg in July...hopefully it will be, but it's more important to be repaired properly than quickly.
If only I had closed the door first! That bad habit is now broken!
Sorry to hear that Gun-S. If it makes you feel any better - someone ALMOST backed-in to me as I was pulling out the of grocery store parking lot yesterday! Fortunately I reached the horn in time and it WORKED! Anything can happen / any day.
-
There are no hog trough issues with the Monte Frame. 'G' bodies with that frame had rust issues on the rear rails and at the spots where the body mounts meet the frame.
When I had my 88 I had the opportunity to compare it to the '64 and there are changes to the body to adapt it to the frame and re-installing the chrome bumpers would be a real challenge.
It would be much easier to replace the hog troughs than to adapt the Stude body to the Monte frame.
ErnieR
Jon Myer talked about this in the magazine some time ago. They changed the floor pan so as to adapt to the GM frame.
One of our members in New Zealand had to do a 'body off' on an '88 when he discovered a majority of body mounts missing. There is a rather convoluted steel piece (right & left) that goes from behind the front tires to in front of the rear tires and is mounted to the body. As I recall, the actual body mounts go between these metal supports and the frame. They have a tendency to RUST. If you want to see the front section - remove the front wheel (I removed the passenger side which also happens to have the air intake for the HVAC)fender liner and you will clearly see the front section that is riveted to the body.
-
Hi
I have a 1988 Avanti Convert that came with the blackout option just like all the 88 anniversary models had. Does anyone know is the blackout a paint or is this powdered coated..??
I'm 99.9% certain it is powder coated.
-
Thanks for the info. The reason I'm asking is I took my car into speedy auto glass to have my windshield replaced and they said they did want to work on it because Avanti motors used lots of silicone on the sides and behind the windshield molding. The installer told me when he got hired 5 yrs ago he had to sign a contract that stated any damage he did to a car like bend a piece of chrome trying to take it off he was responsible for half the damage and it would come right out of his check. So he was afraid to attempt trying to take the chrome off the car. So now I want a spare windhsield molding set handy so when I take it to another shop and the chrome does get bent I already have a replacement. My car(1988 convert) also came with the black-out option so even when I get the Windshield molding replacement set I will have to get it painted.. You would think that an experience glass shop would have the means or no-how on how to get the chrome off even if it is siliconed. anyone else ever have any problems with getting the windshield chrome off..??
I take it you 'haven't' replaced the windshield as yet. You should definitely get the original Studebaker manuals (also on CD) which describe in detail the removal procedure. Also, others have written on this subject here and in past magazine articles (there is a CD on that as well).
I'm just going to say this windshield design (although I'm no expert) is not 'normal'. The large stainless 'A' pillar covers are just that - covers - covering-up a very messy windshield opening. On 'normal' vehicles the actual 'A' pillar is EXPOSED. On ours the steel 'A' pillar is covered-up by the stainless or blacked-out side moldings, and they cover-up a vast area filled with voids (the kind that love water). So, a normal old-fashioned windshield with chrome moldings would simply be installed in the opening, but the moldings are installed AFTER the glass is in place and end of story (those moldings had clips that fastened to the windshield frame (fence).
Except for the 'side' moldings, you shouldn't have any problems since the top and bottom moldings are placed on the windshield BEFORE installation. The side moldings DO actually serve another purpose, other than as 'covers' - they also complete the attachment process by sliding into the top and bottom moldings and then these side moldings are themselves fastened to the 'A' pillar. To start with you must remove the rubber weatherstrip on the 'A' pillar (front of door opening) in order to expose the 5 or 6 screws that fasten the covers (along with the drip rail). Chances are underneath these covers you will find (once you manage to get them off) a whole lot of adhesive material as well as filler material. These side covers were never meant to actually SEAL the car from water by themselves.
So the 'A' pillars are made of steel that is not meant to be exposed as almost every other vehicle. They are covered and often the covers hide the fact that the steel 'A' pillars underneath are badly rusted. Cafaro changed these to Kevlar on the '90 4 doors.
In conclusion, I would only allow a windhield repair company familiar with the Avanti do the job. And don't forget to buy/get the rubber seal that goes around the glass.
Bill
-
I have a 1988 Avanti Convert and I'm looking for the windshield chrome molding.. any help on where to find..?? Thanks
Stude Intl has the 'A' Pillar Stainless covers. Nostalgic has the rest (not sure if the 'top' moulding is the same for a convertible}.
-
here's some pics of my w.i.p. (work in progess) you might enjoy
That was Great! Thanks for sharing.
-
There is also a 'filter' media on the canister. Maybe try and clean IT first and see if that helps. Think it is located on the top area - made to filter to the atmosphere (I think).
OK, the filter (disc) is located on the BOTTOM.
89 Gas gauge
in 1984-91 Avanti
Posted
Well, at least you know the fuel level in the daytime! BTW have you added fuel to see what (if anything) changes? I'm wondering about the accuracy of the gauge in general.