


wdaly
-
Posts
345 -
Joined
-
Last visited
Content Type
Profiles
Forums
Events
Posts posted by wdaly
-
-
Can anyone tell me where I can locate (tap into) the back up light circuit? There is no switch I can locate on the shifter or transmission. I am working from jack stands and do not have easy access to a lift. All of the pictures I can find of the GM switches appear to be for column shifts and that does not seem right. Any help appreciated. Thanks.
After extensive research my mauals also mention the colum. However, they include this info: "Combination neutral/start/backup lamp switch". This switch does both. They say it is mounted on the transmission shift mechanism in the console. I don't recall seeing anything special in there on my '88 and my mechanic has adjusted the neutral switch in the past and I'm sure he would have mentioned dealing with the console as he doesn't like INSIDE stuff. So, if you can find the neutral/start switch you will probably also find the back-up light switch (same thing). I'm guessing on top of the transmission or where the shifter cable attaches.
-
Thank you for the information. We have been successful in dismanteling the interior of the vehicle without incident. As the shop manual I have is for the Studebaker models, it concentrates on manual windows, so I have decided to take the window adjustment to a glass shop.
One other question has come up in this process. Though it does not concern the current project, how do you remove the shifter handle? We have been able to access the wiring we need by rotating the cover panel, but some future project may need more access.
Again thank you,
Dan
The shift handle is secured onto the post/stick by a small 'u' shaped CLIP that is located at the front of the handle. Move the handle to the neutral position or farther in order to access this area. Pry out or use needle nose pliers. You should really get a GM manual (or go to library) lot's of common stuff in these manuals.
Good Luck!
-
I have a 1990 unit with a window problem as discussed, and have found the postings on this topic very useful, however, how do I remove the door handle? I have found the door handle removal tool to be useless and there is not enough room to compress the door panel to see what I presume is a retaining clip on the handle. I really do not want to damage the leather door panel.
Also, my remote locking unit has died and I am trying to install a new Viper unit. The old unit, based on the activation switch wiring appearing to be wired into the factory wiring harness, seems to be factory installed. Does anyone know if these units were original equipment, either as an option or as standard equipment? Either way, does anyone have an idea as to where the physical location of the alarm system control unit might be in the vehicle?
Finally, for now, it appears I may need access to behind the dash panel, particularly on the passenger side. Any suggestions??
I have never seen a '90 'close-up and personal' for very long so ... IF you have the 'old fashion' inside door handle (looks like all other Avanti's) the removal tool will work. The handle is held on by a simple spring clip. The TRICK is to place the tool in the right place (you may have to remove the armrest first (you'll have to remove it anyway if you're removing the door panel). You should have a plastic round bezel behind the handle - behind the bezel is a round plastic (call it a washer if you will). Slide the 'tool' between these two plastic pieces (you aren't going to SEE anything) you just have to Feel your way from the front OR the back as you slide in and out. Before you know it the handle will be loose and will come off.
As far as behind the passenger side instrument panel - same thing - not sure what this car looks like, BUT my '88 has this big one piece carpeted fiberglass cover/shroud to cover the AC/vent/fan etc.. This can be removed with a screw driver (the screws are hidden under the carpet). I never did put mine back on (a pain). I even found the 'computer' stuck under there wedged right behind the front of the instrument panel passenger side. I moved that out as well and never put it back (mounted it on the side of the console).
Don't give up!
Bill
-
i'm new to this ('88 model), but i'm having similar problems. windows operate erratically. same scenario - gauge dips, no action. regular use seems to help. at times i've borrowed a switch from an operating window and it works. other times it doesn't. fiberglass car, maybe poor ground? i also notice that even when they're working, it's slow. i wonder about the window channels and the need for refurbishing?
let me know if you've found something.
fred
I have an '88 Coupe. Years ago I had the same problem on the passesger side. Spent over $400 to have a specialty shop replace the motor (from a K-car).
A few years ago SAME problem. I ordered an entire replacement system from Nostalgic (good price) they give you a rebuilt one in exchange for yours. Here's the deal - chances are there was NEVER anything wrong with the system to begin with (both times). WHY? Because these cars have a problem with 'elongated holes' that mount the window assenbly. Look in there and see what's up. It is very difficult to properly adjust and align once the holes get big enough from the force of window torque movement (espcially the Swivel Pivot Point). Get the original '62-63 Shop & Parts Manuals - they will have drawings/pictures and by-the-numbers removal, adjustments, etc.
Bill
-
About 25 years ago I worked at an RV dealership and we would install hitches accessories so I have a bit of experience though somewhat dated.
1500 lbs. is Class 1 (2000 lbs. gross weight maximum rating). That means you can use a light duty hitch, though you can always install a heavier unit. Since you say a Monte Carlo hitch cannot be used due to the shortening of the frame, go to a certified welding shop that fabricates trailers for farm use, etc., and they can make one for the car. They will probably simply fabricate one and weld it to the frame. That will probably cost less than fabricating one, drilling and bolting it. I don't know what the maximum tow rating is for that car (the manual should tell you if you have one or a Monte Carlo manual should give that). You do need to find that out...some cars are only rated for 1000 lbs. towing...it's not just the size of the engine that makes the difference...it's the frame design and construction which is often the limiting factor.
Depending on your state, you may be required to run your trailer with electric brakes, though most states don't require brakes on a trailer less than 2000 lbs., some do. If so, you need to add a brake controller under the dash and run the electrical lines to the rear for the connector.
I realize it's only a lightweight trailer, but I would suggest having a transmission cooler added if you tow any real amount. I've seen what happens when people don't do that and burn up their transmission...and it rarely if ever happens close to home. An engine oil cooler is nice but not really necessary for light usage.
Make sure your cooling system is in top working order (always good advice regardless). Add a container of Redline Water Wetter or similar product...it's helps make the coolant transfer heat more efficiently, though maybe not enough to matter in your case with occasional light towing.
If you wanted to tow heavier weight, there are more bolt-on modifications that can be done, but in your case it doesn't sound like it would be necessary.
Thanks G-Slinger!
-
My '91 van with the trailer hitch is just about shot. Want to get a little gas mizer-mobile to replace it. So how can I tow in the future (he said as he looked over at the 1988 coupe)?
Hear me out on this:
I know I have a full frame monte
I know the fiberglas body is rather heavy for this frame
I know that GM used less beefed-up frames as the monte went more & more unibody
I know that the Youngstown engineer told Kelly to strengthen the '87-88 frames
I know my car doesn't have heavy duty (towing) radiator, transmission cooler, etc.
Finally, I found out you can't just put a Momte Carlo hitch on since the Avanti rear frame has been cut-off a number of inches
I would only be pulling a small alum boat and enclosed cargo trailer each weighing about 1500 lb loaded. Hey, a big 305 V8 w 4bbl WHY NOT! Your thoughts Pro & Con appreciated.
Bill
-
Hi all! Need advice: I am looking for an Avanti. I recently inspected an 87. Although likely not driven in upper-midwest winters recently, it appears to have been at one point in it's life. Looking under the car there is a definite layer of rust on every metal part. Most important: There is insulation over (or under) the transmission tunnel. This is a metal-foil over yellow fiberglass insulation material. On this car it is badly deteriorated - and there is ellow insulation literally hanging down. Just from what I can see, there are two c-channel metal strips that run from side-to-side under the front of the floor. These are totally rusted - like a graham cracker. My guess is part of this is due to the connection with wet insulation. My question is: If I buy this car obviously the insulation has to come down and be replaced with like, Dynomat. But I am worried what else I may find. Is anyone familier with this occurrance - and what should I worry about? Can I replace these metal brackets (sorry do not know what else to call them.) I guess my overall general question is: How big of a factor is rust underneath these cars? Is there any one particular area of greatest concern - i.e. not repairable? (Ok, one last one: I am over 6-foot - and my head hits the roof. I am taking a gamble in buying one of these cars with the hope that I can modify the seat so I fit (something I have to do with every car I buy - old or new.) I know I can literally bolt the seat back several inches - but has anyone figured a way to lower the seat for increased headroom? Strange question I know.) Thank you in advance for your help with these questions!
I would be interested in how many miles are on the vehicle, also does it have a sunroof?
I have an '88 coupe purchased new and driven daily in Wisconsin with 118000 miles. Runs and looks great, but look underneath and RUST. It's ashame you buy a fibreglass car that still looks terrific yet underneath its just another car. My fiberglass/foil has been hanging down for as long as I can remember and my mechanic has yet to be concerned. The big problem as I see it is the body attachment to the frame. Although we don't have the 'hog-troughs' we DO have another/different set-up that is used to fasten the body to the chassis and it rusts like any other ferrous metal. I personally know of at least one body mount that has rusted out and dropped to my garage floor (drivers side just behind wheel). One of our members, Mr T from New Zealand, purchased an '88 convertible from the Chicago area in the past 1 1/2 yrs? When it arrived a majority of the body mounts were Missing! He is probably the FIRST ever to remove the body from the frame on this era car. I do not look forward, nor can I afford to perform this operation.
Seat height - I have changed my drivers seat to an aftermarket (by the way the bolts in the floor are positioned for the GM platform seat not Stude). I am under 6' and stll my head is up there. The new seat helps a bit if you recline the back. A big problem is the sunroof - seems to take away a lot of ceiling height.
Bill D
-
Don't know about a 1988, but my 1989 Upper Radiator Hose is NAPA 7994. repeating - NAPA 7994.
The GM dealer did not have one that fits a 1989 Coupe.
Ernie
My '88 coupe also used a NAPA upper radiator hose - sorry, lost the number. I took the old one in and they gave my one that fits exactly (end to end). It does not sit on the hose 'rest' as it is a 'little' different - BUT it has been on for years with no problems.
Bill
-
I'll get a picture taken this weekend.
I have been meaning to write this for quite a while. My trunk release has not operated on a number of occasions, mostly in Winter. If I start the car the trunk releases normally - not enough 'juice' getting back their otherwise? SO, if this ever happens to YOU try getting more electricity back there / you probably won't need to use the "emergency release".
Bill Daly
-
Bill and Ernie:
Thanks, once we knew where to look we were able to get the trunk open. Great
Hey - Ernie!
I have often thought about the front hood release - could you describe (picture better) how you accomplihed the "emergency" release set-up?
Bill
-
Does anyone know a secret way to manually open the trunk when the latch does not operate?
You're convertible should be the same as my '88 coupe. Although I have never tried it - there is a small bare wire under the back left side of the car that should be the 'manual' release - just pull on it I guess.
Bill
-
Follow the wires from the electric choke and the dash light and see where they meet. That should be the relay. Since most things with Avanti's don't come easy, I'd expect to find the relay somewhere under or behind the dash where only a six year old has hands small enough to work with it.
According to the 'official' GM Chevrolet Monte Carlo (1988) electrical diagnosis and service manual - this is:
Engine oil/choke warning indicator (V8 vin G and V8 vin H). If this indicator stays on with the engine running >
Check for proper oil level and pressure.
Disconnect the choke heater connector and observe the indicator with the ignition in RUN. If the indicator is on, check the LT BLU (78) and TAN (31) wires for a short to ground. If the indicator is off, check for battery voltage at terminal B of the engine oil pressure switch. If battery voltage is present, replace the engine oil pressure switch. If battery voltage is not present, check BRN (250) wire for an open.
This manual also has the diagrams (at least that GM used). Here's what I'm looking at - Choke heater is wired to the engine oil pressure switch. 3 other wires come off this oil press switch. 1 to computer command control (idle speed control). 2 to 'C/H' fuse 20amp "hot in run". 3 to the ACTUAL indicator light.
Bill Daly
-
My understanding (from my mechanic) this is NOT a GM radiator - mine ('88) was 'pulled' and re-cored? ACME comes to mind - Indiana?
Bill Daly
OK. I found a list I made when M. Kelly gave out some info at the annual meet in 1998. Radiator - Griffin Co. Georgia - contact name Steve Polish - don't know if that name can be of help 10 years later.
Bill
-
I have a 87 convertible - need to change out radiator. Label is gone. I believe it is different than the standard chevy that came with monte carlo originally. Anyone no the stats? - thanks
My understanding (from my mechanic) this is NOT a GM radiator - mine ('88) was 'pulled' and re-cored? ACME comes to mind - Indiana?
Bill Daly
-
Mr. Bond, Mr. James Bond:Your car has them. They cover up the adjusting screws on the headlights. They also cover the bracket holding the head lights in place.If you still insist on these plastic headlight cover/lenses - I'm pretty sure it can be done. I'm thinking the factory decided to manufacture cheaper/faster and sometimes that's OK (like the windows behind the doors) my understanding is they "sealed" them right to the body - no hinges no leaks no wind noise, etc. With your headlights - instead of using 4 long screws to attach the headlight (square) surround to the body, apparently they choose "velcro". Once again, I'm thinking the actual body around the headlight hole is the same as it has always been with a detented rim around the opening. This rim had 4 holes in it and screws were attached using 'speed nuts' I think they're called. All of this is in the Studebaker manuals and I can provide you with the specific items if you wish. You just have to DRILL 4 holes in exactly the right places - I would think on outer trim ring would make a good template as this item is the last to be attached and already has the "Official" holes in it. The lens, gaskets, rings and even the surround that covers the headight bucket are all available from Studebaker Intl. Note: I may not be using the correct names for these parts right now, but they do exist. Price? Haven't got time to look-up right now but you should be looking at Lens's, trim rings, gaskets - maybe a little over $200. The screws and speed nuts available at any good hardware store. I know I like mine - and I would think it is more aerodynamic as well.
The name is Daly, Bill Daly
-
My brand new '88 did not have them - I called the factory and they said these were not allowed in certain States (?). I told them I didn't care - I wanted them. They sent them to me, no charge. If the '89 has the square 'ring' that 'attaches' to the headlight assembly with 4 long screws then you can add the lens behind it. You will also need one each rubber gasket that fits around the plastic lens for a seal. Available at Studebaker Intl.
Bill
-
The second car from the right is listed as a 1979 but it has plastic bumper and square sealed-beam headlights. Weren't those changes made by Blake a few years later? Did the owner make these update modifications. I like it - I'm just asking. I would love to do just the opposite with my '88 / go to round headlight seal-beams (with square housing) and get rid of the plastic bumpers.
Bill Daly
-
After looking at the door rubber on a '87 Monte Carlo and seeing that it was the same I talked to my local Chevrolet dealer and found that they were still available. I had them order the drivers side for me at a cost of $142.00. This is the seal attached to the body that seals the drivers window. I also picked up all the parts to replace the inner and outter window sweeps from Restoration Specialities, will have pictures and Part #'s later.
Jim Wood
Jim:
I don't/can't understand HOW a Monte door opening could/would EVER have anything to do with Avanti. I understand the Monte was the 'donor' chassis-drivetrain (body-off) etc. How can it be that simple? If so, would it mount in the same fashion (however that is) and is the price better than what Avanti suppliers are asking? Mine is an '88 coupe.
Bill Daly
-
For the past 6+ months I have been having difficulty removing the key from the "lock cylinder". Lately it is 50% of the time. Now it has gotten to the point where I am also having occasional difficulty turning the key to 'start'. I have found that if the wheels are straight vs turned I have less occasions of these problems. I am thinking the "LOCKING COLUMN" may be the problem. What concerns me most is that in addition to the lock - this whole 69 piece set-up also prevents shifting into gears / I don't want to find myself stranded somewhere someday. Any thoughts AND is there another way to be able to start car if I give-up on the factory set-up ie. separate start switch/button?
Bill Daly
-
That steering wheel came on many later Avanti's, maybe it was even standard. And I agree with you...it is strange looking.
Is it ME? Or is everything BACKWARDS in the engine compartment (hood strut, alternator, air cleaner snoot, etc.). The battery IS in the right place!
Bill D
-
Paul:
If possible, would you please post a pic of your rear end? Hmmm, better qualify that by asking to make sure its the Avanti's rear end with the modified lights.

Joe M
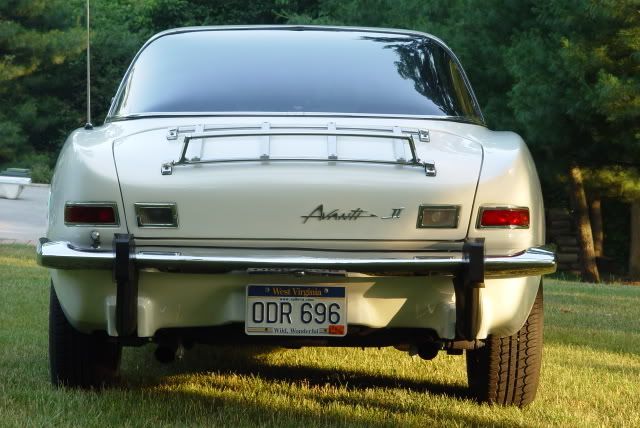
Paul makes some good points. I too have added auxilary back-up lights ('88 ones filled with water and blew-out over & over). May I recommend adding a standard relay to your back-up lights - if they are like mine they pull 110 Watts! To install relay you must run a power wire from battery to trunk.
As far as 3rd brake light and using the two original trunk lid back-up lights instead - please consider using metal/foil tape on the inside cavity where there really should be some kind of mirrored reflector. This will give you way more light. I actually converted mine to AMBER turn signals!
Bill D
-
Hi I have a 74 Avanti and would like to have the added protection of a third brake light. I was thinking that a later model Avanti that had it as a mandatory item due to the law might fit. Anybody have any information, suggestions or experience with solving this? Thanks
My '88 had this light on the inside with a "pedestal-type" mount, the kind auto manufactures used at first, before they incorporated this light into the design of the car. Quite a convoluted device. I changed the incandesant light in it to an LED (I had the rear window tinted and wanted more/different light). Just this past year I finally removed the interior set-up and swithced to an exterior light that has 2 incandescant bulbs.
Here's the deal. These lights are hard to come by anymore because all cars for the past 20+ years have had them installed - so who needs replacements? When I say hard to come by I really mean your choices are quite limited. Checker, Advance auto, Whitney et. all do have selections (do it by internet). Trouble is they don't always distinguish between inside/outside capabilities.
Make sure the light aims "straight-out" not down or up / this can be difficult if trying to mount inside the Avanti extreme-swept-angle rear window. If you do mount inside the light should pretty much 'enclose the window area so as not to waste any light or get any glaring reflections inside and out. There are some 3rd brake lights available that go for $100+ for outside mount (mine was $16 JCW). You could, if you dare, develope your own 3rd brake light - say an LED trailer-type set-up (oval).
Now for the most important part. You will need a LOGIC CIRCUIT. Either get it with the light or order it separately if the light doesn't come with it (not expensive).. The logic circuit tells the 3rd brake light that it is only a brake light and not a turn signal (2 wire vs 3 wire 'amber' set-up). You will hook the logic circuit and 3rd brake light to either the left or right brake lights which also happen to be TURN signal lights.
Bill D
-
I have attempted to "stay out" of this topic for quite some time as I have heard most everything everyone else has BUT TODAY, well, it was a FIRST! Quote: "Is that one of those cars that has the headlights that turn with the steering?" (Sorry sir, you are thinking of a 'Tucker'!!!)Mine is!..... (now)Bill D
-
It is located in the passenger side fender well. you will need to remove the plastic liner thing they hve . belive its held in plce with four screws. there should be a opening about four inches in dia.covered by a wire screen.I used some dryer duct to increase the fresh air. still working on a inlet piece. for now I have stuck in my fog lite opening. this was a great improvement in air flow in the car! It also removed the engine smells. Hope this helps. I have a LSC
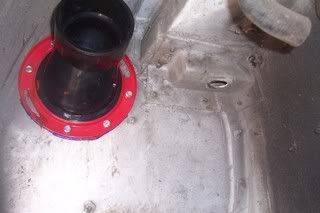
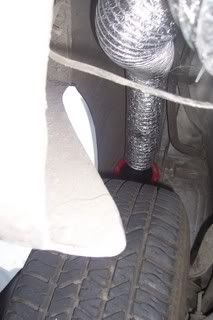
Thanks Twnchgr! I wish I knew this about 19 years ago! As soon as it warms up a bit more (Wisconsin) I'll be making the long needed change - Great pictures!
Bill D
Radio
in 1984-91 Avanti
Posted
Have to agree with G-Slinger. My '88 has a Sony that pulls right out (with 2 special small puller devices that came with the radio/car). A new radio will have CD and an 'auxillary' jack to plug-in digital music devices.