


Avanti83
-
Posts
1,282 -
Joined
-
Last visited
Content Type
Profiles
Forums
Events
Posts posted by Avanti83
-
-
Roger
That is really pretty.
I use photobucket and load my pictures at 640 X 480. Works well for me. You need to do it in the edit mode.
Yours appear to be about 1200 X 1400 by looking at the format but a word of caution, I'm no expert.
Bob
-
Bob,
So the 90 deg fitting I see directly above the differential housing with the braided hose, that is the fitting I need to remove to get the tank out?
Don't get me wrong, I'm thinking 2 holes drilled through the bulkhead is plan A, I just like to keep at least a B and when possible a C available. I don't know that B is such a horrible thing after all, since the fuel line is probably due to replace anyway.
Ken
Ken
If you have access to a hoist as I do, pulling the tank is not as bad as when I tried to pull the tank on my 83 while it was on floor jacks. It was almost impossible to do as I couldn't get my arms in any position to turn the fitting out.
That was one of the reasons I bought a hoist to save this old body from those maneuvers on a 30 Deg F floor.
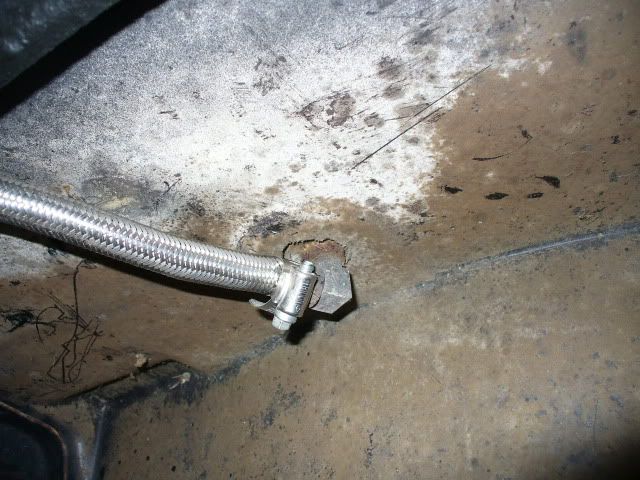
Here's a closer shot of the fitting and yes, changing the hose is a good idea. The braided hose on mine was run all the way from the tank to outside the frame where it will become 3/8" steel tubing all the way to the engine.
Good luck, Bob
-
Ken
Here are the shots of the Avanti I promised.

What is missing from the picture is the matrix of vent piping that attaches to the stud you see attached on the top of the tank. If you can't work around it, which I think you can, it can be moved by removing it from the two studs. I think you can get an 1 1/2" or so hole saw in there. I'd make two holes, one for the light and one for the bar.
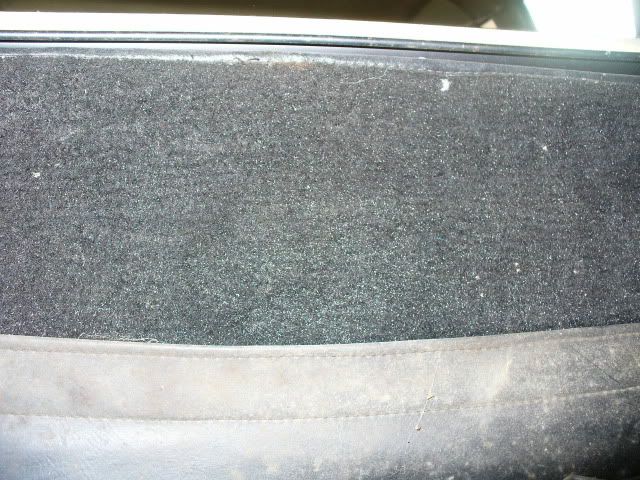
This is a shot of the trunk side which is carpeted so you will need to know that if you decide to drill into the rear.
This is a shot of the fuel tank area above the rear axle.

If you need more photos, the car is on the lift so just let me know.
Bob
-
<br><br><br><br>Ken<br><br><br>My 74 is setting with the interior out but the gas tank in place. I'll take a shot of the area tomorrow and post it.<br><br>Gas tank removal looks straight forward from the interior but the problem becomes the underneath issues. The fuel exit is in the bottom of the tank and must be removed to pull the tank. <br><br>The tank needs to be completely emptied by removing the plug in the fuel line under the passengers door then getting above the rear axle to the short rubber line and removing it. You will still get a fuel shower if not careful. There is a 90 degree fitting that screws into the tank that must be removed and then the tank lifted out from above.<br><br><p>That doesn't sound difficult until you try to reach up above the axle with tools. Room is tight with little room for leverage and almost impossible to reach from jack stands. A lift is the most reasonable answer.</p><p>In the previous post I quoted $1000 for a total front suspension kit. That is a complete kit. If you don't need it all the cost would be less.<br></p><br>Bob<br>I take it you have been here-done this.<br><br>How much room is there above the top of the gas tank to the underside of the shelf? As for the hole, are we talking a 2" hole saw etc? Please keep in mind, I'm not a Gastroenterologist, I'm not used to using multi jointed devices with optical capabilities. What could be the odds I'll still be pulling the gastank to cut a bigger hole? If so, how much work to remove the tank?<br><br>Thanks,<br><br>Ken<br> -
Ken
Some thoughts
The GM calipers would suggest a brake upgrade to Turner or Steeltec, a good thing.
It sounds like there is a suspension rebuild in the future. Parts for a complete job are about $1000 from SI.
The center pivot, Bell-Crank, is bolted through the frame with sleeves to keep the upper and lower section from compressing from the bolts.
The steering adjustment in on the side of the steering box away from the frame although you may need to drill an access hole to get to it.
The hog troughs don't seem like a big issue and you can access them by drilling 3" holes through the floor boards. I have a post on the SDC forum about how to do it. I'll send you a link if you wish.
If you remove the gas tank firewall you will have room above the tank to drill a hole large enough to get a light and long rod into to open it.
Hope this helps.
-
About 12 years ago, I bought a 63 Avanti R2 from Berkeley CA. It had been sitting for 9 years when I bought it. It was barely running then, and I started a restoration when I first bought it. My kids were in preschool then and finally, I just couldn't keep up working on the Avanti and I had to let it sit for a while. Now, the kids are in college, and I've gotten the car back out to start again. There was some wiring damage from squirrels and some nuts stored on the engine, but I'm getting it cleaned up slowly. I chose an amber metallic that looks ok, but the guy that did the job was a drunk and it has a lot of mistakes in it.
Right now I'm cleaning the front brakes, and getting the chassis sorted out well. After that, the engine gets run in, and I'll setup the trans. The engine was rebuilt in CO, and I pickled it when I stopped working on it. I may have some Avanti specific question in the next few months, hope you all have answers that us noobs come across.
Doc
Always glad to see someone have the time and ability to get back to previous love. Just a thought. This forum is a good start to finding answers but I'd recommend you also join the Studebaker Drivers Club forum and also post questions there. A lot of we AOAI forum members also belong there but a lot of the Studebaker/Avanti experts on the SDC site don't visit here often or at all.
The SDC site has a much larger membership and, therefore, more folks with knowledge to share.
Bob
-
-
My 1983 has 15 X 8" on front and back. 3.5" back spacing on front 4.5" approx on rear. One caviat Steeltech front brakes.
Bob
-
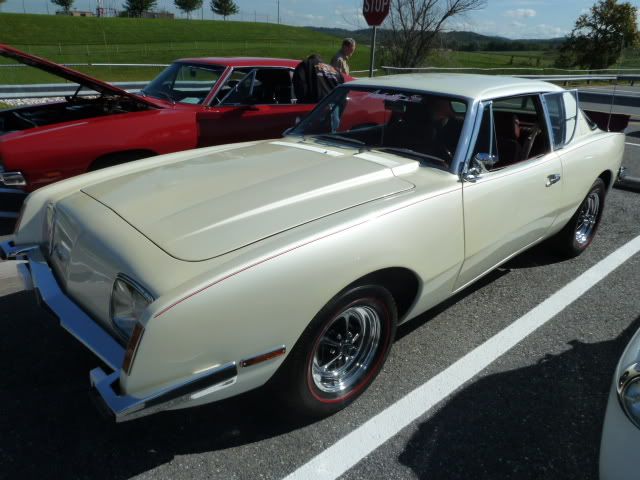
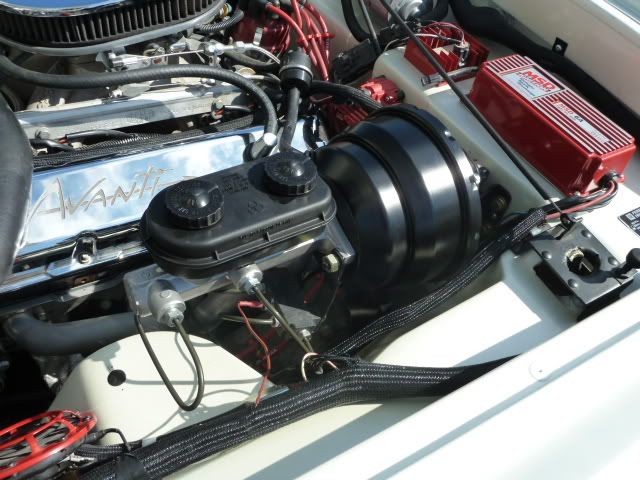
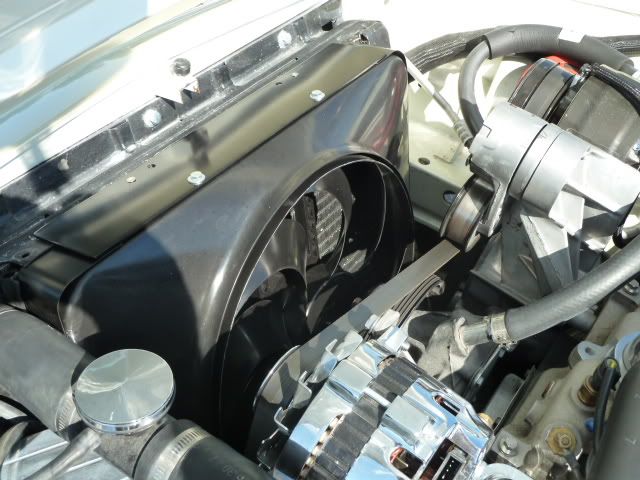
Here's the "after" photos...after the bodywork was completed we discovered the power brake booster was bad. I took the car to the speed shop that installed the engine and transmission and they installed a modern, aftermarket brake booster and Wilwood master cylinder. The brakes work better than ever and have the pedal feel of a modern car...very pleasing to say the least. While the speed shop had the car I had them install an electric fan and eliminate the standard fan and radiator shroud.
The manager of the body shop said he was sorry to see the car go...he liked showing it off to potential customers looking for restoration work.
Here's photos of the completed car at a car show over the weekend...
Bruce
It looks like the body work and paint match are dead on from the photo. Looks like the shop did themselves proud. Again!!! Really Nice car.
What did you use for the electric fan and shroud? I would like to use the same on the 74 in progress.
Bob
-
Agree, the OEM seats are too close and too upright. I changed the seats completely, going with some leather heated 6-way power seats from a brandX import. Being able to put the seat at the distance, angle and rake I like completely changed the feel of the car.
Yes, the stock seats can be moved back and put at a bit more of an tilt also.
jack vines
Jack
Any particular model or brand you have in mind for the Brand X seats for the Avanti.
-
PA
My 74 ST-10 4-speed is up on the lift receiving some frame work. If all else fails, I can probably pull the 1-3 and 2-4 levers and photo them along side a ruler.
Bob
-
Does anyone have the shift rods, or shift rod numbers, ( stamped in rods ). for a 63 Avanti?
Any help would be appreciated, I assume any Avanti up to 85? with a 4 spd Hurst shifter would
use the same rods. Any help would be appreciated.
PA
Here is the Hurst sheet on the T-10 vs Super T-10. I assume yours is a T-10. The only difference from 74 0n looks like the reverse linkage. http://hurst-shifter...I4&cktime=96655
Why not contact Hurst as they should have the parts for their shifters available.
Bob
-
Bob,
This should be a great help. It will be interesting to see how far the damage went. I like helping the old guy. Old guys have a lot of interesting stories to tell.
Jon
Jon
Yes we do and occasionally some are true.

Bob
-
John
Here is a link to Bob Johnstone's website and is stated to be for II's from 72 up. http://www.studebake...ms/aec/aec.html
Whether it is absolutely correct I don't know, but it should help.
You should get familiar with Bob's site as there is a wealth of knowledge there and also the Studebaker Drivers Club forum if you will be continuing to help the old gentleman.
Kudo's to you for making the effort to help the senior citizen.
Bob
-
<br>Wow. thanks for all of the info! This seems like it is going to be a fun time and can not wait to get the car on the lift and assess the vehicle. It also looks like i just missed the national meet in PA. <br><br>I am going to fully document every step of the way and hopefully I too will be a source of valuable info. Now i have two questions that I can not find the answers to anywhere...<br><br>What were the color combos for 1981? <br>How the heck to you open the trunk? I can not find a release anywhere.<br>
Open the glove box, there is a button on the left inside by the light. If that fails, you need to open the hinged shelf under the rear window and reach the latch with a long flat blade screw driver and turn the latch mechanism. Put a light in there and it will be obvious.By this time in Avanti's life, you could pick any color available by any manufacture. I have an original Avanti II sales brochure and no mention of exterior nor interior color other than the availability of solid or dual colored interior leather.
Bob
-
I am new to the club and just purchased my first Avanti. It is a 1981 with a leather interior and sunroof, and has 32,000 documented miles. It was a barn find and has sat in storage for 20 years. The car is 100% complete and has had no modifications I have been a car guy for years and have always been interested in these cars but never owned or driven one.
I guess the first thing i need is a service manual and point me in the direction of the club recommended vendors. Any ideas?
Welcome
The easiest answer is http://www.studebakervendors.com/ but the two I use are Nostalgic Motors in Wixom, Mi and Studebaker International (SI) in Indiana.
The newer ones, like yours, Mine is an 83 have several nice upgrades for driving comfort. The engine, as you know, is a stock 80-81 Chevy 305 small block with all the emissions and other controls of the era. Not a bad motor, dependable as heck but not a performance engine.
I'd also suggest that you join the Studebaker Drivers Club Forum. http://www.studebakerdriversclub.com/ Many more members with a ton of knowledge that here although there is a ton of knowledge here. Also join the Avanti and Studebaker Drivers club as a member. Low cost and great publications. That helps to fund these forums.
Lastly, get it up on a hoist and access the frame and hog troughs as they are the weak link in these cars. Then go over the suspension to access condition and if all is well, Drive the wheels off of it. They are great fun to drive and an attention getter.
OH YAH!!!! By the way, it didn't happen without pictures.
Bob
-
Has anyone installed a Idiot tilt steering column in their Avanti? I amthinking of putting one in my 1971 Avanti II RQB 1600, Studebaker tilt column and in dash ignition switch. If so, which model, part number do I need to order? Looking for a chrome column.
Just a couple of thoughts as I have not put one in a Studebaker.
1- Probably easier to find if you contact Ididit Co not Idiot
2- I don't think they make a Stude column so go to there website which will tell you how to measure your column to get one of their's that fit and then call them.
3- Lastly, don't forget Flaming River as a source too.
Bob
-
I recently purchased a boroscope and it's great for seeing what's inside places like hog troughs, under the dash where you can't get eyes on anything, etc. I bought it more or less on a whim but it is quite handy. On cars like an Avanti where everything is packed in tight and rarely visible, this tool can be a big help...and not hatefully expensive. While I am very careful about buying tools from Harbor Freight...this was on sale and I also used one of those 20% off one item coupons they put in every advertisement. That made it an easier decision to buy one.
That could work well, particularly if one chose to use the newer style spray on/in undercoatings with the wands available to change spray directions.
Bob
-
Avanti83: What did the troughs look like inside, looking thru the holes you drilled? Looks like a neat idea. I also like Gunslingers idea of drilling the bottom and inserting removeable plugs. Probably more serviceable than 'outting' the carpet to check each time.
The reason I chose this approach was the rear of each hog trough had a soft section that I repaired with new metal. It was difficult (impossible) to get far enough forward to see and treat the rest of area. ErnieR had posted previously on the SDC forum about doing the same thing.
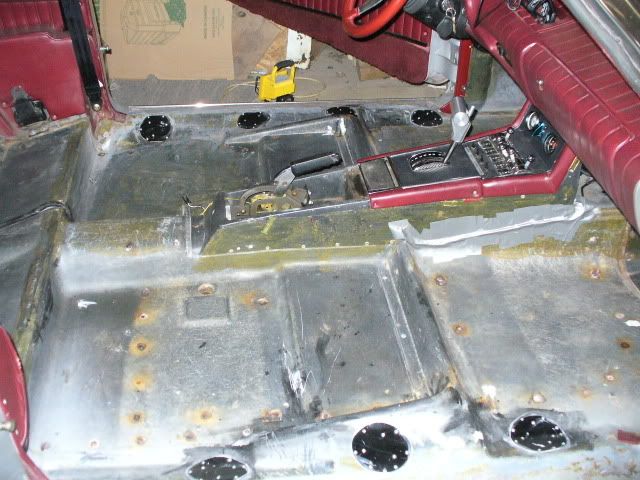
When I opened up the floor area, I found the usual mouse storage of nuts and fluffy stuff which I removed. The hog troughs had flaky rust but seemed to be solid otherwise. I brushed the rust out as much as possible and slathered on the POR15.
The reason I used POR15 was it's reputation for encapsulating and stopping rust. I used a lot of it inside with the brushes you see in the writeup.
Realistically, I don't plan to open them in the future but I guess I could if necessary.
As far as drilling into the bottom, be sure you do this before you treat the hog troughs. You need to provide drains to allow any moisture out and leave them open.
I will say that the only way to know that you have covered the entire interior surface is to open them up enough to get you eyes and possibly a mirror inside.
Bob
-
If you really want to do a great job you need to brush in POR15 or some other rust inhibiter.
This is a shot of my 83 after I finished drilling 3" holes in the floor, using POR15 and resealing the holes by taking the round plugs I removed, adding a thin aluminum disc to the top to allow the plugs to be put in place in the holes with sheet metal screws.
Here is a link to the SDC forum that I posted on what I did. It worked out quite well as you can't see the holes with the carpet in place.
http://forum.studeba...k-Bige-s-advice
Bob
-
We did all that. In the two months my second mechanic had the car, he checked everywhere for vacuum leaks; checked the distributor; rebuilt the sealed Carter AFB with a kit from Myer's Studebaker; replaced the sealed Carter AFB with an Edelbrock 1406 (with marine grade seal installed in the accelerator pump), which helped a little; adjusted both carbs extensively, looking to get it just right. We really left no stone unturned We've got it about as good as we can get it. As I said, I expect the transmission change will make things a little better, since the car will either be in neutral, or I'll have my foot on the gas. And it has a lumpy idle, but in neutral it doesn't tend to stall out.
I still think the cam, in my case, is a little more radical than I want to live with for what will be almost entirely a street car. Aside from the rough idle, the engine only makes 5 inches of vacuum, for example, so I had to put a vacuum pump and vacuum reservoir on the car to get my brakes back. And even in neutral, when the transmission's not putting a load on the engine, the engine has to be set to idle a little faster than a smoother idling car would in order not to stall out, which makes vapor lock a little more likely. I imagine a rough idle will make starting and running in cold weather a bit more challenging as well, at least until the engine gets completely warmed up.
Billy, I know this is stating the obvious but why not just replace the camshaft with one that behaves better. A lot cheaper than switching to a 5-speed and still having all the issues you described. I too wanted a five-speed in my 83 but finally figured a 200R4 AOD would serve better.
I also have a significant cam in it with a lot of duration and lead but it does not have the issues you are having with your R2. But mine is an SBC that has the stall speed and manifold to handle it.
Let me make a recommendation. Ask the folks at Racingstudebakers.com to advise you on a better all around camshaft or if you choose to not go that route on RS, there are several individuals on the SDC forum that can also help. Both Jack Vines and Mike Van Vieghten (sp?) have been building high performance Stude engines for a long time and you could email one of them. Jack and Mike are on both sites.
An Avanti that runs like yours takes a lot of fun out of the great experience of driving a well performing car. Mine is a blast as I can leave big long marks if I like or run down the road at low speeds or even sit and idle for long periods. I'll bet in the end you will lose little if any performance with a better stick.
Bob
-
Hi all,
Well the fear many of us have has occurred. Took the 2007 Avanti to work today and the taillight lens cracked and a piece is now missing. I am unhappily remembering reading that these lenses were completely custom, so I am really at a loss on how I'm going to resolve this. Especially frustrating since I am registered to go to the Meet at Gettysburg.
Anyone have any ideas?
Thanks,
Wayne
Wayne
I seem to remember an article on a product that could be poured into a mold that was made from an original tail light and resulted in a clear red duplicate. I don't remember how large nor complex they could be made but it would not be difficult to produce a two piece mold from plaster of paris or catalyzed rubber and coated to provide smoothness. A google search may be informative.
Bob
-
I have the computer off my 83 with the connection plug...is it worth anything?
My guess is very little as it is 18 years old and a pretty generic 82-83 Chevrolet unit. Probably best to check Ebay for a while to see if any sell. I purchased several 89-90 Chevrolet units a while back off ebay for under $20 each for a project I was building.
Bob
-
It appears the horn switch in my Avanti's steering column has gone bad. It is not the same as used in Larks (#1541949). Looks like it is a bunch of individual parts none of which are available from Studebaker International. What options do I have?
Try Nostalgia Motors @ 1-800-Avanti1. They are a much better source of Avanti parts that the normal Studebaker suppliers. Dan and Betty Booth can also answer about any question you have about Avanti's. They have a lot of the original Avanti stock.
Bob
Engine Identification
in 1965-83 Avanti
Posted · Edited by Avanti83
The casting number indicates a 350 block. Chevy HP numbers from that era for the 350 are about 185 -225, so yours should be in that range.
The odds are you have a two bolt motor as four bolts usually went to trucks. In any case, that's not all bad. The 397000 block you have, if cast at the Saginaw Foundry, not Mexico, is considered a quite strong block and one of the favorites for building into decent HP numbers. Even better if it has 010 or 010/020 cast into the block, Which is rumored to make them high nickel blocks that have very good strength. Yes! the pan needs to come off to see if two or four bolt.
In fact, I'm building a 383 SBC for my 74 Avanti and I'm using a 1970 3970010 - 010 block for the build.
If you pull a valve cover and check the head casting number, it should help pin point the exact engine source.
Also reread the stamped #, Nasty Z28 has no listing of ZAH suffix.
Bob