


Avanti83
-
Posts
1,282 -
Joined
-
Last visited
Content Type
Profiles
Forums
Events
Posts posted by Avanti83
-
-
Thanks for responses. Will have it checked today. Isn't there a computer connection between how the tranny works and the engine stopping?
How extensive is it to repair or replace the torque converter?
Probably not worth repairing, replacement requires unbolting the converter, removing the trans, replacing the converter and bolting the trans back on. The only problem is the weight of the trans. I put one in my 83 on jack stands and a HF tranny jack. It's fiddley. Rock Auto shows the converter (1989 Camaro) at $69-92 + core
Lockup control is electrically actuated. Here's the wiring diagram from 1989. Hope it helps.
http://www.rowand.net/Shop/Tech/images/TH700R4WiringDiagram01.bmp
Google is always a great help on these issues, I use it almost daily. Good luck, Bob
-
The issue will be how the front of the seat base bolts to the rise in the floor and the lack of a substantial mounting point behind the back seat mount. So moving the base is not just re-drilling mounts.
The front mount on the seat mount is pretty sturdy because it bends just in front of the slider. To lengthen it would put a longer bending moment on it and perhaps cause failure. The rear could be moved by drilling the hole further back but it would take reinforcing the area.
Don't get me wrong, I think it is totally possible but it will be more difficult than just a couple of holes.
If I were to do it, I'd probably make a new mount from 3/16-1/4" strap and cut the mounting flanges of the original mount and reattach the slider part back the amount you wish to move the seat. That way you are using the original mounting points and maintaining whatever strength they are designed to have.
I'm not about to weaken the seat mounts to get the seat back as the originals don't look all that substantial to me. If I get hit, I want the best chance to stay where I'm setting.
Possible but it will take some modification.
Bob
-
Your tranny should be a GM auto with overdrive. My guess is the torque converter is not unlocking as quickly as it should. Most any trans shop should be able to quickly diagnose it.
It's to early for computer control, but you might want to try changing the fluid and filter if you are doing it yourself and/or google torque converter unlocking. Your tranny should be a 4L60 version of the 700R4. I'm betting on converter locking/unlocking issues.
-
Aluminum melts at 1220 deg F. The alloys can move that slightly but that's the neighborhood. It's not hard to put a thermocouple in a cast iron manifold before one buys. If one wanted them badly enough, a quick experiment should add confidence to the purchase.
-
If you want to do your own investigation, put the front end up on jack stands. Check for wheel rotation as Bruce suggests, if it's OK then pull the tie rods off the spindles and check the resistance to turning by moving the wheels back and forth. You can feel if there is a difference due to stiff or frozen king pins. Check the bell crank bearing too.
If the above is good, take it to a good alignment shop that knows king pin suspensions. They will get the steering wheel straight and the pull out of it.
If you don't know a good shop, call some of the local shops that do trucks and cars and ask about doing Studebakers and early 'vettes. Most truck alignment shops have done king pin setups.
Bob
-
This is what they look like. http://www.ebay.com/itm/Vintage-Avanti-Power-Front-Window-Regulator-/400648817549?pt=Vintage_Car_Truck_Parts_Accessories&hash=item5d4887cb8d&vxp=mtr
Be careful of the after market units. The Avanti/Studebaker doors of that era a not very tall and most of the after market stuff is to tall to work well. I know, I've tried.
This is in the library of the SDC Forum and could work on an Avanti. http://forum.studebakerdriversclub.com/showthread.php?75224-hawk-power-windows
I used Mazda ones on my 54K. http://forum.studebakerdriversclub.com/showthread.php?21999-K-body-CASO-Power-Windows In any case, it's not straight forward unless you find the OEM Avanti stuff.
Don't sell your manual ones, and there is a big market for them, until you are happy with the power setup.
Bob
-
If the arm can be removed, I'm surprised the Body Shop just didn't suggest making a new one. Even if you could find a new one, the old one will need to come out so a replacement could be reinstalled.
If the arm is glass/plastic, it should be possible to fab a section to cover the break and glue it in place with the new panel adhesives.
Good luck in either case.
Bob
-
Bob,
Saw your posting and I'm interested in your 4 speed items. I have sent you a private email.
Luma
Dan
PM sent, Bob
-
http://kpr.craigslist.org/cto/4275538094.html
Anyone know this one? Seems to be a really desirable car, but is it going to bring $25K in today's market?
jack vines
I see a pretty good sized flaw in the passengers side fender top edge about 16" back from the front and some non-standard engine components. The front bumper looks cloudy but it could be the photos which, BTW don't do the car justice.
It's interesting that the seller's name is Skip as, I believe that is the same name as the owner of 2127, the suspected last 4-speed of these models. But I think he lives in the DC area out east. My 74 4-speed is 2123 the second to last so this is an earlier 74 than those two as I think 2127 is red.
Hard to go much further without better pictures but the price seem high for this car at this time. Most go on Ebay for $10-15K depending on condition. However, if someone wants to convert their auto to 4-speed, I might just have the complete setup minus pedal assembly available.
Bob
-
Warren
This is my brake setup out of the 74. I know it is OEM because I purchased it from the OP's family. The M/C is new but the proportioning valve is original. It looks like yours. I haven't checked closely but I think the 83 looks like this also. It probably doesn't matter but I can check the 83 if it's important.
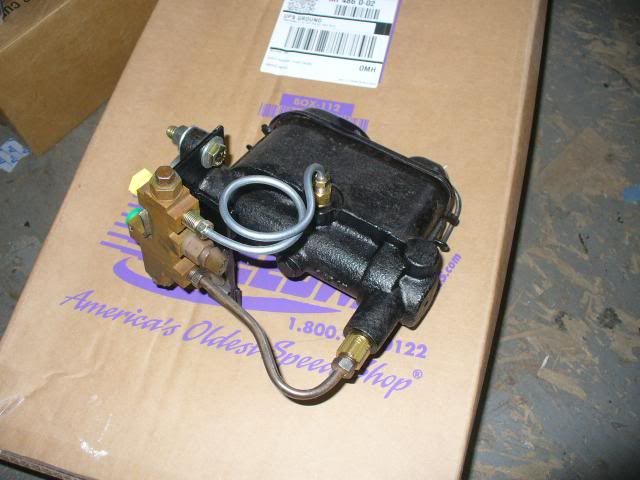
Bob
-
If all else fails, this bleeder attaches to the wheel cylinders and pushes fluid toward the M/C. That should be the most efficient way to remove air from the system.
I have one among my tools and it has yet to fail if retained air is the problem.
http://www.summitracing.com/parts/psl-2004?seid=srese1&gclid=COiEx9b__bsCFYhcMgodCj0AGg
Bob
-
I guess one of us should have mentioned that anytime one pulls the springs out to check the bushings but you did that any way. My guess is that they all come from the same source so whichever supplier you use should be fine. Just be sure they are new not "old" stock. Time and storage are not kind to these type of items.
-
The springs are mounted just as they came from the factory as both my 74 and 83 are that way. I saw an explanation once but can't recall if it was in the manual or else where. The spacers are also present on my 74 with the OEM Mag 500 wheels so that is also correct. I can't imagine them there for no reason but again no idea.
The springs are identical side to side as I replaced mine in the 74. If you chose to switch them side to side it shouldn't be an issue. If you look for replacements, they are not inexpensive so try pricing them locally to save shipping. I got a great deal from my local heavy truck supplier that took the time to find them in their catalog.
Be careful about using overload shocks as the upper shock mounts are not made to support heavy loads that air shocks or other shocks of that type can impose.
Bob
-
Have you tried posting on the Studebaker Drivers Club Forum? You'll probably find more folks there who might have Dana 44s laying around.
Best idea so far. I don't see where you are located but one of the best sources of used parts (mostly Studebaker) but Avanti's are Larks is Bob Peterson in Ca.
Give him a call and discuss your needs.
Otherwise, Jeeps and the like are full of Dana 44's.
Bob
-
Hard to get a good closeup but I assume this is what you are talking about. It came OEM with my 74.
Bob
-
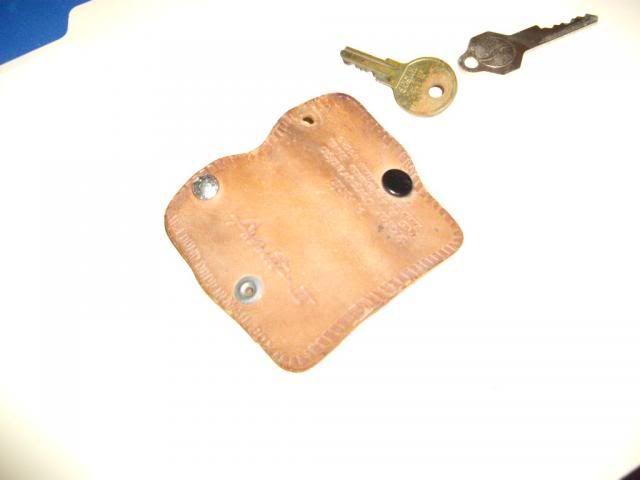
As you get deeper into disassembly, if you chose to do so, you will find the car number on any number of pieces. They only way to keep them straight on a limited production vehicle.
I'll bet if you pull the drivers door panel you'll find the same number on the back side of the panel and the key number (different than body #) written on the door body, just under the window opening.
Bob
-
Whether it's Avanti or Studebaker, the answer is not straight forward. This is an oft discussed topic on the SDC forum and the answers go from early 90's Cavalier or equivalent vehicle, Slick Street conversion to complete subframe replacement with either OEM or aftermarket like Fatman Ind. unit.
The jury remains in session on the first two and with either you'll be tilling little used soil. The OEM and Aftermarket units have enough engineering in them to be passable but they take a very good fabricator.
One SDC forum member (Mike V.) has used 'vette parts but he has excellent engineering and fab skills.
My recommendation, unless you possess above average skills is either to be sure your front suspension is in like new condition with the quick steering arms or contact Morrision or the like about a new frame, expensive though. Bump Steer is not a fun thing.
I put a R&P on my 54K but the problem is it's never been over 45 MPH. So far so good but I'll bet in the long run, It will be replaced by something else.
Bob
-
I don't know what the 70's stickers looked like but this is the one from my 83 the PO said it came with. It's about 6 1/4" X 10 1/2"
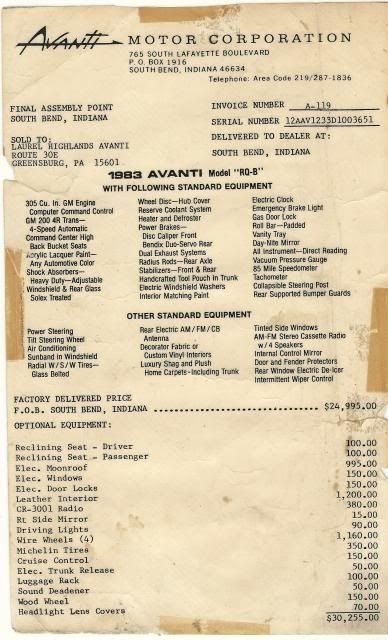
Bob
-
Of all the things I need to be checking into on my '79 I pulled the grill and bumper push bar last night.
Grill in great shape. Had to straighten a couple of bars. Should polish nicely.
The bumper cylinders pose another issue. I would like to see them gone but they are part of the frame horns and therefore not removable. Other than taking the sawzall to them or covering the ends with running lights, any sugestions?
I know this will change the originality of the car but they are so ugly IMHP.
You can remove the front safety bumper, cut off the parts that attach the bumper to the frame and reattach as it was to support the radiator and front bumper. The grill is made of 1/8" stainless steel rod and pieces can be Migged/Tigged to fill the spaces and return it to look like the earlier models. The body can be repaired with fiberglass and you'll never know it was cut up. If you need, I have a few shots of the mods on my 74 bumper bracket, but just looking at it will show you where you need to cut it at an down angle.
I'm not a fan of driving lights so they set in storage from both my 83 and 74. I use heavy duty headlights instead.
Bob
-
I agree with Gunslinger, Do it right the first time. When I bought my 83, my front end guy told me I needed a front end rebuild as yours did. I just bought the complete kit from SI, it was under $900 for the complete kit with rebuilt kingpins, bell crank, and all bushing and bearings for the kingpins and all the parts to rebuild the control arms too. The core charge for the kingpins is steep, they want them back, but zero sum when you return them. The discount for buying the entire kit is significant so don't piece-meal it.
Installation isn't difficult if you read the posts on the SDC forum and make a few simple tools and have access to a press. There is also a way to do it without the press but I have not done it that way. This is the install I posted on the SDC Forum http://forum.studeba...l-Replacements. The search will yield a lot more. The Avanti manual will cover all the kingpin and bell crank tolerances and installation for either you or the rebuilder
The Avanti, after alignment, handles very well for the suspension design and 8" wide tires on it.
Bob
-
I like your plan, post some pictures and enjoy.
As an aside, be sure you find the seats comfortable for long trips. I say that because you are planning to re-upholster, so covering a better seat would not be out of the question.
Bob
-
No offense taken, I'm very hard to offend anyway. I know the bottom and sides are because they are visible through the holes. The top attachment is the least of the worries as it's the last place to rust out.
I know the foam you are addressing quite well and, as indicated in my original reply, would be my choice if I had faith in the ability to seal everything from moisture. I spent way to many years in the permeation business to be comfortable with the ability to seal this area this well.
I'm not gospel on anything and would like to see you move ahead with the modification. If it works well then it would be a help to the entire owners group. The downside is I'll be somewhere else when the long term data is available. I just wouldn't do it on mine.
Bob
-
My 74 4-speed came with a 3:23 I believe. I think the automatic was 3:07. That will give you an idea. Otherwise you could jack up one wheel and count the wheel rotation versus drive shaft rotation when turned by hand.. A word of caution however, this won't work with a posi.
The Avanti.net website has a lot of data on Avanti's but the problem is that during this period, there was precious little documentation on the exact specs. During this time period a lot of them were built to customer order. My 74 should have a 400 SBC but the OP wanted a 350 and got same.
Dan Booth at Nostalgic has most of the build sheets from this era so you might find it on that document.
Good luck, Bob
-
The foam idea has some merit if it's closed cell foam which will keep the moisture from permeating into the trough. The problem is that the hog troughs have many places that the foam needs to seal. The entire surface between where the fiberglass and the metal needs to be sealed. The troughs themselves have small open areas where they are bent and the pieces are spot welded together as well as the holes used for the rivets and drains from the roof. If the foam could form a perfect seal between the metal that would guarantee no permeation of moisture then you might have a chance. The problem comes if any moisture does get in you have established a perfect environment for rust to start it's disastrous pass.
I just don't have the faith in a product not engineered to do the job succeeding. The other problem is that once filled with foam it's impossible to very difficult to reverse in case of issues.
What I did on my 83 after I repaired the soft areas in the hog troughs was to drill several 3" holes through the floor into the hog troughs for access and some smaller holes for the troughs to drain out the bottom. Then with a couple of brush variants I slathered POR-15 over every inch of the surfaces inside the hog troughs and let them drain until everything was setup. I then plugged the holes in the floor and added insulation and carpet.
This gives them a chance to dry out if they do get some moisture inside. As I said, I'm just not confident enough in keeping the moisture out by filling them up.
Bob

Auto Transmission Question
in 1984-91 Avanti
Posted · Edited by Avanti83
You are essentially driving a 1989 mid/full size Chevrolet, although much better looking. Personally, I'd ask around about a local shop that does "older" cars, of that era that is trustworthy, by reputation, and go talk to them.
Take 'em for a drive, be sure they know the trans and engine are 1998-99 chevy and let them diagnose it. You are far enough into the diagnostic era that they should be able to tell what the problem is in short order. Let them give you a quote and if it's reasonable, repair it. If they want to rebuild the tranny then I'd get another opinion or two. A rebuilt 4L60 is probably $900 or more.
I'm just not one to throw parts at a problem if I have to pay the freight. If it was mine, I'd just throw in a converter after I made sure I had a 12V signal to the connecter on the tranny that gave a signal when it should and see what happened but my labor is free so I'd only be out $70 or so. If they replace it after diagnosis, you'll probably have $300 in labor but the problem is solved. They may also know that there may be an answer from their experience that is a $25 connector and save you more.
An on-site analysis is always better than on-forum but I think you now know the correct questions to ask to find the right shop.
I hope that answered your question, if not, I'll try again. Bob