


silverstude
-
Posts
594 -
Joined
-
Last visited
Content Type
Profiles
Forums
Events
Posts posted by silverstude
-
-
While you're working your way through the wiring problems, you may want to go to your local NAPA or even Home Depot and get a can of CRC Electrolytic Grease. Disconnect every wire from its Significant other, put a dab of that grease in and reconnect. It will enhance the connectivity, prevent corrosion, dry connections and make life very nice, especially for light bulb sockets. You can't go wrong with it...
-
If there's no lip rolling under the fender, then it is definitely weaker. Might just flutter in the wind turbulence when driving at speed. I can't comment on how the bodies of an 83 were manufactured, but the lore is that by 1983, he factory did some of its best work on these cars. The seams were tight, tolerances close and very professional fit and finish. Hard to believe there wouldn't be any reinforcement behind the fender
-
Nice. You'd wonder why it was parked to begin with..
-
-
-
.......... and change the timing and carb jetting.
Interesting that all this can be done without causing any mechanical grief.
-
That's R-2353, right? Looks like it's mostly intact...
-
The hood-mounted strip appears to be a different cross section than the one used on the cowl.
Jim,
That cowl strip is important. I recall hearing somewhere, that the cowl section of the wx/strip was allowing hot underhood air to bleed by and get sucked into the cowl air intake..... warming up the interior. It's important that it seals correctly..
-
Check this info page... http://www.studebaker-info.org/Tech/repavIIMC.html
-
Put an R2 in it. ($$$$) ( not being cynical )
-
WayneC... Your photo is exactly like the one I have. The air cleaner base drapes over the side of the carb and allows that large cleaner element
-
Check your messages..
-
I still have the original from RQA0381. It has NO snorkels.
-
From the photos I have, each of those 4 switches are just pressed into the console. Probably have a plastic locking tab to grab the side of the hole. If you wrap a piece of masking tape around the end of a putty knife, use that to protect the wood. Then try and slip the keen edge of a penknife between the putty knife blade and the underside of the switch. These are polarity reversing switches. You can find them in a lot of places. Yours may have been a bit more proprietary in 1990, so I'd start looking at McMaster-Carr. If you find something that looks and works, pass the info on...
thx
-
Might be a bit late, but here's a 1970 RQA type
http://www.studebaker-info.org/DSCN2469m.jpg
You can see the bottom of the bracket. The belt adjustment is made from a piece that's bolted to the front of the exhaust manifold. There's another pic around with the bracket on the bench. Will try and dig it up..
.....and the dig was successful, but not the pic I thought... You can see the attachment point
-
I believe Dennis Paul has seen it first hand and can tell you more about it.
Thx, I'll contact him
-
Disregard the year and read it again....
-
I've been away...
Does this belong to anyone here?
http://rockford.craigslist.org/cto/5755884290.html
or has anyone inquired? Did you get the serial number?
thx
-
Bearing grease or red RTV
-
The starter cable from the (Ford) relay, gets bolted to the top GM solenoid lug. The bottom lug is a thick copper strap to the starter windings. When the GM solenoid gets energized from the Ford relay, the action of the solenoid plunger/lever moving the starter gear into the flywheel also closes the starter circuit.
-
1974 AMERICAN MOTORS JAVELIN 6.6L 401cid V8 (With Disk Brakes)
A-1 CARDONE 5473105 (54-73105)Cost Core
$ 65.99 $ 20.00 1 $ 85.99Here's a pic..
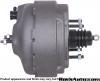
On the mounting bolts, install one .5" thick wall spacer (four total) between the booster and bracket. Same installation as all Avantis from 1973 - early 87
-
Thanks all, I found what I needed..
-
I've just read about complaints like this maybe three times in the past three weeks.., both here and on the SDC forum.
What you need to do is get a Ford style relay (...like the Stude Avanti...) and mount it away from the excessive heat, perhaps on the upper inner fender. Run your ignition with wires to it and the starter cables from the battery to the (Ford) relay, then to the upper bolt on the GM Starter.
You'll never have an issue again...
-
Look at the heavy metal bracket under the dash where the brake pedal rides. Notice there is a 1/4" hole that almost perfectly, lines up with the narrow side of the pedal on the drivers side. Sometimes there is a rubber snubber mounted there to cushion the brake pedal at rest. Using that hole to mount a NAPA SLS66 brake light switch and run the wiring to the switch. Might take all of an hour to do. Never have to deal with the hydraulic switch again

Avanti house
in Avanti Pub
Posted
Is the website avantihouse.com still viable?