


silverstude
-
Posts
594 -
Joined
-
Last visited
Content Type
Profiles
Forums
Events
Posts posted by silverstude
-
-
Sounds like a great place to start. The adjustments are easy and the switch is right under the shifter handle
-
On 5/16/2018 at 12:56 AM, drat said:
The turner brake conversation is great, it’s the first thing I did. I also put a wilwood master with a 10psi residual valve inline and a generic 8 inch booster for a firm pedal. I also Modified some bilstein shocks to work, taking the old shock tower cross bars out and puttin new bushings and pressing the old ones in the new shocks, I think they wer a Camero part number, replaced every bushing I could with dureling or Poly urethane everywhere, new zerks, (zerqs) ? and LUBE.. the front end requires lots of grease maintenance. Onvce to twice a year,depending on how much you drive, I had some front springs made, just have them copy yours... mine are shorter and stiffer , it lowered the car 2 inches front and I blocked the rear, had custom exhaust made to work with sanderson ceramic block huggers and clear the control arms with it being that low,...Etc etc.
nothing is ever plug and play on my rqa319. Lots of trial and error, and this forum have got me by so far. I’ve done motor work, moden fuse box and wiring loom, hid headlights, electric cooling fan, alarm, pro sound, 18in wheels, suspension, electronic ignitiion, exhaust, a 700r tranny conversion, posi rear end, (I destroyed th Dana/stude spider gears, and replacing them with more readily available parts seemed prudent). Basically anytime anything breaks I research and find or engineer or have engineered an easier better or more available part.
Id just search this forum and the SDC forum on what you want do first and go from there.
How about some pictures
-
On 4/7/2018 at 11:26 AM, mfg said:
RQB3654?....WOW!..my own '83 Avanti RQB3655 followed your's down the production line!!

Was it on a Monday? ?
Send me a picture...
-
The door handle lock spring looks like an Omega symbol. The handle shaft has 2 slits cut in the sides for the spring to slide through. The slits should be parallel with the handle, so using the tool, it's either down from top or up from under the handle
-
-
-
one jack on the axle pot, the other on the center pin of the front crossmember. Once up, place jack stands at the frame points mentioned above
-
Check out the pertinent topics on this link
http://www.studebaker-info.org/rjtechdec2017p1g.html#PowerWindows
Your motors could probably use a fresh shot of grease in the gears, as well as the rollers on the regulator/ sliding parts. They draw an awful lot of current and can cook themselves quickly if let to strain too often.
-
Ja! Autometer...
-
-
Many cars have not been listed in any recent inventory or club rosters for the entire time of their existence. Send more pics when you can.
thx
-
Did you get the serial number?
-
Yep,
Dorman "Help Kiosk" part #31000. It appears to be what is needed.
-
Here's a trick learned a long time ago.. In the mid 80's when personal computers were coming of age, there were a ton of ancillary pieces being produced. One was a screen filter for 7" CRT's. They fit inside the square headlight bezel perfectly..
-
Golde Sunroof
-
Here's one on Ebay
https://www.ebay.com/i/192358276720?chn=ps (B/W R281P) Matches the new one I've had on my shelf for the past 30 years
-
Camaro
-
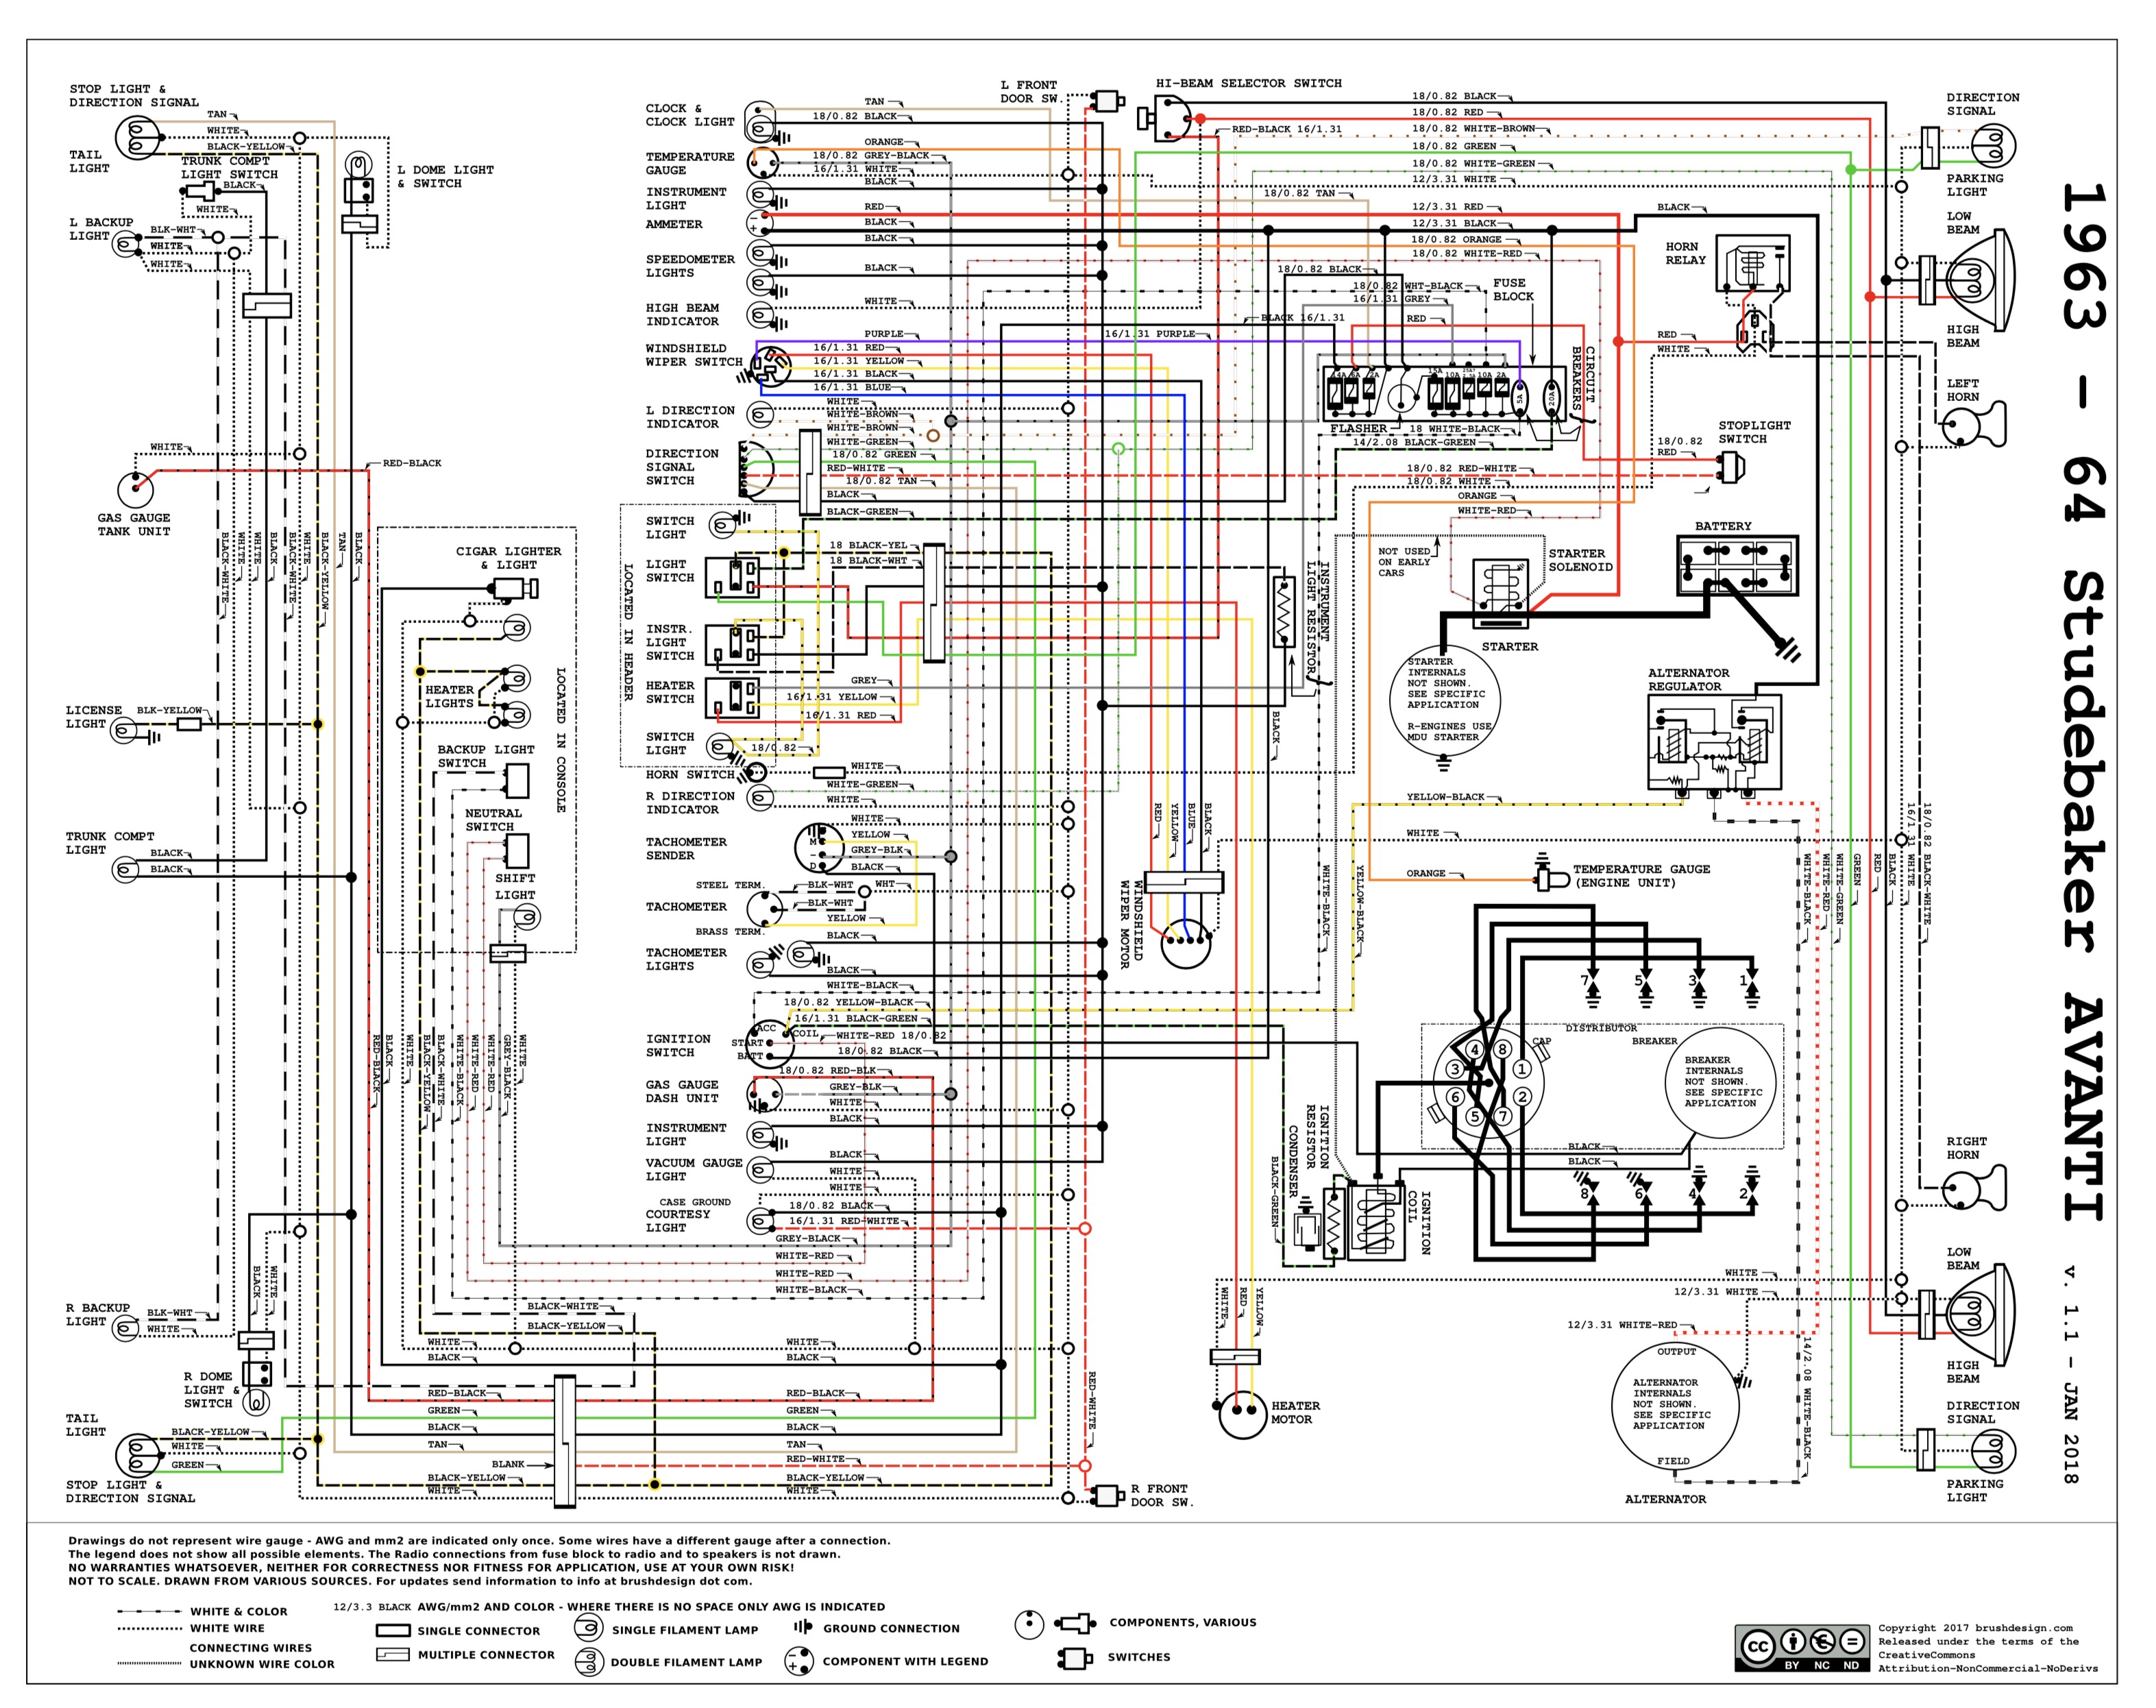
Here is a new drawing that was offered to me to post / Might be of some help
-
Where did you get the ownership info?
-
I believe Jon Myers acquired that engine around 1999
-
Depends on what you want to do to the body. I did mine in a garage by initially building pylons under the trough corners, raised the car enough to unbolt the chassis and lowered it to the floor. Next was to insert a couple 4x4 posts between pylons under the firewall and another at the rear, then continued to raise the pylons till the chassis could be rolled out from underneath. Was a bit labor intensive jumping around shimming the pylons little by little, but method was safe and secure. The car was fully intact body-wise when this was done. If you need to work on the troughs, this would not be the way to do it.
-
To insure the pistons and pads are parallel with the rotor...
-
I have to agree that the DOT5 silicone fluid ( No matter how careful you are) will have microscopic bubbles suspended in solution and they will cannot and will not be bled out, causing less than a solid pedal. The better side of the argument in using this stuff is the long life of the components.
One other damning problem with the stuff is, never get it on an unpainted surface or it will get absorbed and migrate through the strata causing a parade of horrors with your paint.
-
Heat insulation?
in Avanti Pub
Posted
The cooling kit was a lightweight ribbed hose set that routed from the transmission shifter area to the vent area under the intake grille at the windshield. The hoses were attached to a pair of ~1" tubes that were fixed to the floor of the under grille vent area and these tubes had 'rain hats' on them. I'm not sure if all early cars had these tubes as they were only used for the cooling issue. There is no air control, so if the tubes were not attached, the intake air would dump right behind the dash. Correctly routed, they dump into the area under the shifter quadrant. It does make a difference to have these installed, as the shifter can get pretty hot and that heat radiates into the car. However early cars may just have the flat floor of the vent to divert rain down into the hog troughs and no means to connect a hose. No sure if the factory kit had the tubes to add if necessary