ronmanfredi
-
Posts
341 -
Joined
-
Last visited
Content Type
Profiles
Forums
Events
Everything posted by ronmanfredi
-
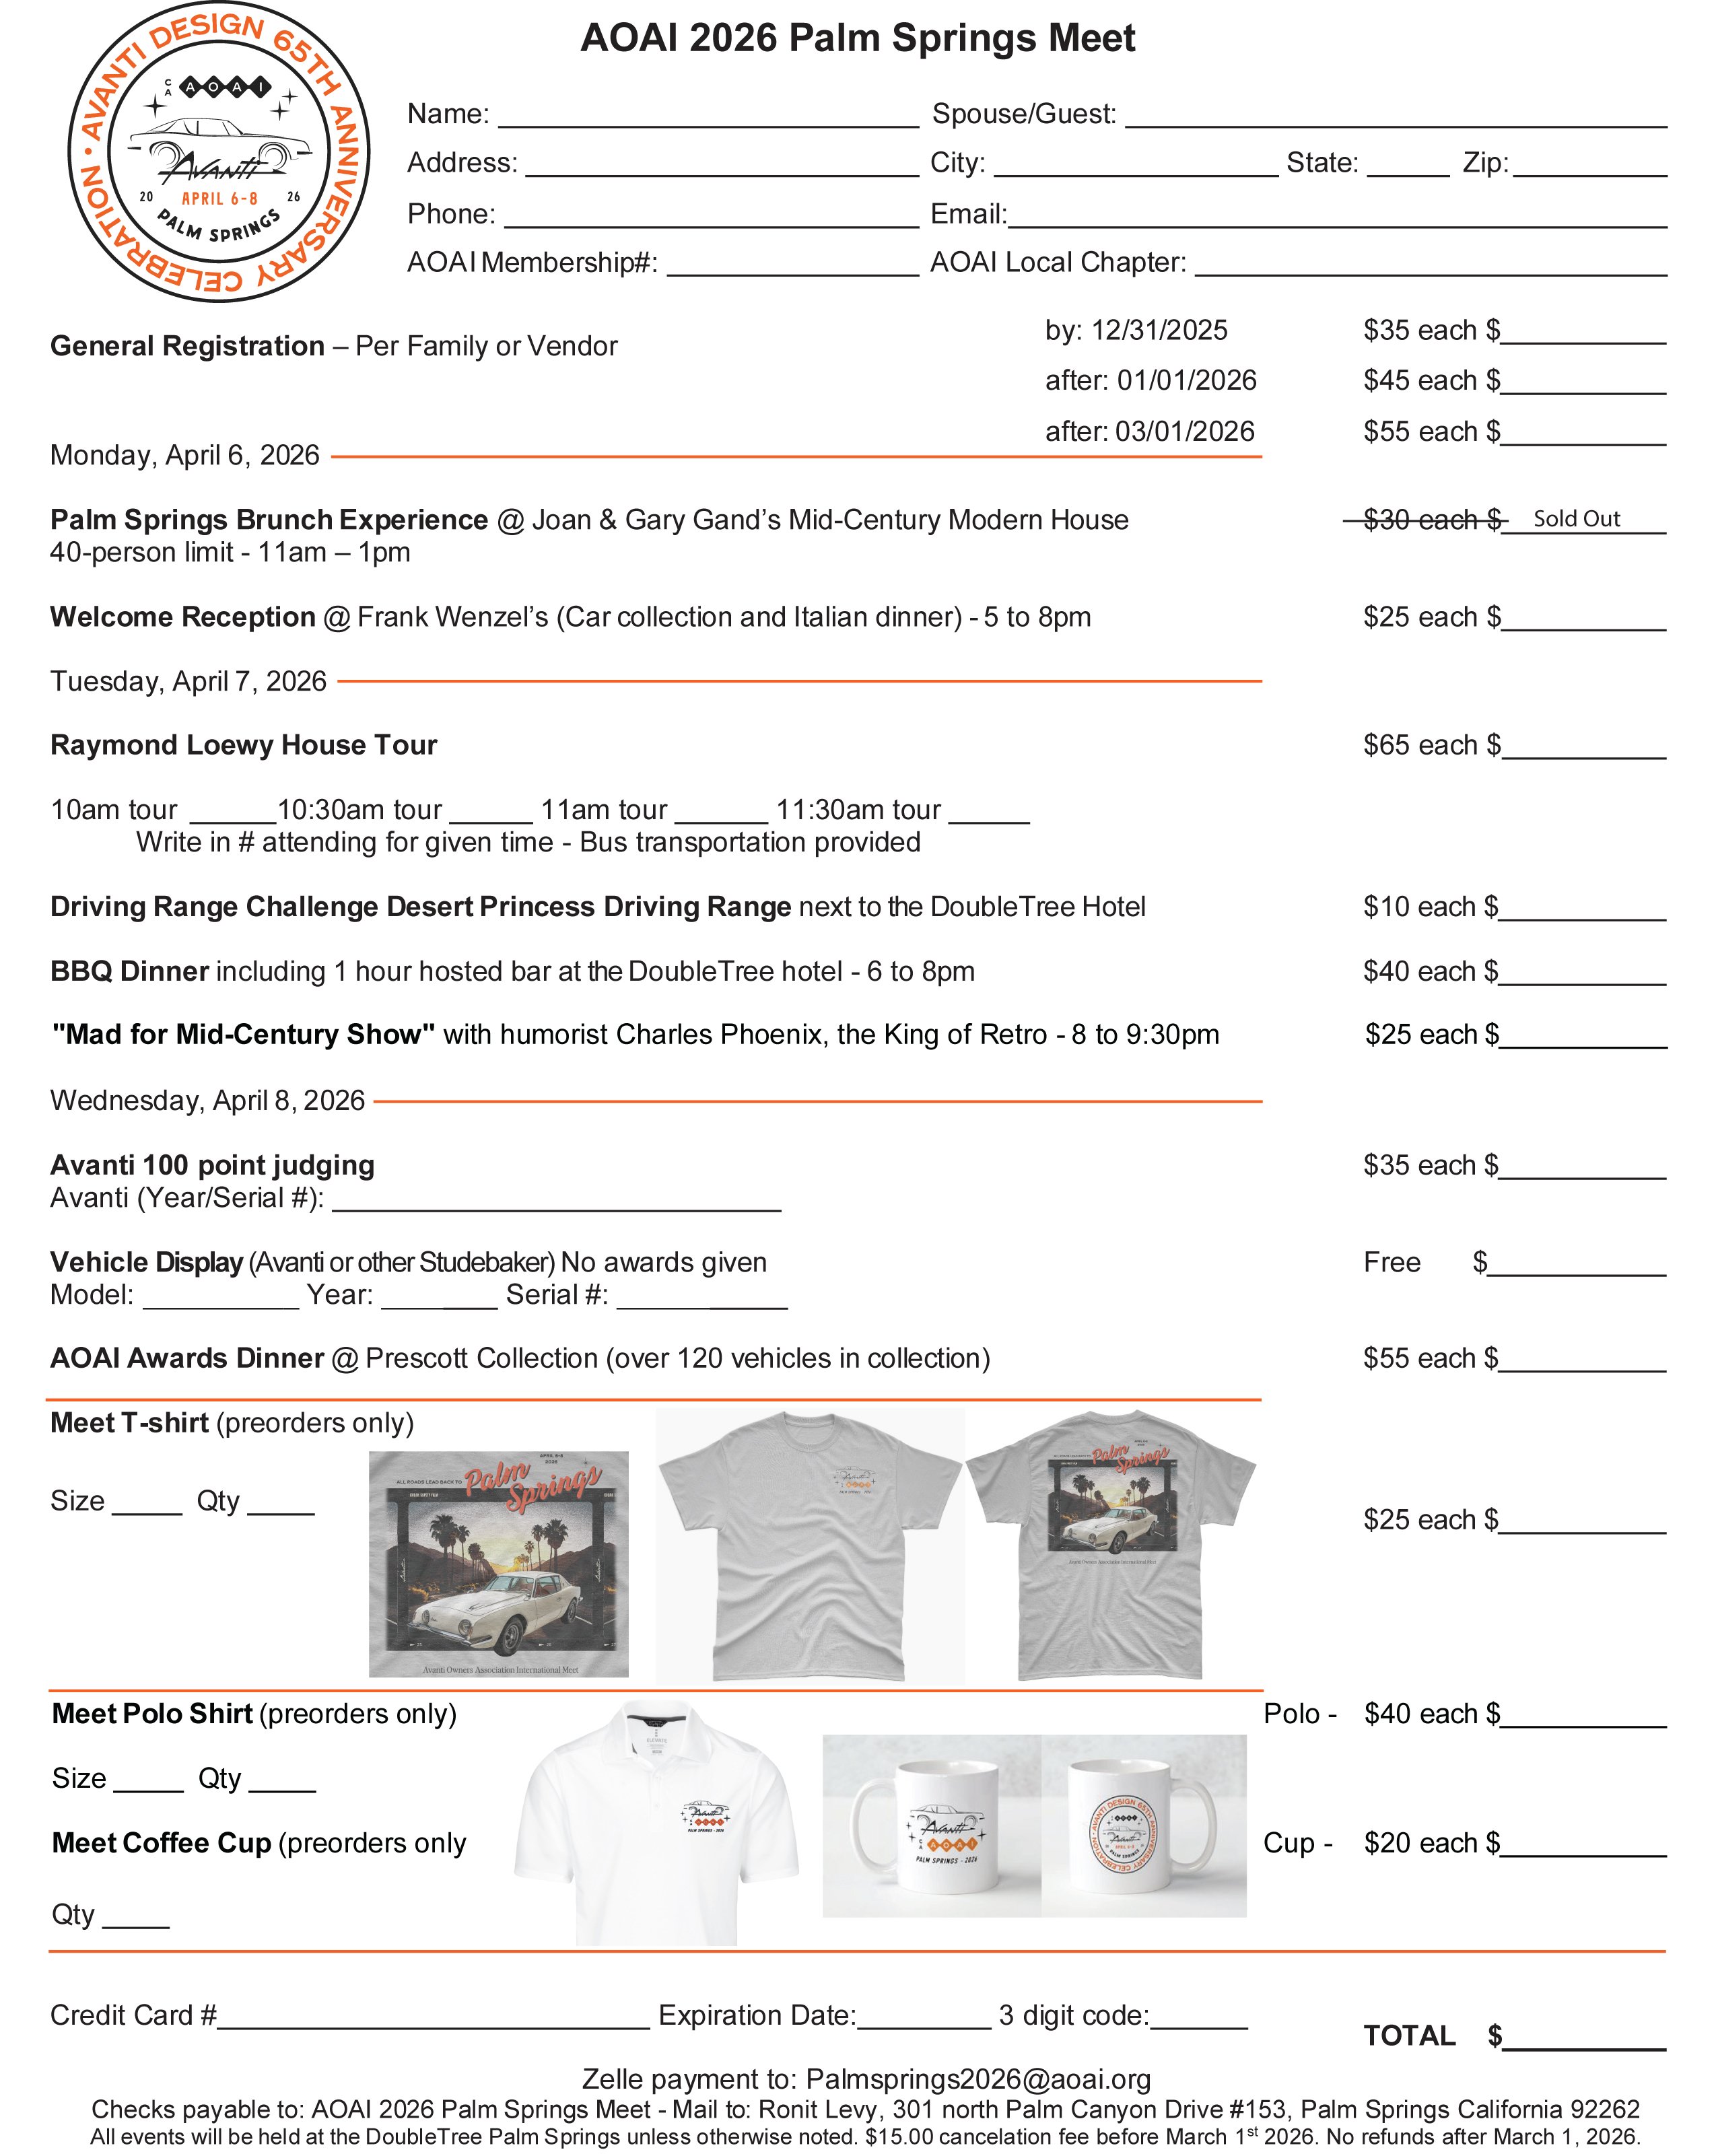
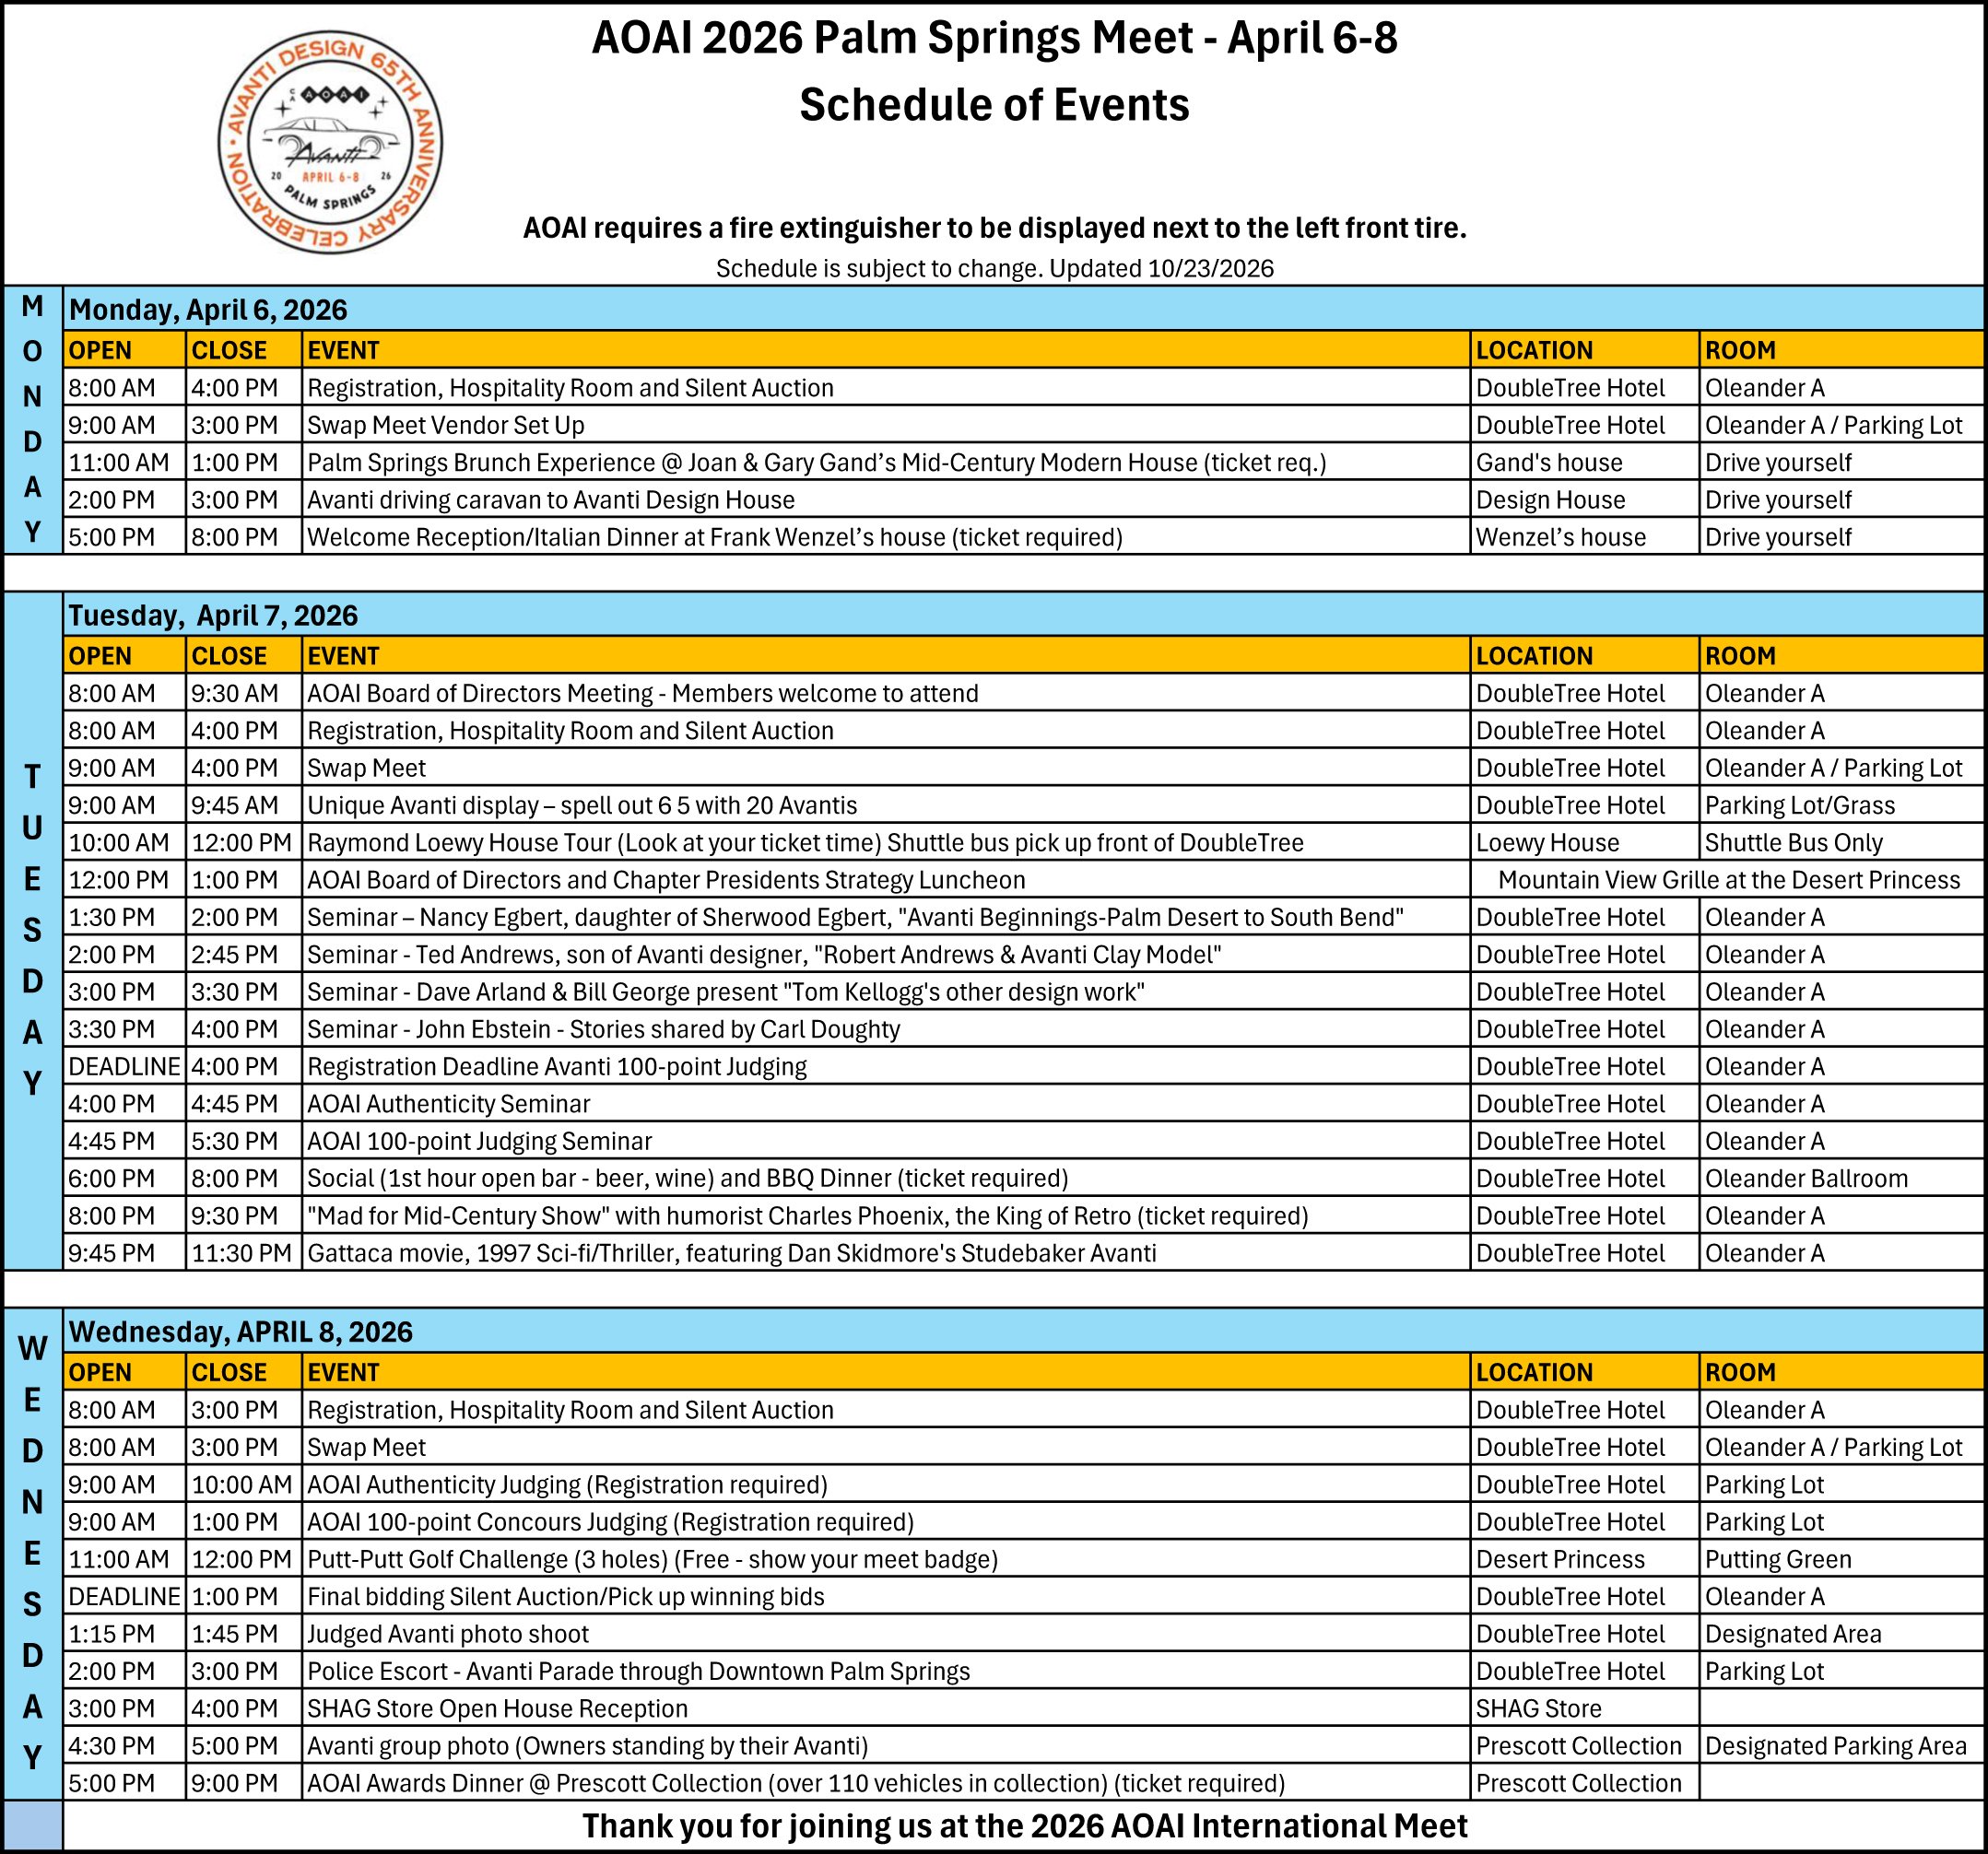
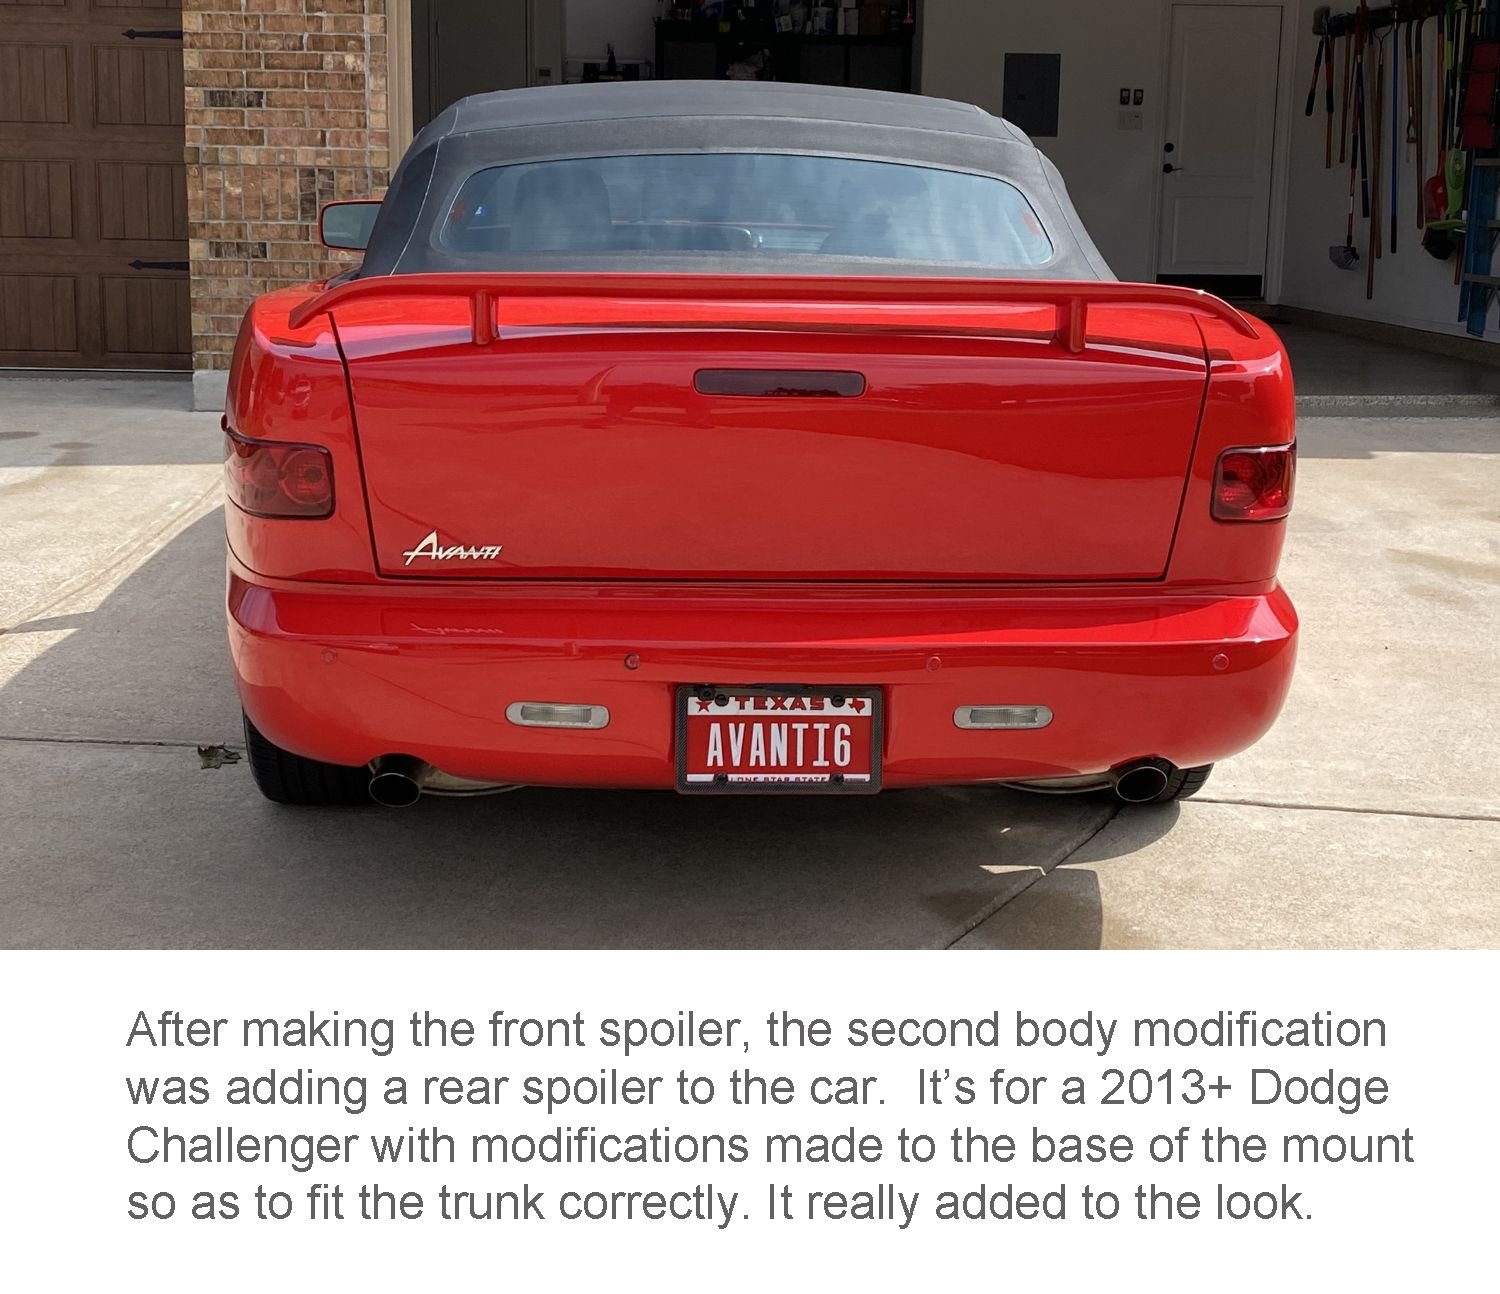
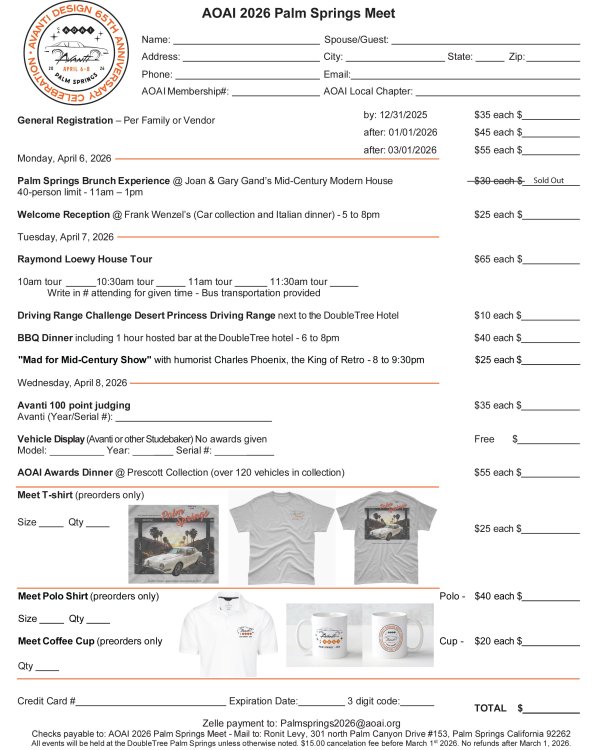
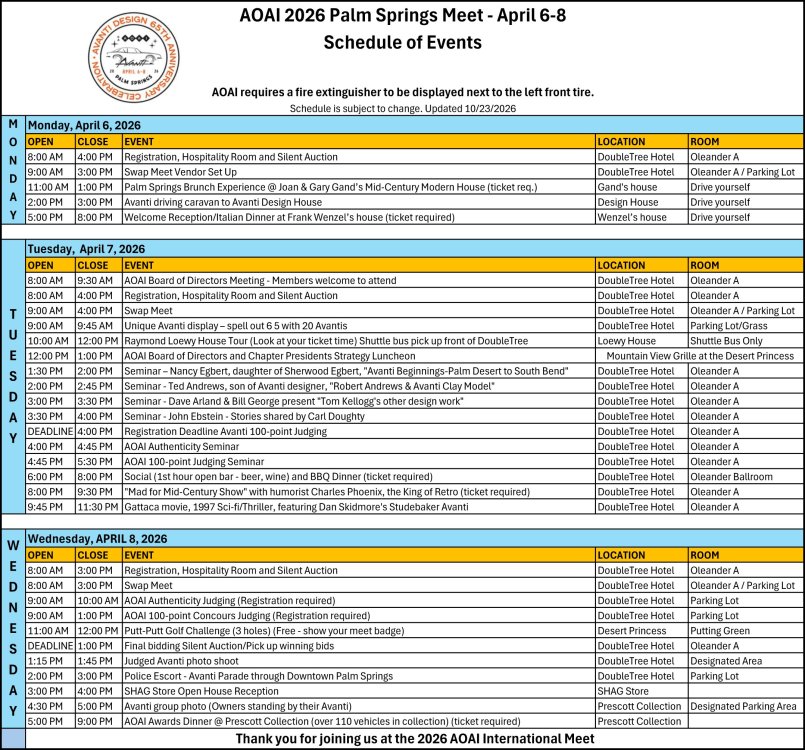
Palm Springs California, April 6-8, 2026. Attached are images of the registration form and the schedule of events. This information will be on the AOAI website soon and the next issue of the magazine BUT please know that this information was available at the Washington Penn 2025 meet and dozens of owners started signing up then.
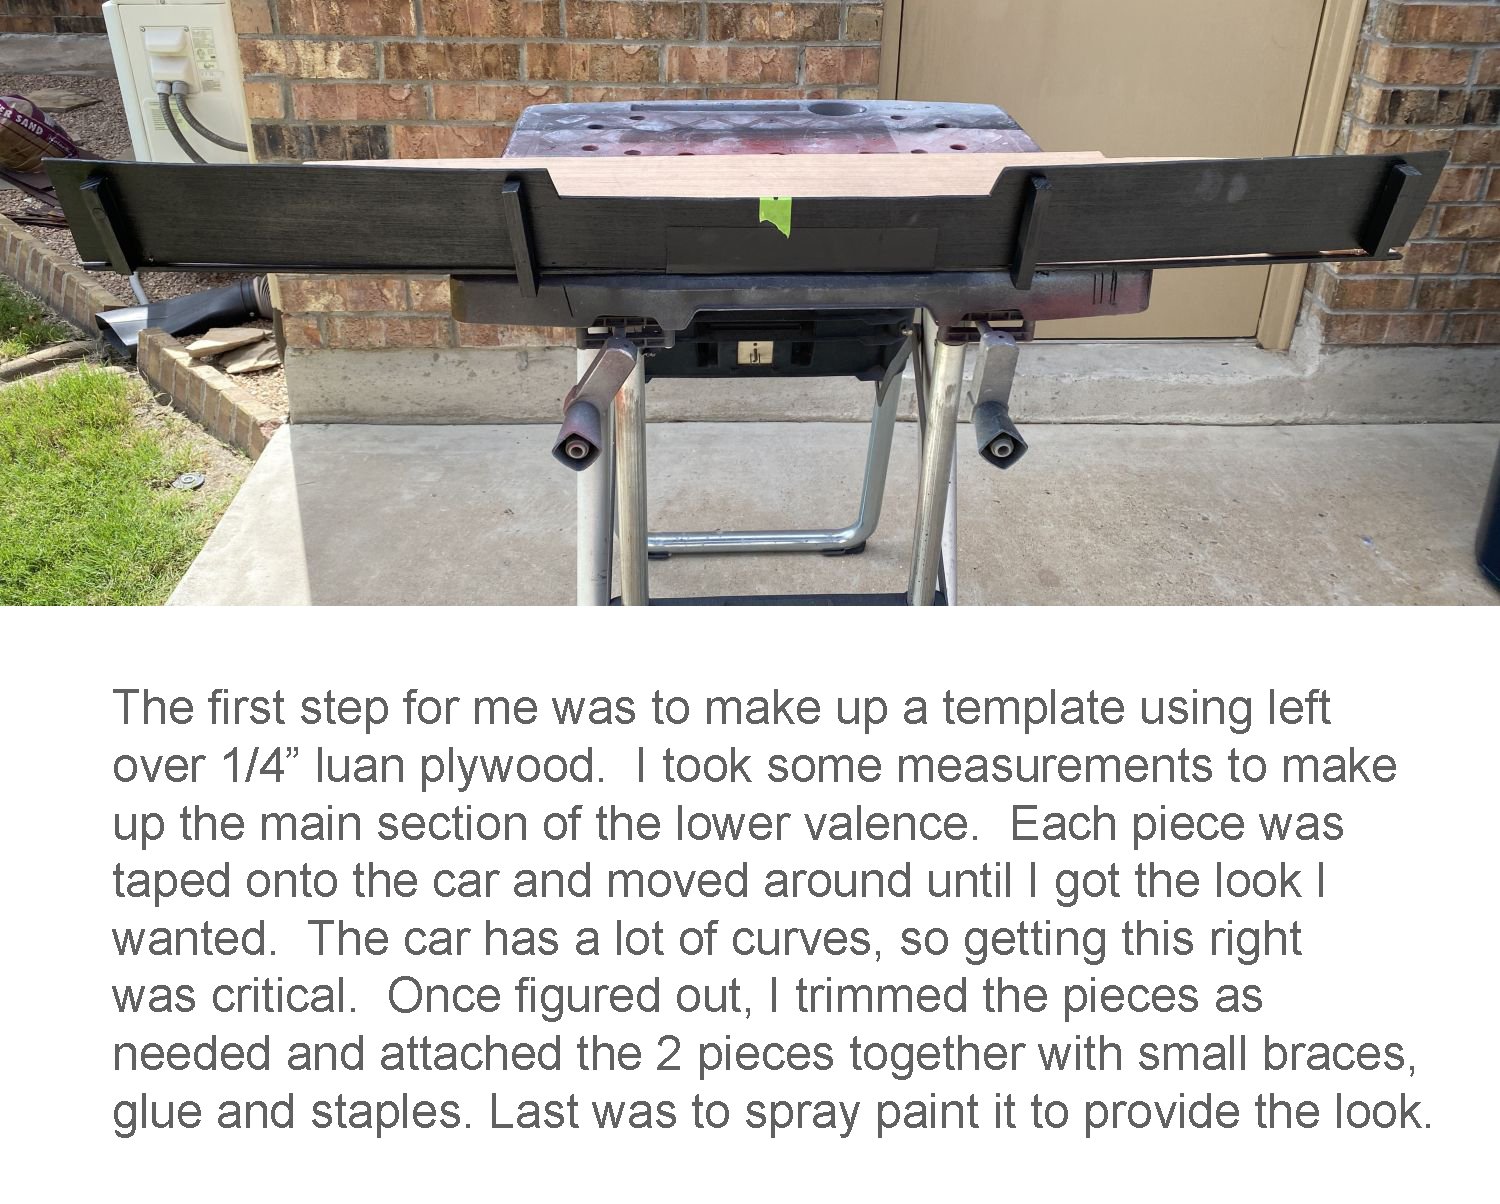
-
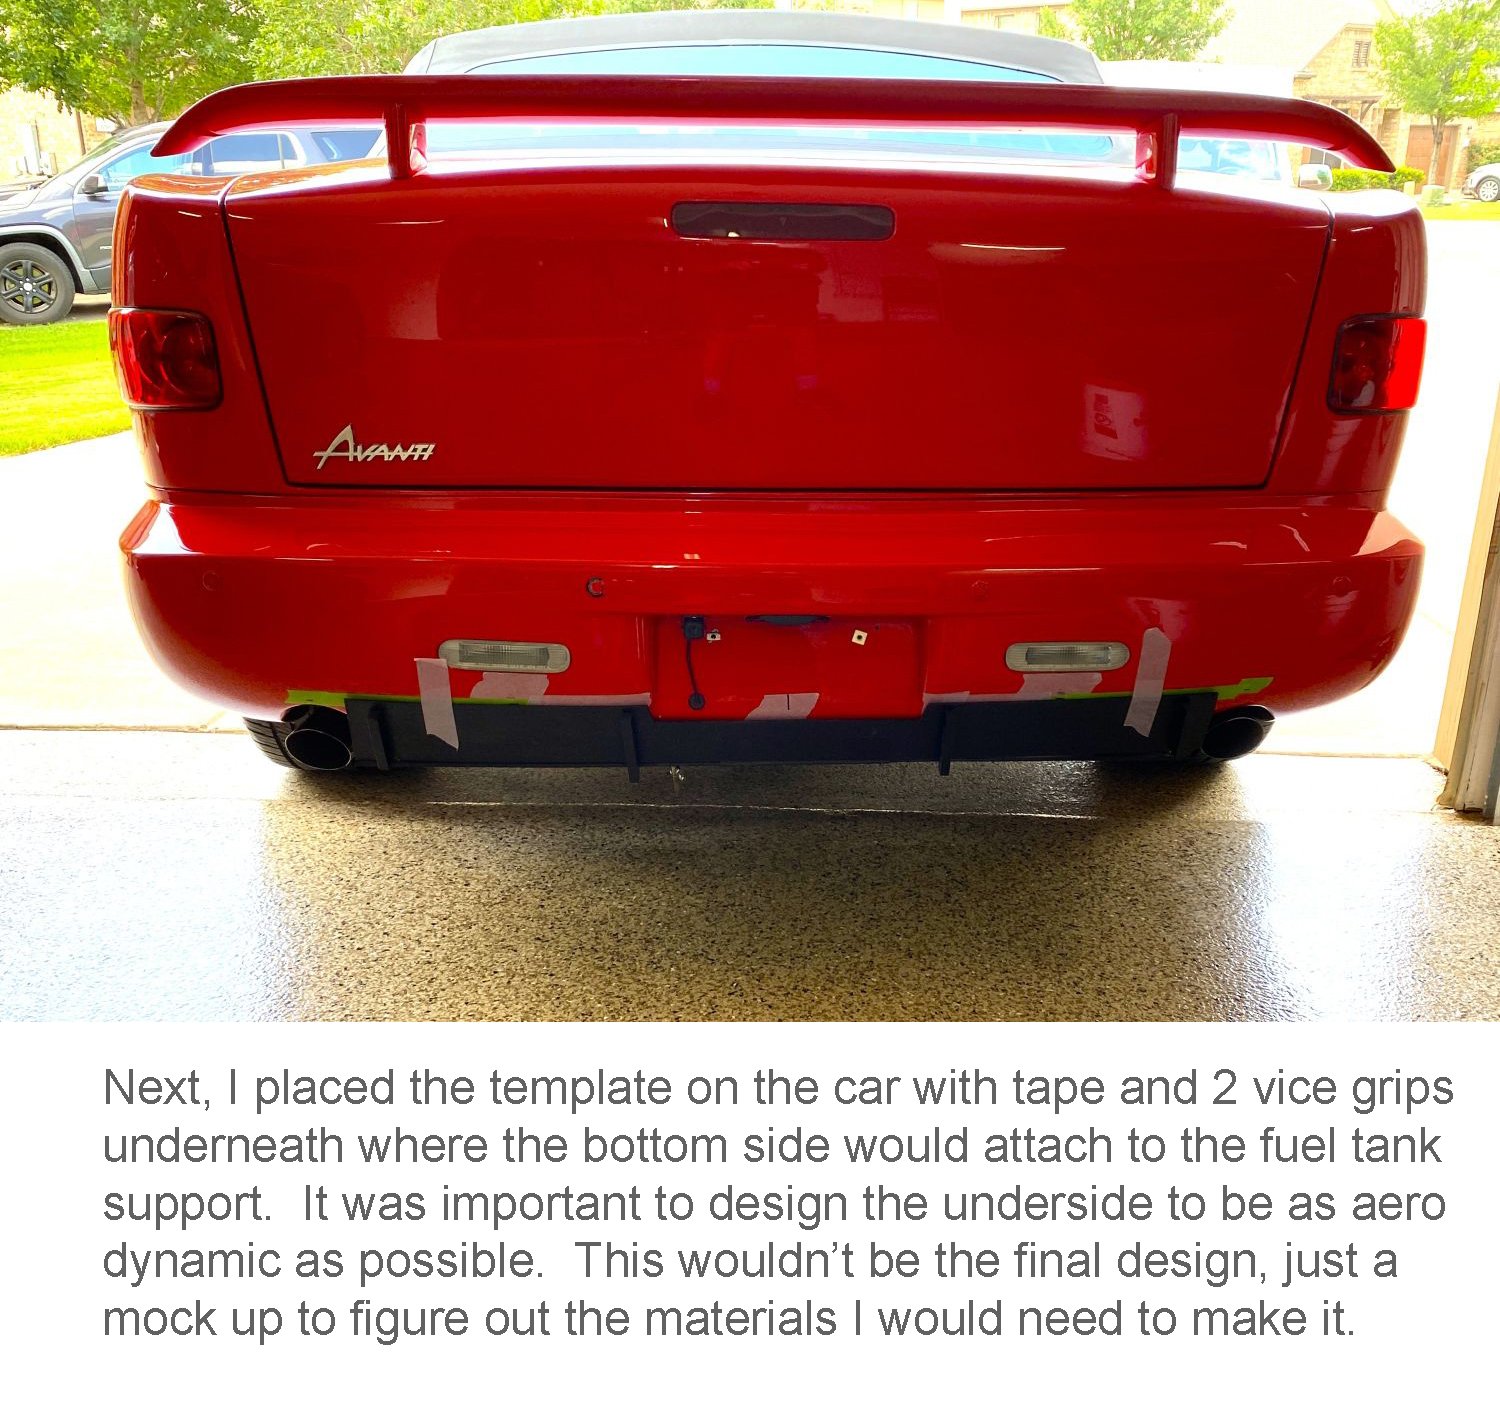
The 2026 AOAI Palm Springs Meet will be Monday April 6 through Wednesday April 8 in Palm Springs California. The Raymond Loewry House Tour is one of the events planned. The guest hotel is the DoubleTree by Hilton Golf Resort Palm Springs, 760-322-7000. Recommended stay is: arrive Sunday 4/5, depart Thursday 4/9.
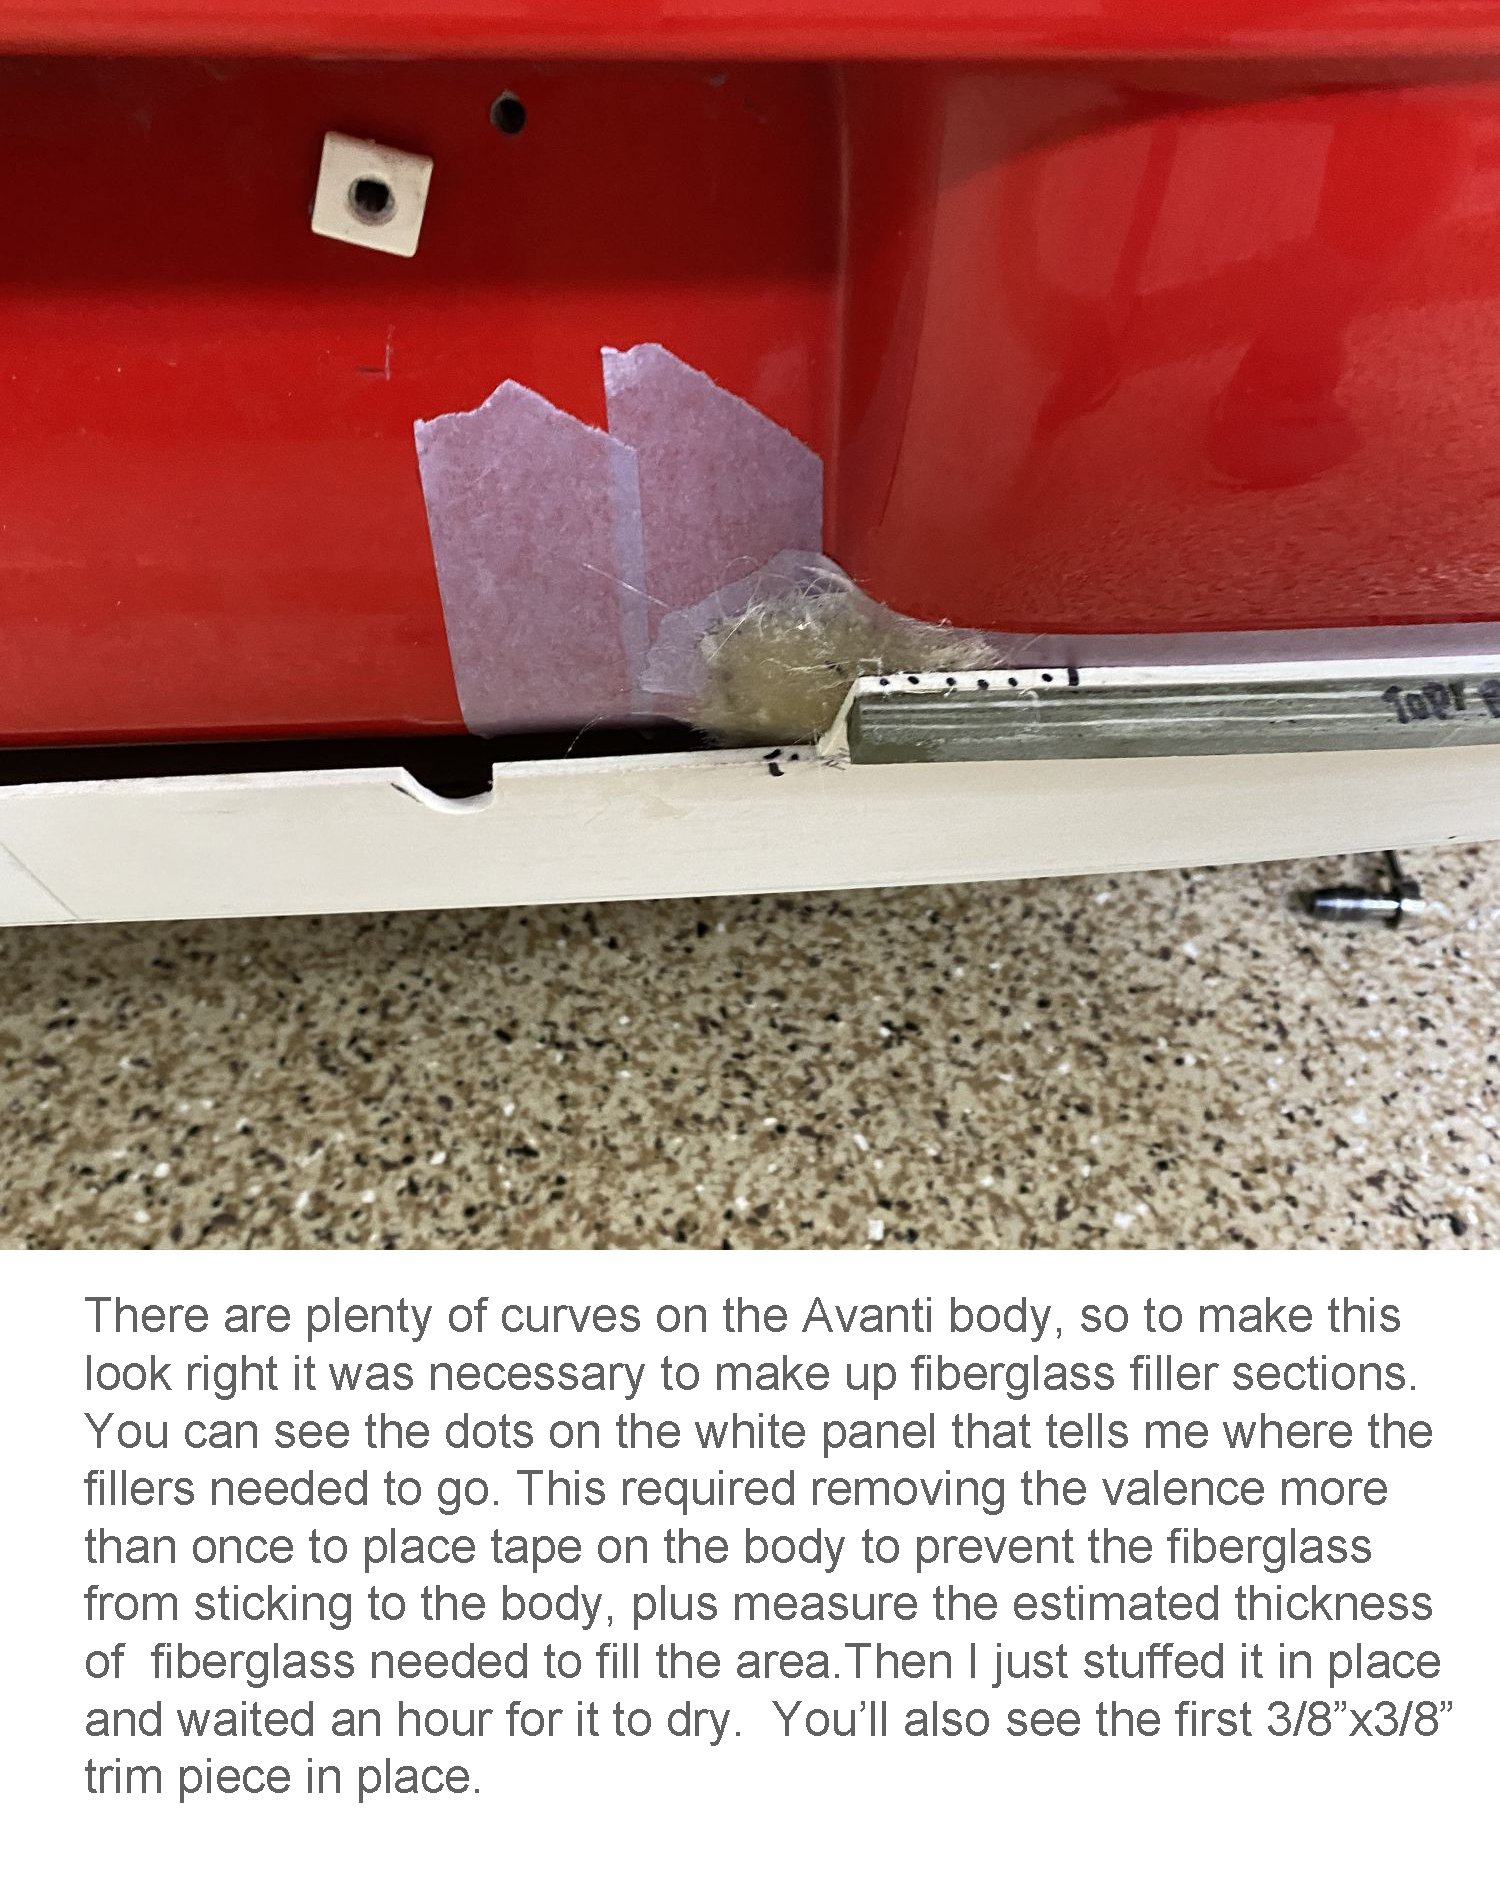
-
Nice looking car! If it were me, I'd contact Turner through his website.
-
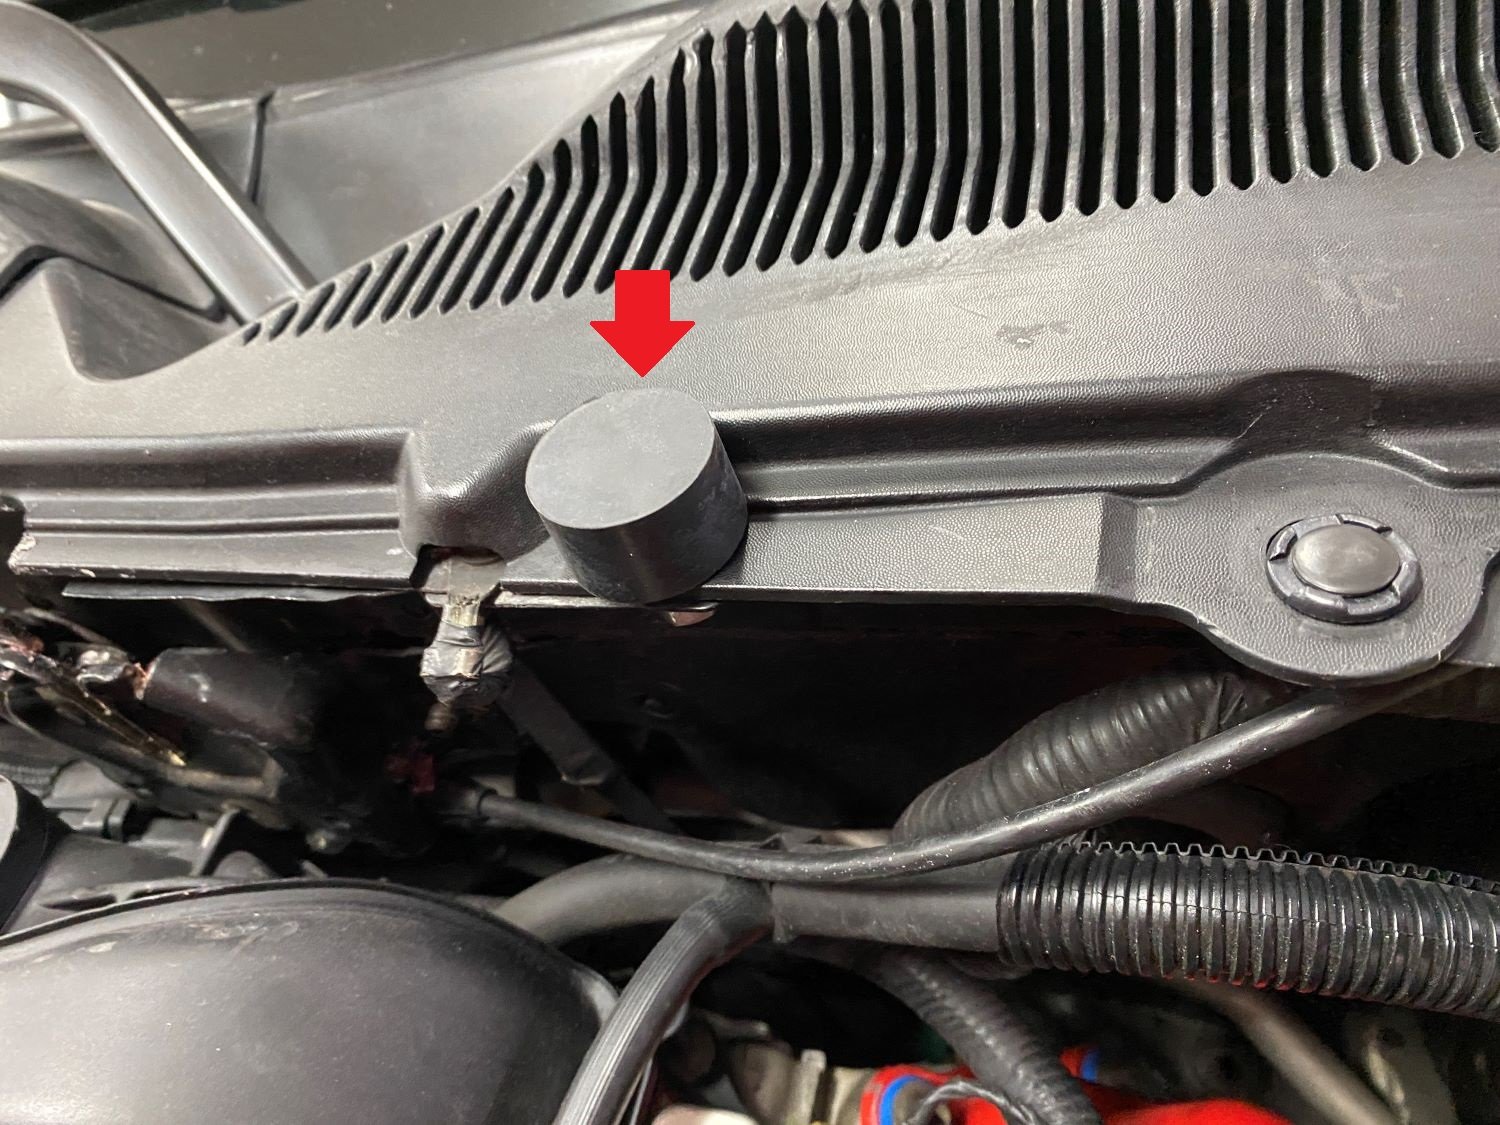
 Our 2006 Avanti like others, have had a problem with the rear corners moving/vibrating when hitting bumps. Adjusting the hood helps some, but doesn’t fix it. Some owners have added hood pins which go through the hood or installed a latch on each corner similar to the original Avanti had. As we were traveling to the AOAI meet this year as a passenger, I could see the corner bouncing around at times and it hit me; why don’t I figure out a way to have a magnetic latch to each side? The electro-magnet would turn on when the engine was running and off when parked. Once back home, I started doing research on electro magnets and found a company called APW Company who makes all kinds of permanent and electro magnets, so I ordered two EM100-12-122 1 ½” wide electro-magnets and two matching plates. The magnet have a rating of about 70 pounds which means it takes 70 pounds of pressure to remove the plates from the magnet. Next was to decide where and how to mount them. I decided to mount the magnets next to the outer hood stops using a thick aluminum bracket that attaches to the hood stop threaded shaft. The brackets will need some twisting and bending to meet the plates on the hood correctly. (the hood is not parallel to the hood stops so the bracket has to be bent so there is full contact between the magnet and plate). To wire the magnets up, I placed the ground lead on the screw that holds the magnet to the bracket, which is grounded to the metal inner fender. For power, I went to the harness close to the ignition switch and tapped into the white wire with a yellow tracer. I placed a 5 amp fuse inline with the power wire. The electro-magnets draw about .4 amps each, so 2 of them would be under a 1 amp draw. We then went to a car show, which was a 4 hour round trip and no matter what kind of bump in the road, the hood corners never moved at all. The problem was now fixed! One of the other issues with the hood latching is flex in the hood latch firewall section and as you continue to tighten down the hood, you are actually pulling the hood down in the middle. With the 2 pieces of plastic trim under the wiper arms removed, you can grab that firewall piece of metal and move it back and forth with little effort. To correct this, I took a piece of aluminum metal and added a brace, which eliminated any flexing of the latch firewall. (picture 3) Lastly, I had already placed a hood stop close to the latch to hold the hood firmly in place when latched. (picture 4). The process I would use to do this again is to install the brace, install the hood stop, adjust the hood latch and stops and then install the magnets. For our car, the latch brace, corner stop adjustments and electro magnets have eliminated all hood movement issues.
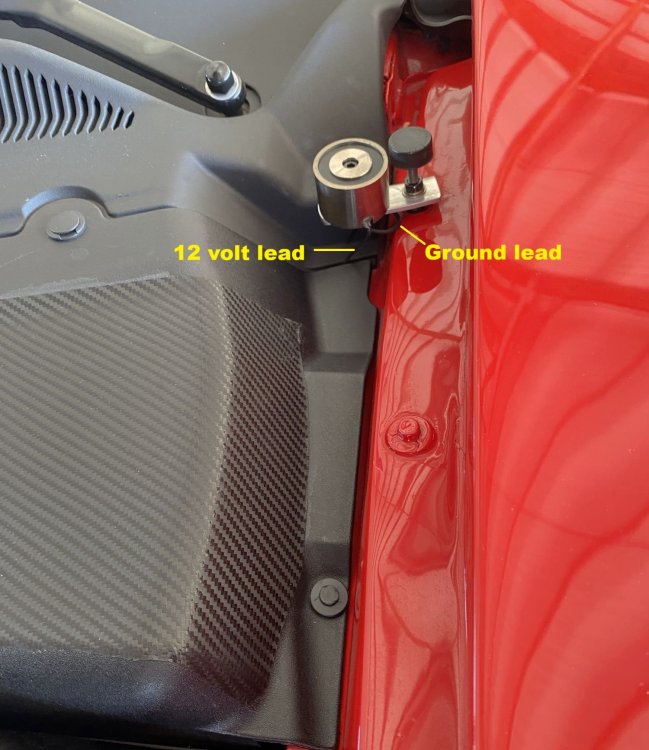


-
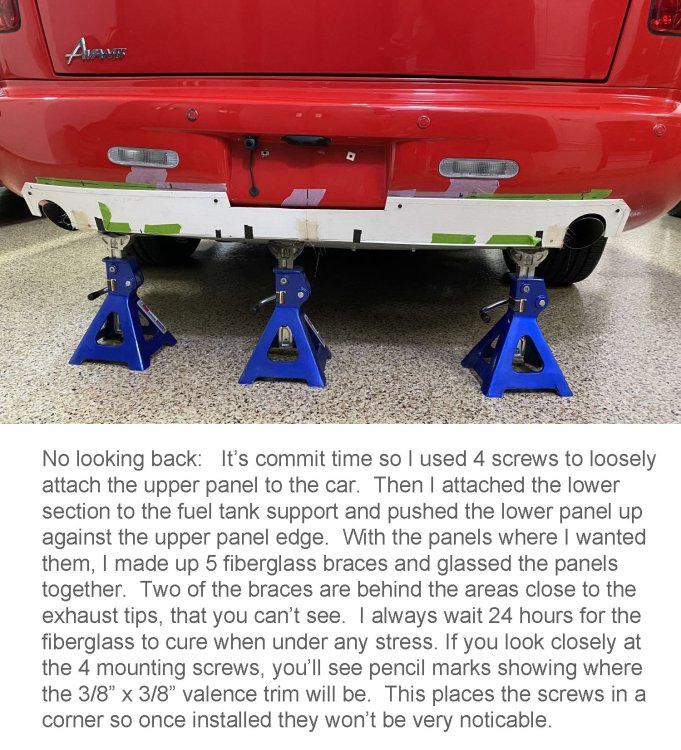
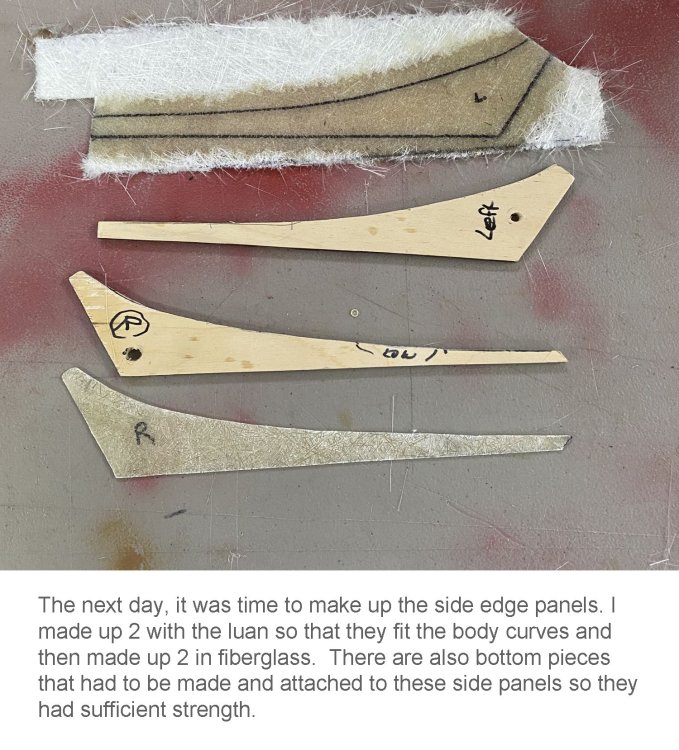
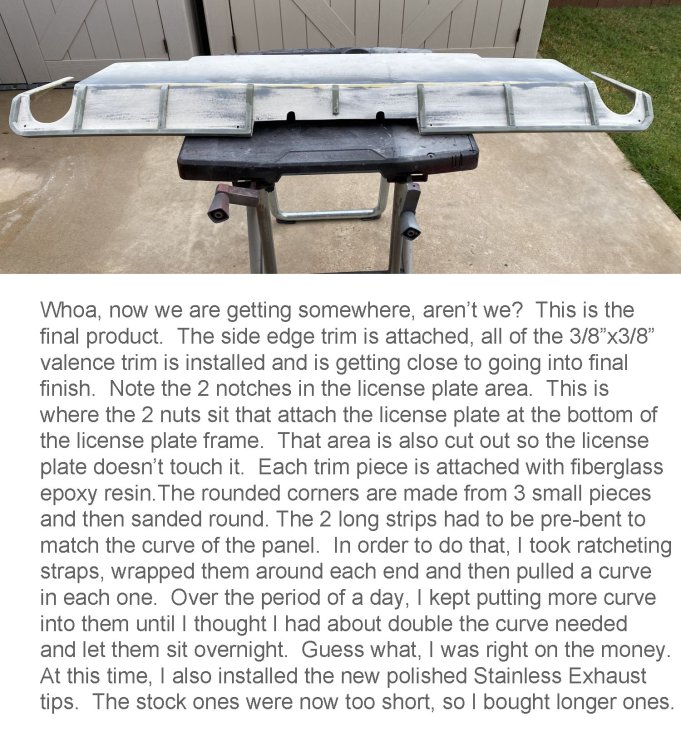
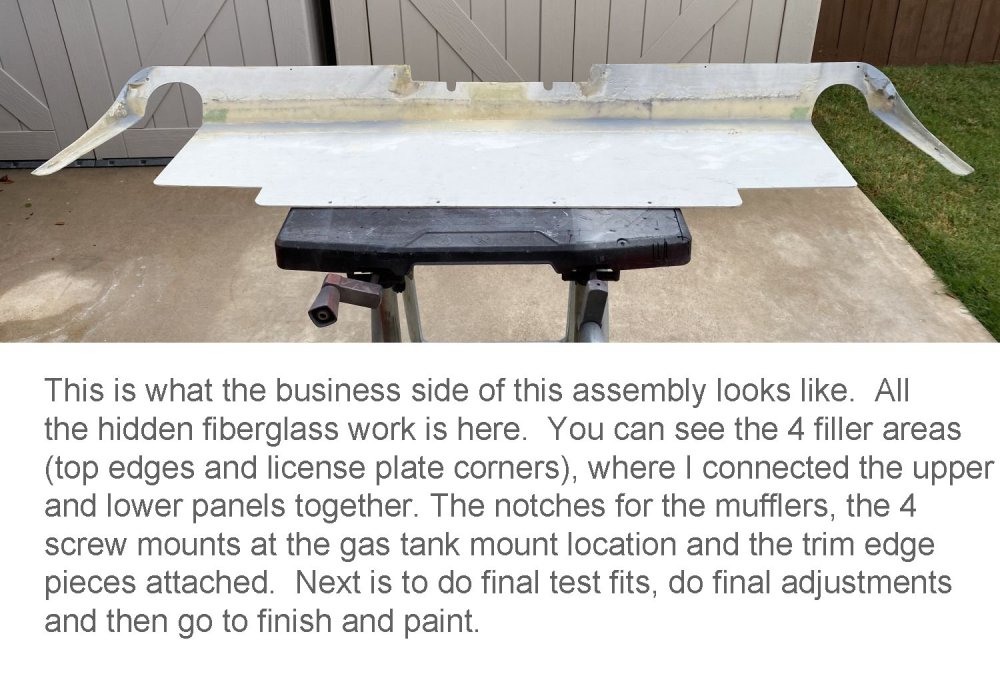
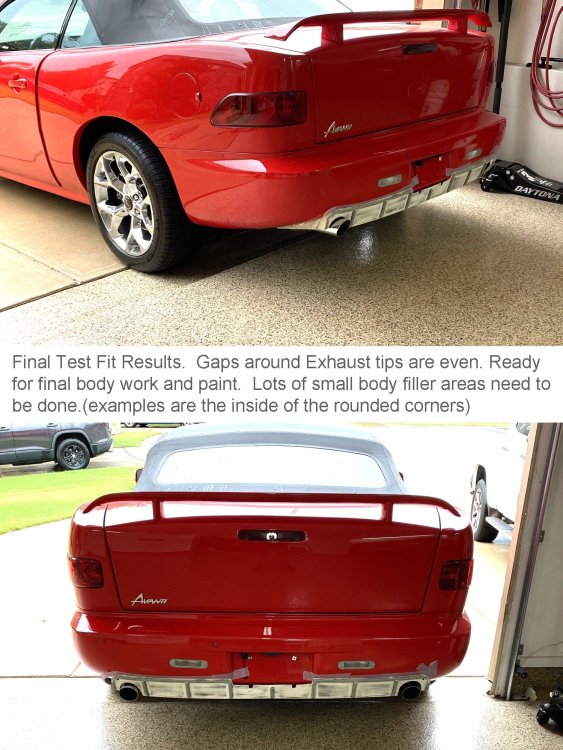
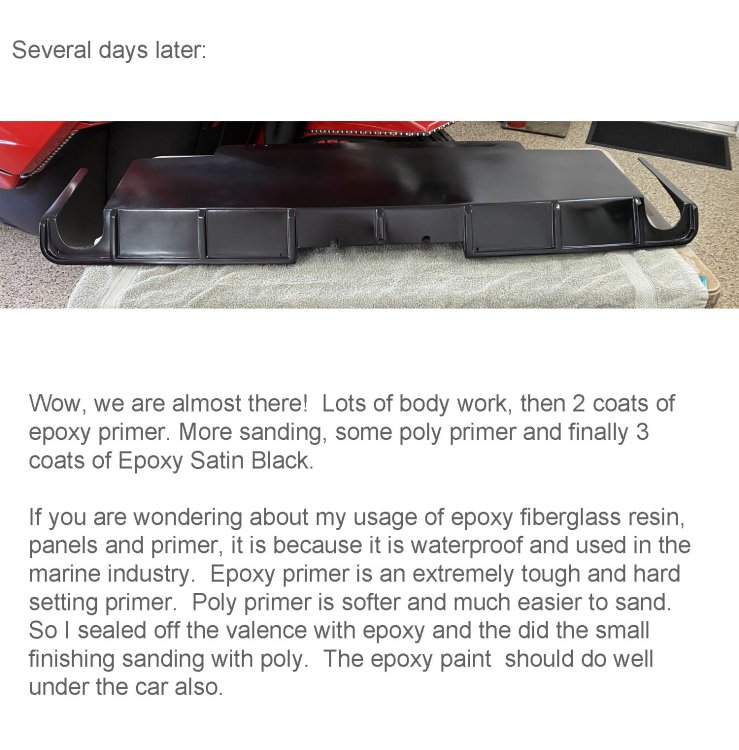
2006 Avanti Lower Rear Valance
ronmanfredi replied to ronmanfredi's topic in 2001-2007 Avanti models
I don't think there are many purists on the 2000s cars. Even if there are, it doesn't make any difference to me. Valuation of these cars doesn't compare to the 63-64 Studebaker models. I know without a doubt that they will increase the value of the car based on comment made to me at the AOAI - SDC dual meet a couple of weeks ago. My car received a First Place award with 98.33 points out of 100. I also received the Longest Distance Traveled award for 1375 miles driven one way. Since back home, I replaced the windshield since there were tons of small paint chips in it. Final work is a new top due to wear and tear. -
How many Avantis are still in existence?
ronmanfredi replied to Ronny Daytona's topic in Avanti Trivia
I'm going to see if we still have any control over the site and possibly bring it to life again. -
Ok, makes sense.
-
The 200r4 transmission has a computer operated lock up converter as well. When removing the computer, you can retain the lock up converter by installing a kit in the valve body, which engages the lock up converter once the transmission shifts into 4th gear. I'm not sure whether or not there is a kit for your 350C but you should check just in case. Beats the manual switch in my book.
-
I love smart butt comments mfg! First of all, I don't expect anyone's spouse, who may drive their Avanti like ours, to have to remember to engage the lock up converter every time the transmission shifts into 4th gear. The lock up kit in the valve body has been around for decades and locks up the converter pretty much as soon as the transmission shifts into 4th gear. Almost all modern transmissions lock up the converter in top gear as soon as it is selected since it's an overdrive gear and slippage only costs you fuel mileage and some performance. With that being said, please feel free to flip your toggle switch in the console and I won't bore you with my bedtimes or amount of rest that I get each night. LOL
-
It would probably perform better without the ECM. The transmission lock up converter is controlled by the ECM so when you remove it, you lose the lock up converter. Some people will tell you that you can put in a manual switch and activate the converter lock up every time it goes into 4th gear. For me, that's a bunch of activity that I don't want to deal with, so I'd invest in the kit that goes into the transmission valve body which automatically locks up the converter in 4th gear. While that's being done, you can change the transmission filter also.
-
Twin Track / Power Lok rebuilt. Plates and discs.
ronmanfredi replied to Leo B's topic in 1963-64 Avanti
Looking at the Avanti parts book and service manual, it only shows 2 discs using the same part #, the center plate and 2 outer concave plates with the same part #. I'm wondering if your kit is incorrect. It also shows the 2 concave plates being installed with the dish pointing towards the discs. -
They do, I bought a kit off Amazon that includes multiple sizes and the tool in a nice case. Since then, I've been using it A Lot !
-
Hood fiberglass separating / hood hinge cause??
ronmanfredi replied to A83's topic in 1965-83 Avanti
If it has already been re-bonded, then either the work wasn't done right or the fiberglass is actually coming apart. Do you know how they re-bonded it? -
Can you use a nutsert?
-
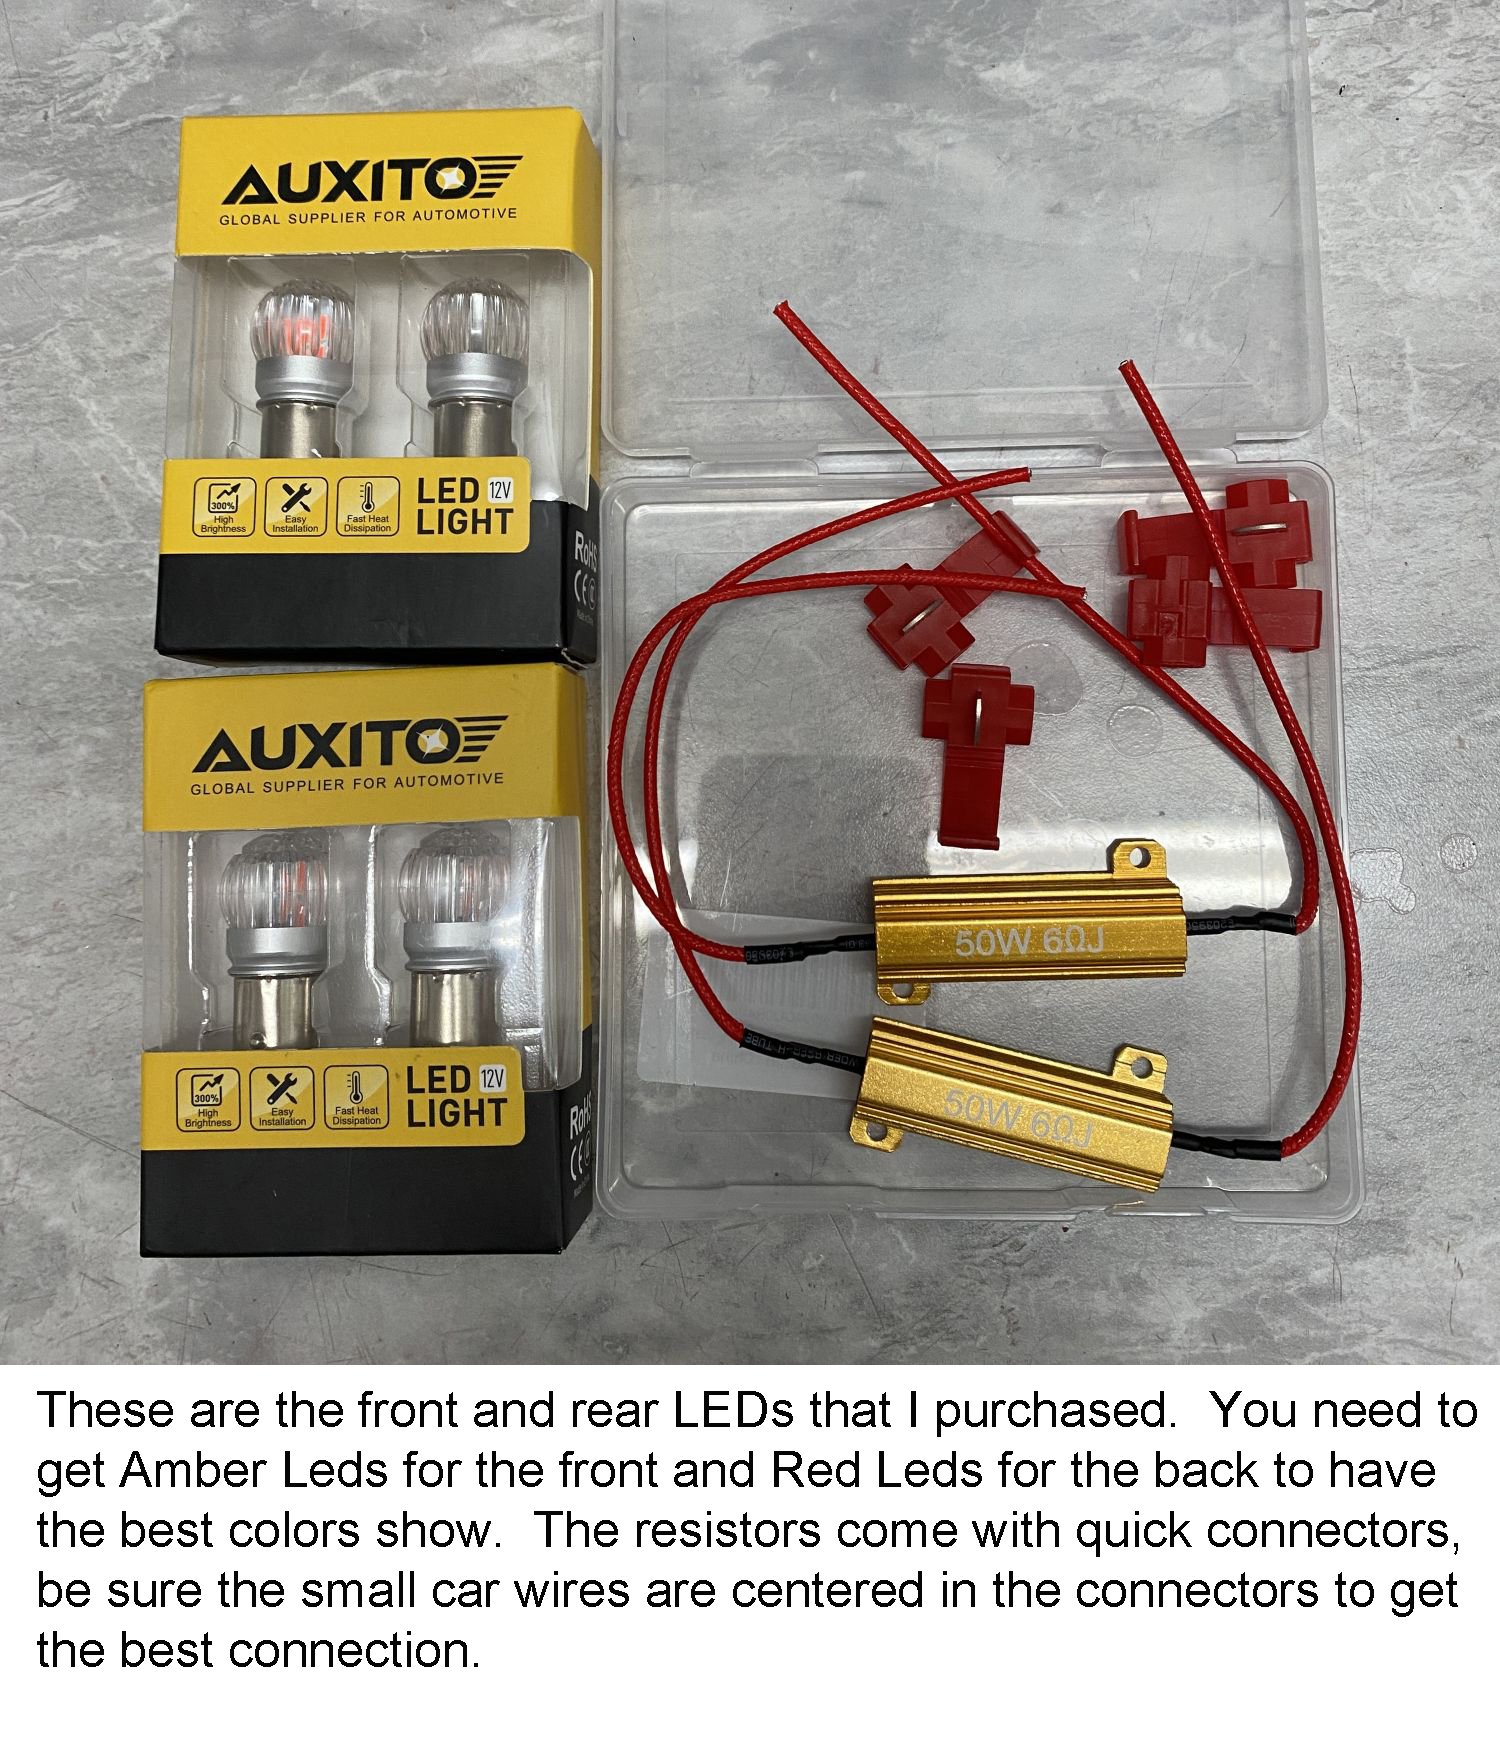
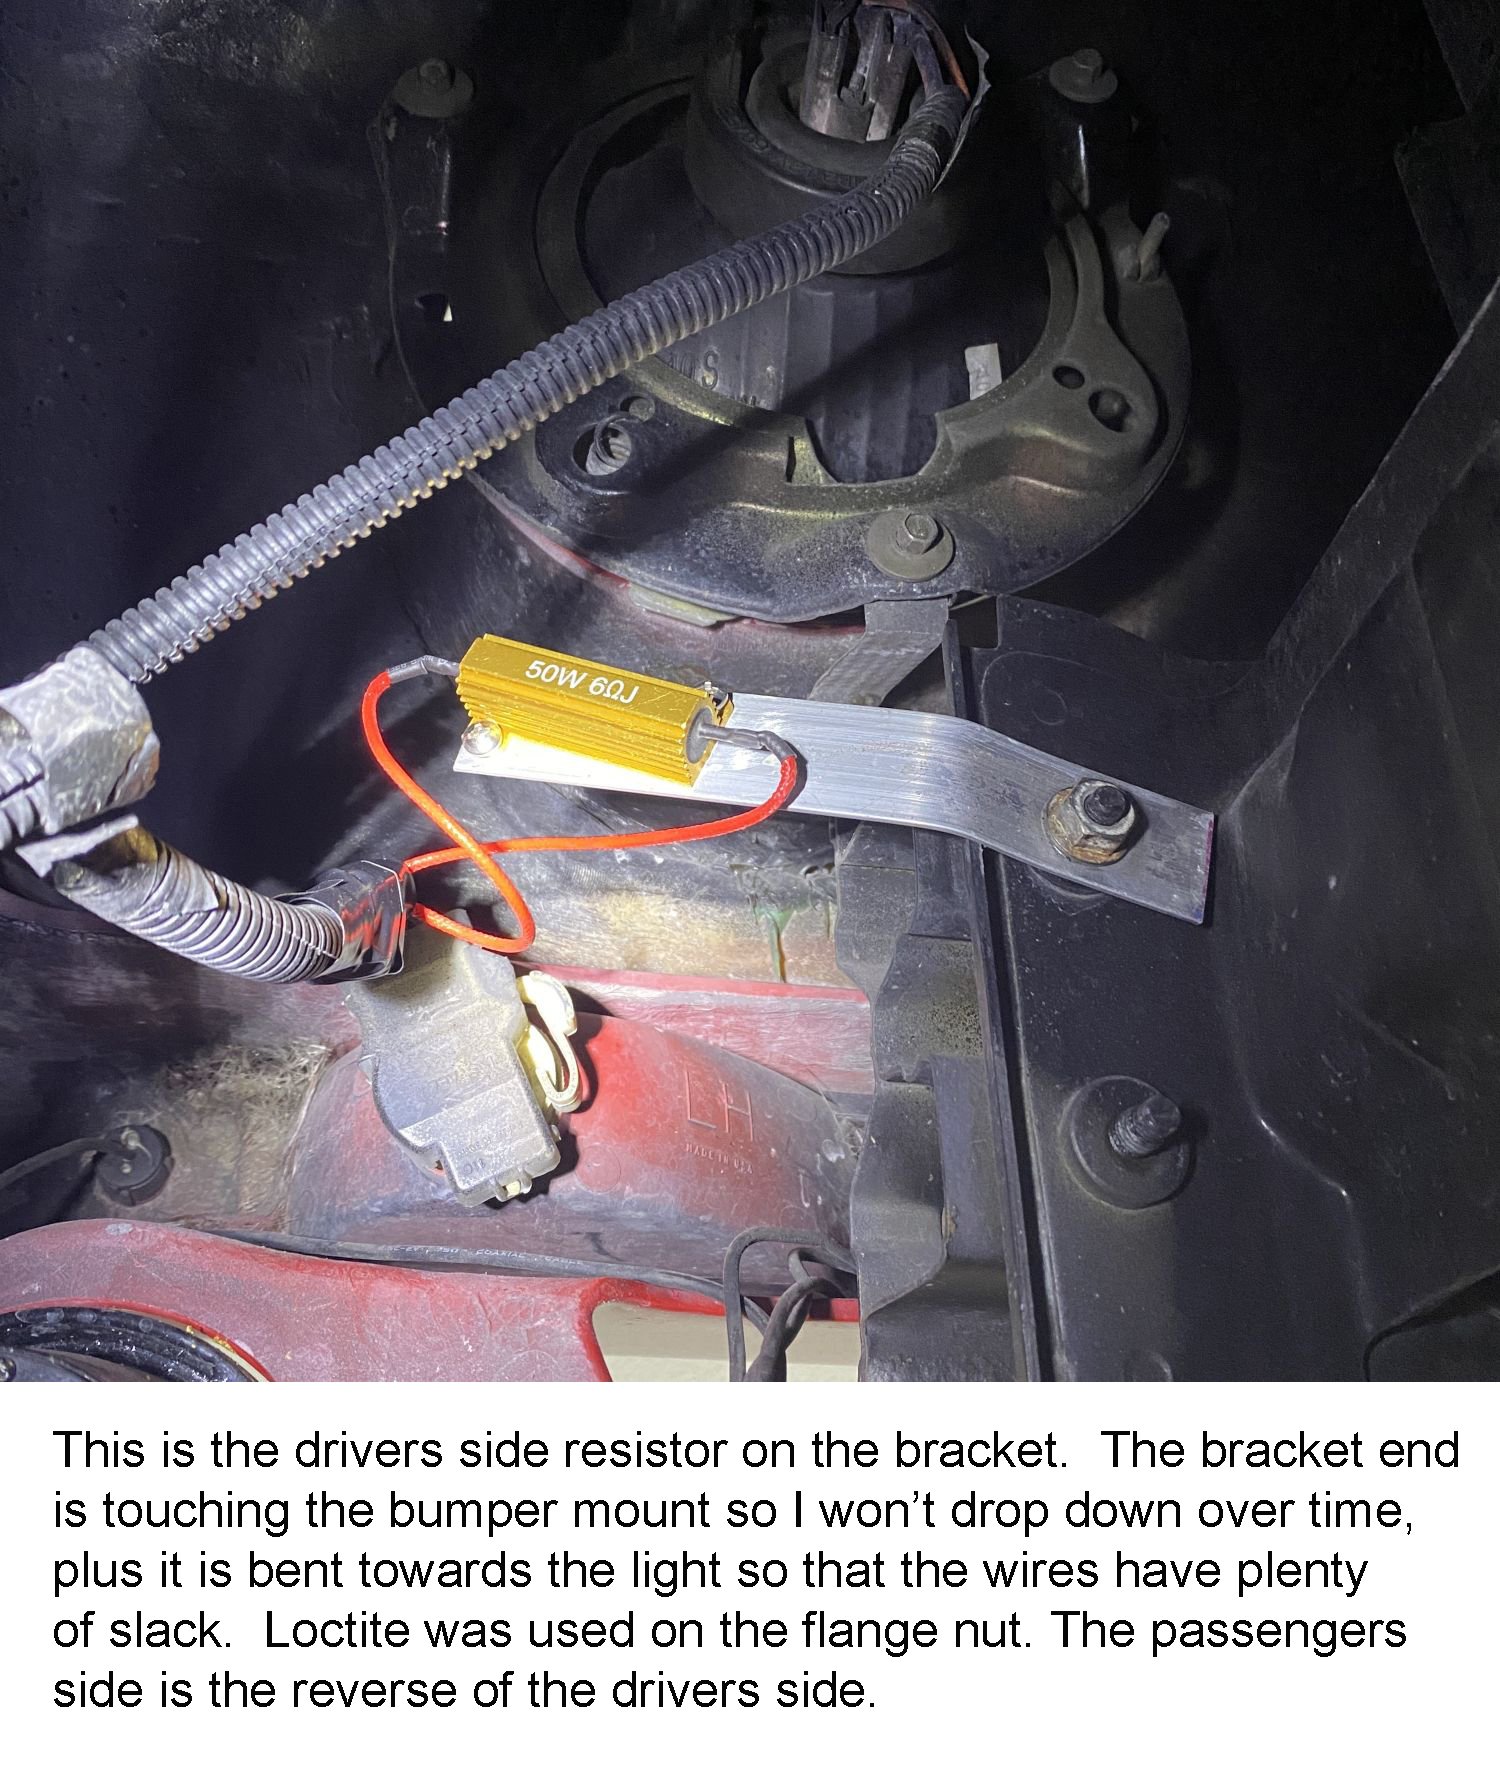
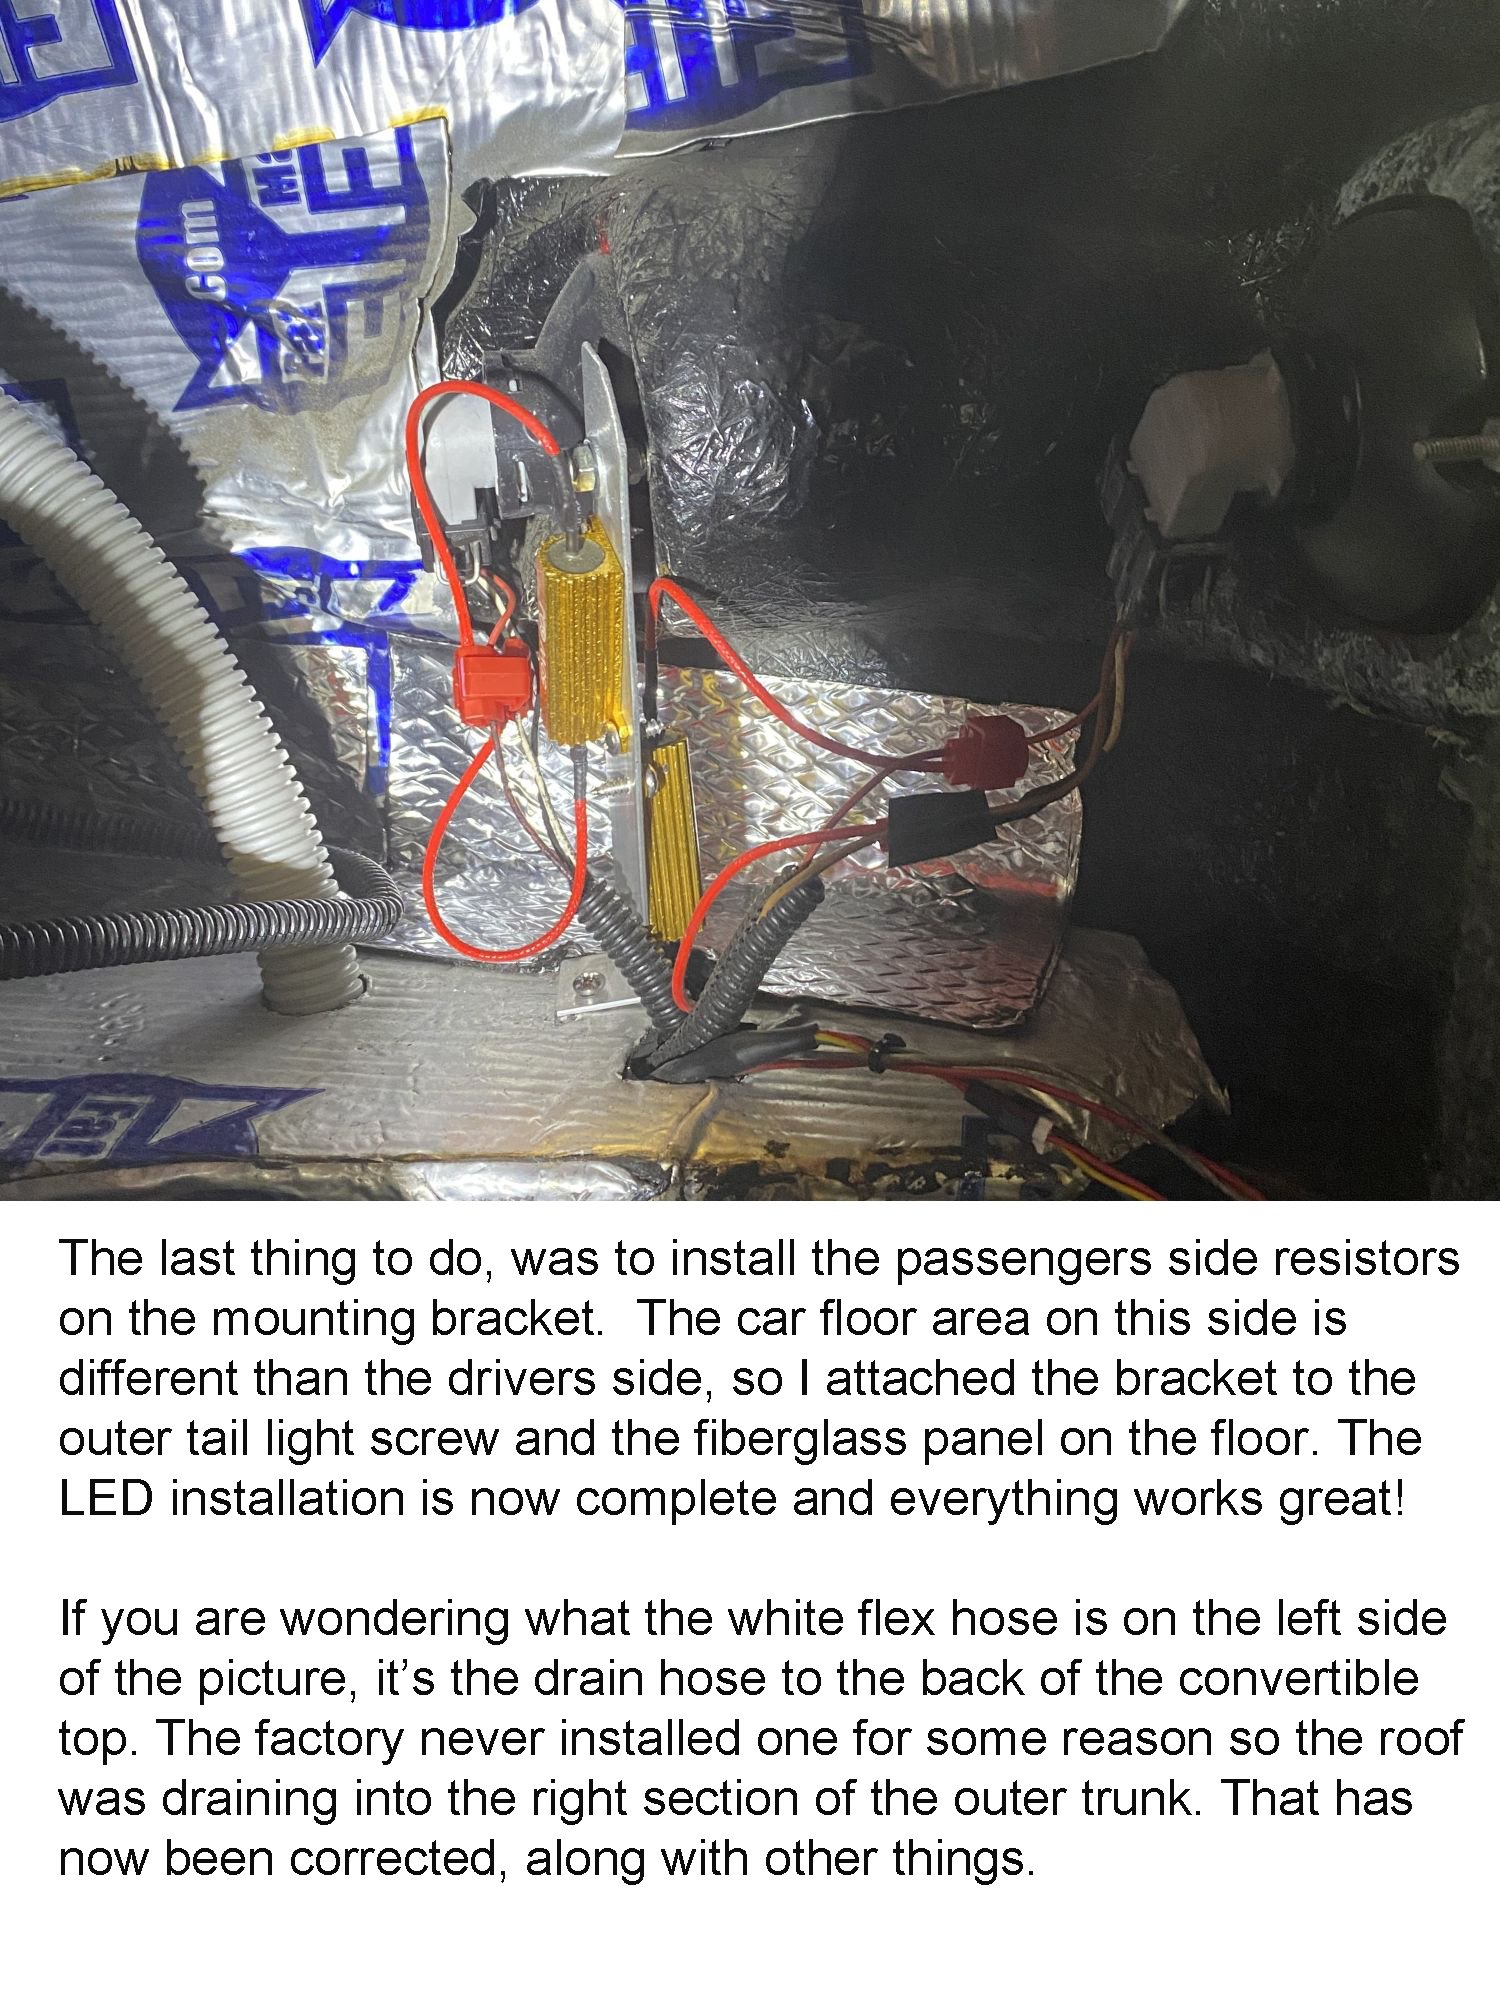
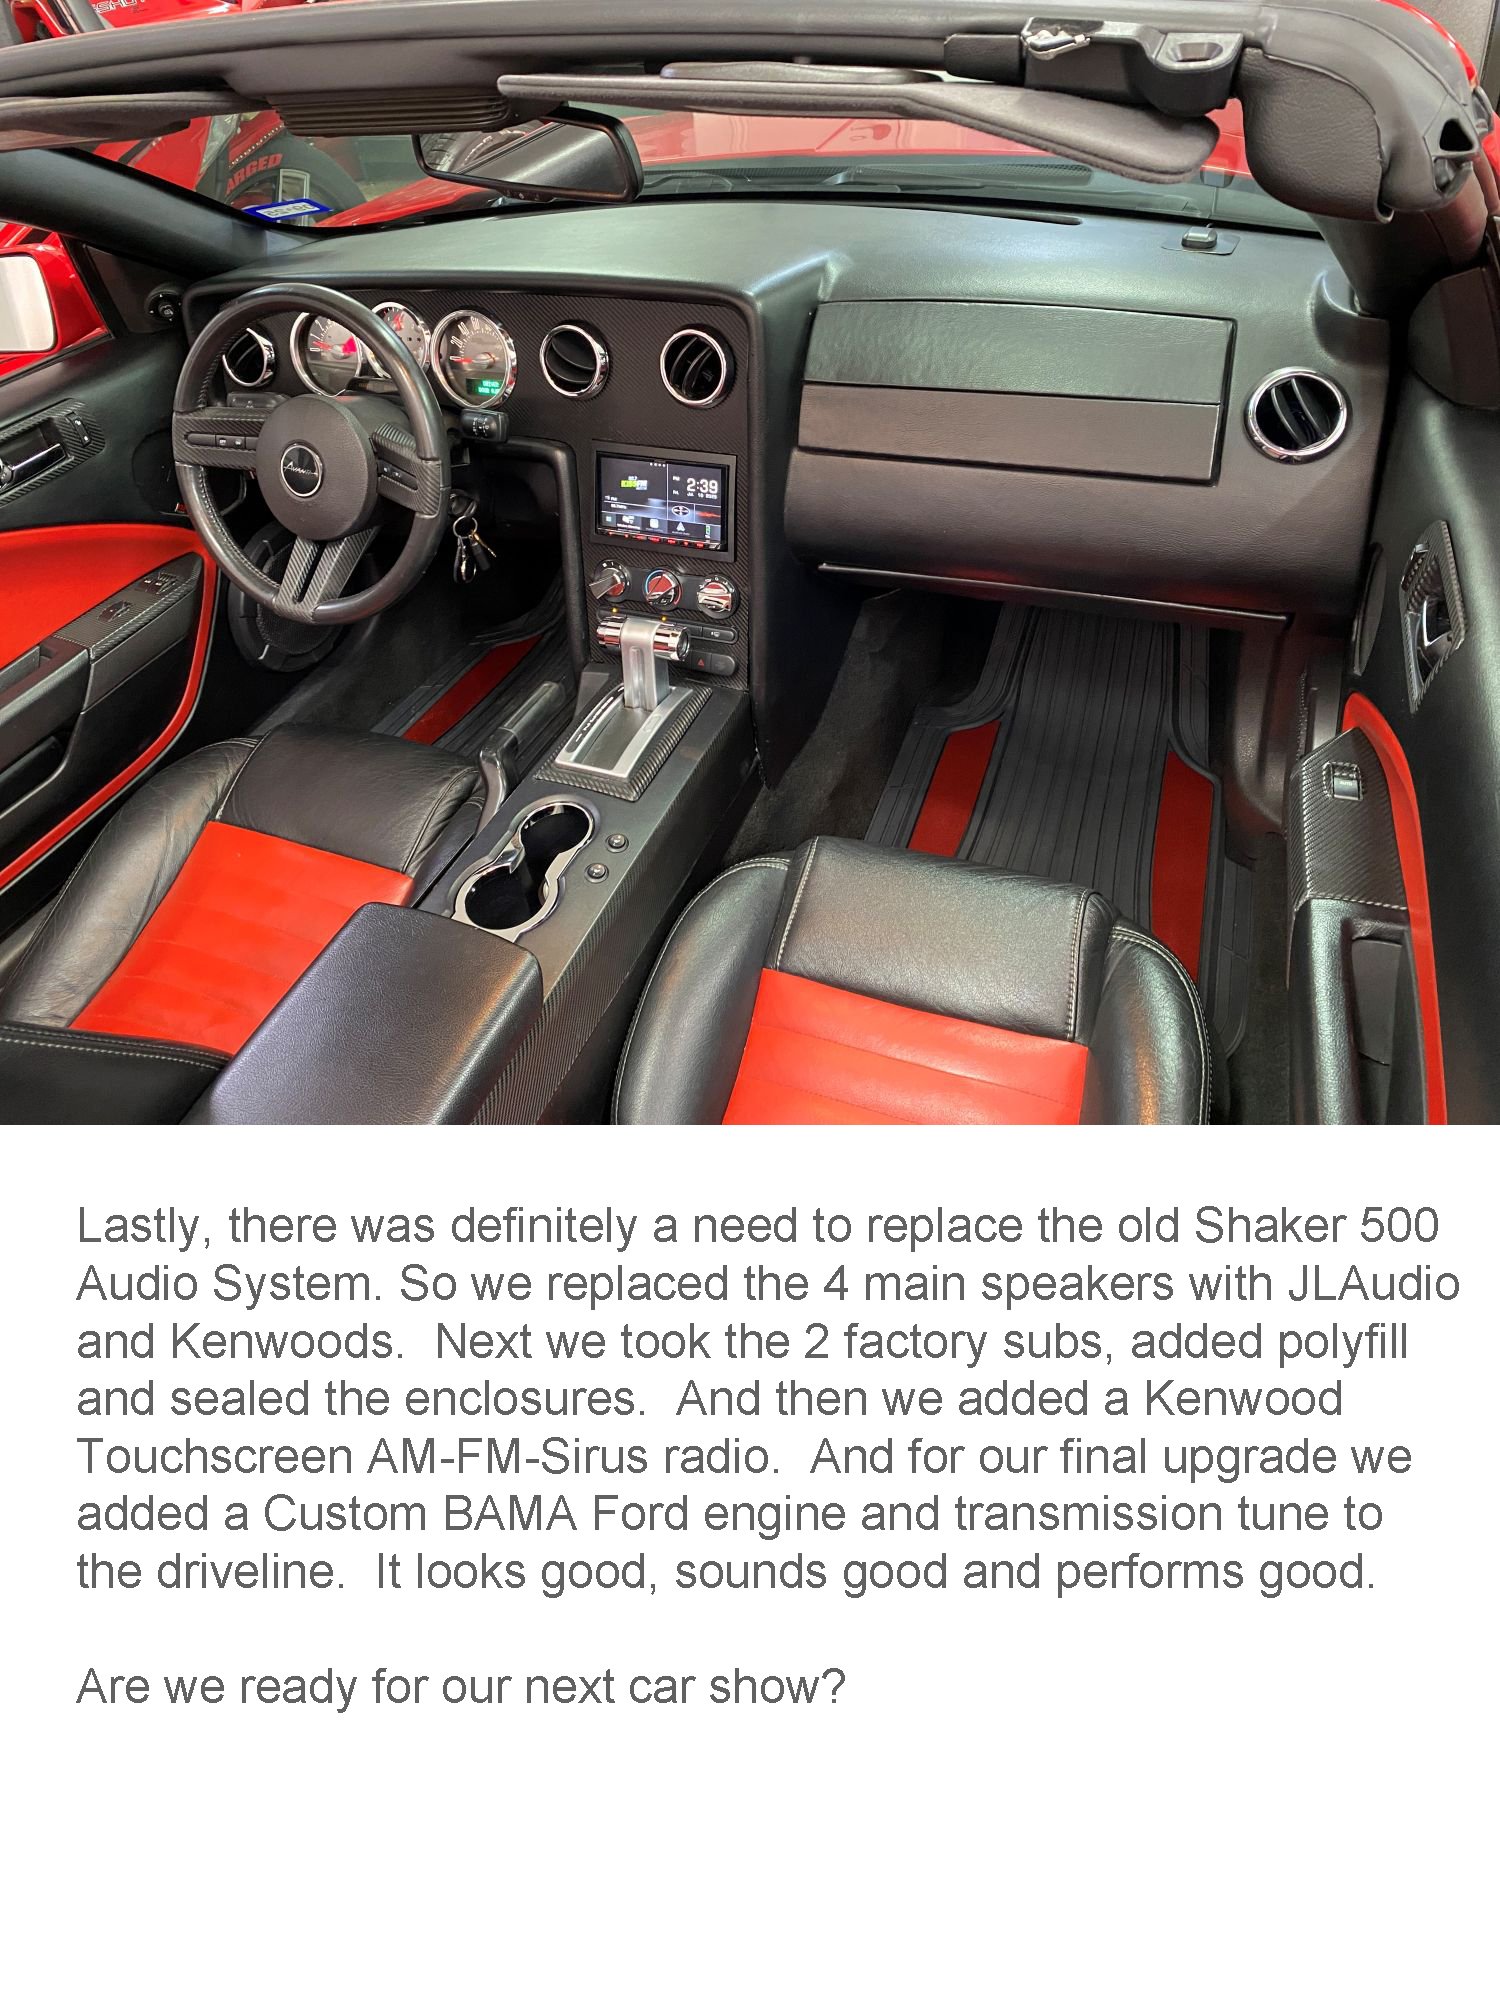
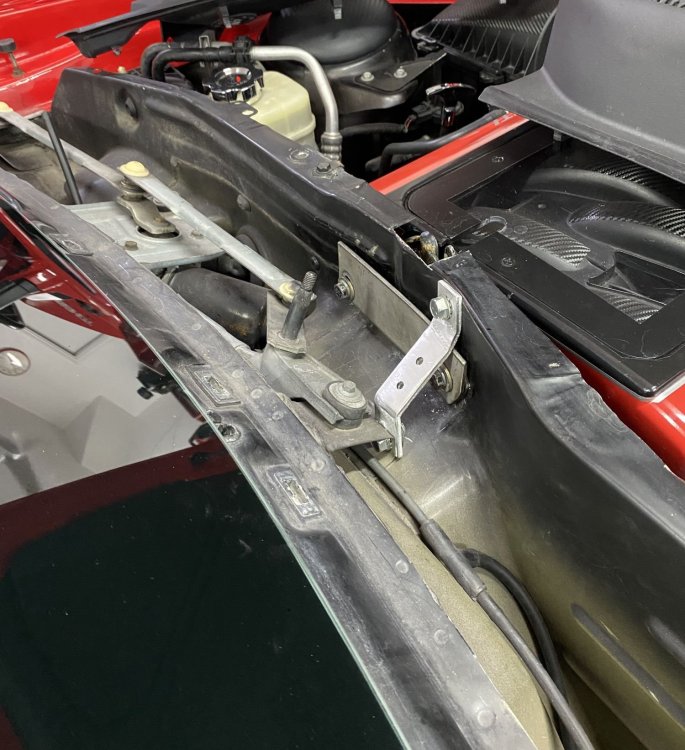
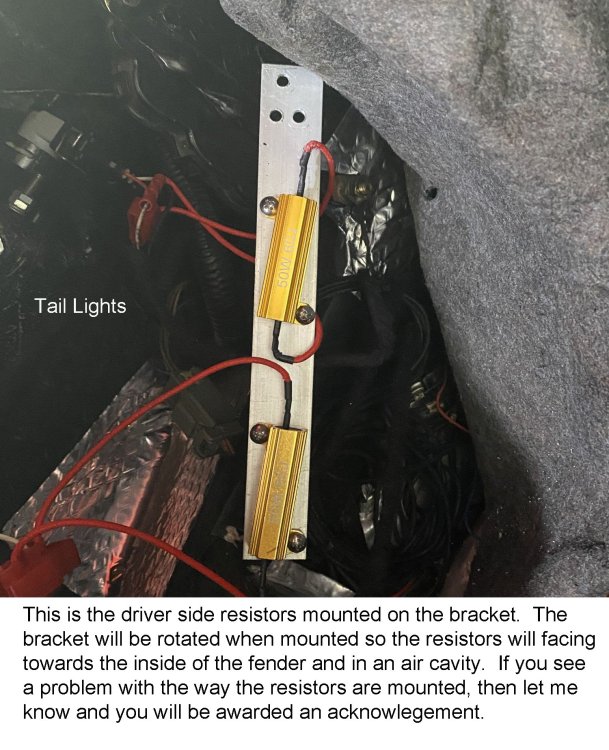
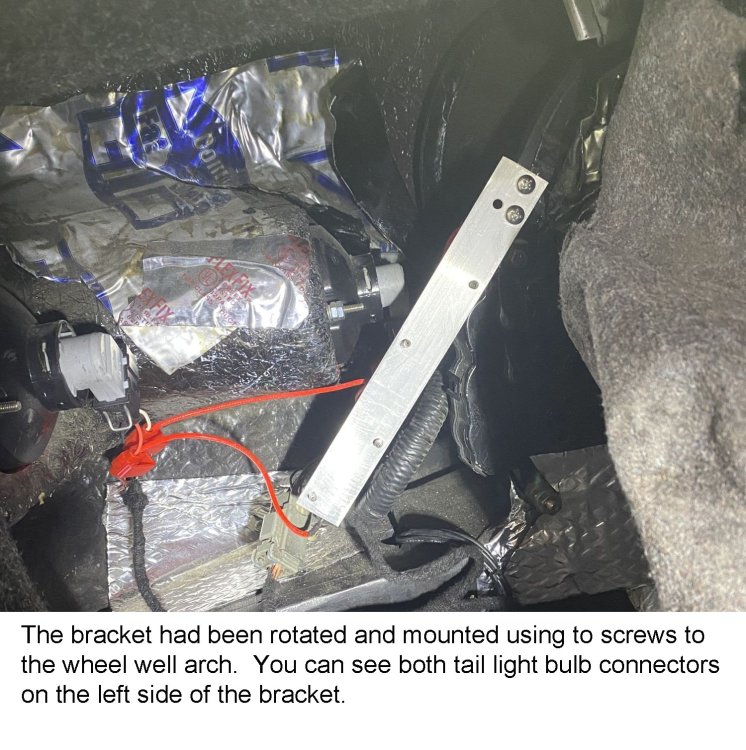
One upgrade that can’t be beat is to change out the run/turn/brake light exterior bulbs to LEDs. (I don't do the headlights since most don't provide the beams the way that I want them). I’ve done this more than once on other vehicles and the result is always excellent. When it comes to the turn signals though, there is always a flashing problem created since the LED bulbs don’t have enough electrical load on them to make the flasher work properly. If you have a 2005 or older Avanti, then you can solve the problem by using a United Pacific 90652 LED Turn Signal Flasher but not on a 2006-2007 S197 Avanti since it does not have one. As Can Bus systems improved, manufacturers like Ford integrated the flasher within a module known as the Smart Junction Box (SJB). Other manufacturers call this a Generic Electronic Module (GEM). In the case of our Avanti’s, the SJB is mounted on the passenger’s kick panel and includes a PC board along with various Can Bus system fuses. The SJB operates other parts of the car like the convertible top, heated rear window, interior and exterior lighting, some instrument cluster components among others. Because of this, the recommended way to make the turn signal and emergency flashers work properly is to add 50-Watt, 6 Ohm resistors to each LED light bulb in the turn signal circuit. These are very common today and I purchased mine off Amazon. For our 06-07 Avanti’s, we need 6 of these since there are 6 turn signal bulbs in the car. Once you read about them or receive them, you’ll discover that they generate heat, enough so that you don’t want to zip tie or tape them to any other plastic part in the car. In my case, I decide to make simple brackets out of 1/6” x 1” aluminum flat metal. For the front, rear and front side marker lights I purchased the Auxito bulb brand off Amazon since I like the bulb design and have used them before without any problems. With the bulbs and resistors in hand, the next thing to do was to make up the brackets for the resistors. The fronts were simple since you can use one of the bumper mounting bolts the extend inside the tire wheel well and simply add a nut to hold the bracket in place. I used blue Loctite on the nuts to be sure they wouldn’t come loose. The rear lights were a little more challenging since you want to stay off of the interior trim pieces / carpet and provide room for the resistors to get some “air”. Once the bulbs and resistors were installed, the bright and crisp lights were now a welcome addition.


-
When I rebuilt the Dana 44 in my 82 model, I bought the ring/pinion and bearing set from Summit Racing Parts.
-
I found, that when anyone does any post about any supposed fact, there will ALWAYS be individuals who check their understanding of the post and compare it to what information that they have. Since you aren't willing to supply your proof as Regnalbob is requesting, then that lack of action places your responses in question. You appear to have a lot of time on your hands and spend a lot of it posting trivia stuff on this forum which is fine. But it also puts you in the face of others and since it is a public forum, then the "others" have the right to verify your claims. Once you complain about being asked by anyone to prove it and you deny that request, then you open up the door for responses like this. Wouldn't that be a more productive way of spending your spare time?
-
Check the firewall gromet to see if it's still there or if you have any other issues in that area.
-
On my 82 model, I ran American Racing Mono Cast 15 x 7 wheels with zero offset and 235/70R15 tires and didn't have any problem. zero offset on the 7" wheel is 3.5" backspace.
-
Sure, you can do that, but why add that to the driving task when a simple change in the valve body makes it automatic? He's already having the transmission beefed up for more power, so the valve body will already be out anyway.
-
The transmission lock up converter is controlled by the ECU that you are removing. The transmission shop can make a modification to the valve body to fix this while they are working on it.
-
It sounds to me like you bought the wrong springs. And the mechanic who installed them didn't pay attention to the fact that the base of the springs were different from what was removed. So, you need to purchase the correct springs and have them installed to solve the problem. If you still have the old ones, then you can verify spring set #2 is correct before having them installed. If not, then you need to buy them from an Avanti Parts supplier for sure.
-
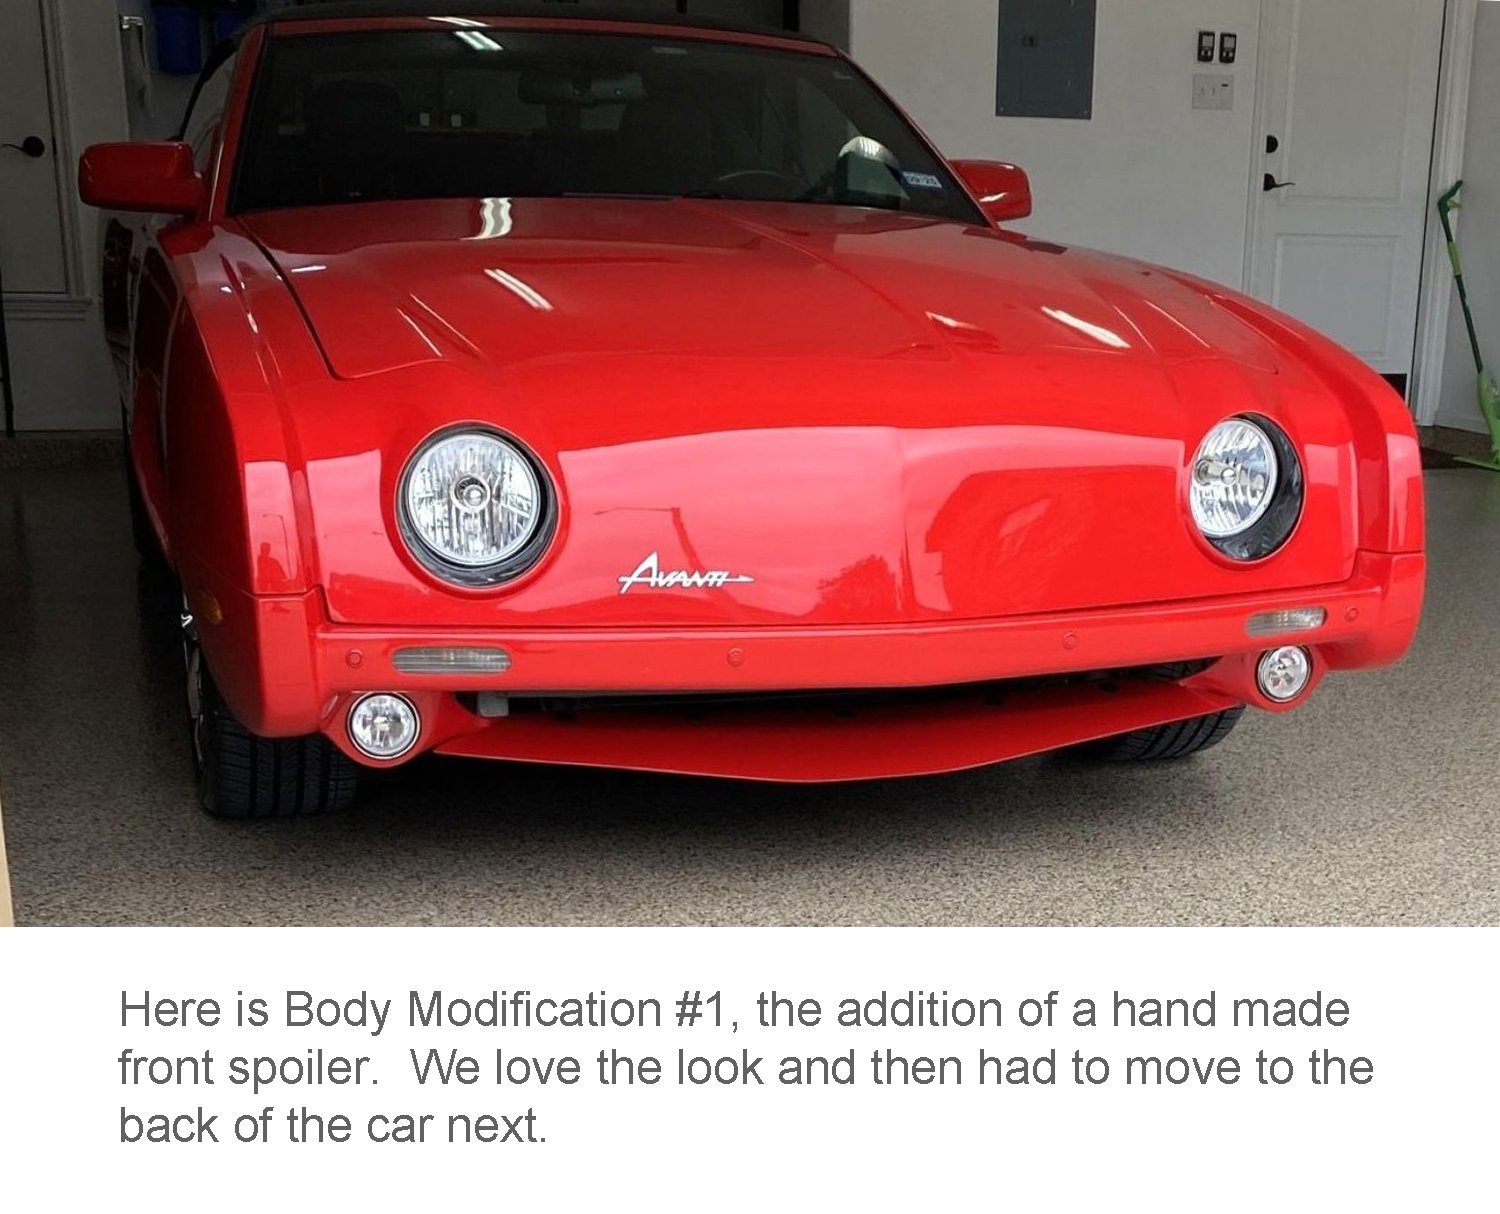
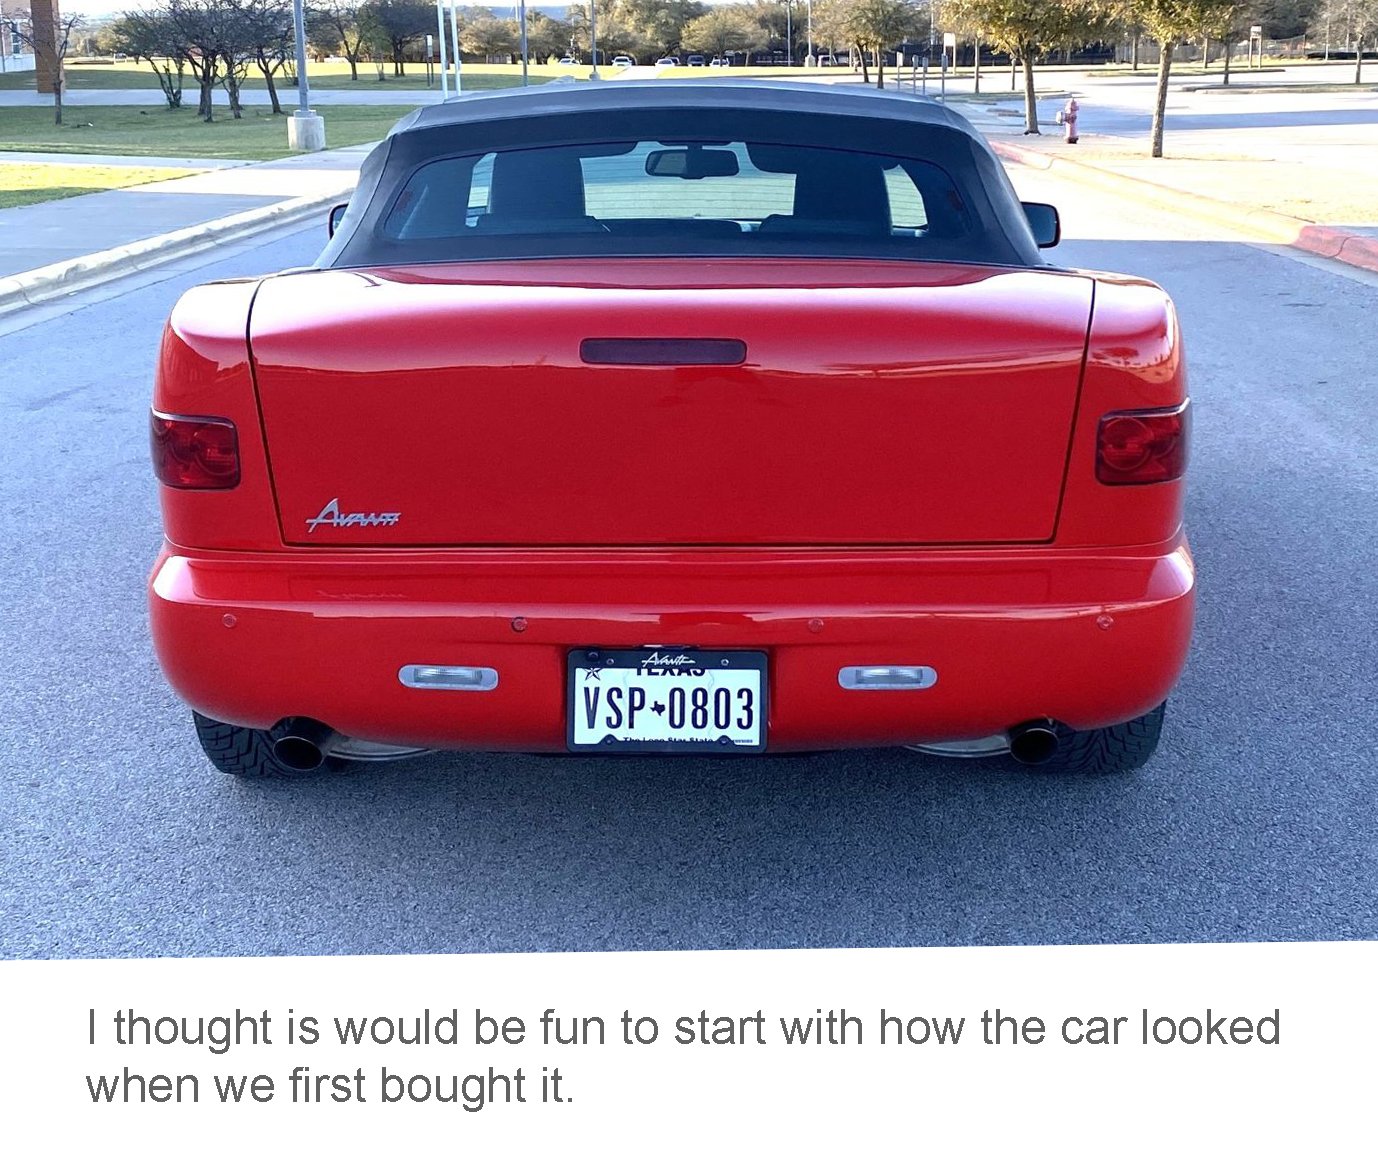
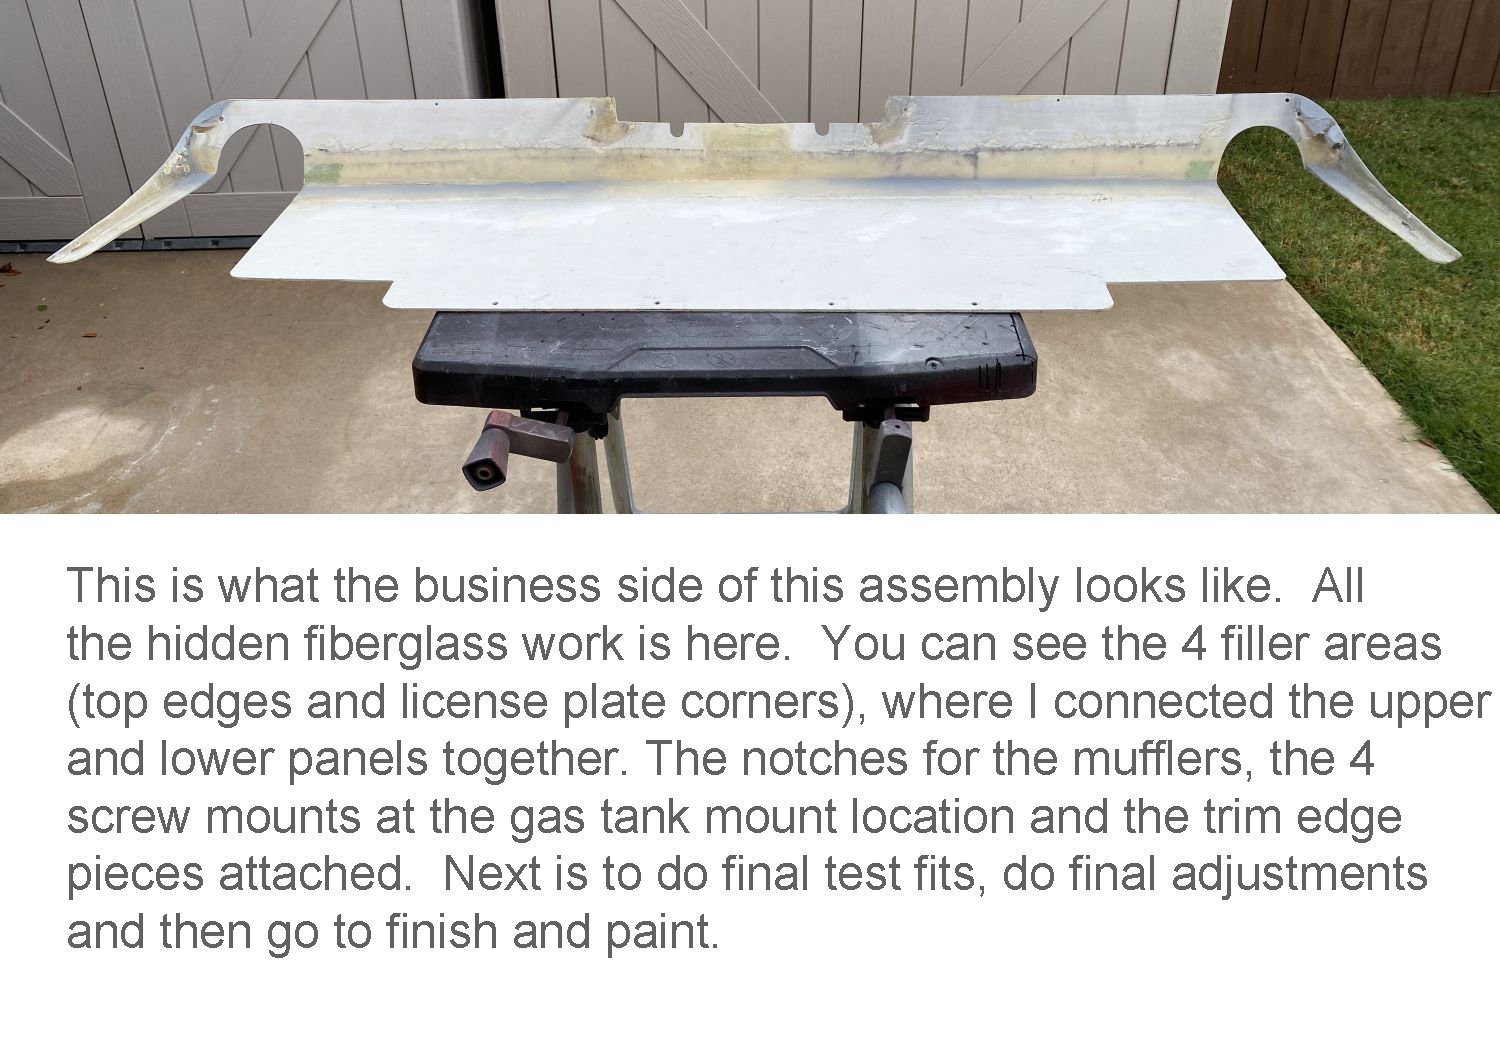
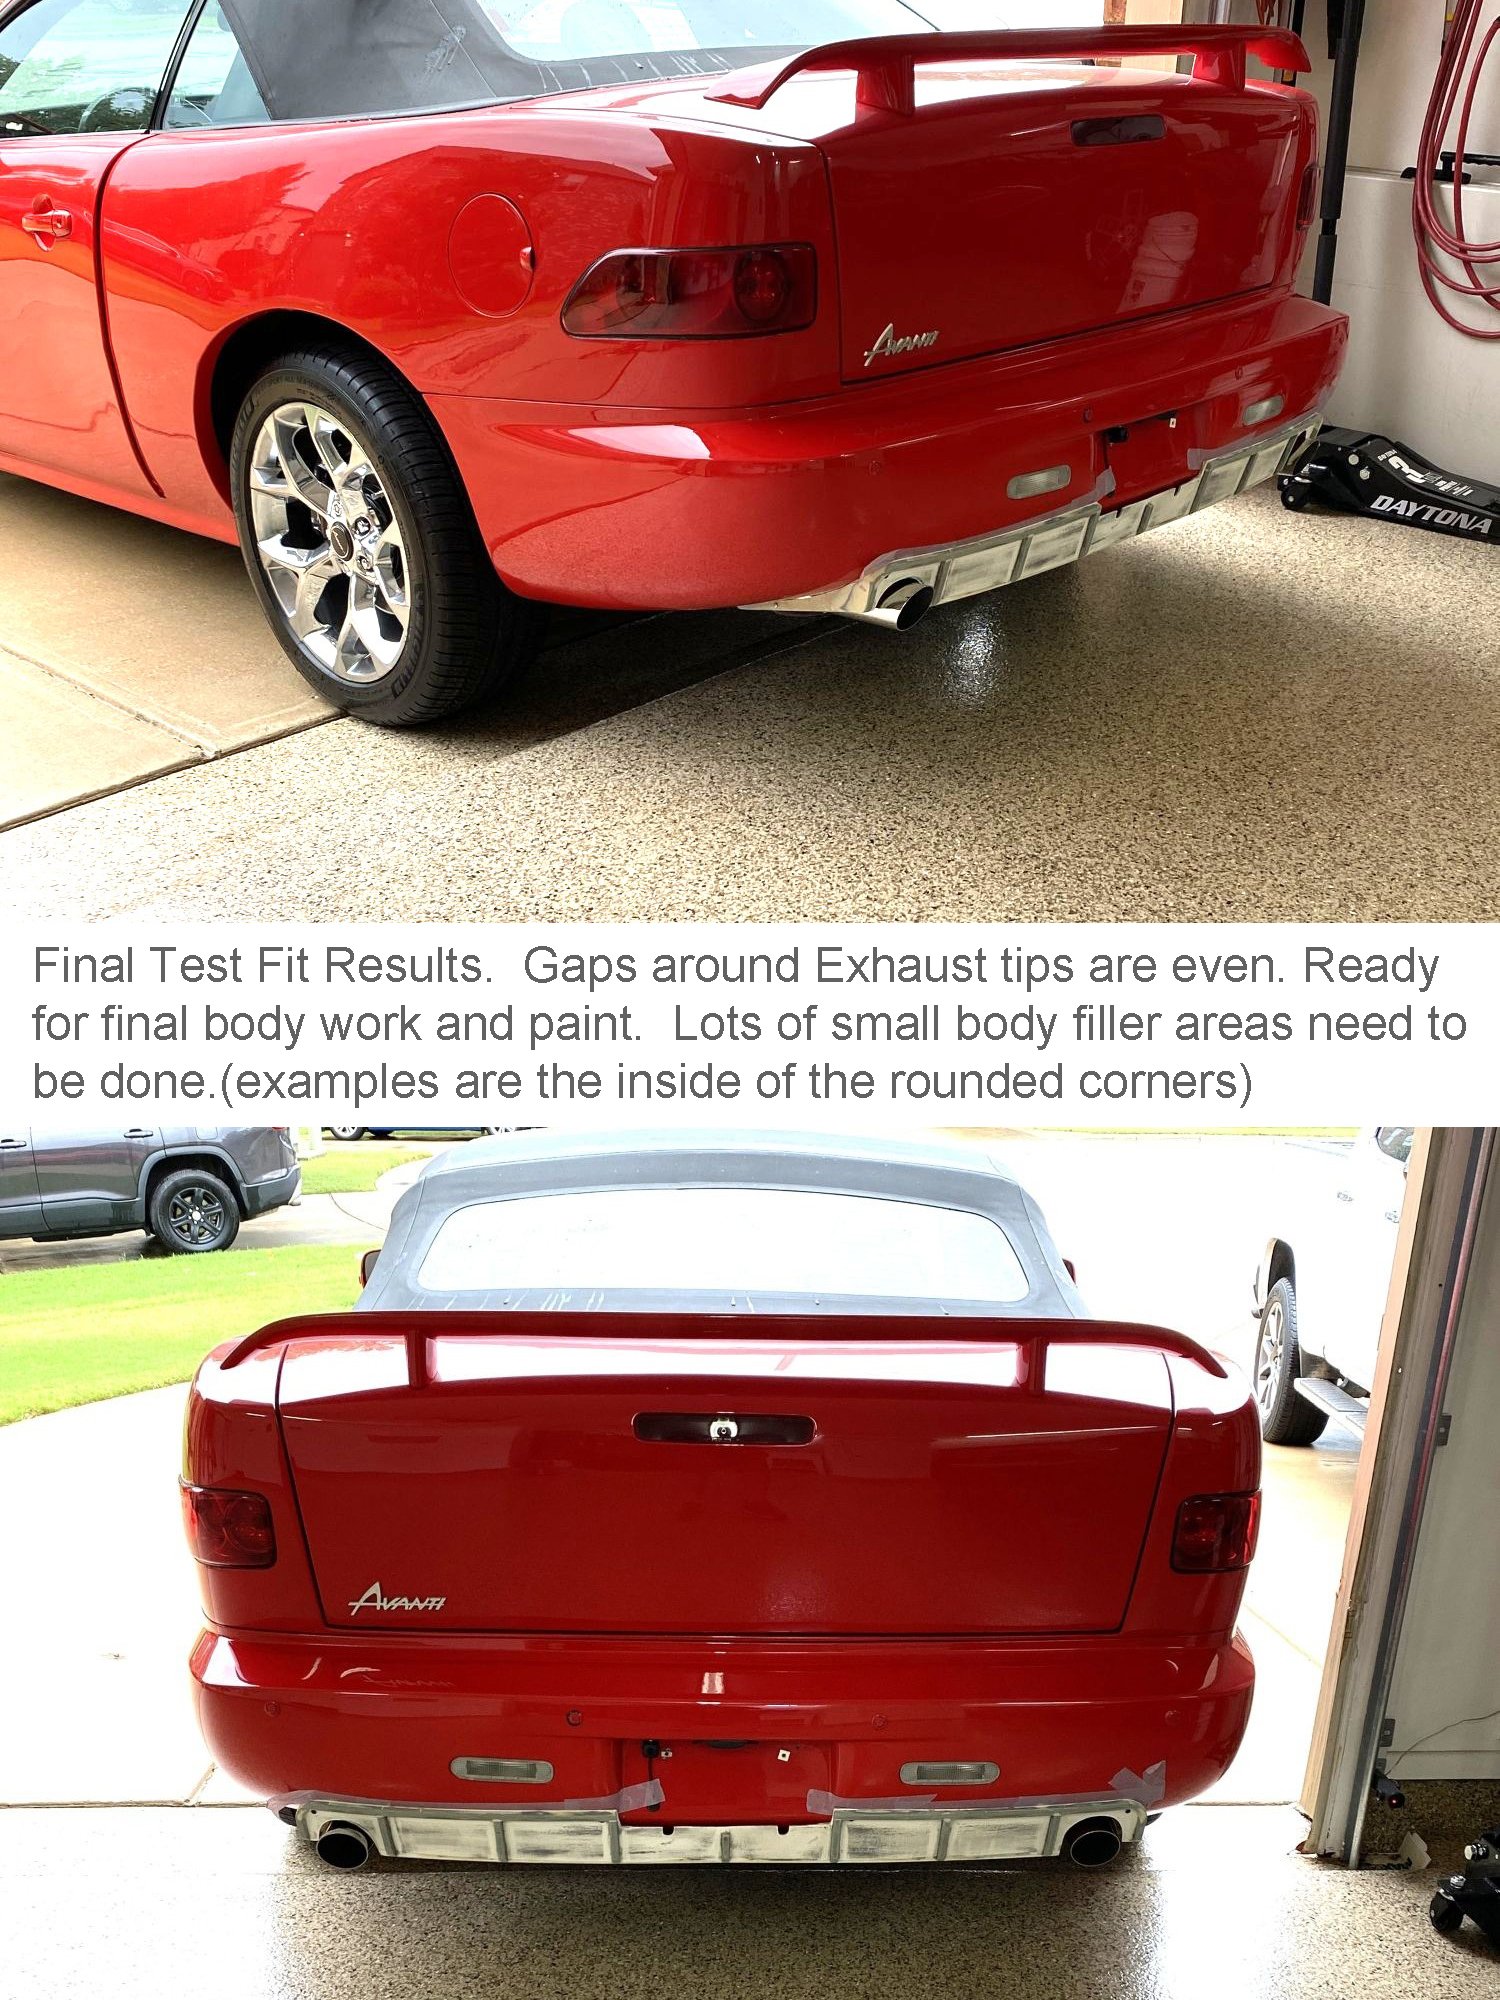
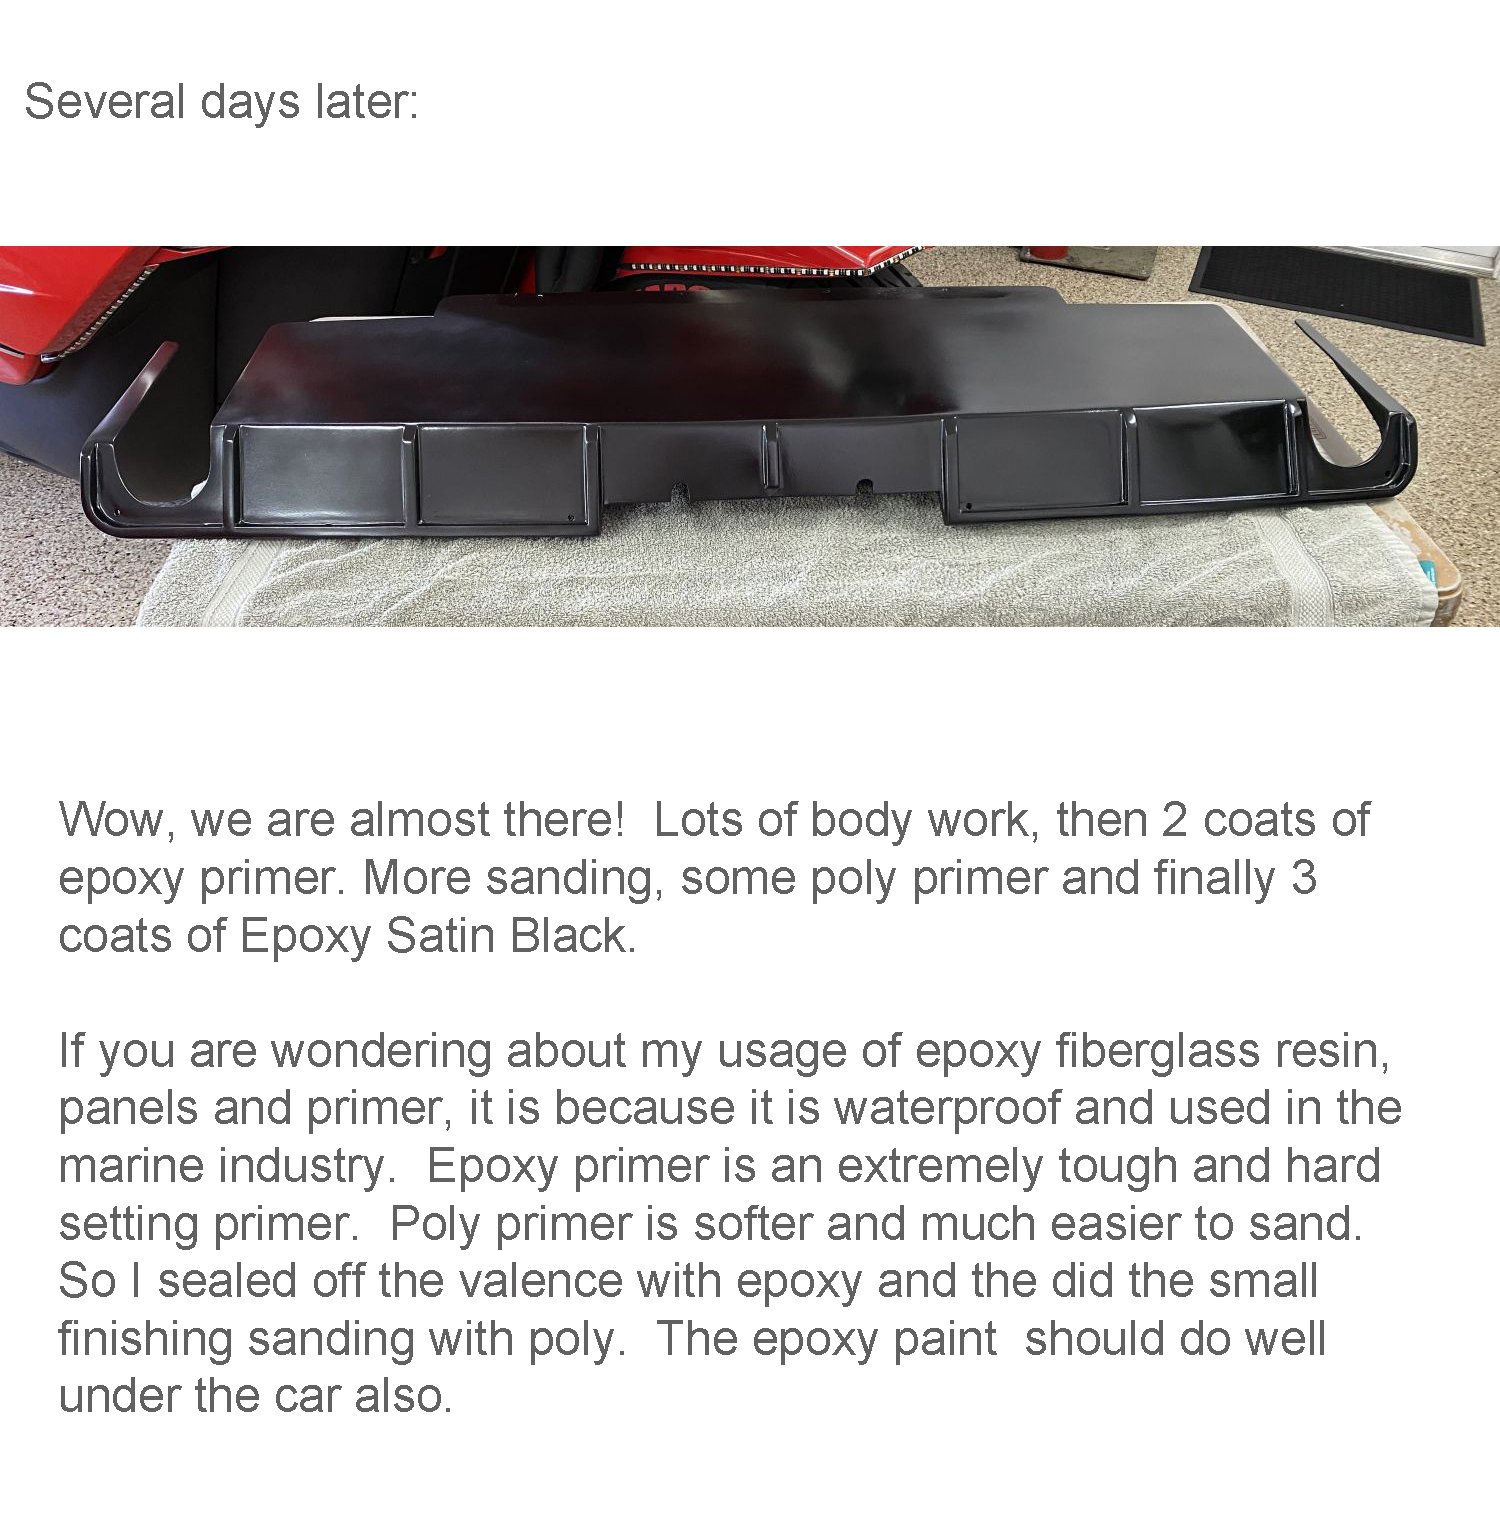
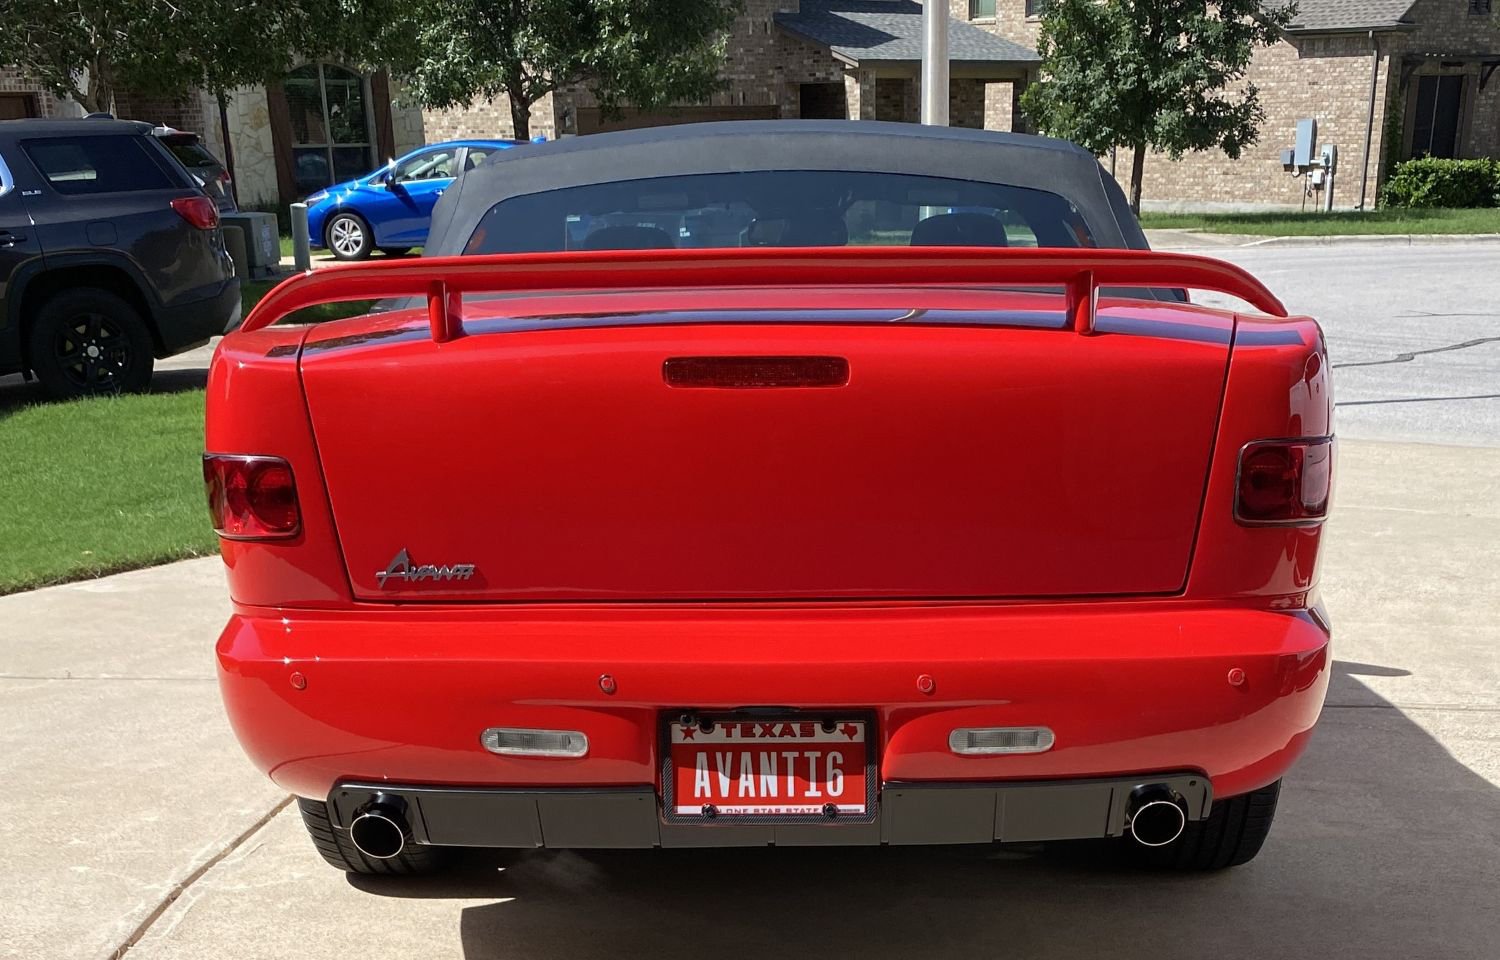
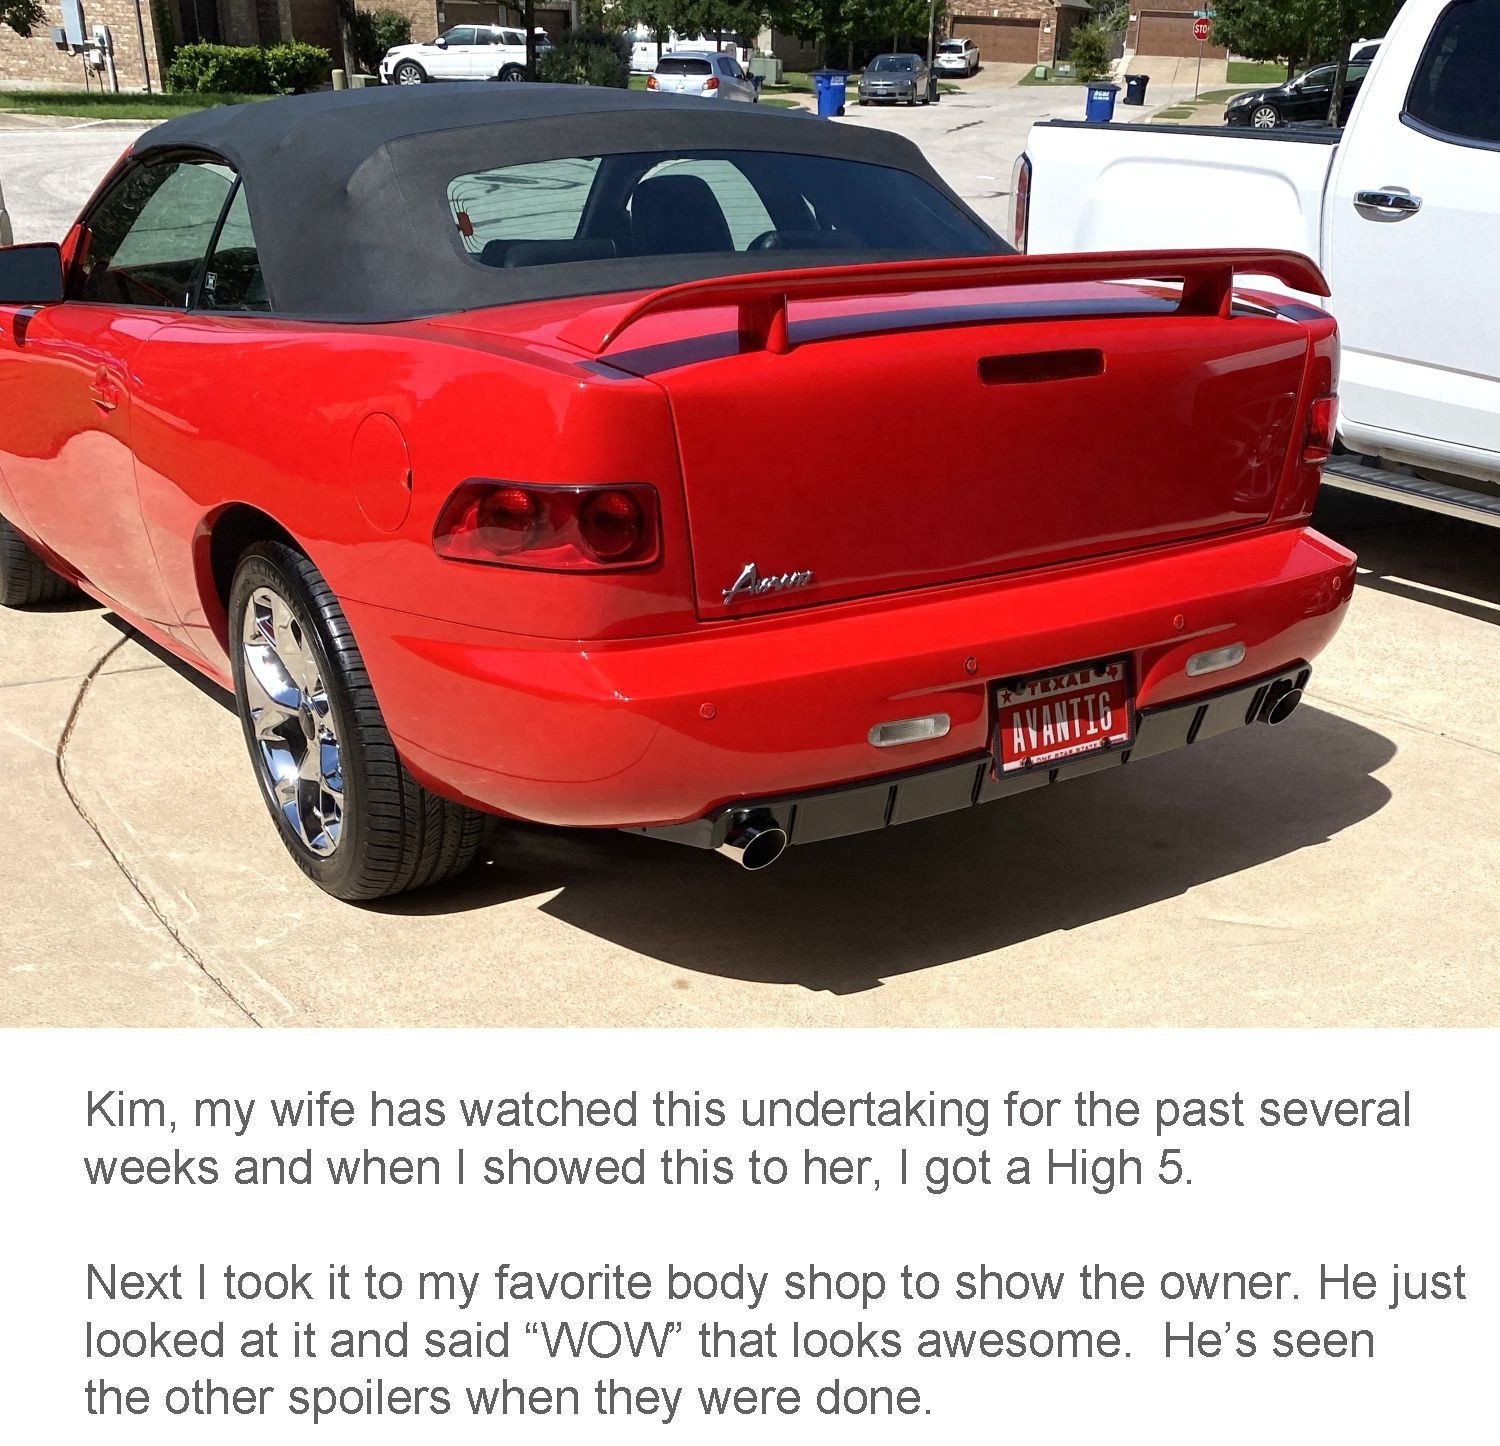
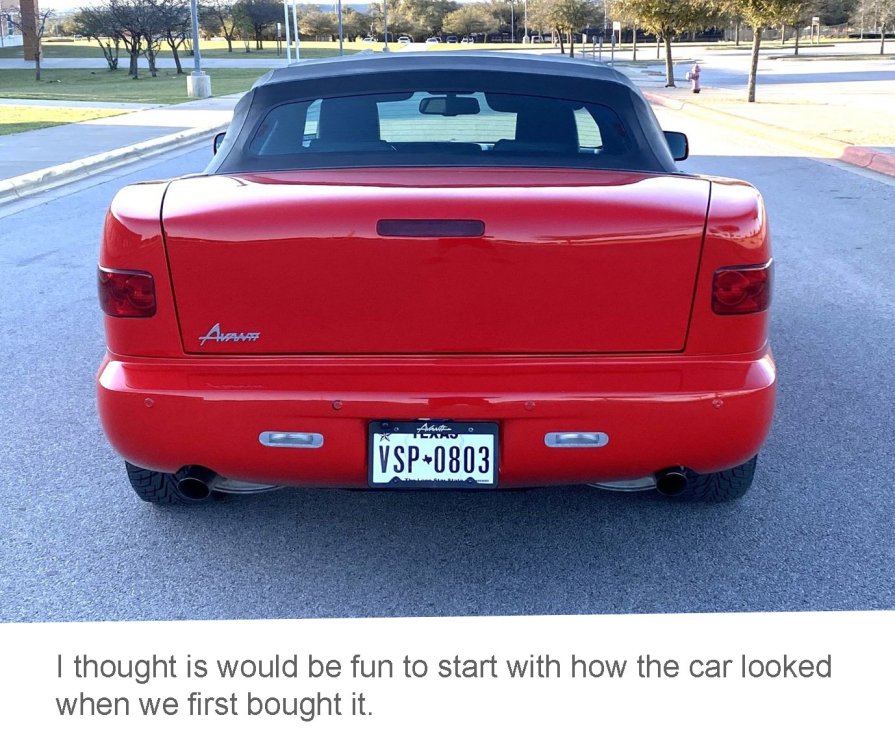
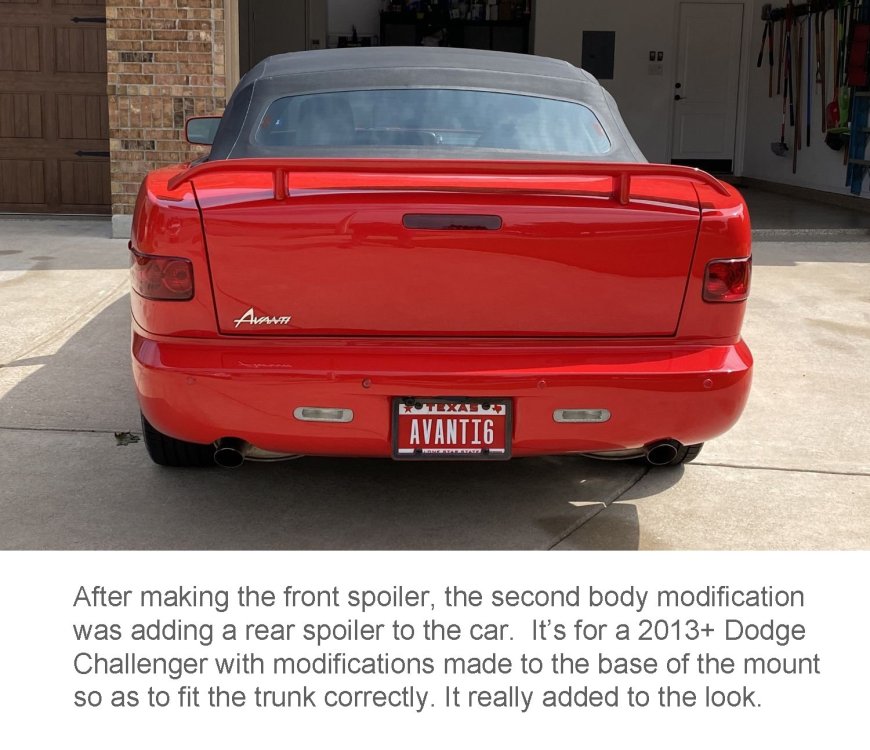
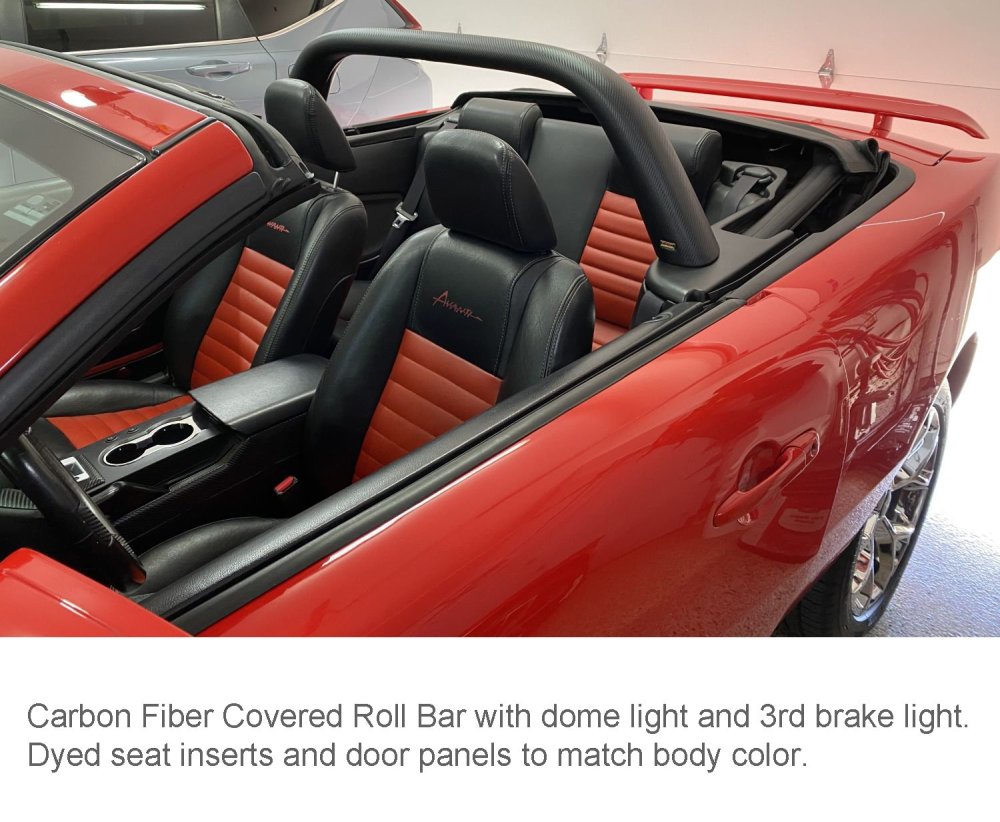
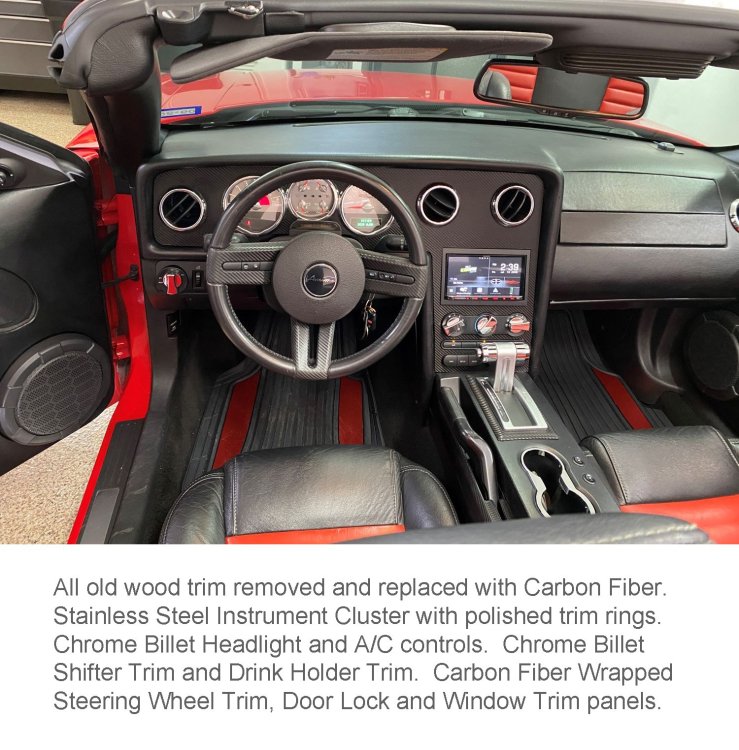
We bought our 2006 Avanti GT Convertible in 2024 from the original owner and it is #11 of approximately 28 cars made in 2006-2007 on the S197 Mustang chassis. I immediately began updating the car to what I consider more modern standards and have posted most of the changes during this year. For our final and most intensive improvement, this post will show you what was done and at the end, I’ll highlight this car’s build. I hope you enjoy it! The modifications to the cars body started with our attending the Mustang Week event in Galveston Texas last April. With hundreds of Mustangs there, I was able to see all of the things that could be done to our car and set out to do each one of them. We got a lot of attention with our “Avanti Mustang” there and next year we are going to blow them away. OK, I’m going to highlight our first 2 body mods and then move into our last, a custom-made lower rear valance.


-
72 Avanti has a line coming from the fuel line drain tee.
ronmanfredi replied to Jim S's topic in 1965-83 Avanti
Some of the fuel pumps had 3 connections on them. The smaller push on fitting was for the return line back to the fuel tank. It is possible that someone installed the incorrect fuel pump that does not have the return fitting on it. If so, you will need to plug it off. -
I'm pretty sure that Dan at Nostalgic Motors has it.