


Zedman
-
Posts
172 -
Joined
-
Last visited
Content Type
Profiles
Forums
Events
Posts posted by Zedman
-
-
I have found an article here that adresses the question-
https://www.studebaker-info.org/Avanti/Avtext3/avt2011/avframemount.txt
there are some inaccuracies but I can deal with those.
-
1" ?
-
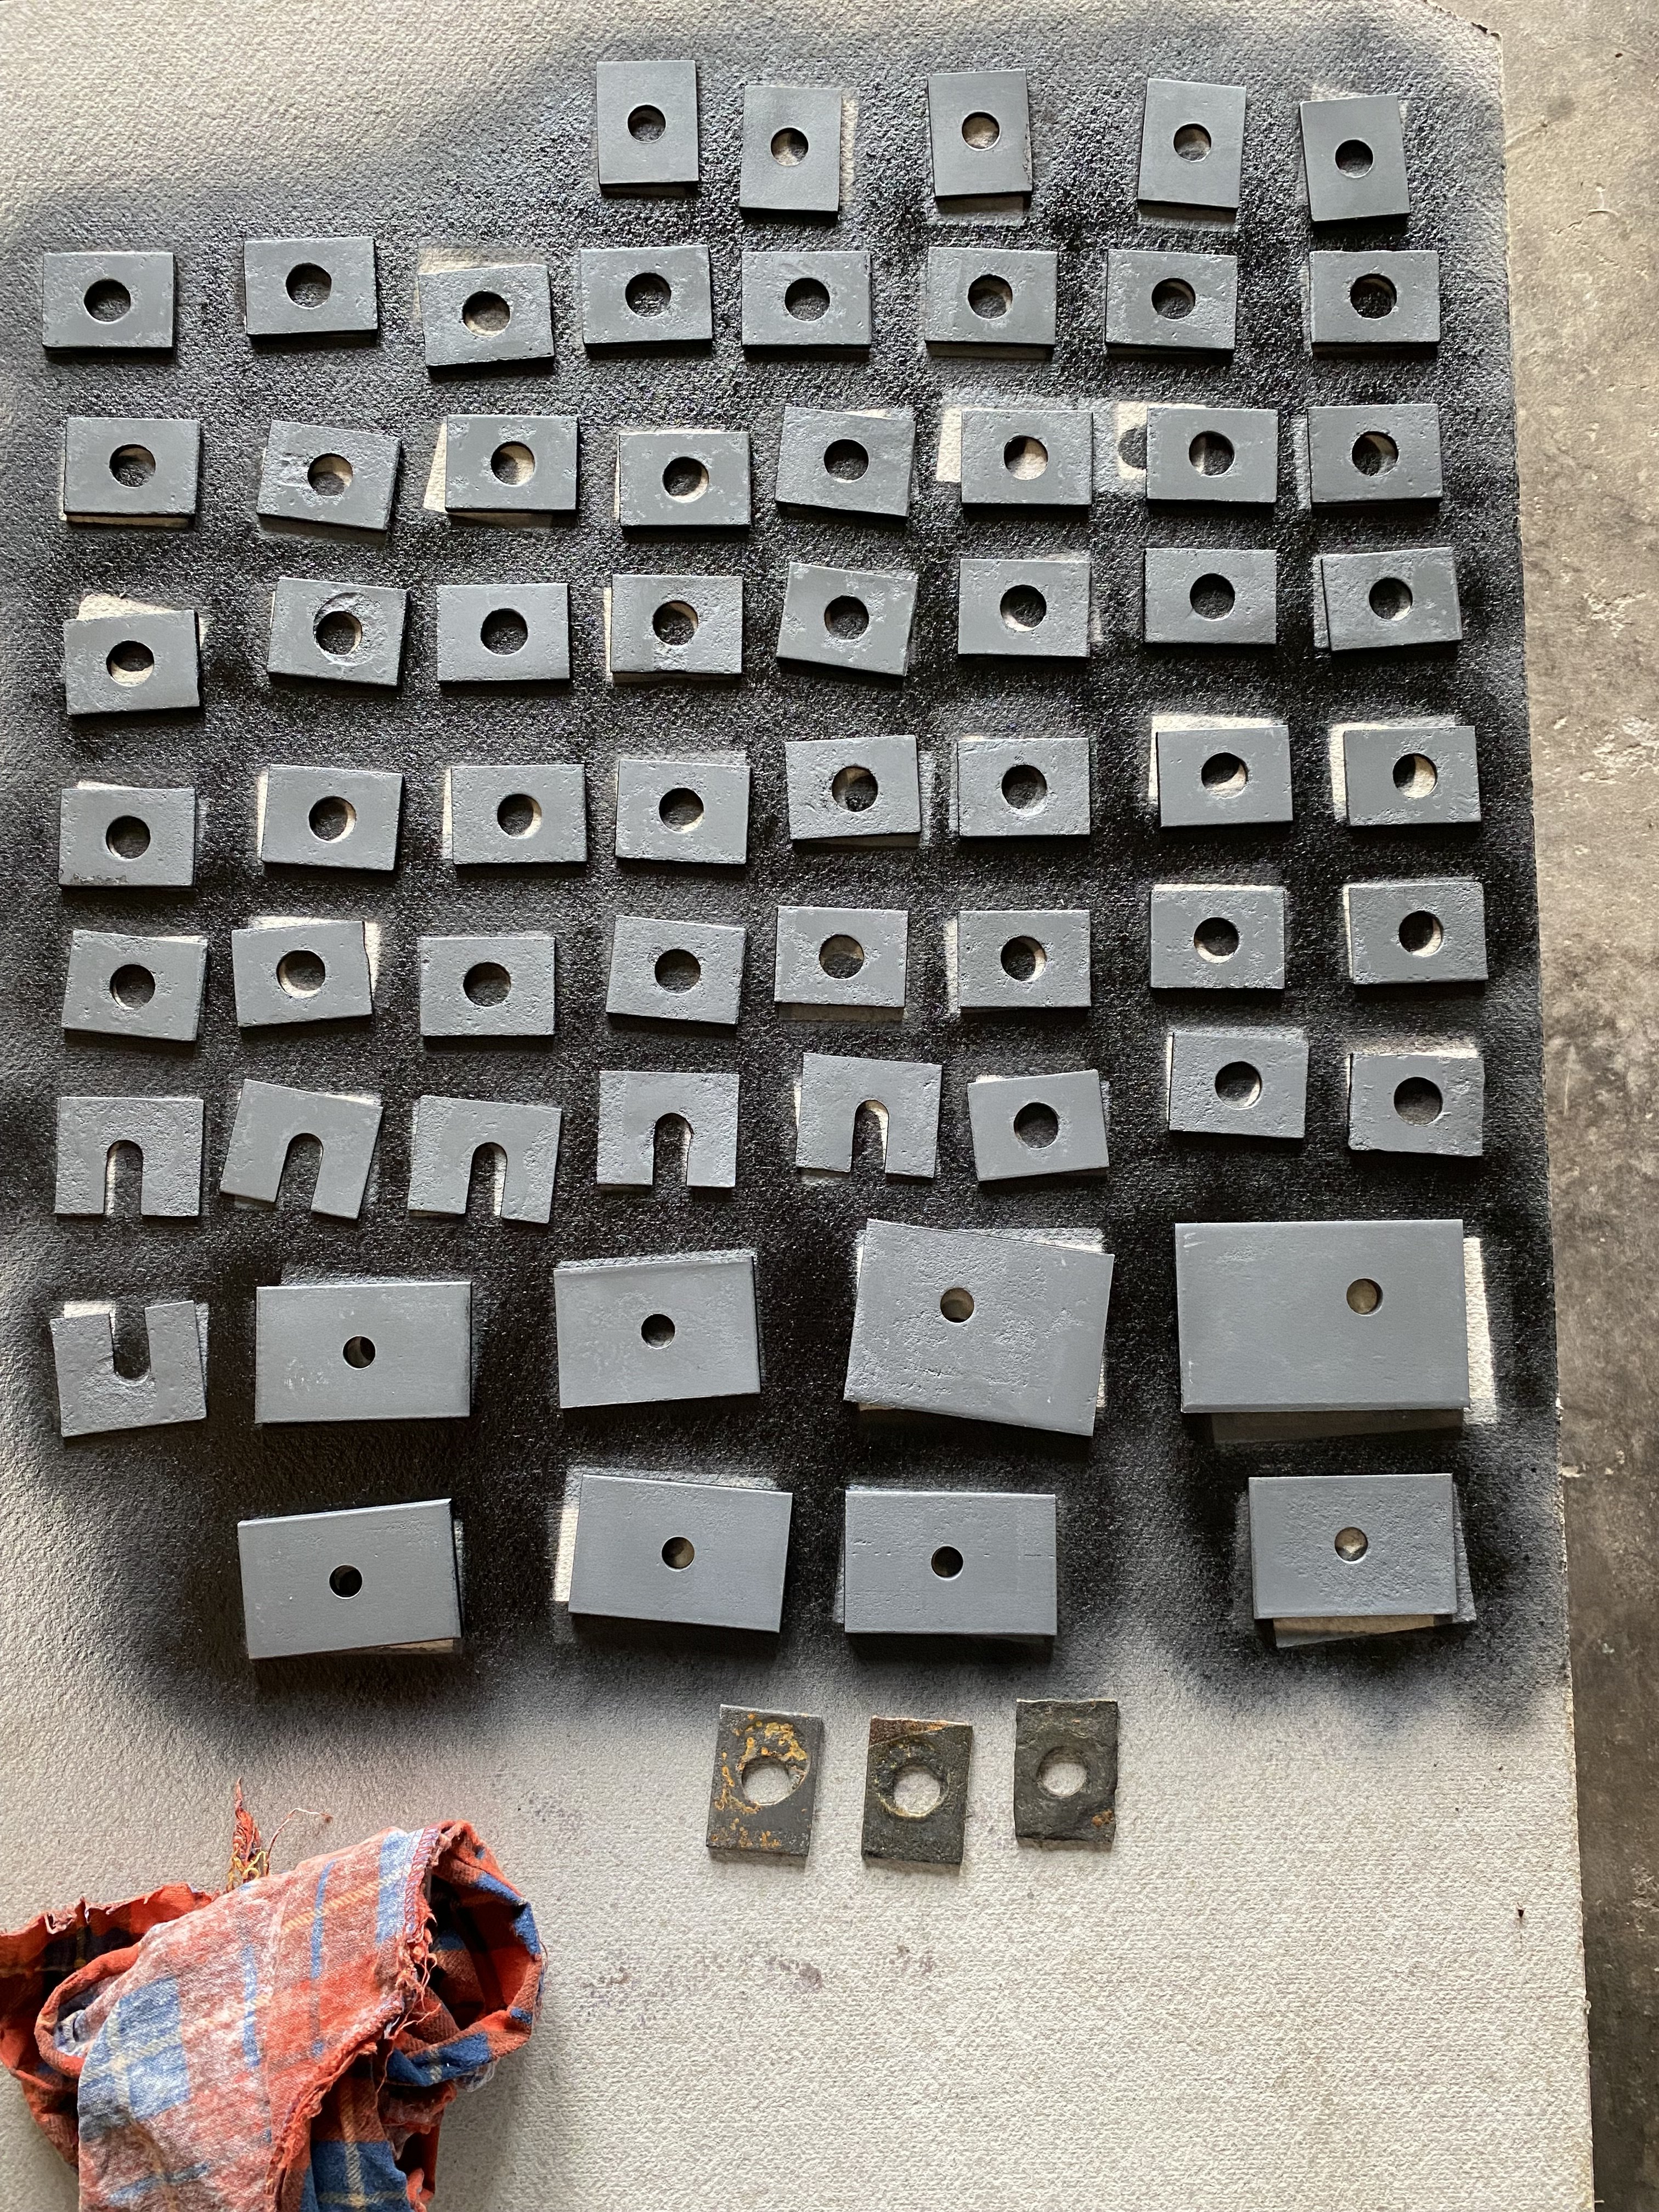
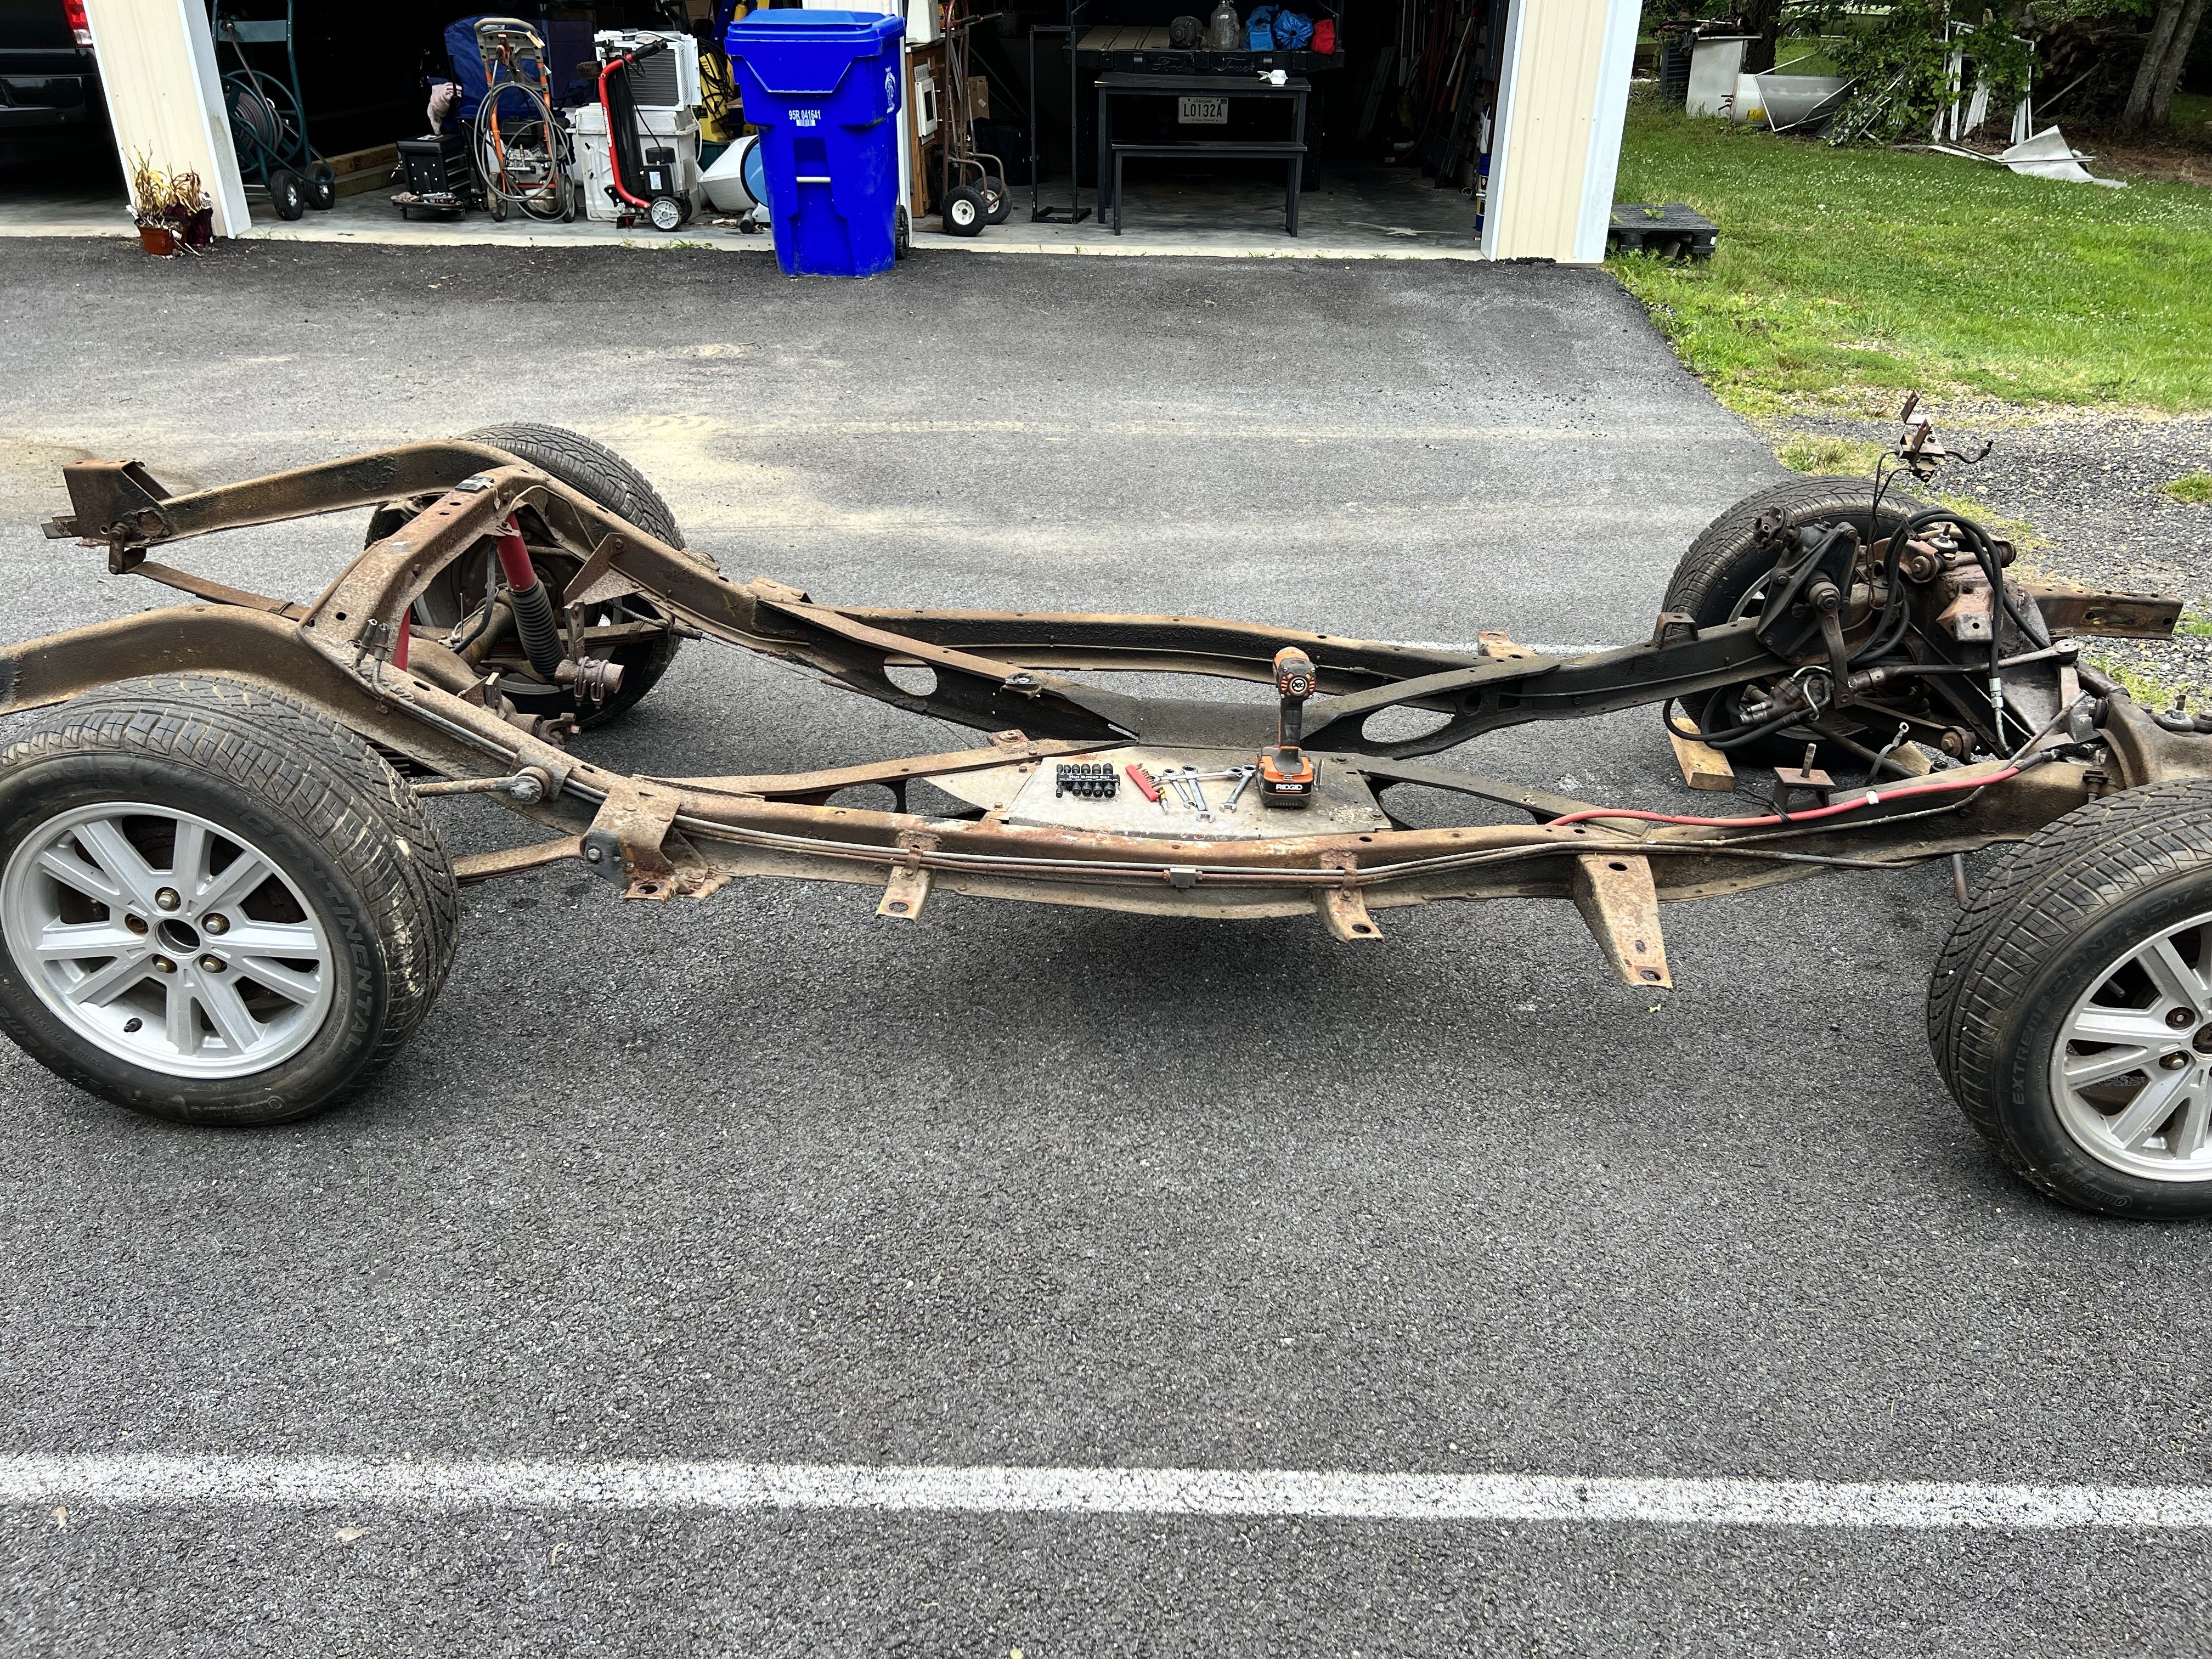
I have cleaned and painted all of the various steel Shims/Packers plus made some new ones. I plan on doing 'Hog troughs' soon- whilst the body is still unencumbered with its Frame. The Frame is a replacement, as will be the HT's.
When I commence fitting the body back onto the Frame, how much packing will I need? Is there a minimum/ maximum height and where should measurements be referenced to and from. I'm assuming the top of the frame rails to the bottom of the floor will have a recommended dimension. I did take lots of reference photos before tearing the car apart, so I have a start point of sorts. Can anybody throw some light on the subject? I'm aware the Frame Crossmember above the Rear Axle had a couple of 1/8" Rubber shims there, originally.

-
11 hours ago, SCPO-PD said:
Zedman - please explain the dummy switch....
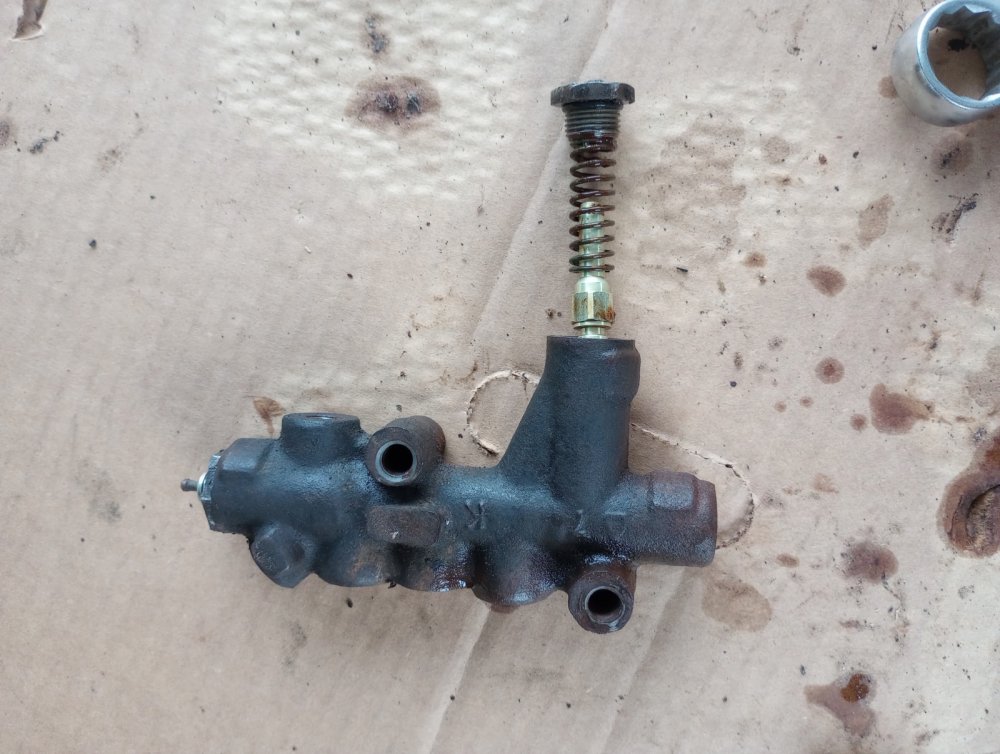
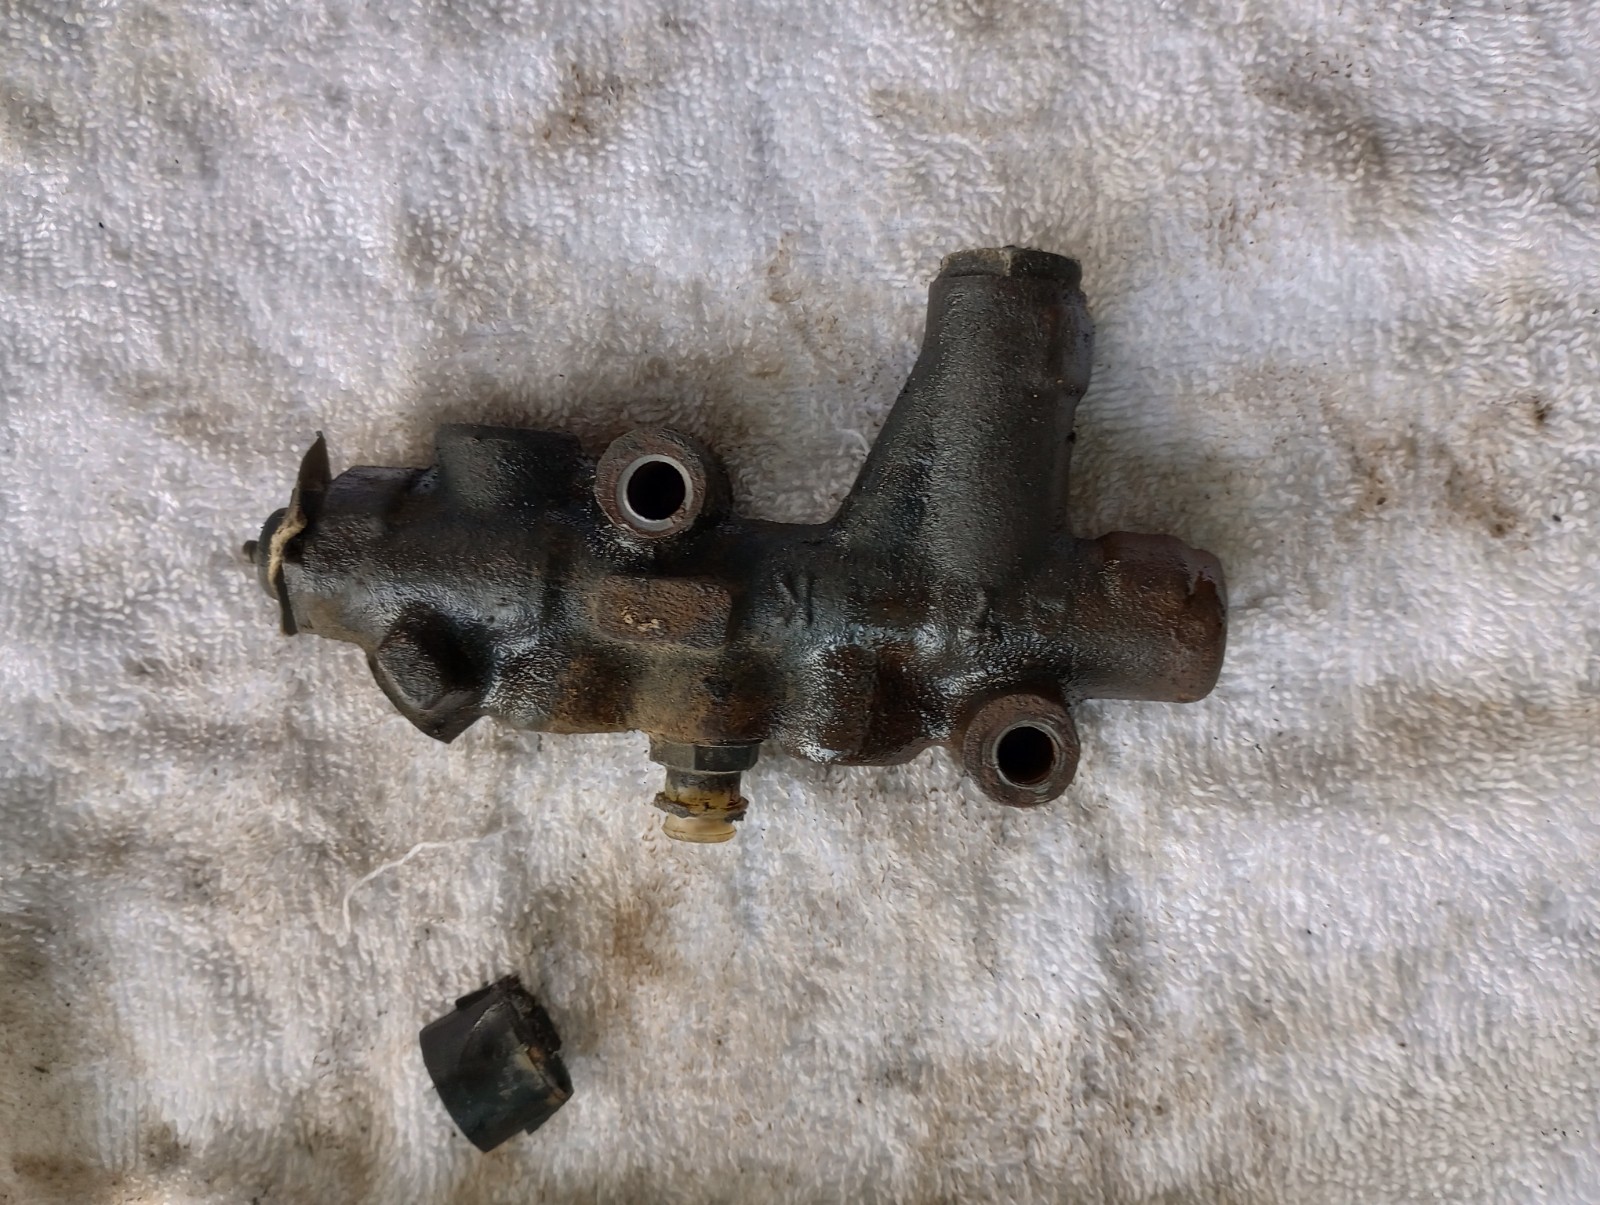
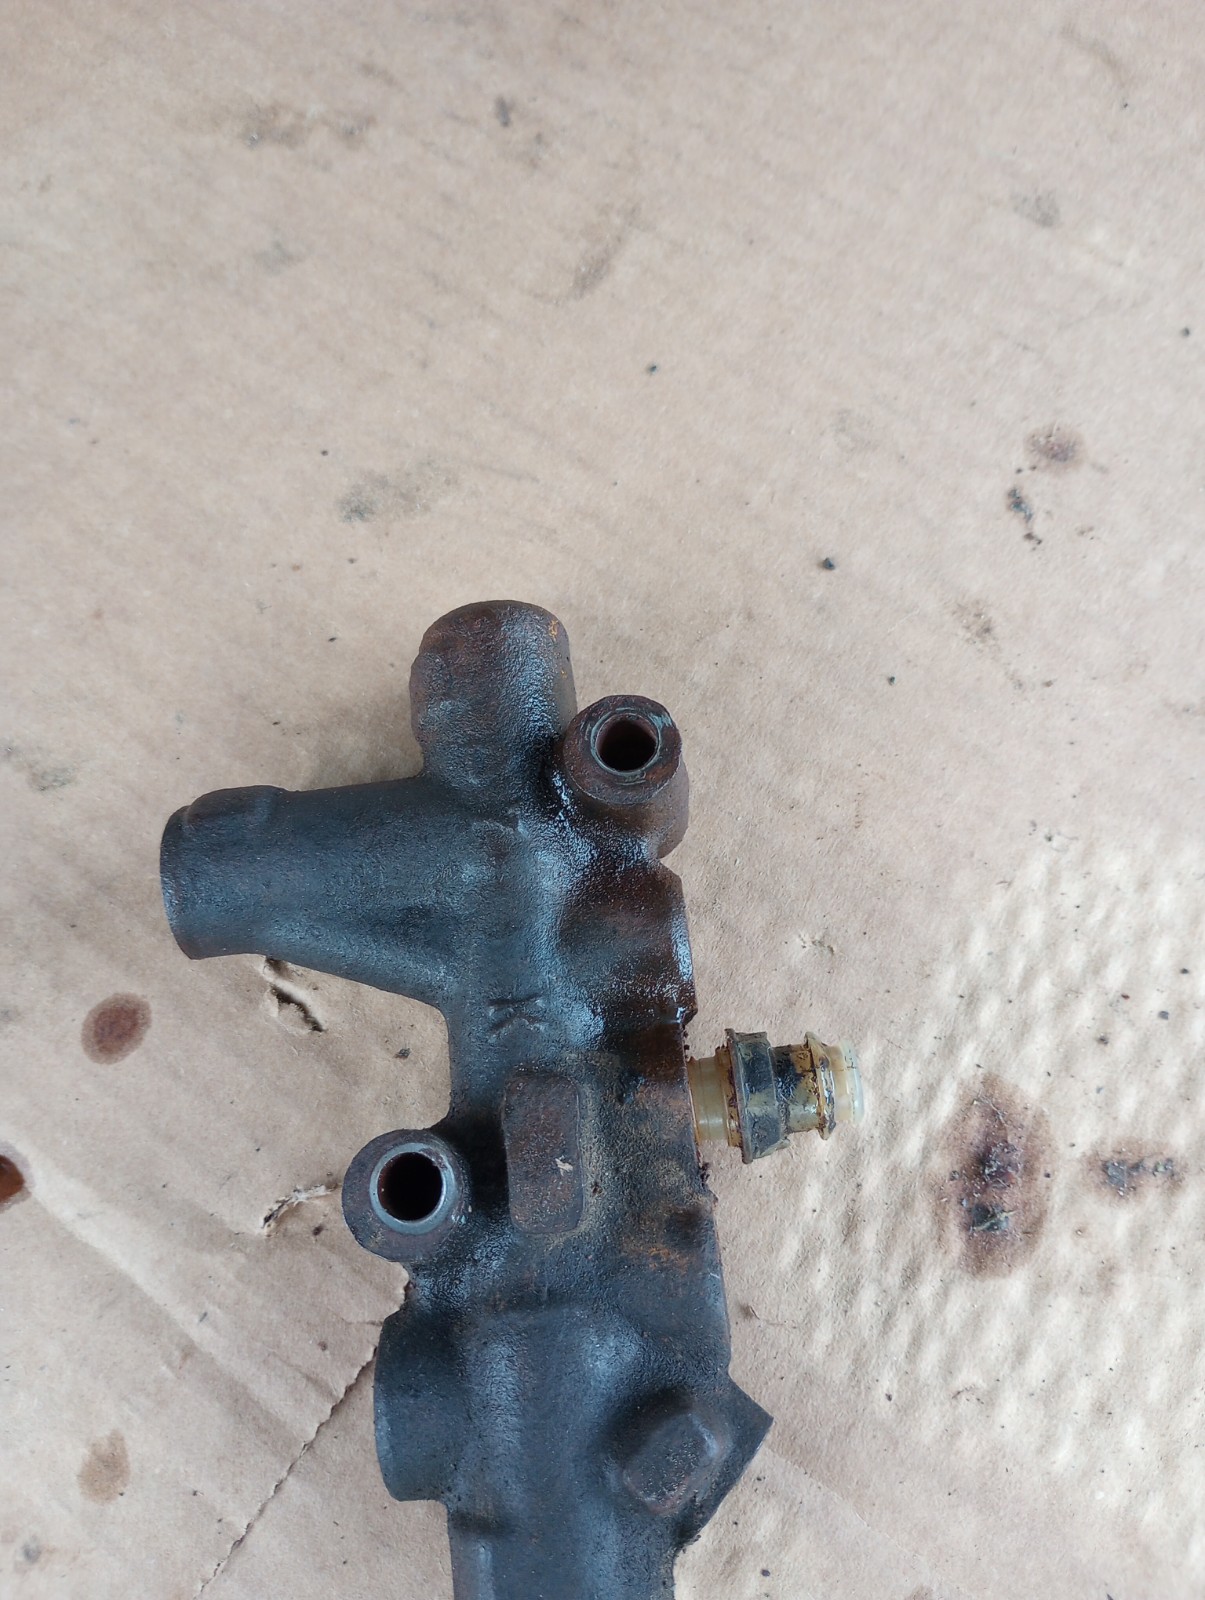
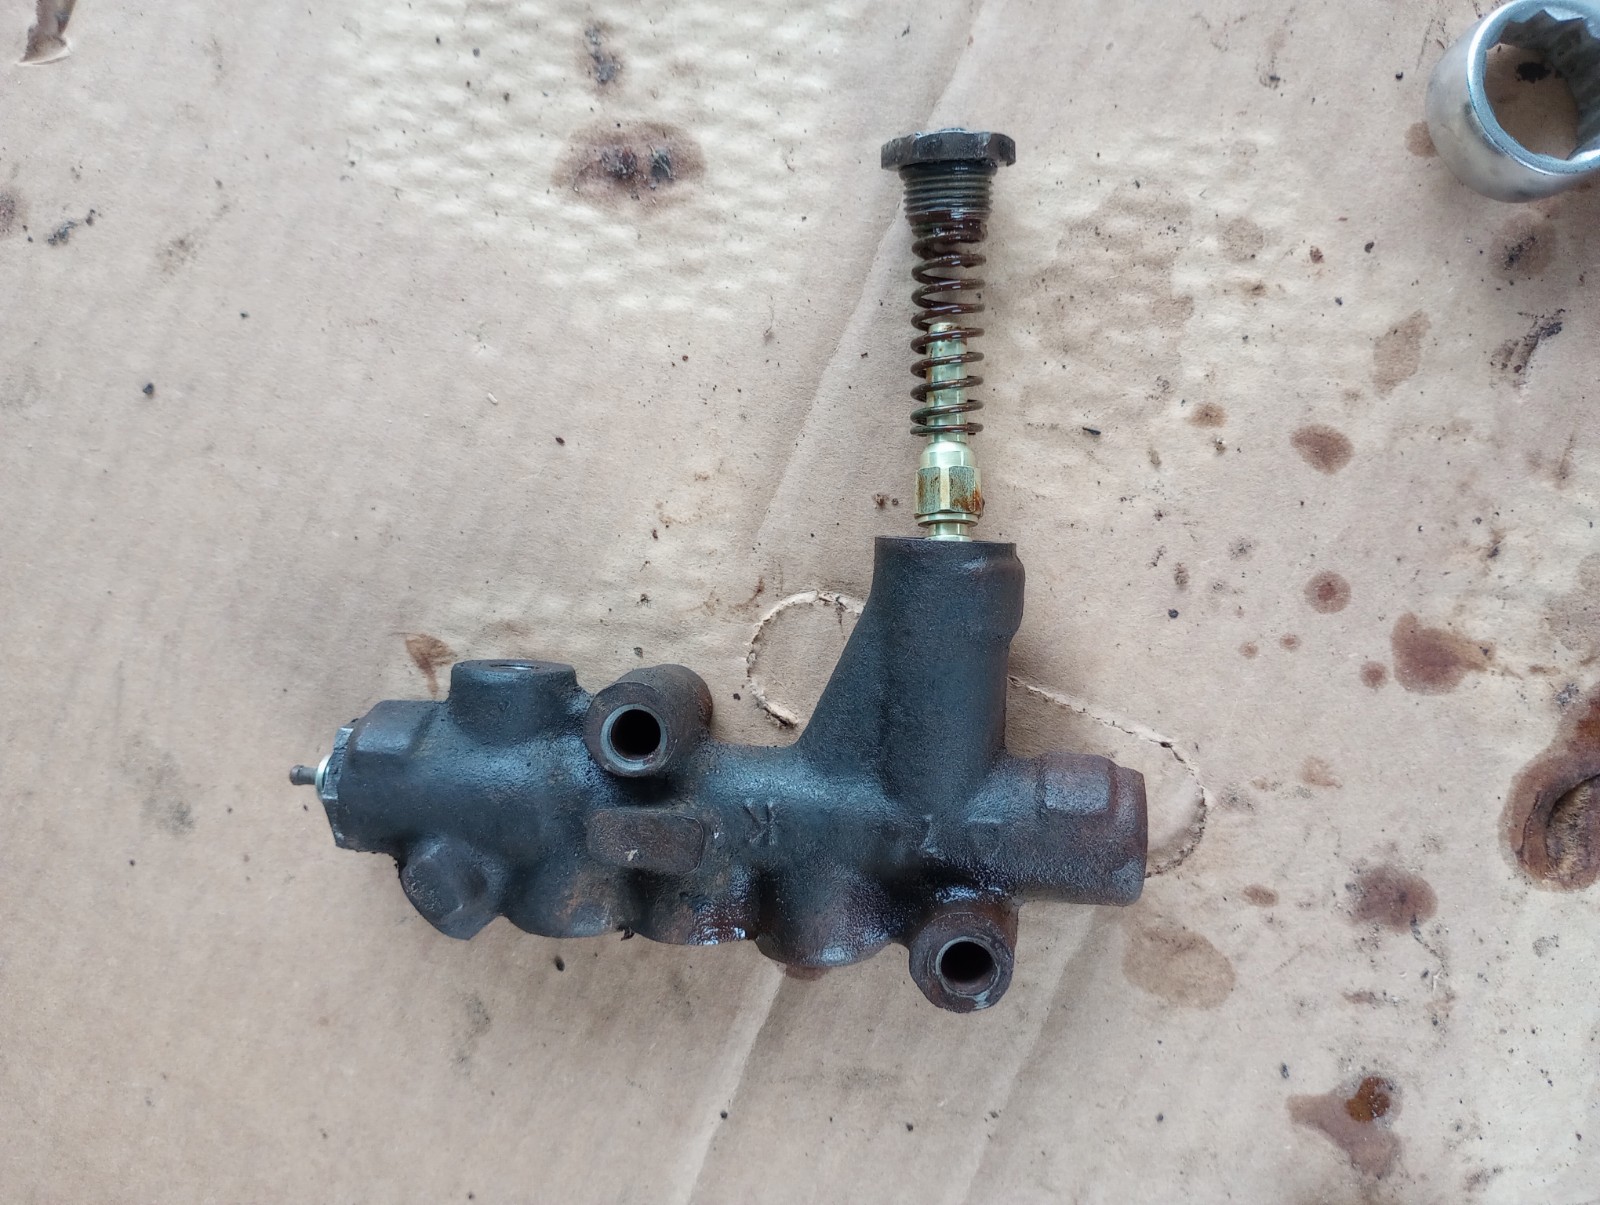
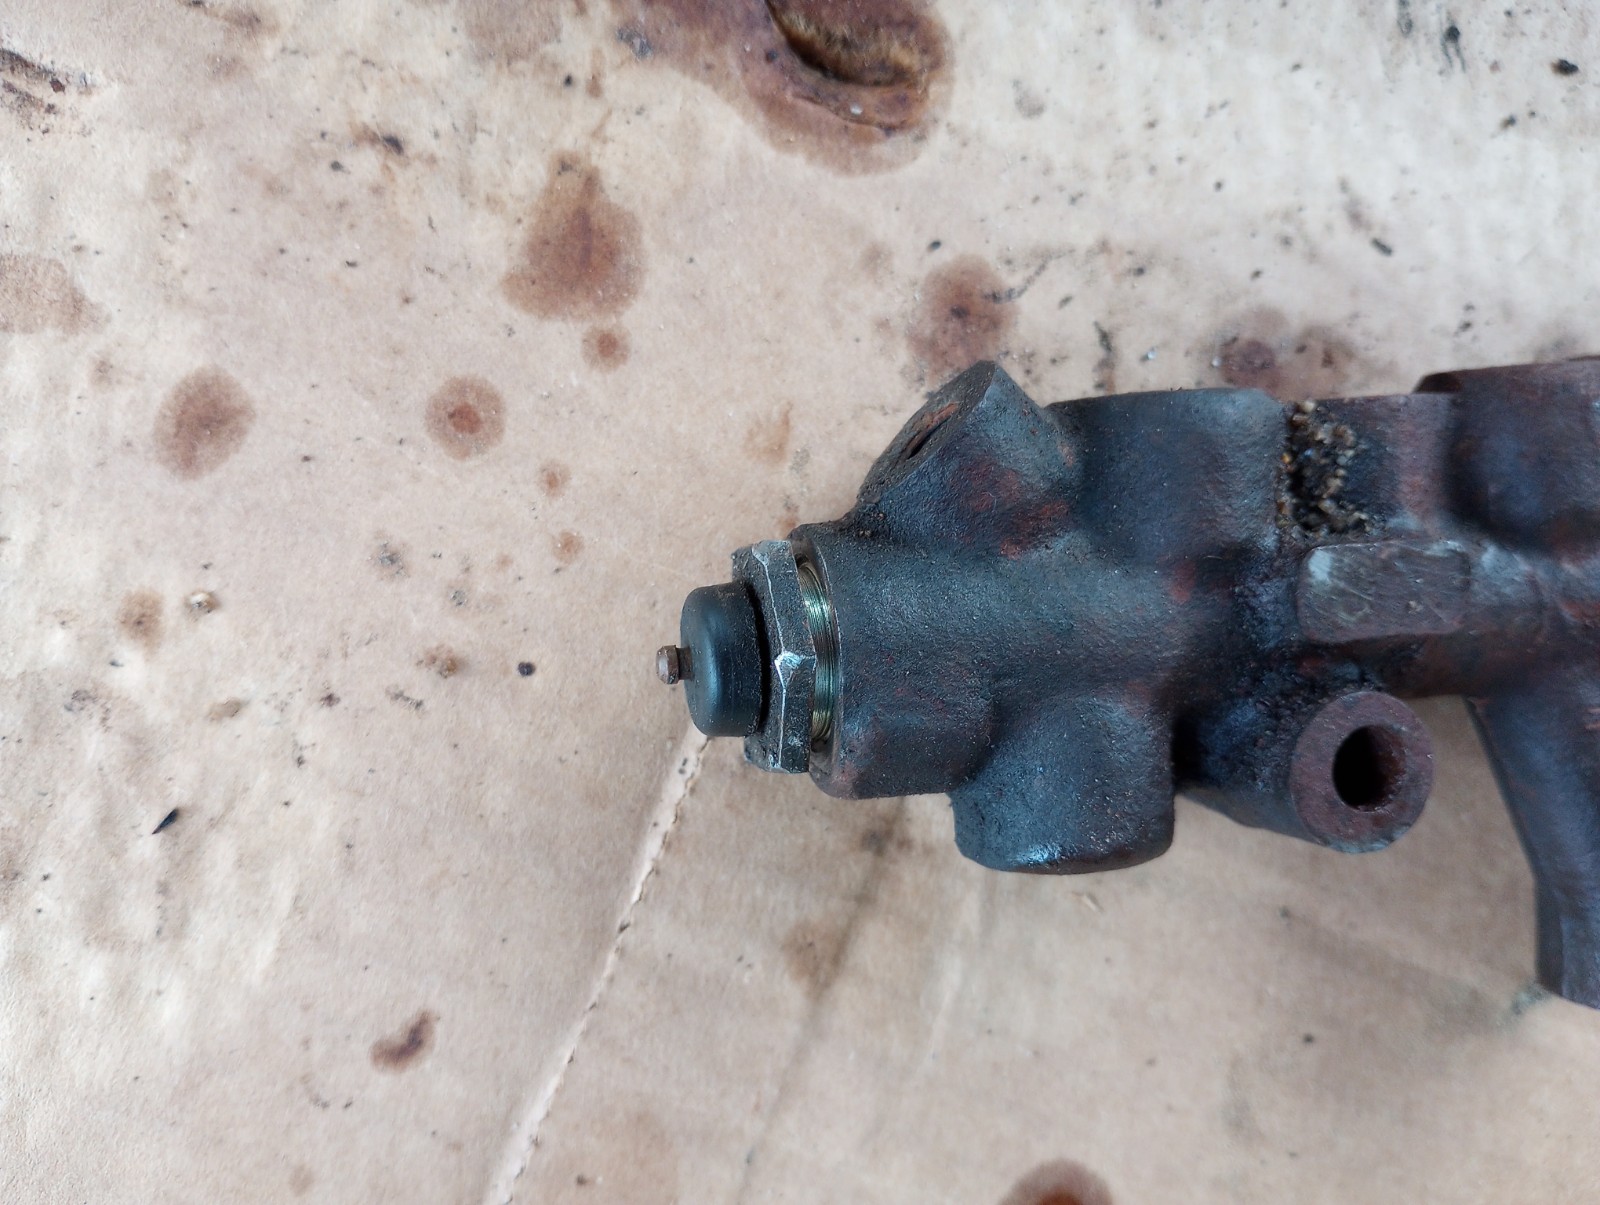
When bleeding your brakes from 'empty' the shuttle valve (did you remove this part when cleaning BTW?) in the middle of your proportioning valve senses this condition as a brake system failure to the either the fronts or rears. The shuttle valve then moves either one way or the other (depending on whether you're bleeding fronts or rears) in an effort to stream the brake effort to the brakes that are operable. This will make it impossible to properly bleed your brakes. The pressure switch on top of the Proportioning valve is temporarily replaced with a "dummy switch" that fits the groove in the middle of the shuttle valve. Instead of having a movable pintle to switch the warning light 'on', it has a solid pin that prevents the shuttle valve moving at all- thereby 'fooling' the valve and allowing purging of air from the brake lines.
A better explanation is here (showing a cutaway K-H valve no less) and a picture of the Dummy included...
https://pontiworld.com.au/usgmsp/product_info.php/products_id/11952
Lots of dummy switches are available so don't pay big bucks for 'em !
-
Hi BillyBob. I started a thread on a Boster rebuild query in the 1965 to 1983 Avanti II forum recently. It has some helpful info there.
-
Hi Tom- In the interests of the wider Avanti/Studebaker crowd, are you 'advertising' the availability of the wheels anywhere, or is this likely to be only a limited one-time order ?
-
7 hours ago, SCPO-PD said:
I pulled the Proportioning Valve this evening and am now playing the game to replace. I think that I may have found one (PV2). I also found that the brake line kit that I purchased from Avanti Parts & Restoration doesn't seem to match what I have on my car to include the multiple fitting sizes of the proportioning valve (all the fittings are identical)

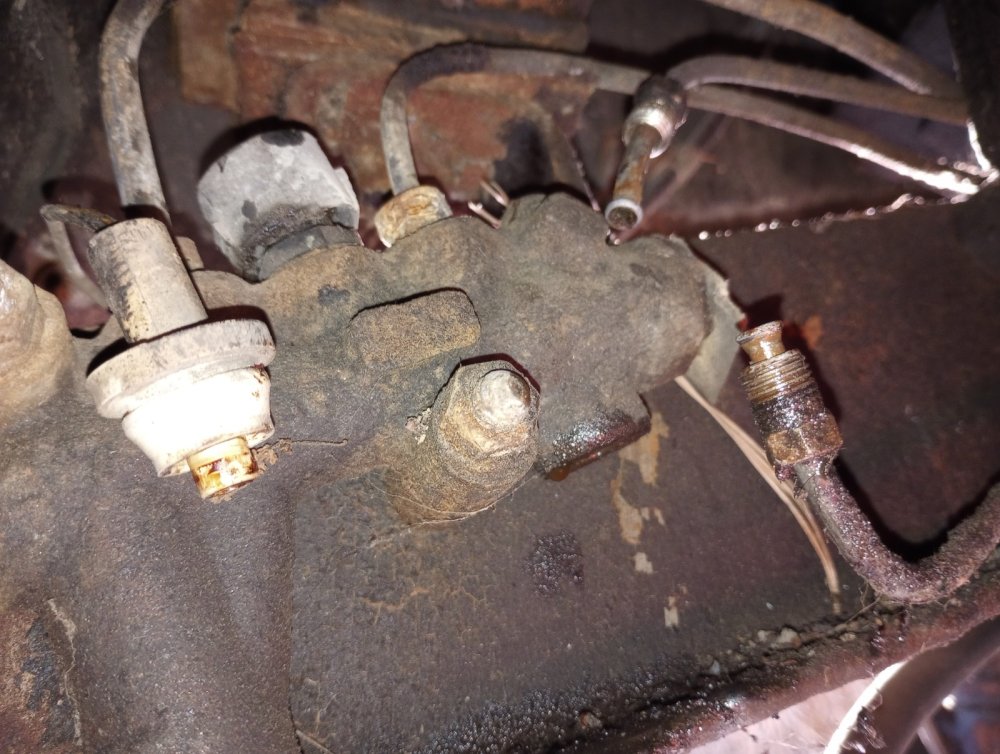
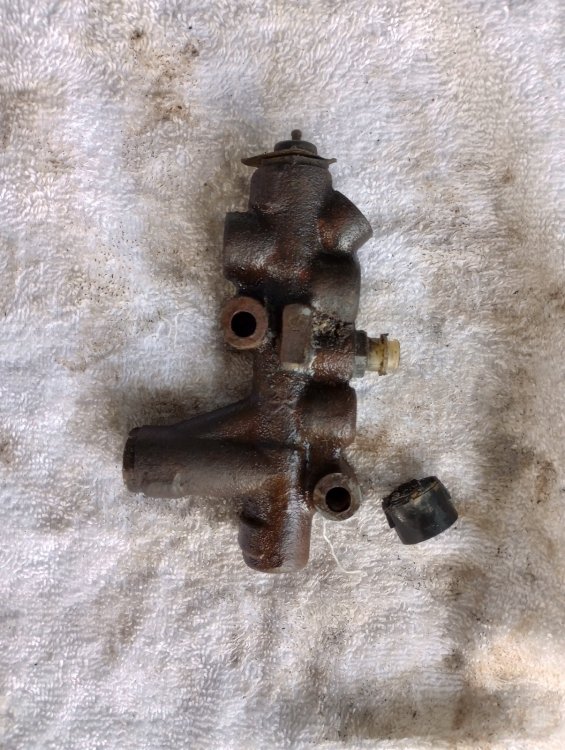


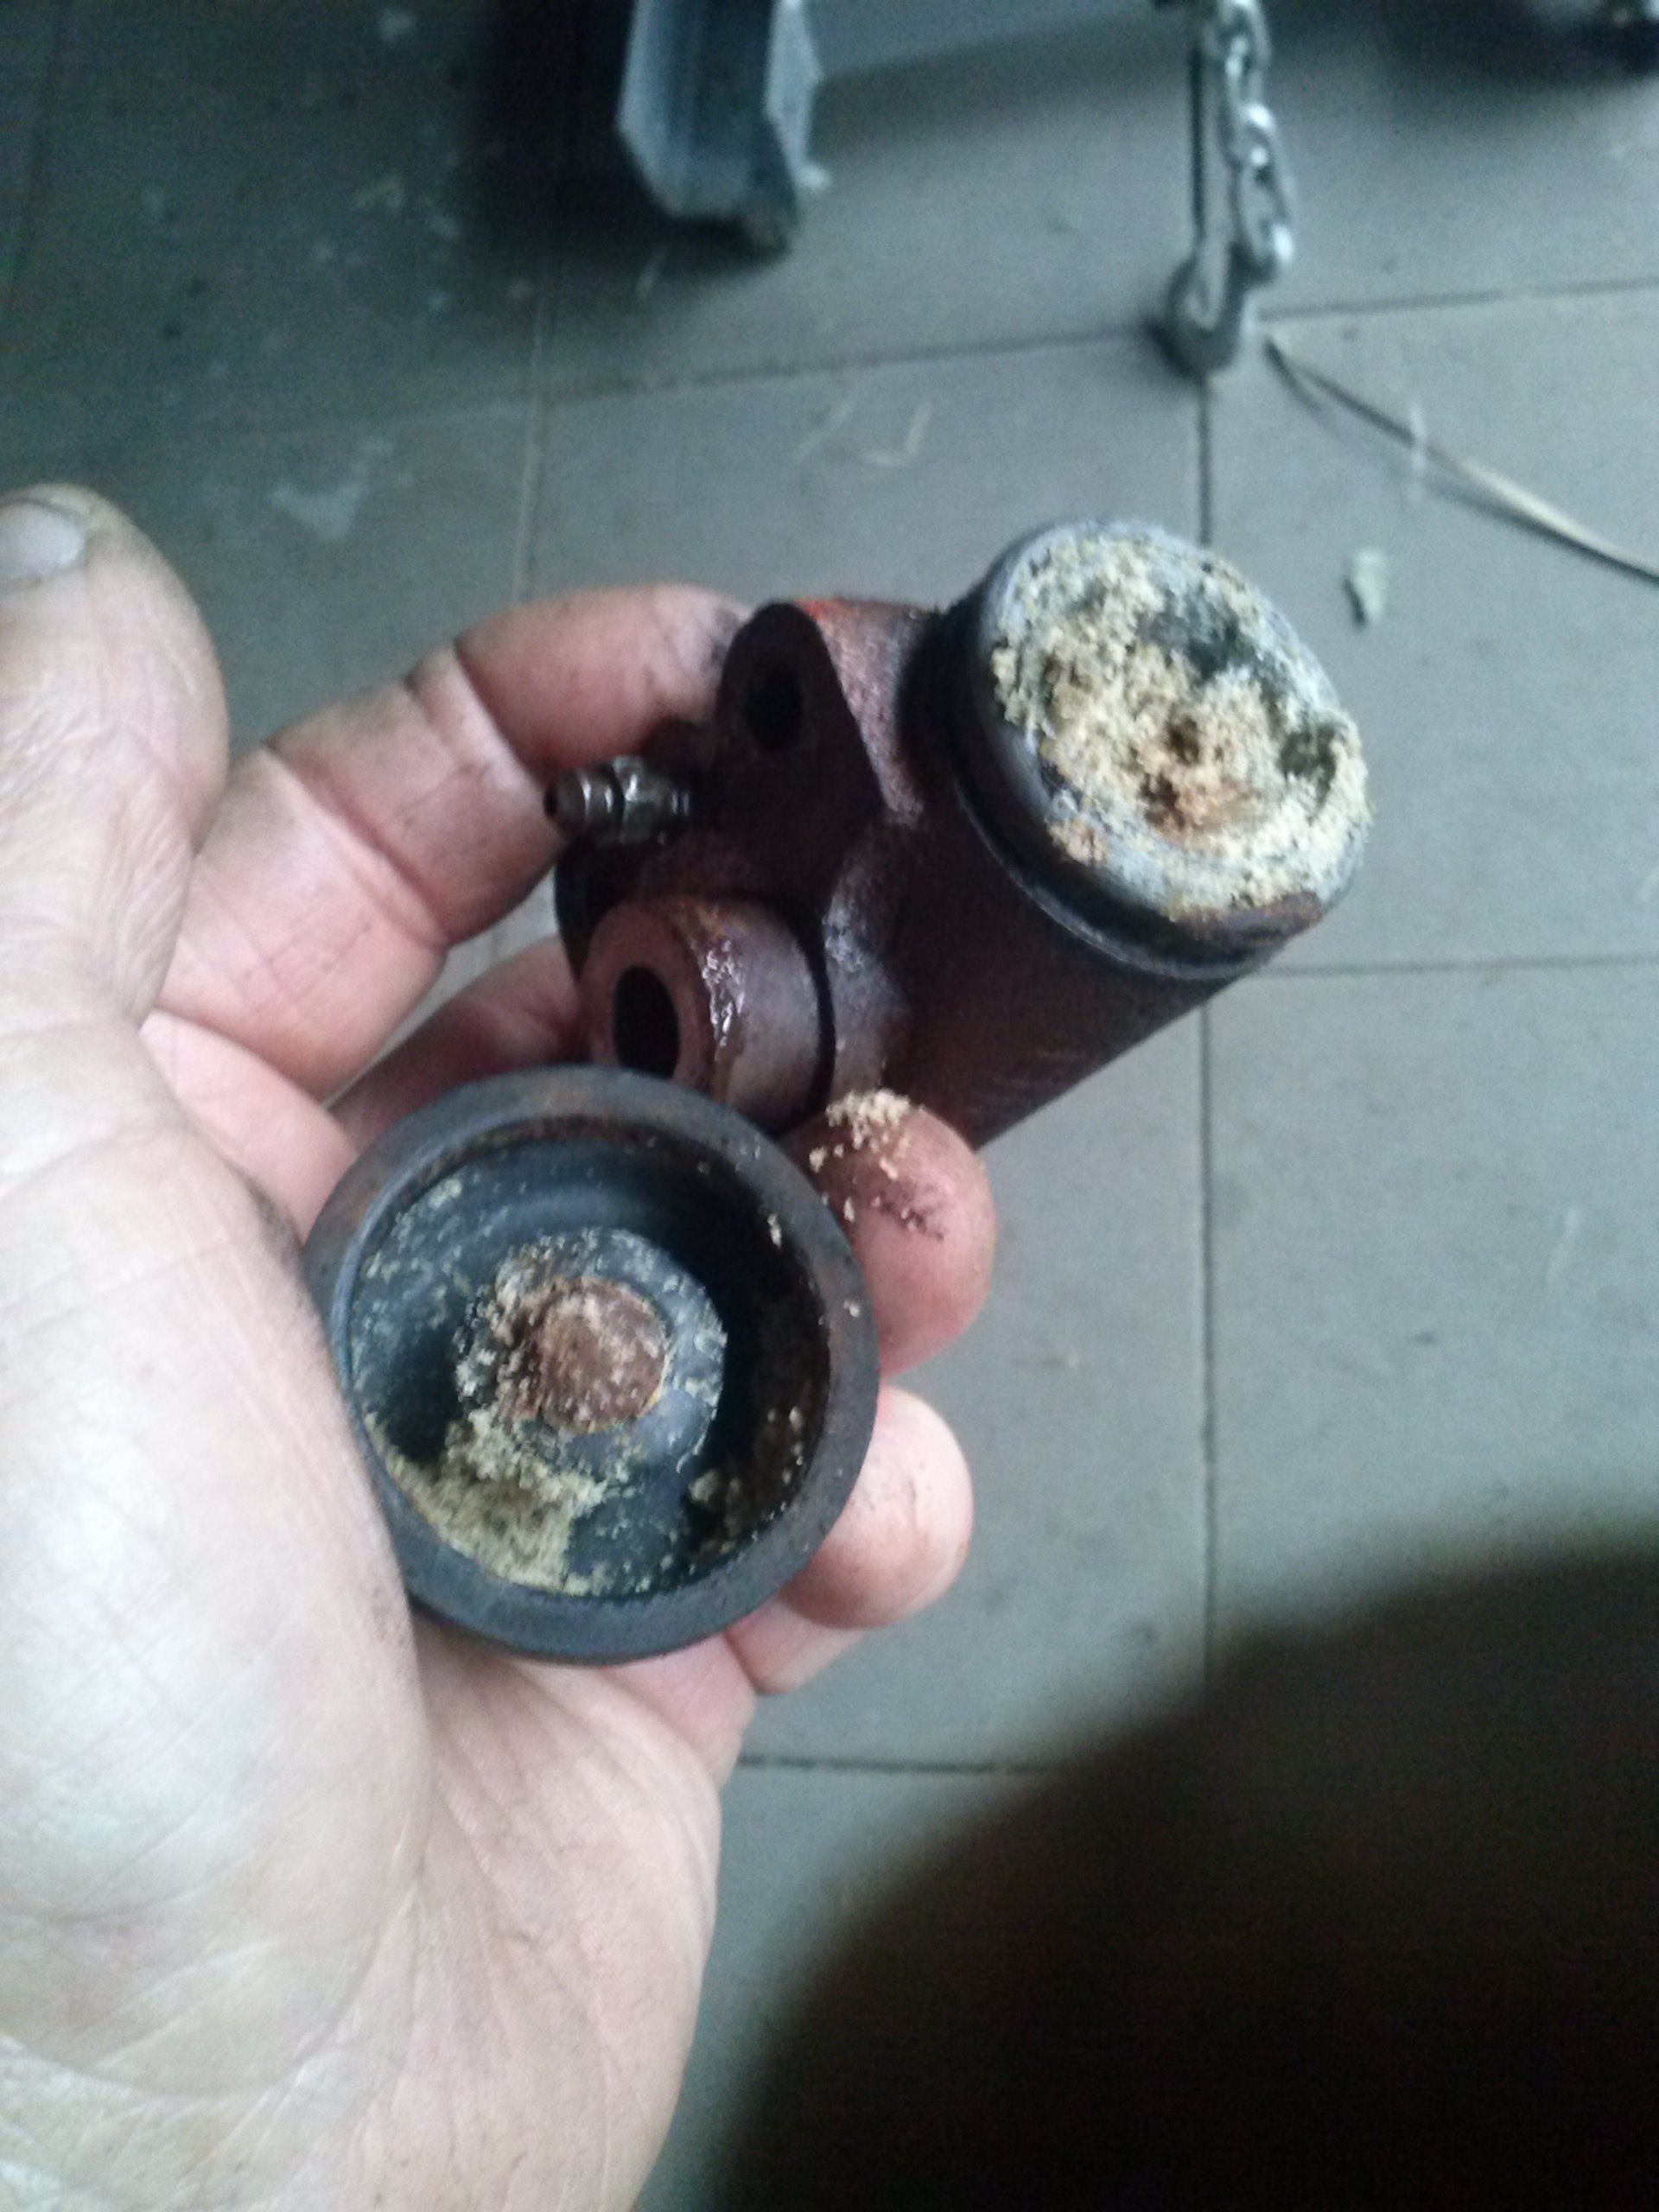
You might be in luck- The internal parts that are coming out look way less filthy than I expected. Bear in mind that you will need to use a dummy switch to prevent the shuttle valve moving when you bleed the system on installation.
-
11 hours ago, Avanti83 said:
Whatever they used to put the dent into the cross member, it left a significant impression in my 74.
Geeze its huge ! It also looks uncharacteristically smooth- perhaps its a dished piece that's been welded in.
-
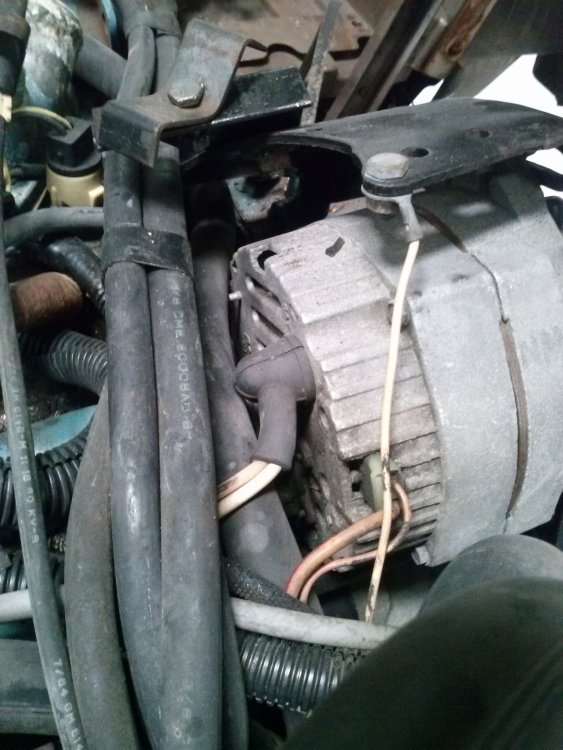
14 hours ago, mfg said:
That first pic you posted (showing the engine rear support crossmember) was a BIG help to me....THANKS FOR POSTING! 🙂
Thanks... Glad to have helped 👌
-
I can recommend cleaning up the backing plate using the electrolysis method. It removes all the rust within a couple of hours and is dead easy.
-
1 hour ago, 1inxs said:
Yes, this concave is supposed to be there!!! It is to allow clearance for the pitman arm. The same on my 1964, 1970 and 1981 Avantis.
Hi 1inxs.... Thanks for that info. 😬 Geeze.... So, irrespective of the steering gear fitted, this 'ding' will need to be replicated 😒. As part of my prior research, I had lifted a bunch of other peoples' pictures from the internet. I noted in one pic there was no ding in the shot but another pic did show closer proximity with the PS Pitman arm in the straight ahead position.
-
9 hours ago, wildfelr said:
RQB3263/81/305 .... I WILL CHECK 3263 NEXT TIME ITS ON THE LIFT AND REPORT BACK HERE ...... BILL IN FLORIDA
Thanks Bill- Being the owner of RQB 3269's close cousins, I bet you'll be similarly disappointed! Do me a favour if you may, please- check for what these furrows and dings actually attempt to make clearance of. 🙃
-
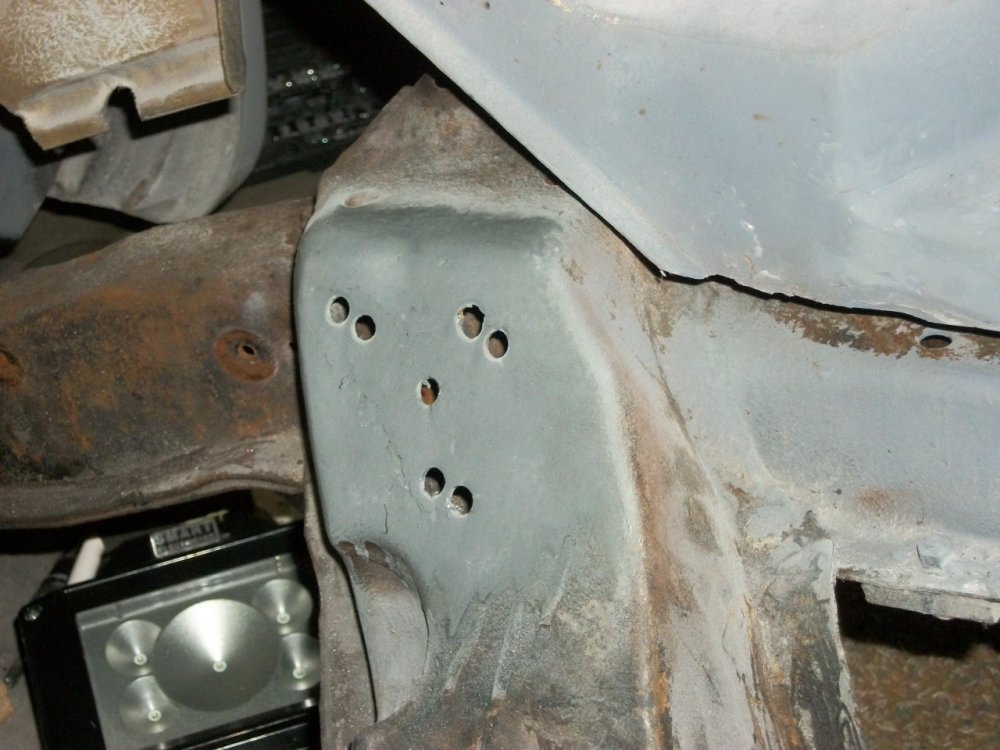
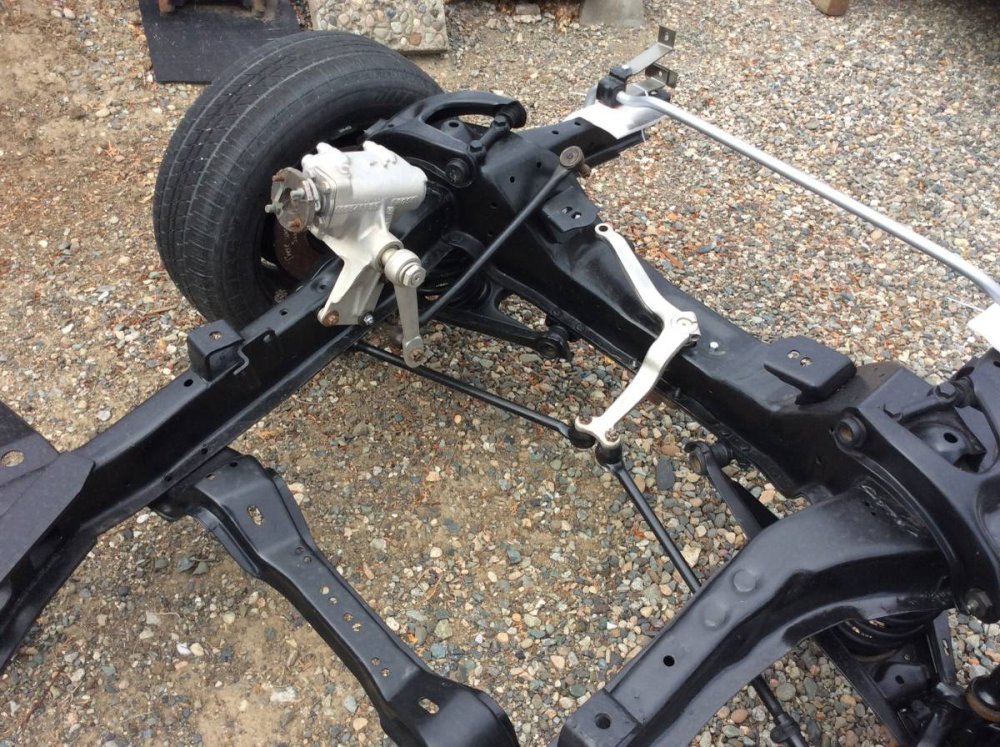
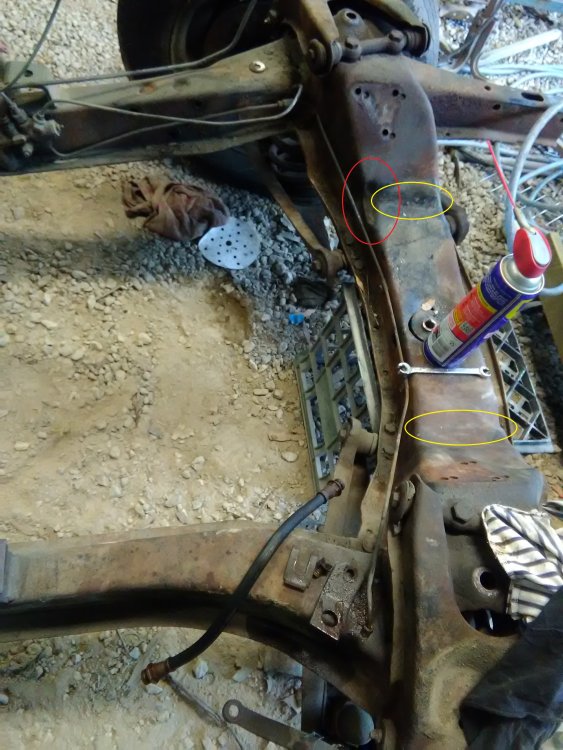
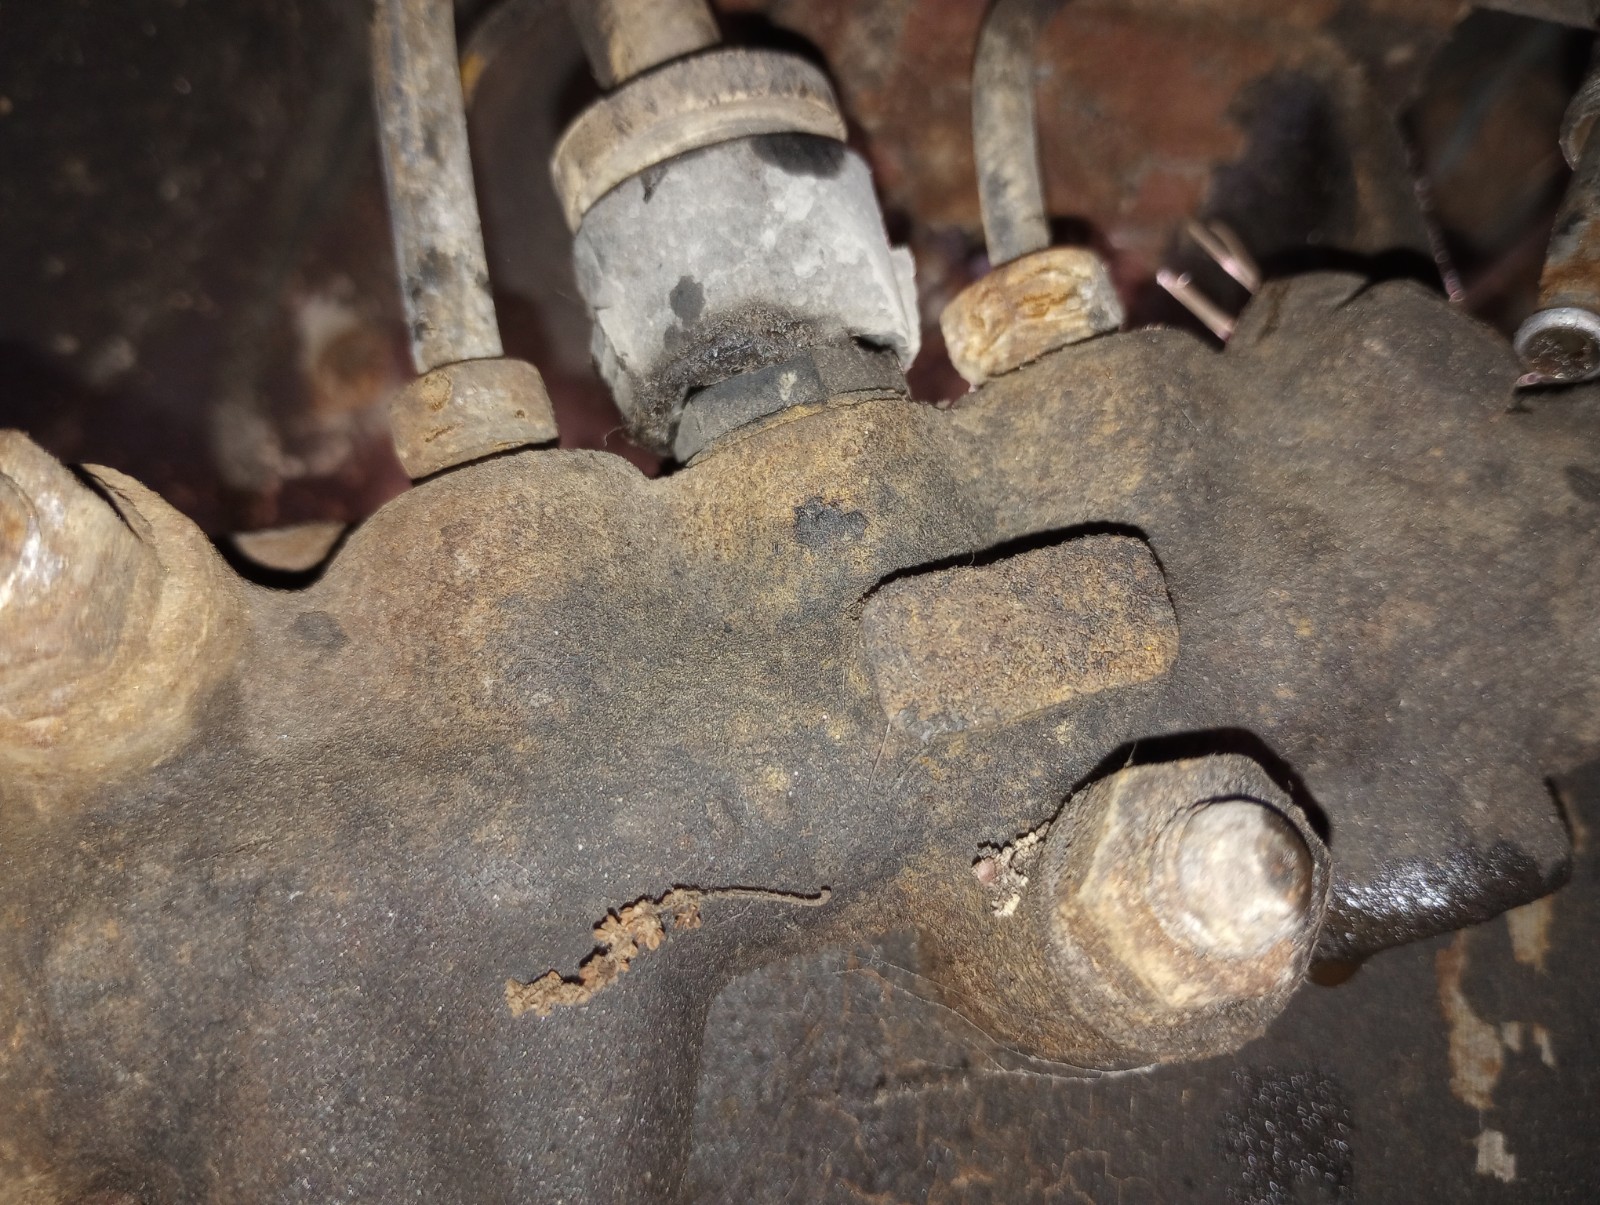
Appropos the Chassis swap for my 1981 Avanti II, I note an odd dent in the original chassis' front Crossmember inner left side (marked Red in the picture). I believe this is another example of factory butchery, possibly for exhaust pipe clearance but I'm not absolutely sure of that. It looks to have been heated with a torch and, quite skillfully, bludgeoned downward with a Hammer. There are a couple of furrows (marked Yellow) there as well but I think those were original. Can somebody elucidate on that ugly depression? I really don't want to replicate it on the replacement chassis it if I don't need to.
-
How do these respond to Dimming ?
-
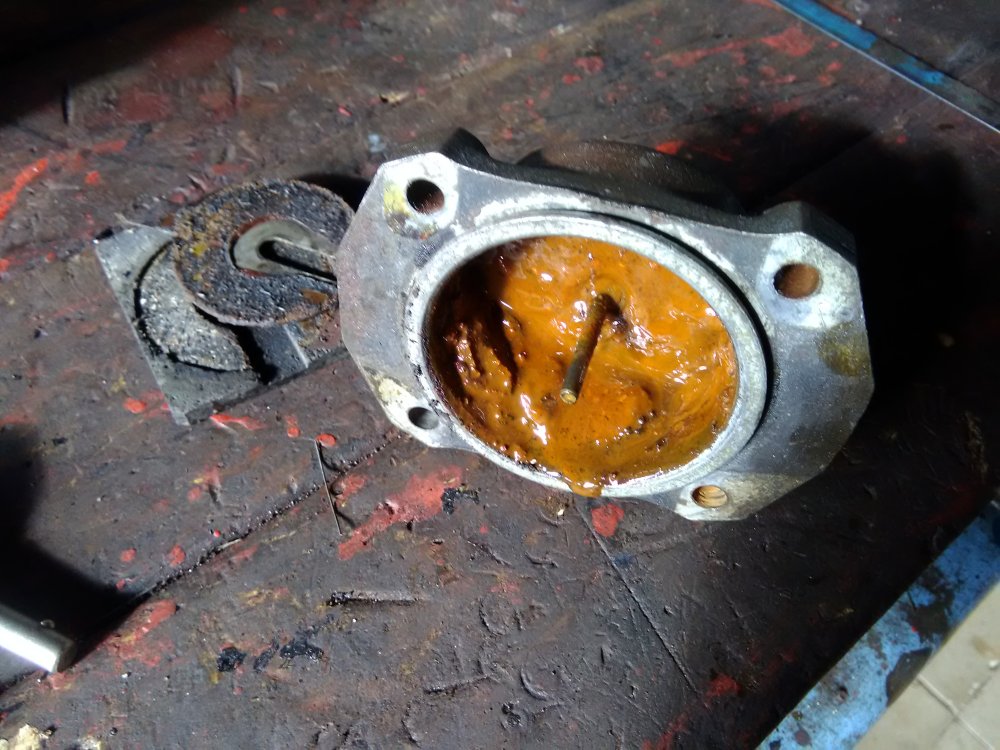
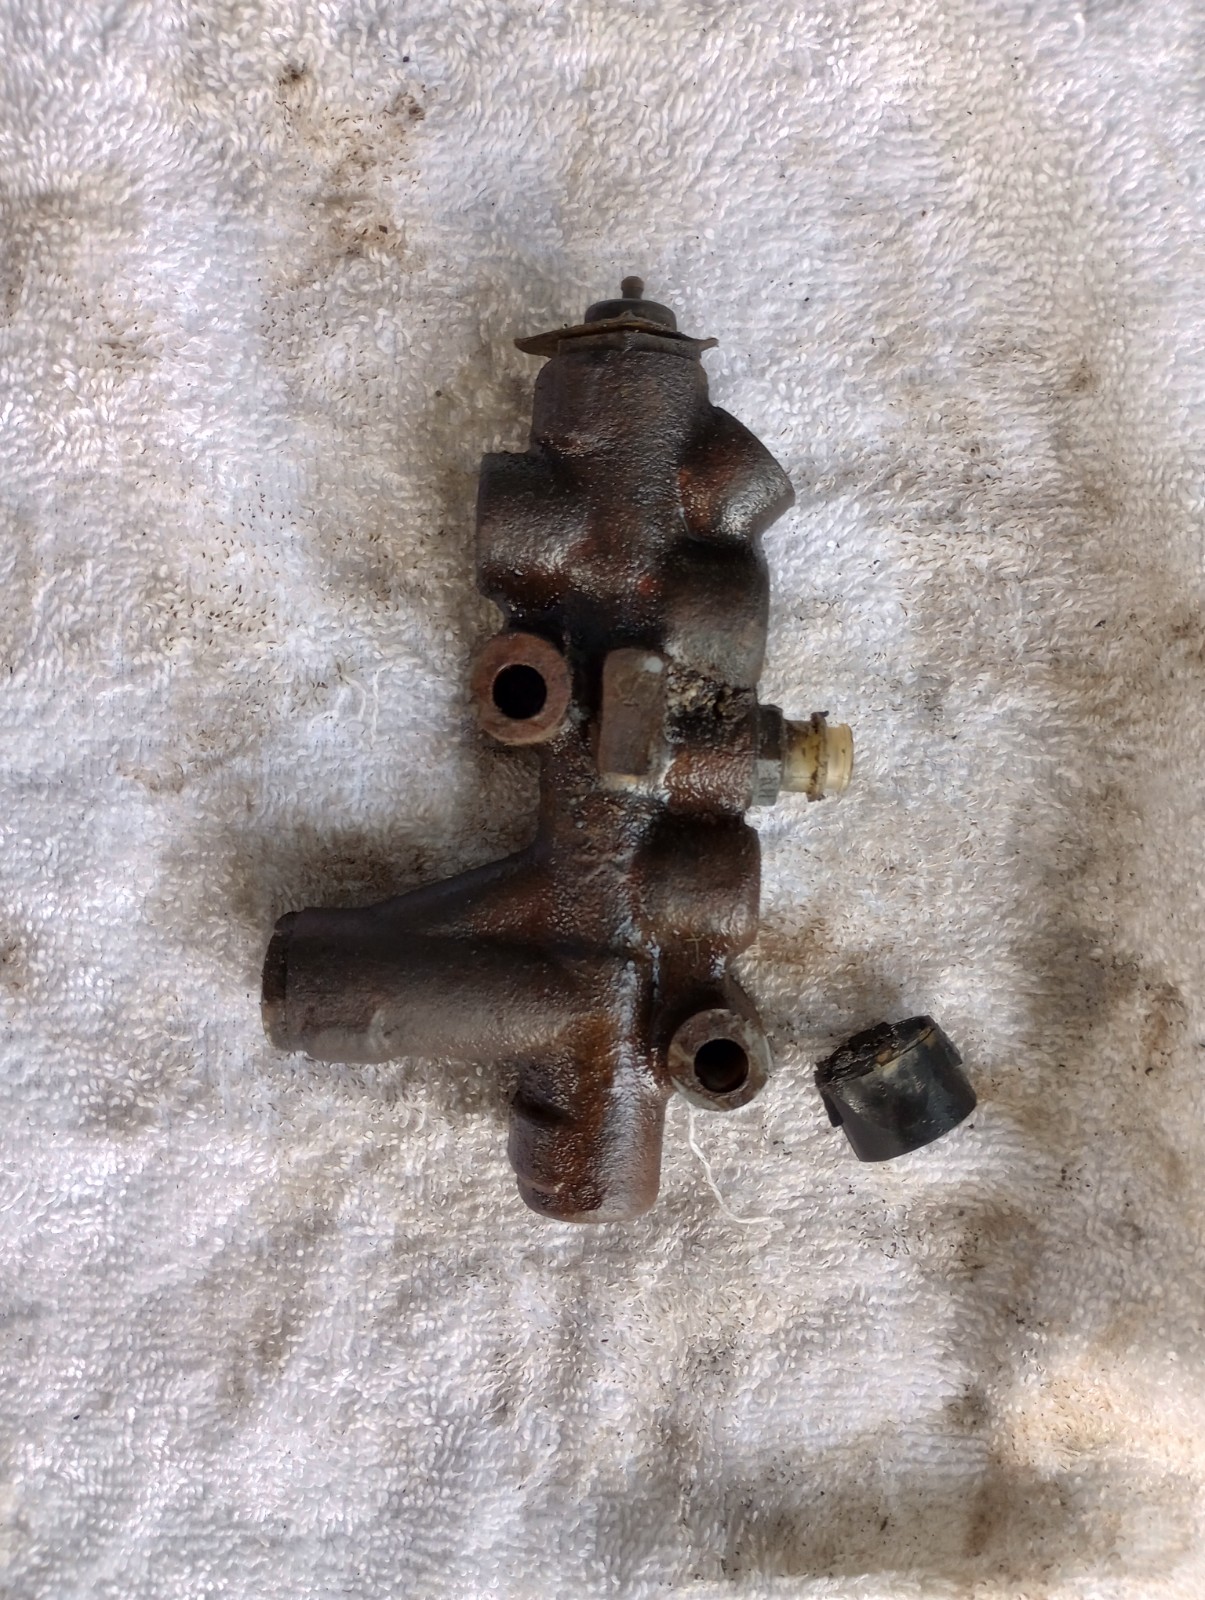
When you recondition your Brake system, take off the Proportioning Valve and give it a wash out as best you can. Don't neglect this unit because if it is jammed with muck, you may have braking issues. I pulled mine apart (Stuck, and full of sludge) completely and did a heap of research on these. The Bob Johnstone Tech site has a qoutation somewhere stating they're a Bendix unit, which is false for our years' range.
They are a Kelsey-Hayes unit and are a little obscure- Nostalgic do sell 'em new but they will already be 'shelf old'.
Not quite all the parts are available to recondition them although the gent running this site has written an "Autopsy" on 'em and sells kits for most parts. https://musclecarresearch.com/content/kelsey-hayes-combination-brake-valve-research
A Video here-
Because you are fitting a higher performance Disc Brake system, you might investigate a 'tuneable' proportioning valve and relegate the oldie to the old parts archive.
Pardon my two cents' worth but there is almost NOTHING on the SDC/ Avanti forums on the subject of Proportioning Valves and I believe it is worthy of consideration.
-
17 hours ago, Gunslinger said:
It's not the first time an Avanti as used by a celebrity for a photograph...

I'm a travellin' man, made a lotta stops...
-
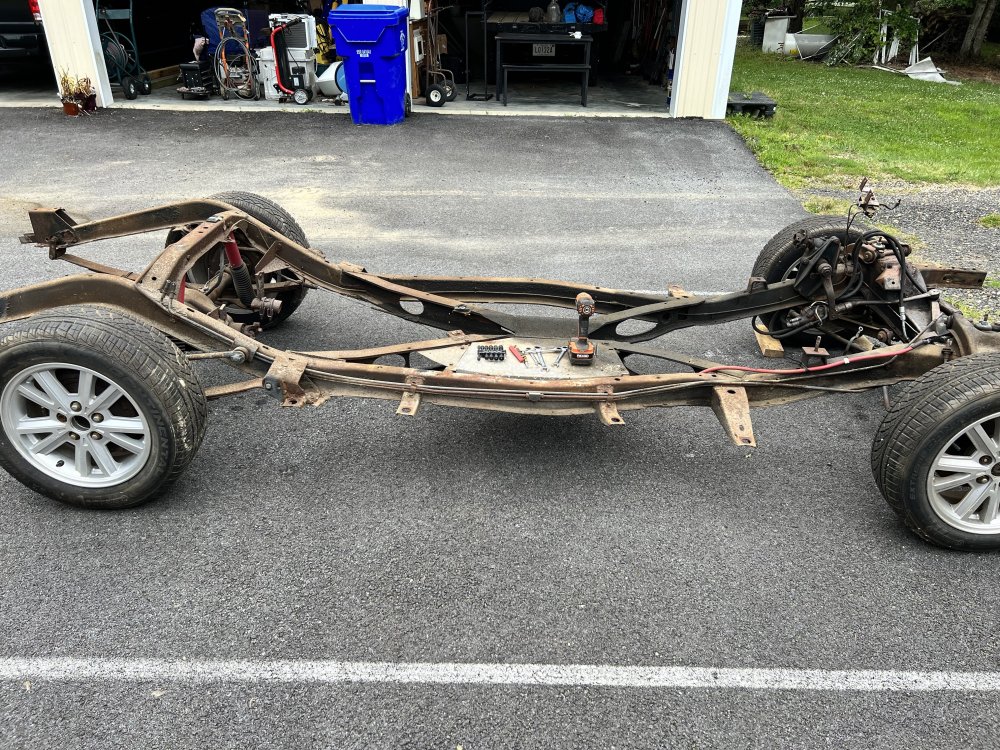
Here's photo taken when I started preparing my '81 Avanti for body lift from the Chassis. Hope it can help.
-
At risk of contradicting Gunslinger (no criticism, mind). My slant on this is the K.I.S.S. principle.
Gunslingers suggestion for the Turner conversion is valid IF you wish to have bigger/ more powerful brakes.
Just me- I like original with minimal change/expense
I have recently replaced my rusty Cast Iron Disc Brake Pots with 2 1/8" (original dia) Jaguar Stainless steel units, plus bent up all new steel brake lines. It was not worth a re sleeve nor economical to buy new original ones from SI through my parts supplier here in Oz. New parts are much more reasonable in the USA. (SI quoted me about $130 USD each some months back- and I needed 4).
-
On 3/9/2023 at 8:27 AM, 1inxs said:
Zedman,
Before I found the company that affordable did the quick and super rebuild on my booster, I almost purchased the 1970-1974 Mopar brake booster to install. You need to fabricate a mounting plate that bolts to the original boosters modified (cut short) mounting studs and have properly positioned studs welded in place on the plate. This may be right up your ally in the Down Under! Good Luck on whatever direction you go
Robert

Thanks Robert- Yep, this was an option I was investigating. Thankfully, I reckon I have it sorted now. At least this Booster has a previous Avanti application.
If I were so mercenary (and I'm not quite there yet) I would possibly opt for one of these (available in Australia for well under $200 AUD) although an adaptor plate would need to be fabbed....
https://www.amazon.ca/Team-Performance-Diaphragm-Booster-Universal/dp/B083N7ZK86
-
Just a word of caution regarding Brake systems that have been dormant for a protracted time. I have had two Studes in that category and both had seized Aluminium pistons (corroded) and blocked Flexible Hoses. The exterior condition might look ok but when I looked under the rubber boots... OMG. Do yourself a favour and dismantle the internals of your Wheel Cylinders and Disc Calipers. I wasted my time not doing that. Don't just bleed 'em- Inspect them.
-
I have done an awful lot of research on this subject and found out more than I bargained on. I thought it might be worth mentioning it here for the benefit of others not necessarily in the USA.
<gripe mode -on> Here 'down under' you just naturally get fleeced for everything.... period. What might be relatively cheap in the USA is poisonous down here. Years ago I was always used to buying parts and installing these myself but these days you just can't get 'em because (A) nobody supplies 'em, (B) the rebuilders hold the supply and (C) nobody wants to tell you anything 'cos they wanna make a buck out of you
Ok, I give in.
I have had two quotes for around $570 through two Brake specialists (in two states)- who then (1) Charges to be the go-between, (2) Charges you the freight both ways to a specialist rebuilder, (3) Adds the rebuilders charge, and into the bargain (C) will never tell you who does the work (And I did ask!)
I got a lead through a Facebook AMC group here in Oz that reminded me of a 'one-man-shop' rebuilder in rural Victoria. He was more than was happy to tell me that the Booster is common enough and not only is it used on AMC's, but Jaguar XJ6's, Volvos and is a common enough GM or Bendix product. Bottom line he said that $570 is the collusive cost that you will get from the all brake shops (yep) and that HE'S THE BLOKE DOING MOST OF THE REBUILDS ! His prices are way more reasonable BTW.
So the upshot is that I'd asked for my Booster to be sent back from the first brake shop quote- untouched. I resolved to paint it, keep my dough- and wait for it to fail one day, and rebuild it then knowing it wasn't such a rare beast after all. Now I am reconsidering the rebuild in advance given a far better quote.
Long winded, sorry. But you fellers in the US get more breaks than you think! 🙃
-
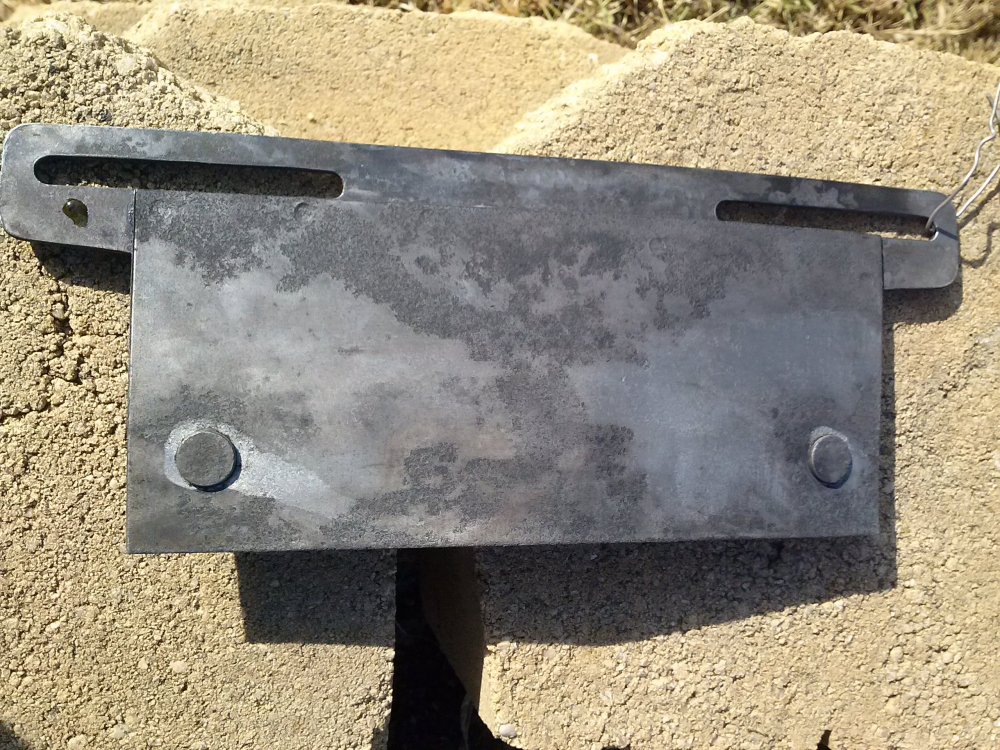
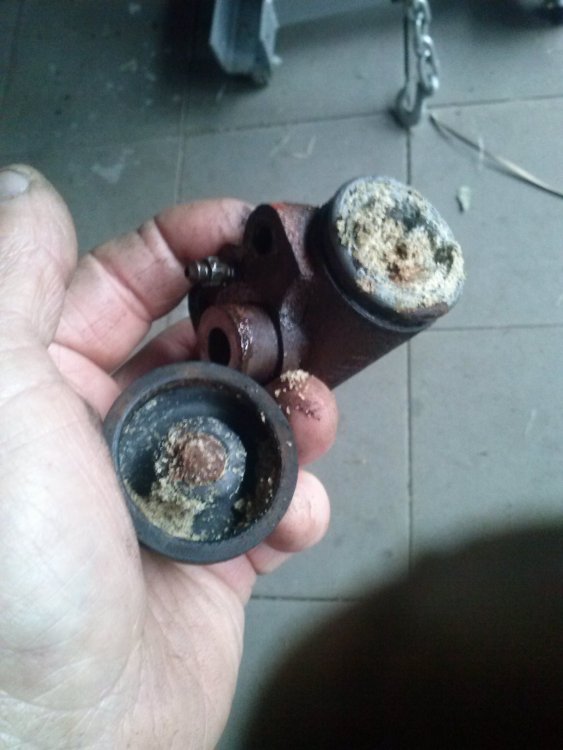
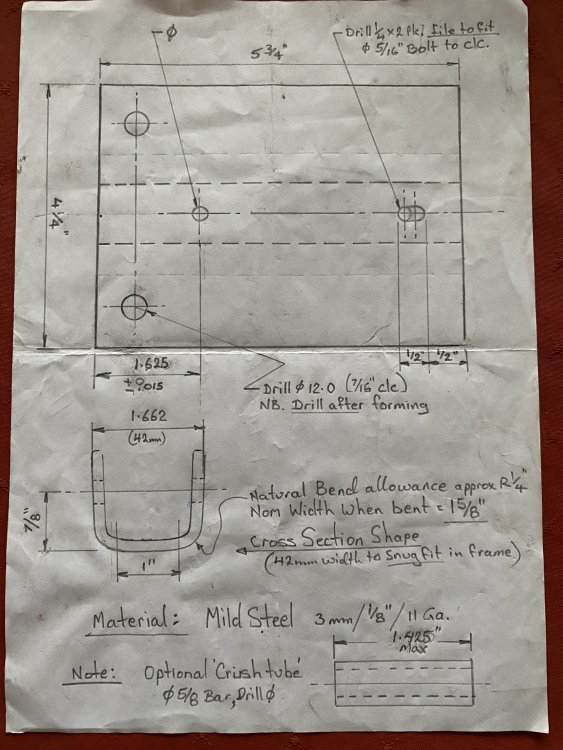
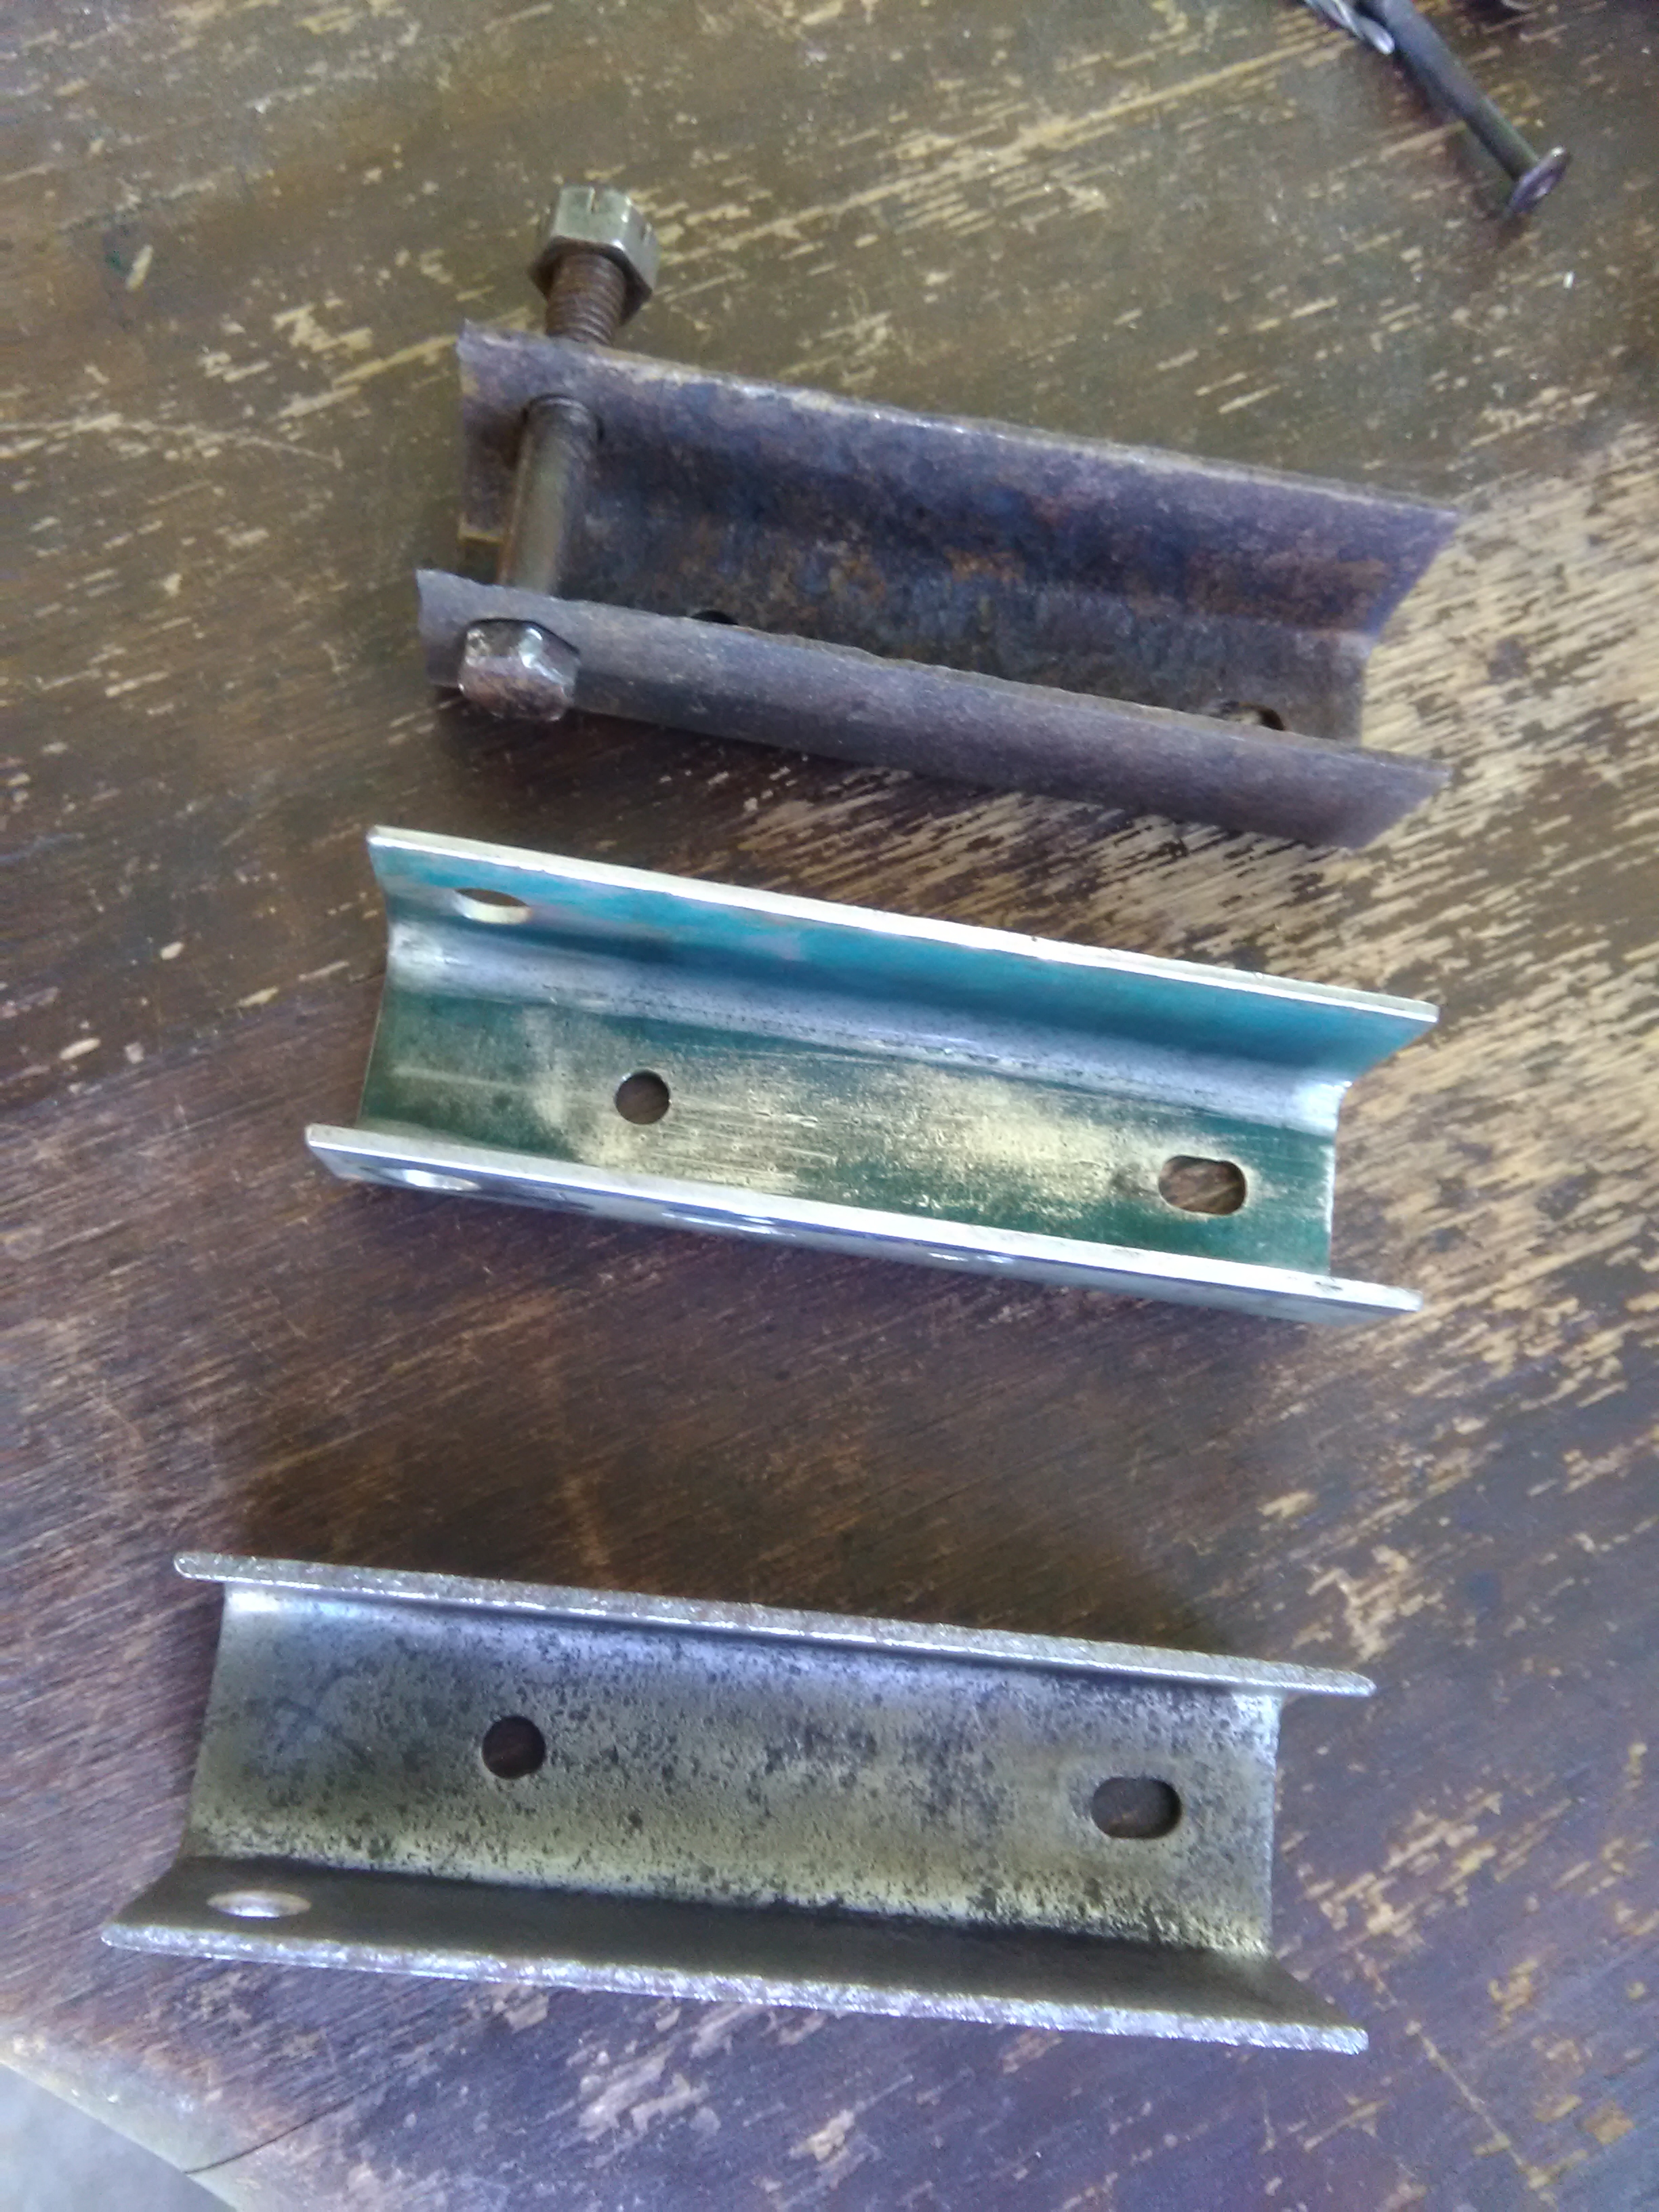
My rear Crossmember was looking decidedly ugly so I replaced it when I replicated a new Frame. If you have very serious corrosion back there, and I suspect you might, you might find the channel shaped Brackets for supporting the rear Bumper are nasty enough to need replacement too (see group 1807-12). My Left one was pretty good, but the right rear one was severely pitted and I wanted to replace it, so I sketched it up and made one. It cost me very little and despite holding it in a Vice and flogging it over with a mallet it came out size-perfect. Photos supplied....

-
11 hours ago, wildfelr said:
RQB3263/81/305 ...... KEEP UP THE GOOD WORK DOWN THERE..... Many have done you exact project and several have detailed there experience here.... As for the rants keep them coming ...its kinda like being married again .....BILL IN FLORIDA
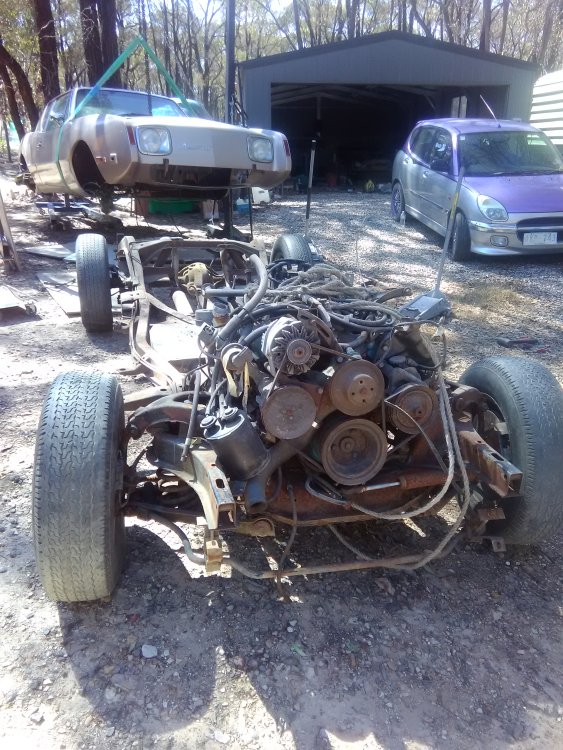
Thanks Bill- I appreciate that 👍 .. here's a photo from Dec 2020 just for laughs. You don't really need a gantry but it can help.
-
Hi SCPO-PD. I am well advanced into the re-framing of RQB3269 and feel I can probably guide you if you wish to remove the Chassis from the Body. If your Frame is badly rusted out, I would start looking for a good donor Chassis from a Studebaker Daytona/ Wagonaire or short wheel base (109" wheelbase) chassis that you can cut the X frame out of and weld it back into the siderails, albeit more work. The latter method probably provides a more plentiful resource, however.
It is not as daunting a task as what you may think, but you will need space to store the body, new Chassis and old chassis. The body will not need to be lifted off the chassis as high if you remove the engine and transmission early in the piece and remove road wheels and suspension parts onto the ground (creative thinking needed sometimes- i.e. lower the frame and support the body). Once you have the body off and away you can support it on 20 gallon drums and tackle rusty Torque boxes with comparitive ease. Rather than bore the bejesuz out of everybody on this forum with my rantings, please feel welcome to contact me privately and I can offer my own experience. I'd like to commend you in advance for what I suspect is the 'saving' of a limited resource ! 👌 Just what is your Avanti like?


Body to Frame shimming
in 1965-83 Avanti
Posted
I have been very vigilant to keep the nose 'propped up' whilst disassembled. Good point to consider, though- on assembly maybe upward pre-load this position ever so slightly. Thanks for the tip.