


Zedman
-
Posts
172 -
Joined
-
Last visited
Content Type
Profiles
Forums
Events
Posts posted by Zedman
-
-
Been looking briefly at rollers but because all the springs need to be higher rates and I'm only looking for a vanilla Cam profile I decided against the expense. Found two 'CompCams' kits that durations bode well & with reasonable cost (in Australia, that is 🙃) that comes with Cam, Cogs, Chain Springs,- the lot so will probably pick the one that is closes to original Chebby Spec.
I got the Right hand Head off today and found bores virtually ridgeless so a hone and re-ring might suffice... A boil-out of block and heads plus new bearings and hope to heck the crank is not scored.
-
Hey Wildfelr- I wont be flogging the Avanti in any way when it's done and it has a very low Rear Axle ratio. That RV/Towing Cam is a good pick, then? As a matter of fact I'm keeping my eye out for an original GM manifold without the EGR valve flange (not a repro), a non-ECU controlled Rochester carb and an aftermarket HEI Distributor. Wanna see if I can convincingly ditch all the Smog controls and AIR pump and make it look OEM.
-
I thought I'd share this....
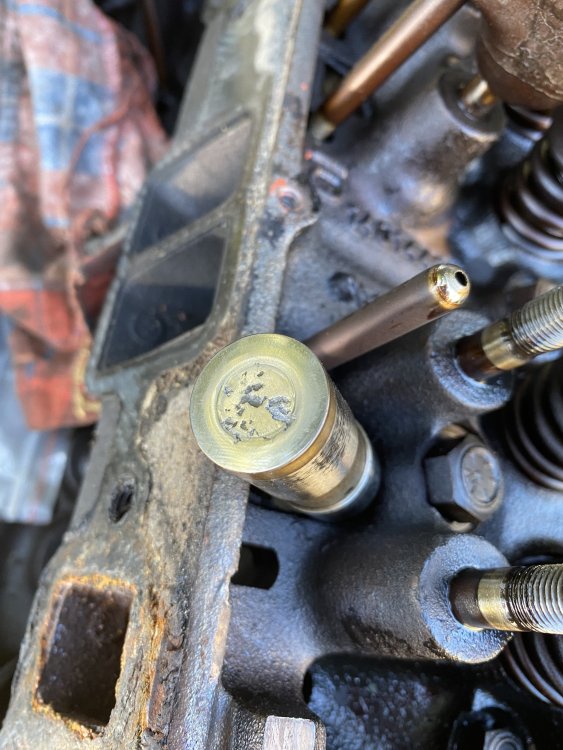
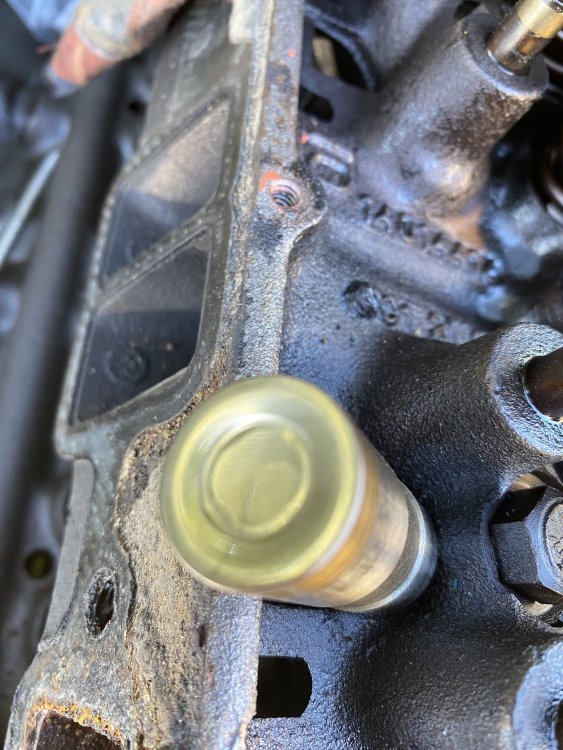
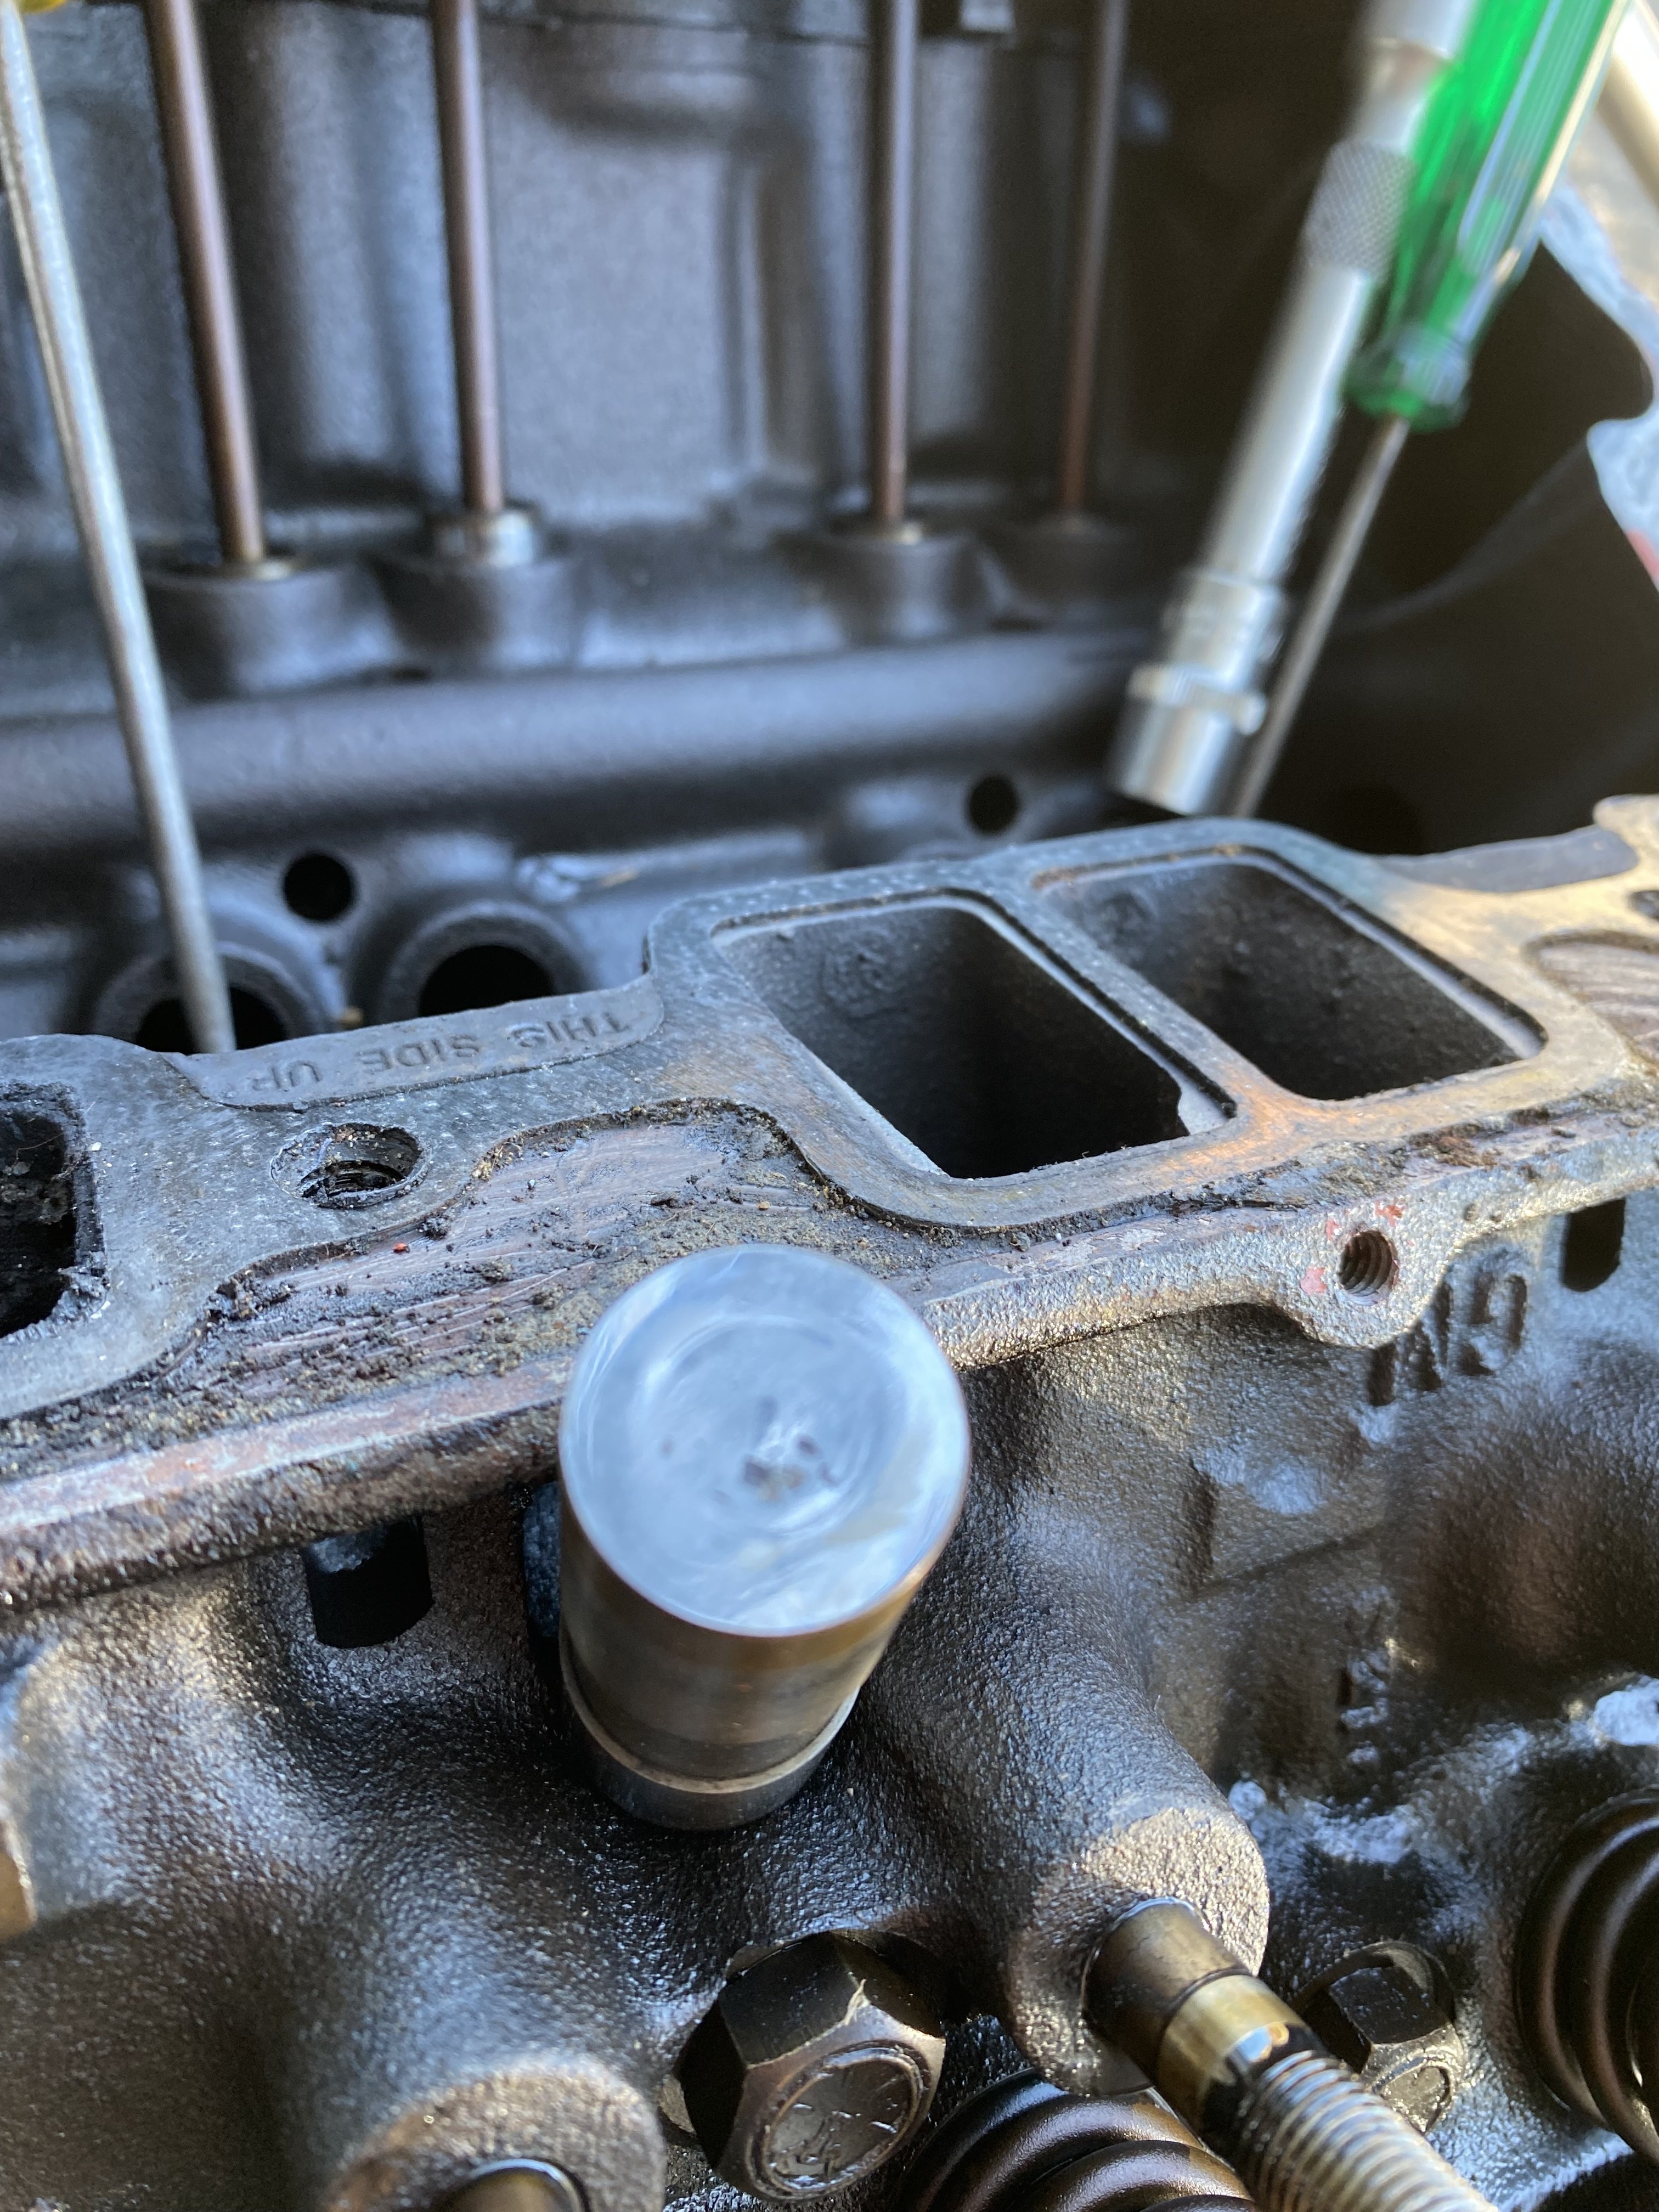
My 1981 Avanti II had stood sheltered but unused for 17+ years before I got it in 2015 and only started once by me as the happy new owner. It's been under Frames-swap since then. It was a supposedly a genuine 65k Miles old car and is in spectacularly good condition inside. Originally, I figured to leave the engine alone, but ought to at least change the nylon timing gear and investigate the issue of 'soft cams'. The fact that it had 'Anti-Foulers' on nos. 2, 7 & 8 sparkplugs made me leery. Well, the engine is being stripped despite "when do you stop mucking around with stuff" self talk. Lo and behold the condition of some of these Lifters.... and I haven't got the Camshaft out yet!...😬
 Just
Just
-
Hi Ron- I will be installing my reconditioned suspension in the next month or so. I think I understand your comment to mean you flipped over the Upper Control Arm inner Shaft to gain more +ve camber ?...
The A Arm mount is offset to where you can increase the camber by mounting it one way. (Mine was already mounted with the offset favorable for + Camber).
I have always wondered whether to 'Flip' or not but looking at you figures, I guess I ought to turn 'em over. Looks like you replaced your original bolts with class 8's. Did they fit really closely? If I remember correctly the originals had a slight thickening of the diameter to fit the holes in the Shafts very neatly. 🤨
-
Unfortunately, you must disassemble the whole thing in order to determine the problem. Chances are that the top bushes will be well shot, but hopefully the journal will be fairly round. You'll need a 1"-2" micrometer for that. I think the diameter is 1 3/16" but I'm not completely sure about that. Many years ago I had my kingpins ground in the toolroom at my place of work They were really Ok but I was a bit anal - they only took off a thou ! I'd bet you could just bung new Bushes in there. I made my own Bushes out of Phosphor Bronze and machined 'em to fit my 'undersize'. The bottom journal is for a Needle roller bearing and that is another issue. If you have any galling or 'Brinelling' down there the King pins might need to go. Once again- you may be lucky.
-
I beleive Studebaker International lists huge numbers of fasteners by part no.s in their catalogue. Give them a try.
-
No need for the engine to come out but you might swing the Steering around to afford more convenient loosening of the Bellcrank Pinchbolt Nut.
It will likely be quite tight so you might need extra leverage to persuade it.
Once the Bellcrank is loosened, the bolt must be removed completely. The four bolts securing the Center Bearing casting can be removed. The Center Bearing will drop out from under the Front Crossmember.
The Bearings may be either Bronze Bushings or Needle Rollers depending on what has been installed before. You have choices on repair & replacement options.
Doing up the Bellcrank bolt again and ensuring the Center Shaft is properly shimmed is crucial to eliminate slop in the steering, however.
-
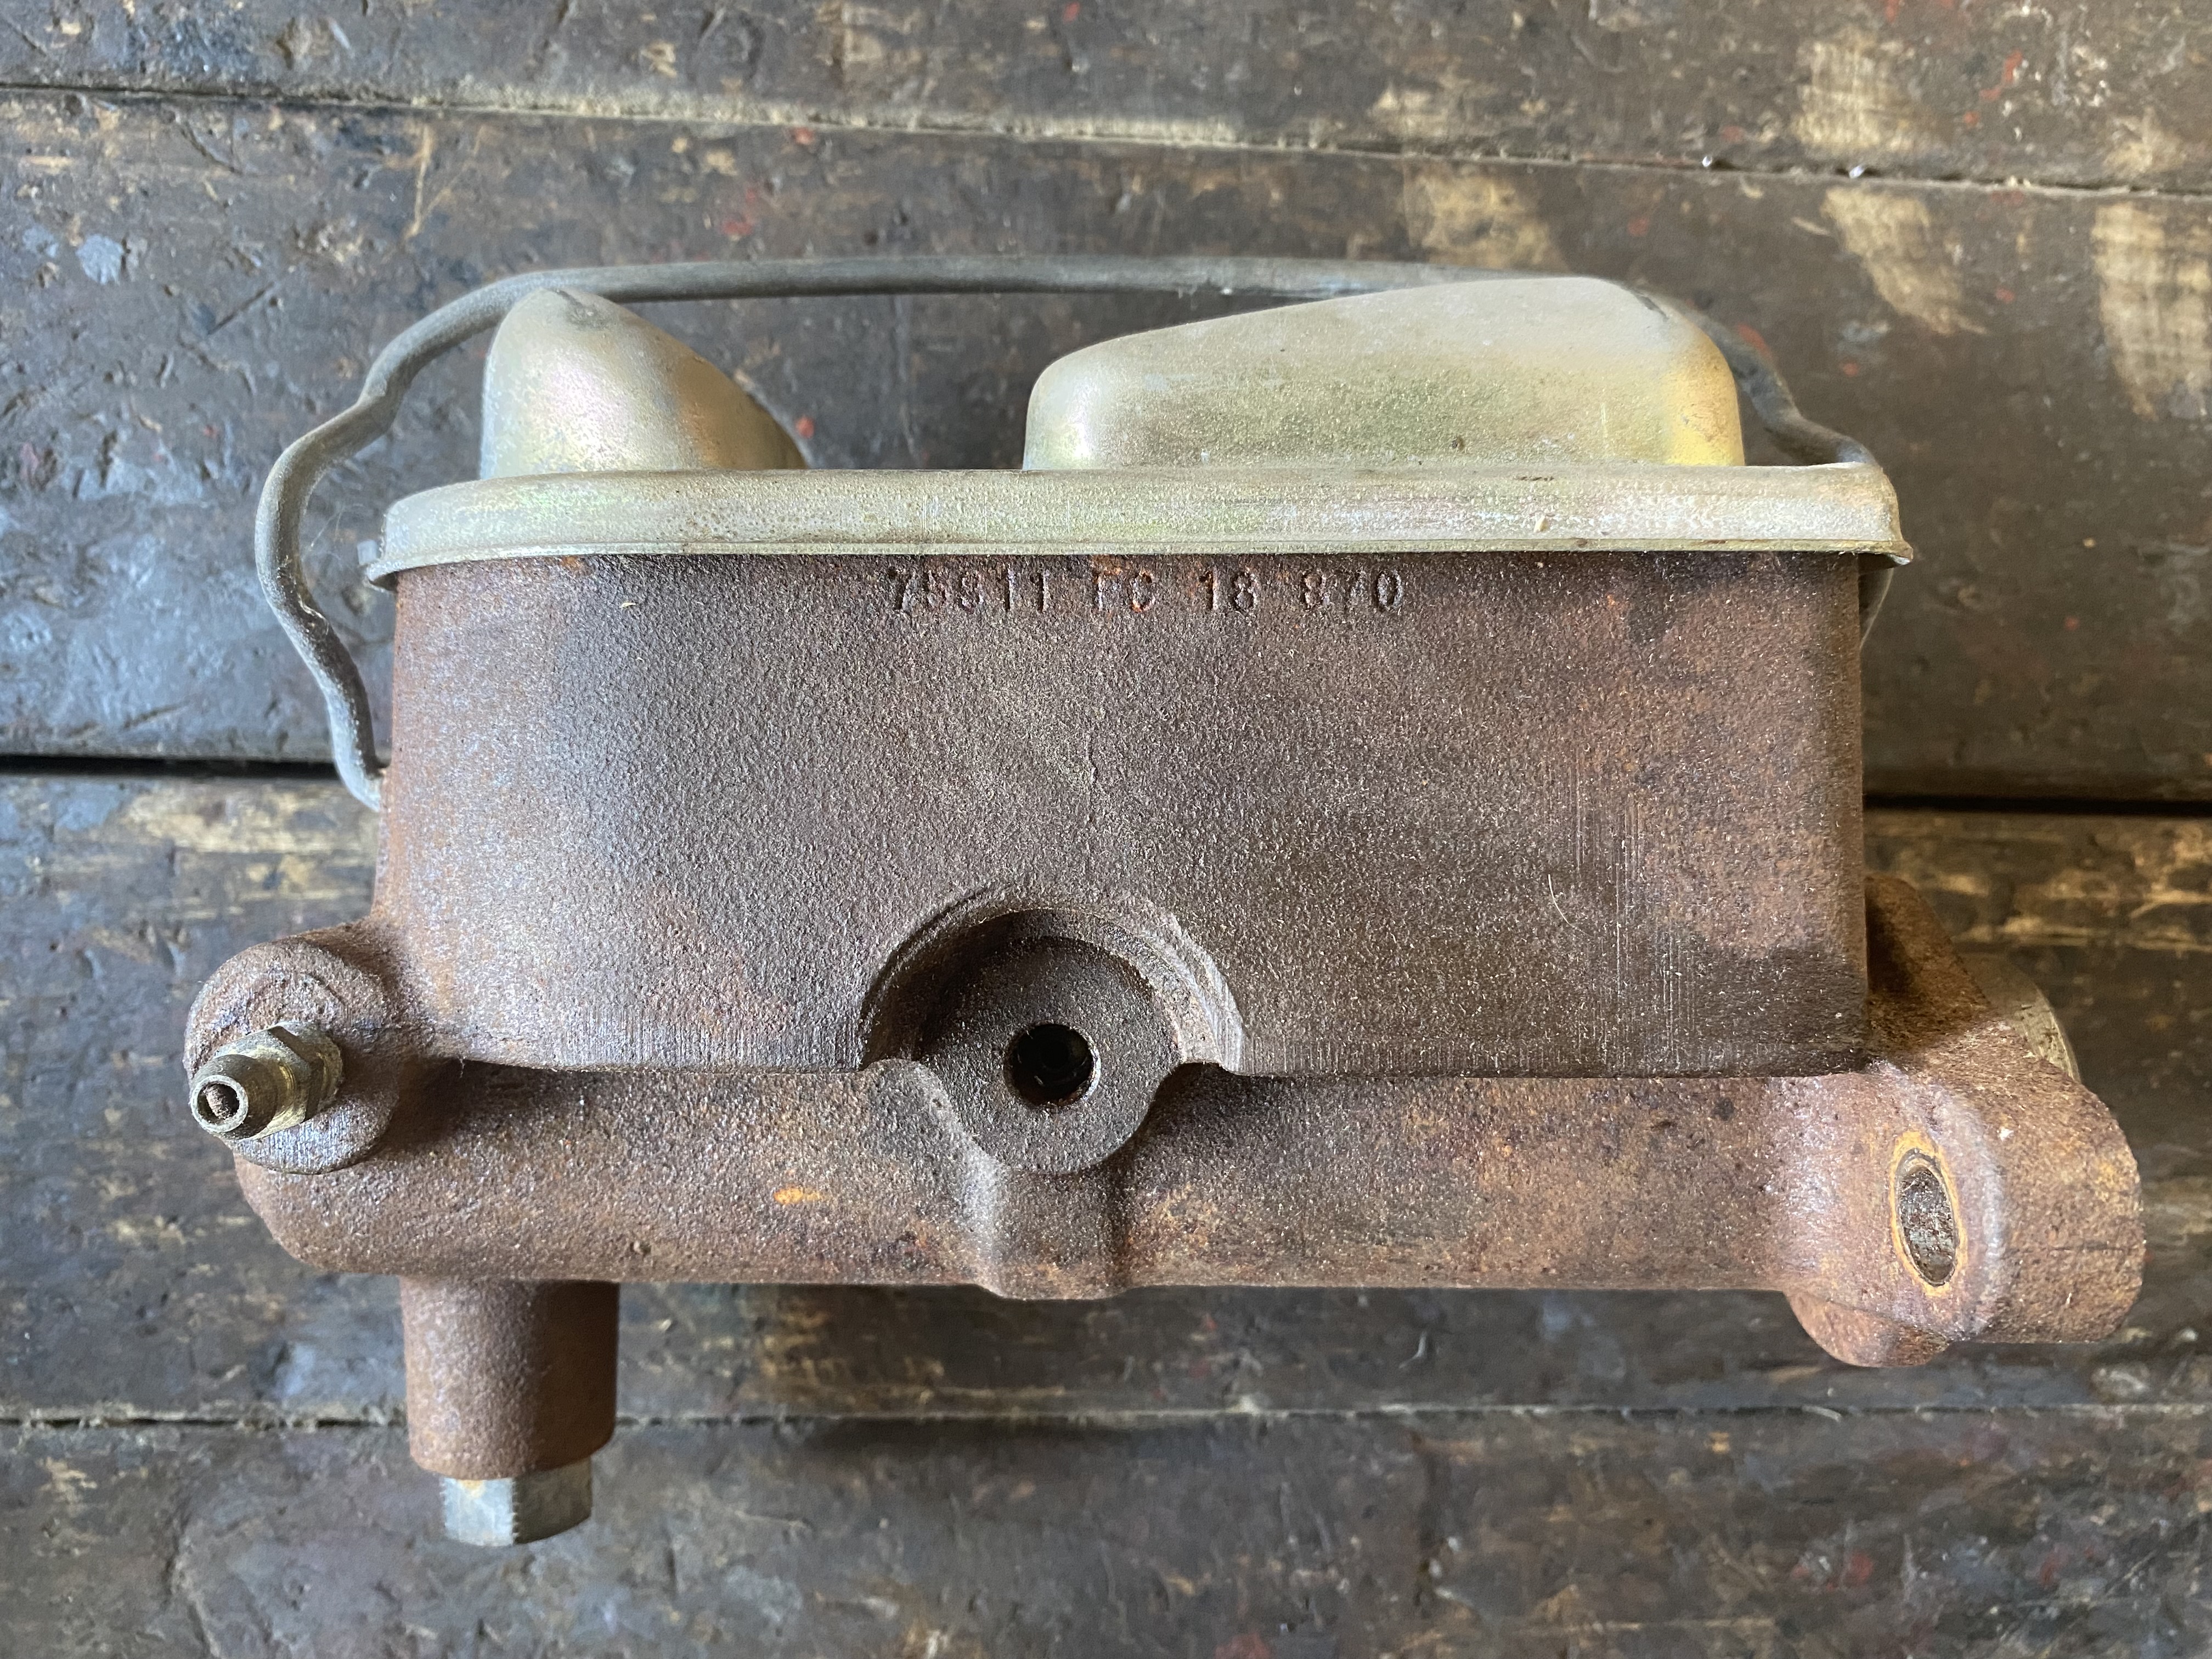
 Recently recoed and sleeved mine (from a 1981 Avanti II) which is the so called 67 Ford Fairlaine 500 MC mentioned in Regnalbob's posted link. Looks like the one pictured... any use?
-
I've been away for a while- Thanks for the input, everybody. I will be re-painting the car eventually and "fixing" the Sunroof was part of that exercise. More to follow when I make inroads....
-
ABADEE ABADEE ABADEE THATS ALL FOLKS.....
I prefer this one, Wildfelr 🤣
-
I have a sunroof in my '81 and I am musing over removing it for repair. From what I have been able to glean from some readings, the Headliners and rollbar cover need to be removed. Has any body any advice for tackling that job.
The sunroof is still attached / epoxied to the roof but after I was able to wrestle the stuck "Blind" backwards, I was able to fish a rust bit of steel out of the cavity- so rot has set in. The headliner appears to be in absolutely perfect condition right now. Ignoring it for now IS a possibility but i thought I should investigate it in view of a future repaint of the car. The interior of RQB 3269 is in very pristine condition- I'd hate to bugger it up 😬
-
Kind of reminds me of a Warner bros Cartoon with silence but for the chirping of a cricket....
I'm curious about this subject too_ I'd like to help but I will be away from my Avanti for a few more weekends.😕
-
23 hours ago, Randy Atkin said:
Here we are some 60 years after the debut of the Avanti and brake pads, pistons, cylinders, etc are still available. How long will we be able to buy Cobalt pads - 5 years, 10 years? They could go out of business tomorrow. Then what? Something to consider.
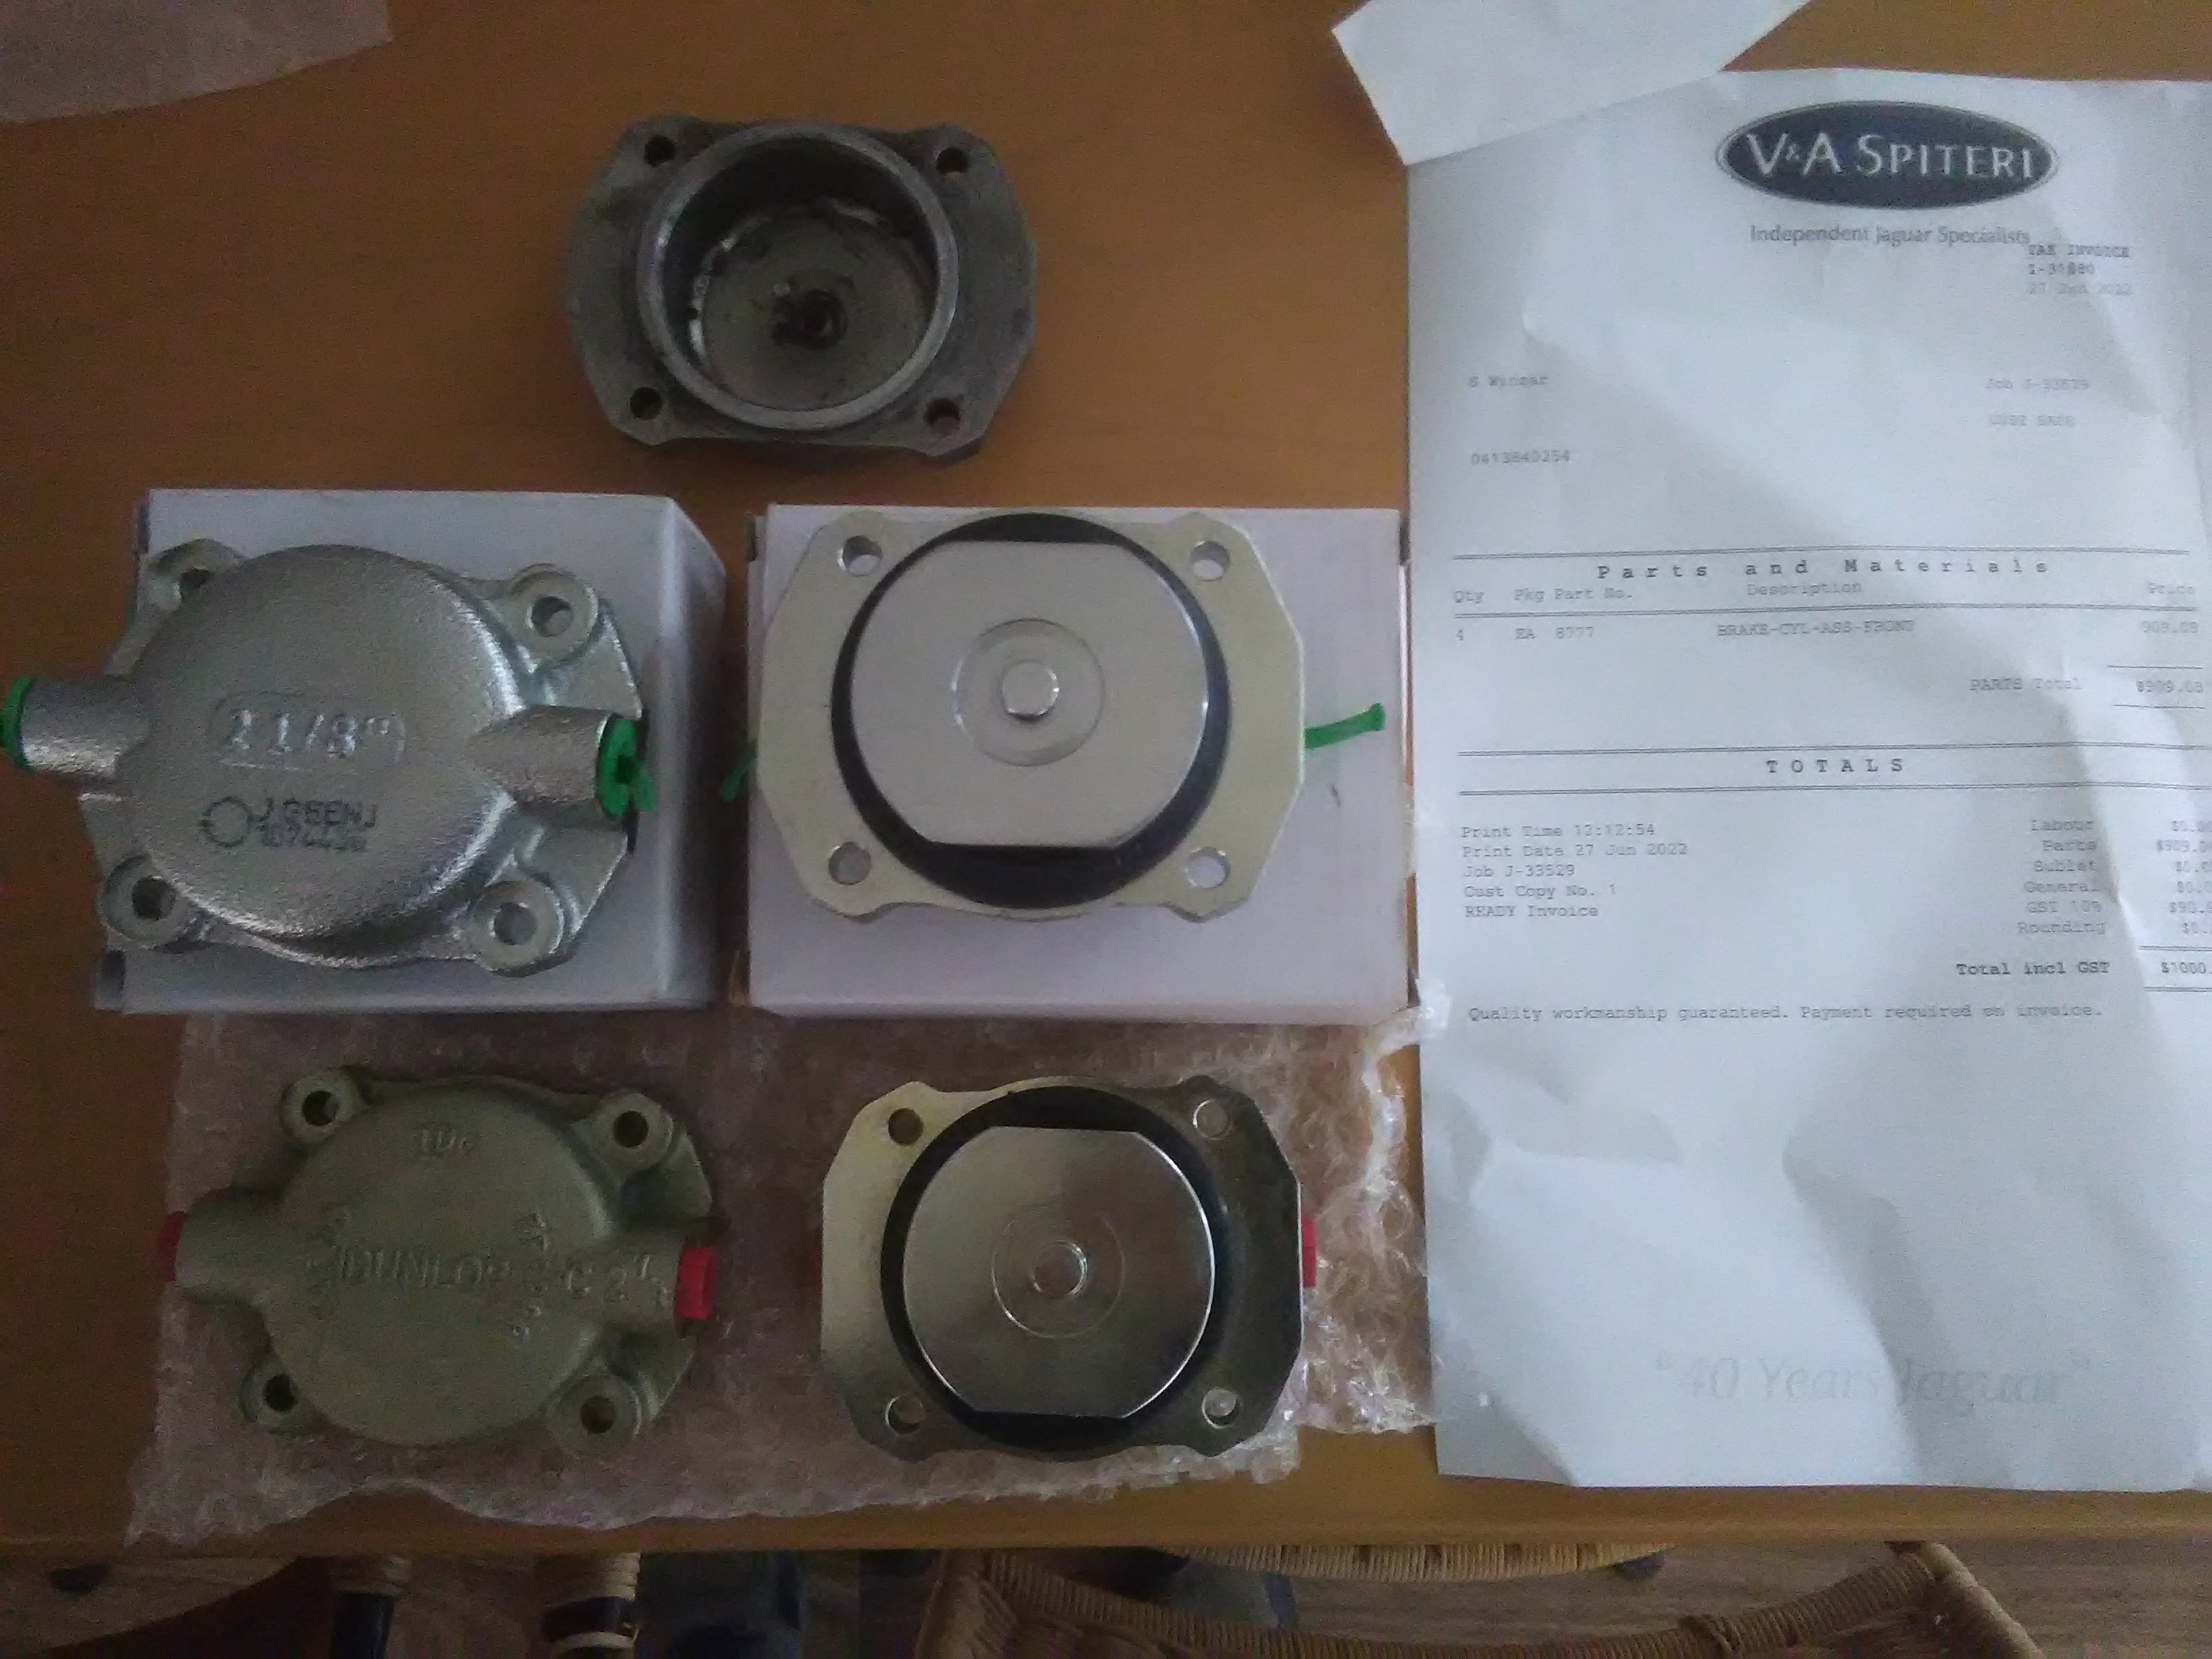
Avanti's share the same size 2 1/8" Pistons with Jaguars. There's a whole lot more of them than Avanti's. I can't see this product (Or particularly, my generic replacement Stainless steel jobs from the Jag specialist) going out of production for the forseeable future. So long as we retain the Bendix calipers - we will be fine for a long time.
-
Thanks for putting this up, Rick, pictures make it all more understandable.
I would expect the Cobalt pads will be simpler to replace than the originals (with that little pin on the piston to be engaged with the rear of the pad). The cost of these is a bargain. I'm all for supporting more-or-less "originality". Looking forward to your on road testing. 👍
-
Hi Volcanicsun. I looked at this article dated in 2019... https://www.hemmings.com/stories/article/1965-82-avanti-ii
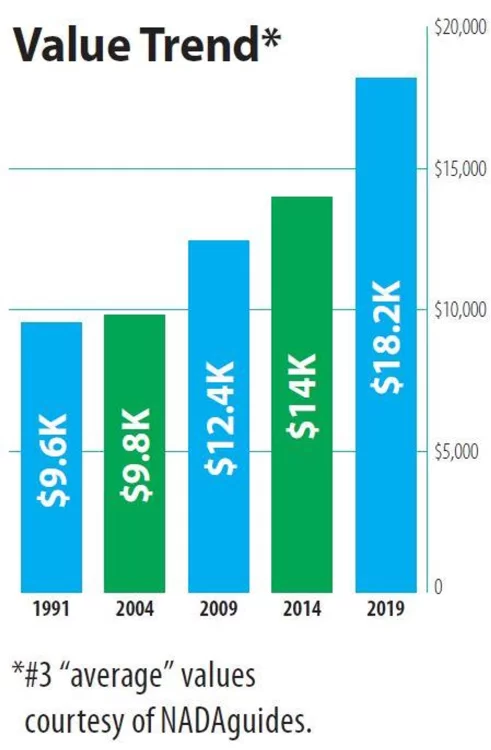
Your Grandmother's car is worthy of a darned good cleanup before you put it out for sale- but frankly I hope you decide to keep it if you can. A spruce up will put more dough in your pocket for very little '$'. Avanti II's are still rare cars by any standpoint and as per the chart I've uploaded, appear to be worth good money. Of note- yours is of pre-Catalytic Converter era, which is a desirable issue in my opinion. My own 1982 Avanti II was advertised for $6000 (got it for less) in 2015 showing a beautiful interior and excellent body but eroding rear Frame and only vestigial hogtroughs. I would be glad to buy it for $9,000 today.
Mine has a new Frame being finalised at this time in case you're wondering, and I'm absolutely sure it's worth the work. They didn't make many of 'em ! Spit polish the thing and ask for $10K.
-
Hey Fourward- Can you remove whatever it is you've got there and replace it with a 3/16" clevis pin an splitpin as per the parts book?
-
12 hours ago, Fourward said:
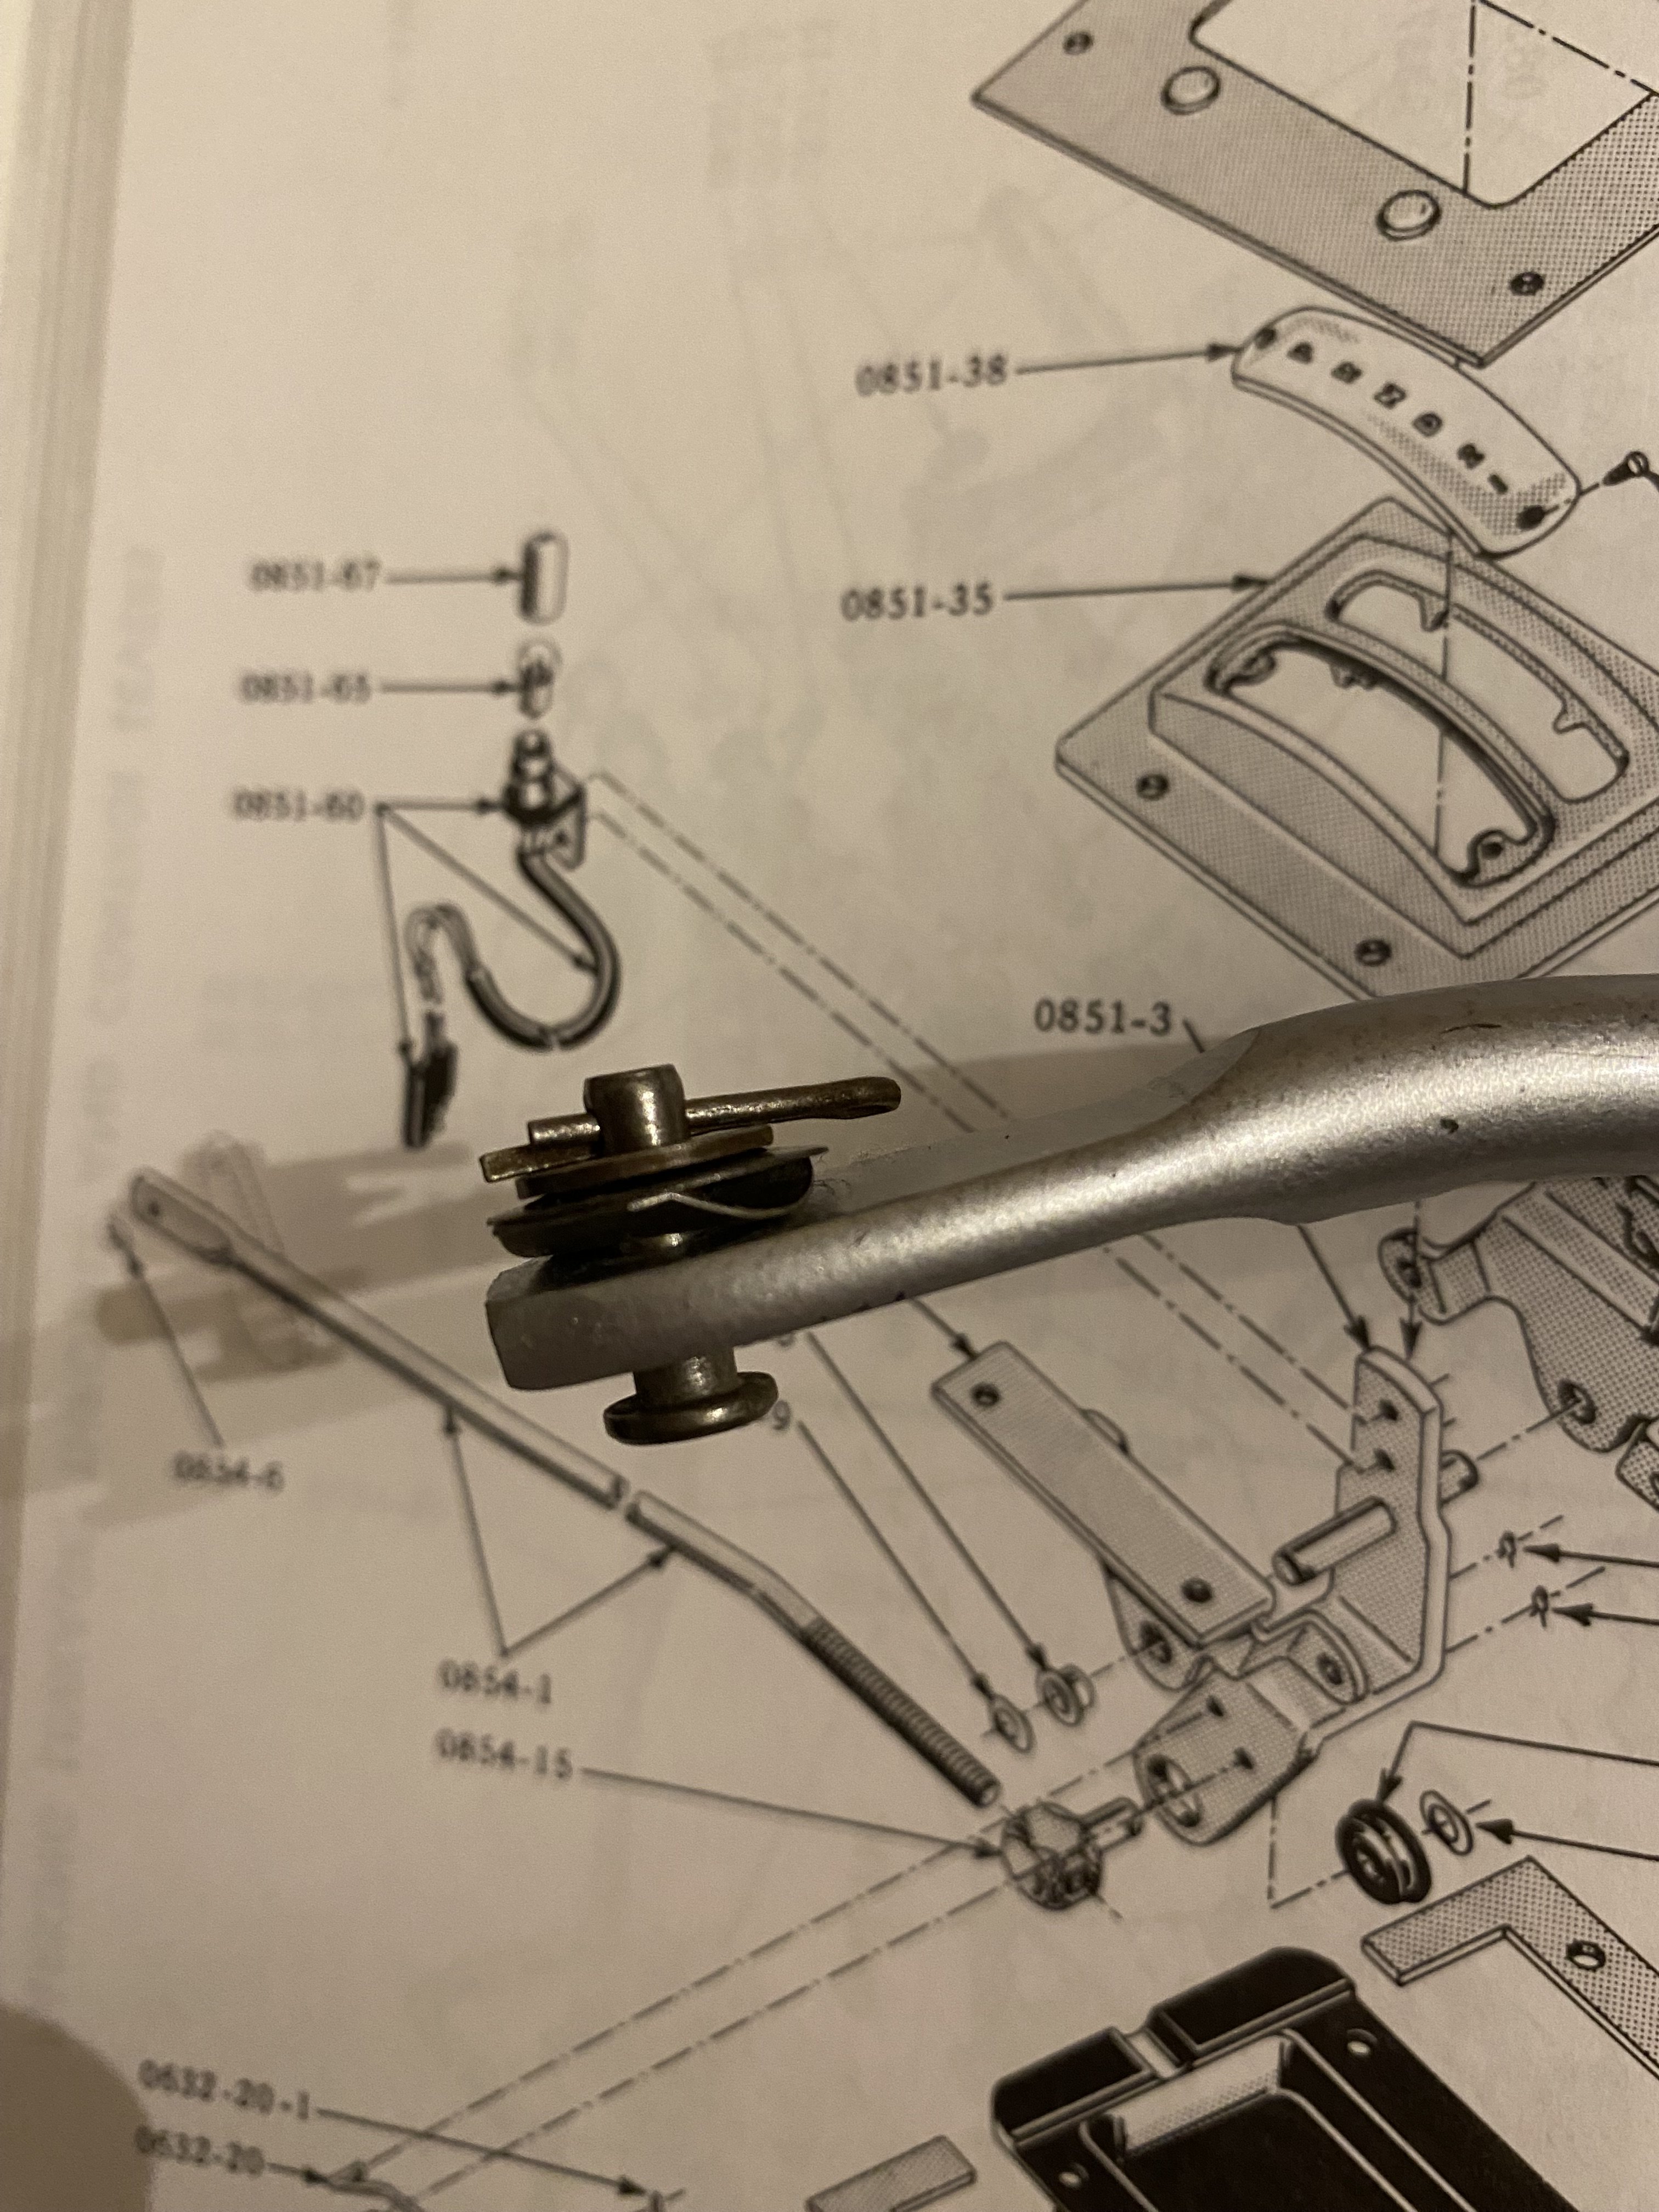
The shop manual says there is a washer spring, washer #10, then a cotter pin 1/16 x 1/2 where the arm from the gearshift attaches to the transmission. My gearshift arm has no provision for a cotter pin. There is an integral threaded shaft on the end, it looks like it is 1/8 inches in diameter. In fact, the shop manual shows a nut, speed nut? where the arm attaches. My assumption is spring washer, washer, then a speed nut or course threaded nut? Does anyone know the exact nut and dimensions, like course or fine thread? And if those two washers go on there.
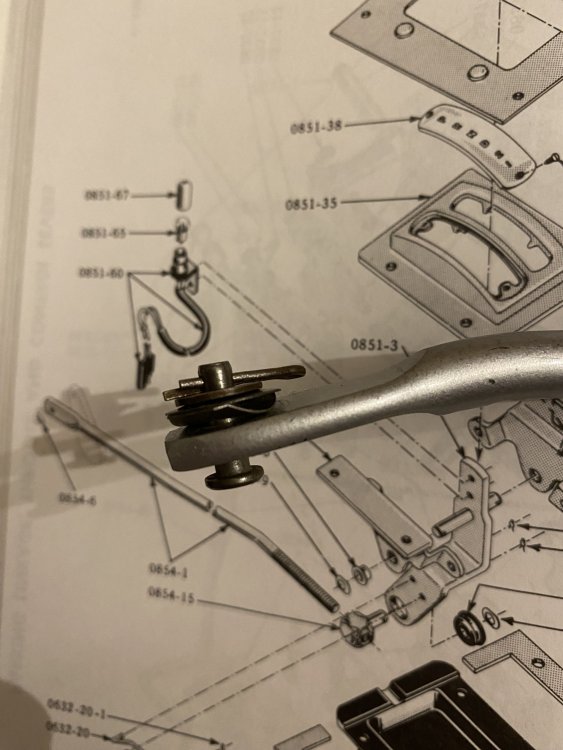
Hi Fourward- I recently removed the 'Hand Shifter' rod from my '81 Avanti II and have it near to hand so I had a look at it alongside the Studebaker Parts Manual. Despite having a GM TH400 Transmission, the Rod appears to be the exact same unit. The photo I took shows the assembled parts as per removal and these coincide with the Parts Manual. There ought to be a 3/16" 'Clevis Pin' there, which secures with a 1/16" split pin, plus a plain washer, thin washer and 'wave' (spring) washer set. I suspect you have a substituted part down there after a PO lost the original pin and replaced it (with a bolt, perhaps).
-
Hi Rick- The pistons on your Cobalt cyls are hollow, whereas original Pistons are flat, wide and solid. Stock pads are quite small. Are these pistons going to properly bear on the small 'Bendix' pads?
-
16 hours ago, Fourward said:
Well, to end the thing then, Zedman, that was solid advice, I can't get the one caliper apart, the bolts are so rusted, I would have to pay my mechanic to disassemble one of them, so by the time I got done paying him, and getting the 4 x $110 pistons from SI, then brake shoes, I'd be bumping up against the cost of "NEW" calipers from Bob Ziff. $595. That bumps me into Turner Brake territory which gets me the rotors too, I gotta think my rotors are shot on this car, everything else was. So, I just ordered the Turner Brakes from Bob. ( I'm not that handy, the Jaguar parts look inviting but I KNOW I'm going to have to modify something.)
Thanks for the regards Mate, we all learned a few thing here ! come to think of it I sheared three screws disassembling mine but got lucky 'ezy-outing' the busted studs- seems the heads were corroded (salt!). At least the Turner assy is well sorted and will give you better grip.
-
13 hours ago, Rick Allen said:
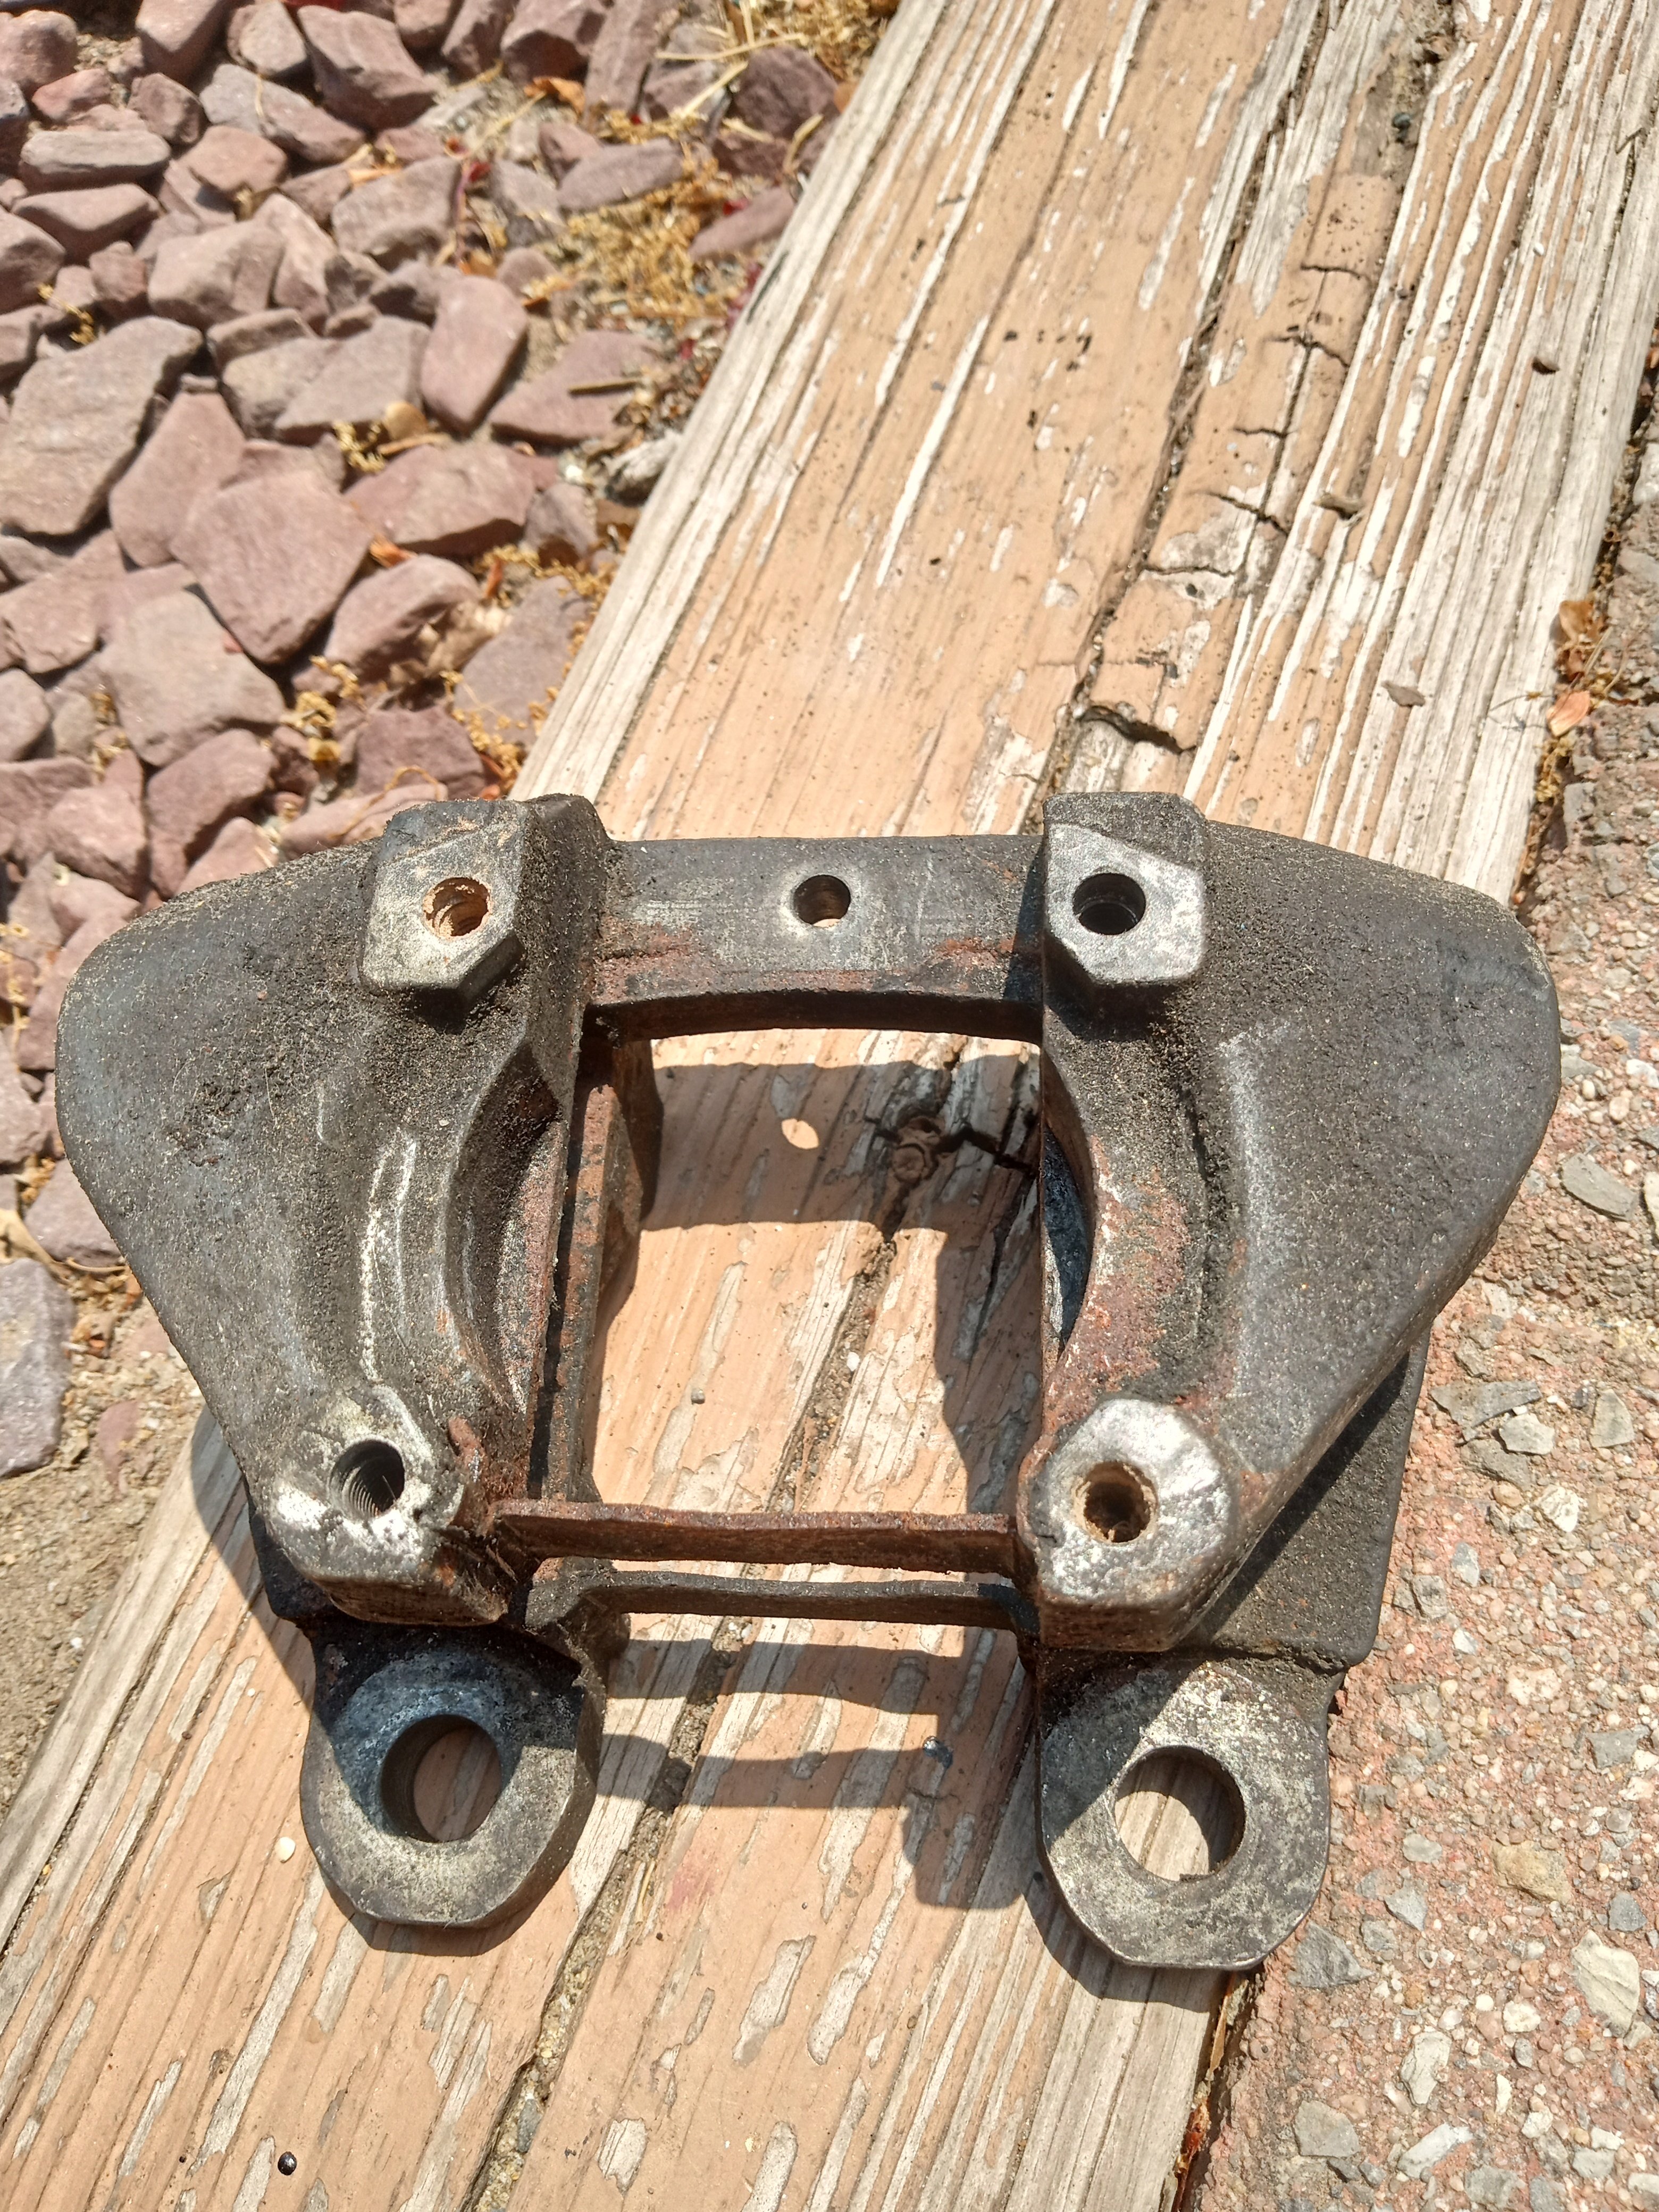
Did you remove the (guide) pins on the new Jag calipers to install on your original Avanti brackets? Seems to me there is no hole in the original brackets for the pins to fit into or am I wrong?,,,


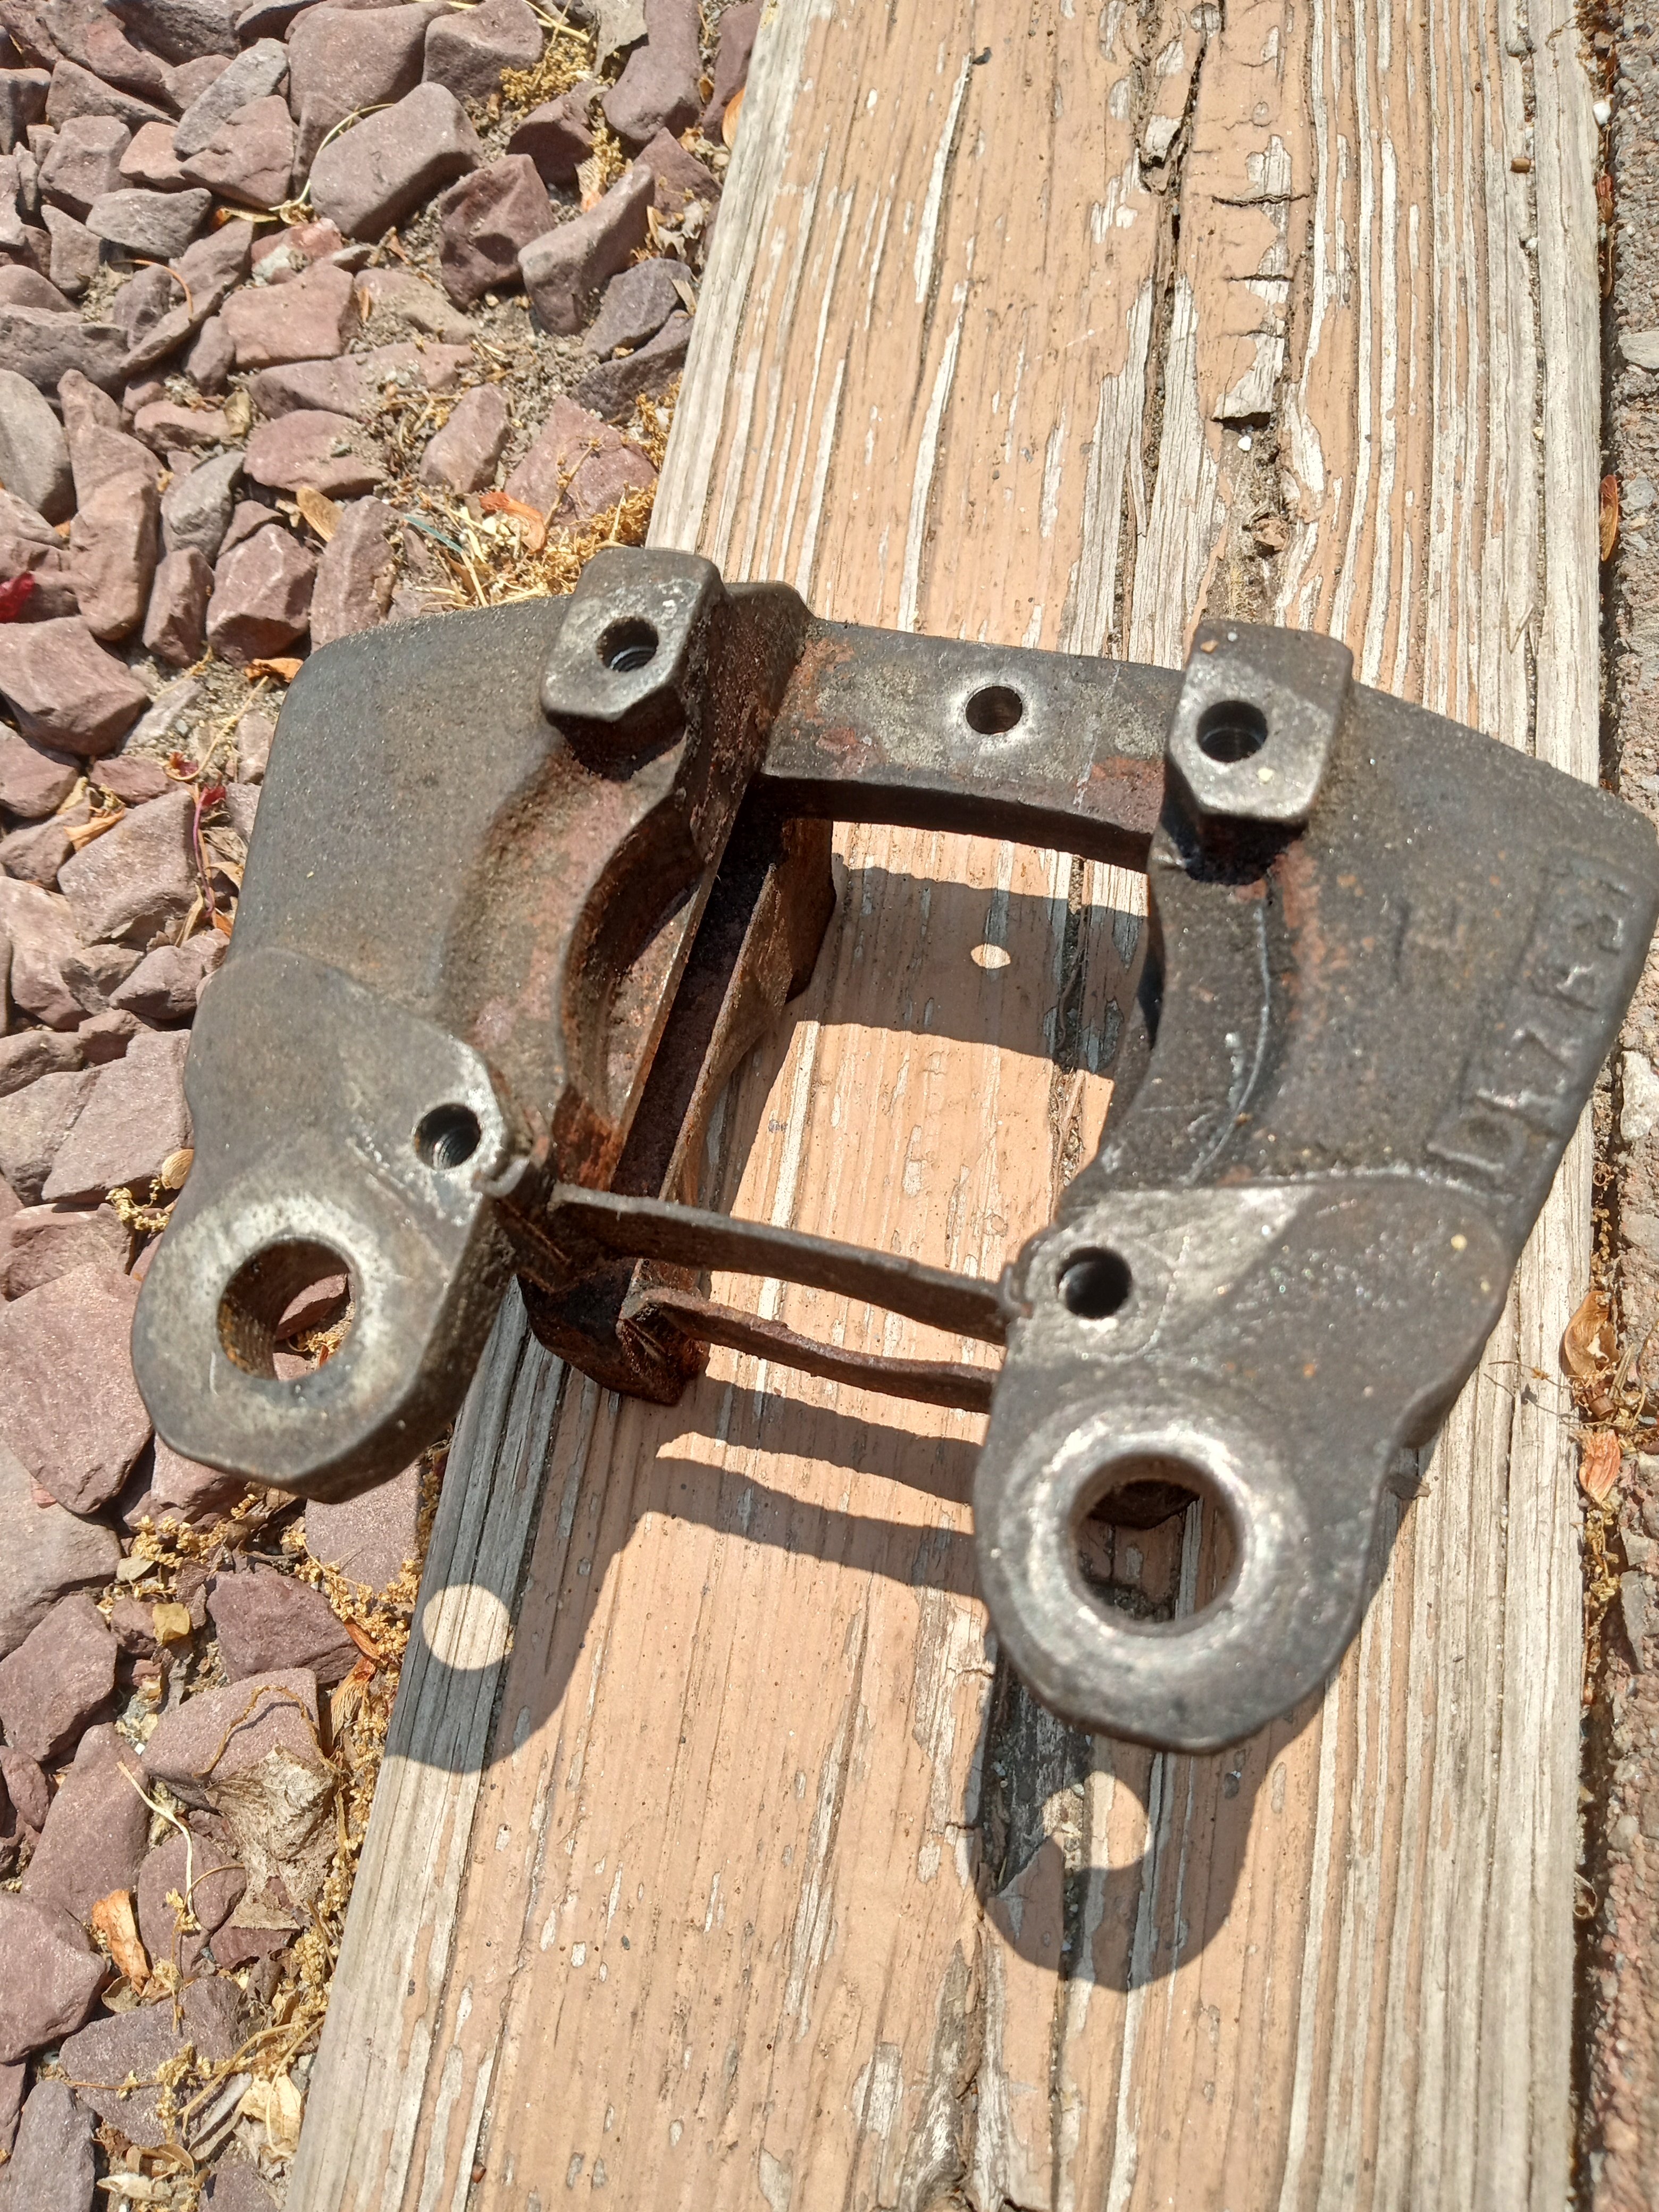
BTW please check my earlier post- pictures and further explanation are there. There were no extra alignment pins on the Cyls I bought from a Jag supplier- just four 1/4" bolt holes. The rusty steel strips on the bottom of the caliper can be gently tapped-out, cleaned up and painted.
-
13 hours ago, Rick Allen said:
Did you remove the (guide) pins on the new Jag calipers to install on your original Avanti brackets? Seems to me there is no hole in the original brackets for the pins to fit into or am I wrong?,,,
My new Cyls did not have any extra alignment pins in them.... just four holes for 1/4"class 5 screws. Fitted perfectly.
-
I have fitted the British-made Cyls onto my Studebaker- Bendix Calipers and the bolt holes align perfectly. Mine do not have extra Pins on them as those pictured earlier and are basically identical to the original Bendix's. I believe the retractor pin is inside 'em based on supplier info, and no, I never disassembled them to look. Reading on the subject further, the retraction pins were somewhat an overdesign back in the day but they still are included in new parts because they do work. The problem with the Pins is that people pry the Pistons out rather than blowing, and end up bending the Pins, resulting in dragging brakes. That's why I couldn't be dammned looking in side 'em 😊. In any case, cobber, brand new Cast Iron assemblies will do nice and cheap, but if you do want to do stainless steel- check the Jag suppliers and keep an eye on cost. But stick to 2 1/8" dia. As an afterthought, you may want to consider the condition of all the brakelines and the Caliper crossover tubes.


-
9 hours ago, Kodjo said:
Thank! Yes, I found the story on studebaker-info. Do you have a link to your blog as well?
Pleased to oblige- It has also been indexed on the Bob Johnstone page... http://studebakerflightomatic.blogspot.com
-
Hi Fourward-
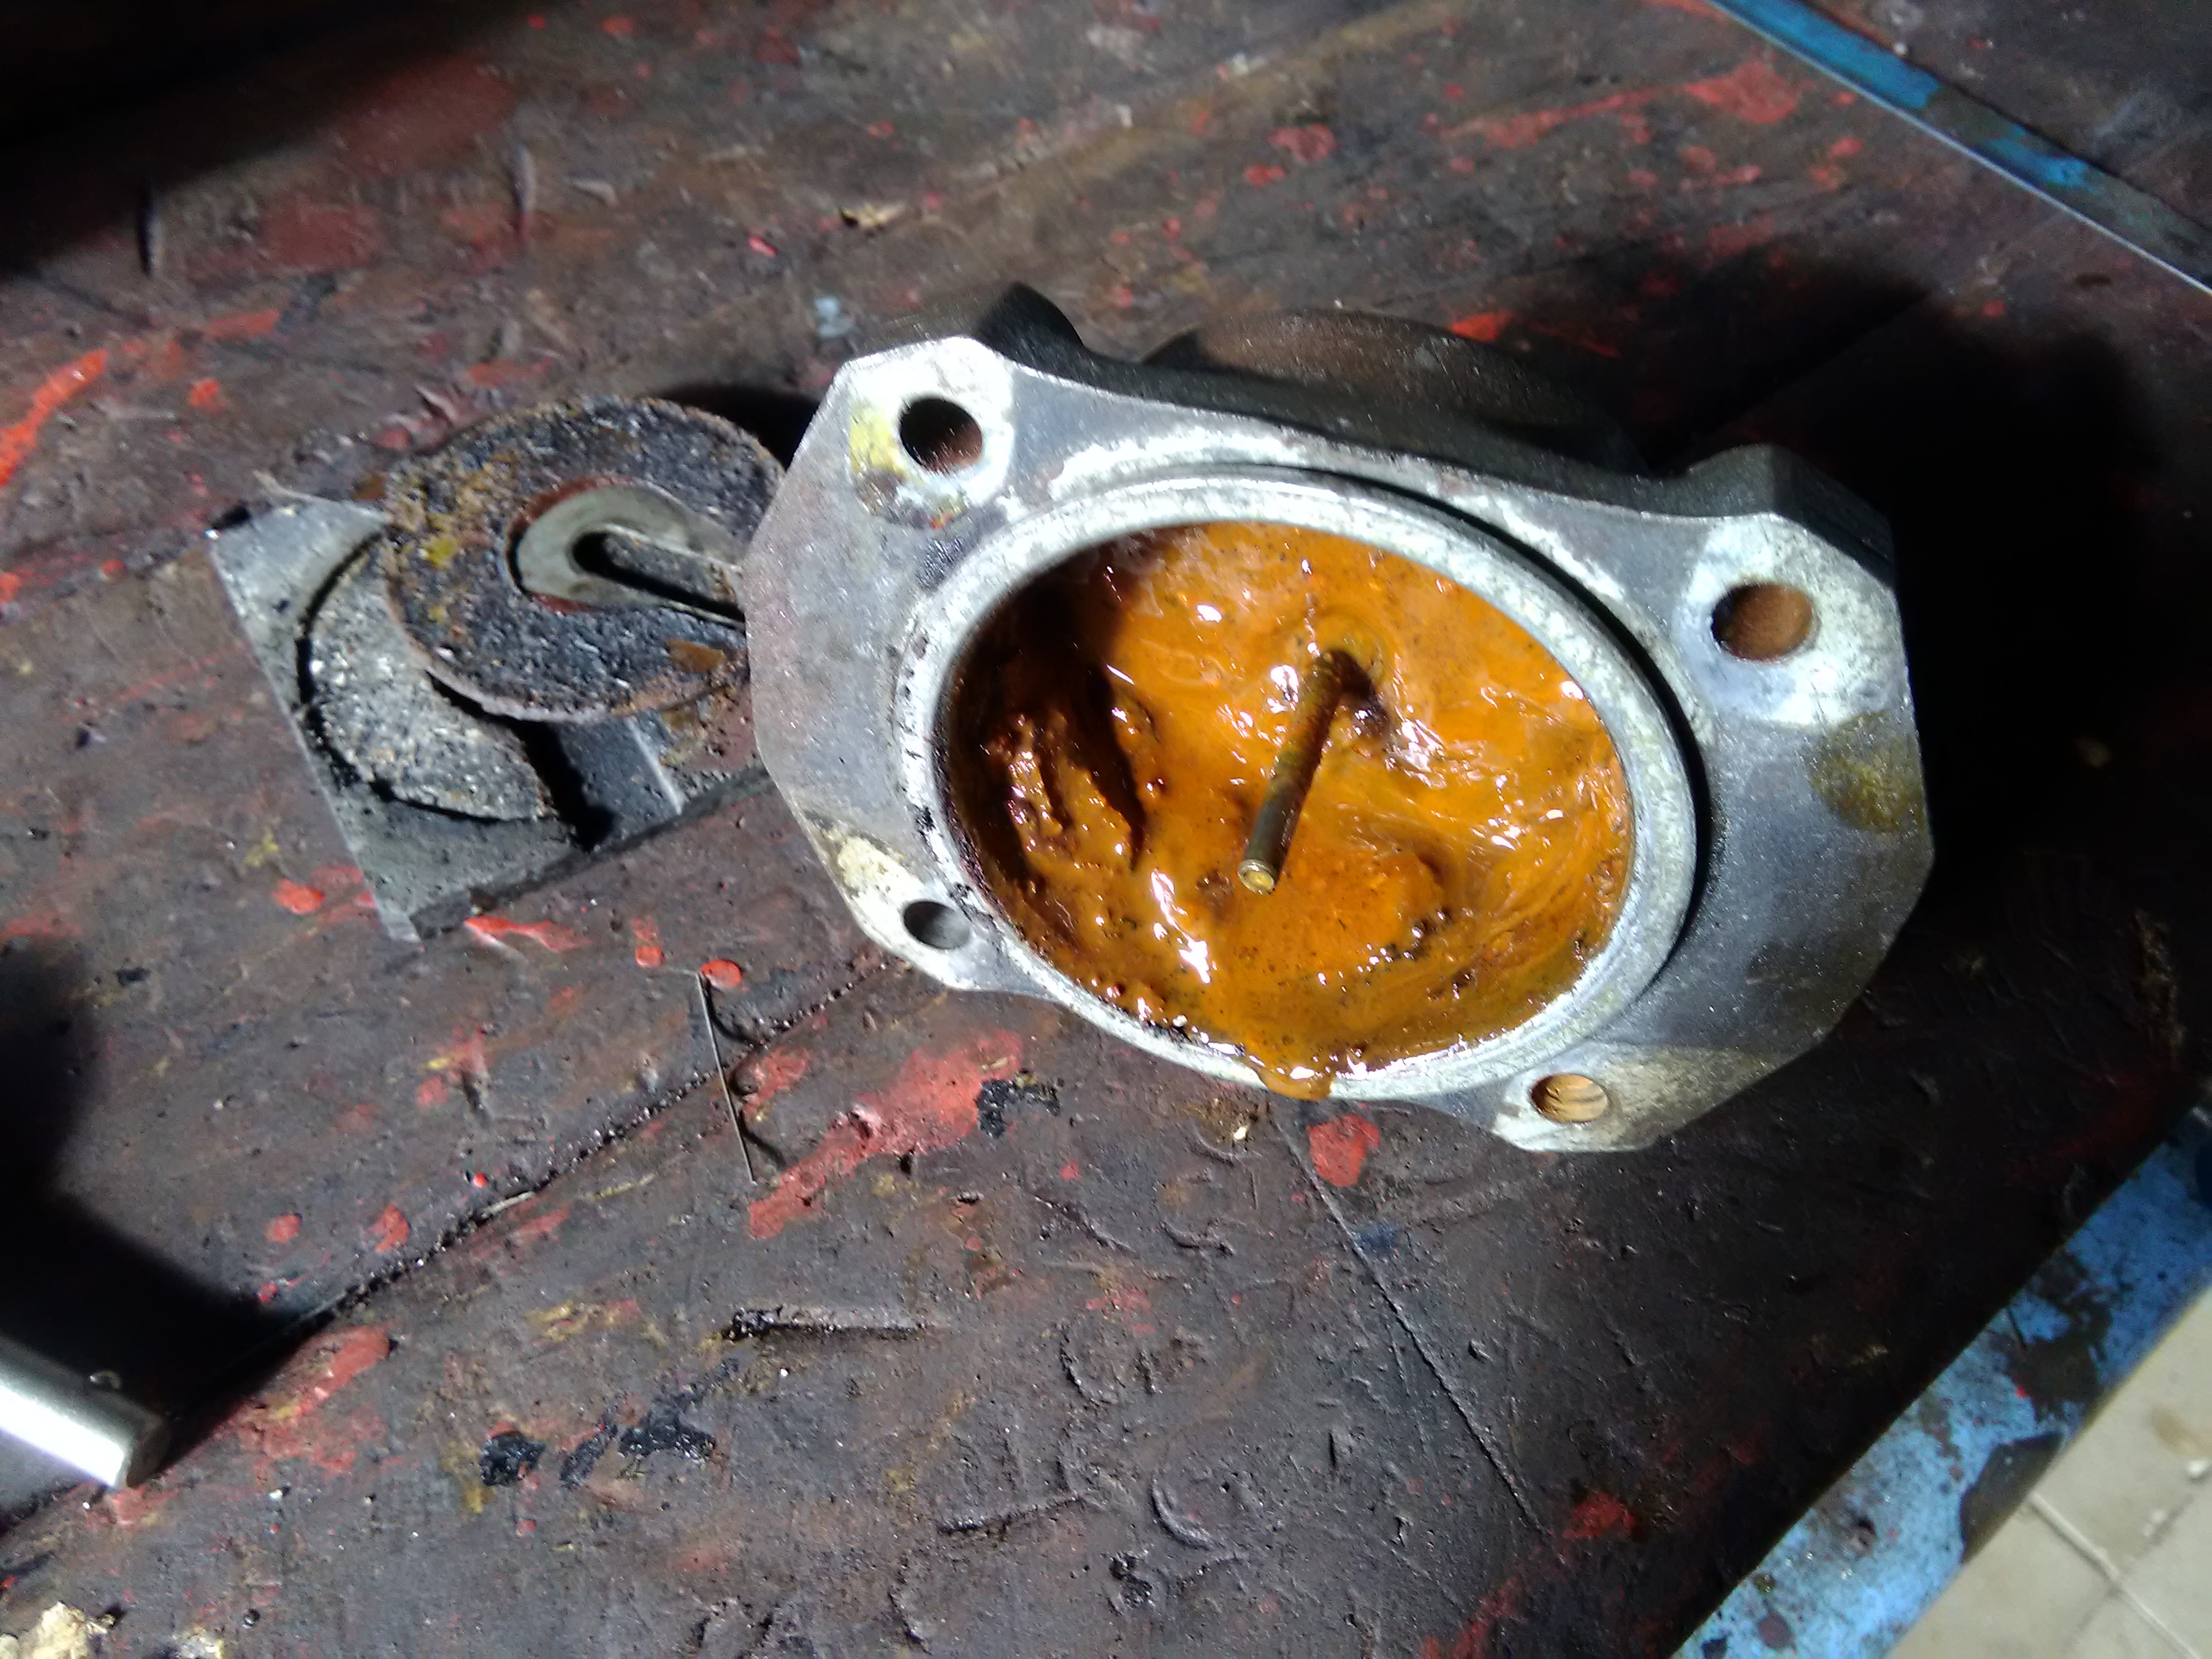
I have recently replaced all four of my caliper Cylinders with stainless steel ones for XKE Jaguar. These were the same as our Avanti's at 2 1/8" diameter. I looked at buying original cast Iron replacements, but here in Australia importing these from the USA was uneconomical given the comparative price for stainless Jag parts- seals & pistons included. Sleeving was not worth the expense.
My humble take on this is -
- don't even bother to disassemble the old Cyls- they will be eroded and useless, so throw them as far away as you can).
- keep your calipers, clean 'em up and paint
- replace Cyls & Pistons with original Cast Iron units from SI to keep your costs and time to minimum OR
- Fish around for Stainless Jaguar parts at a good price and use those.
Good luck.


Dodgy Camshaft?
in 1965-83 Avanti
Posted
I removed the engine ages ago and am dismantling it for inspection and go from there. I'm likely to overhaul the TH350 trans (nope, no OD) as well. Gotta find/make a suitable puller for the Harmonic Balancer....