All Activity
- Past hour
-
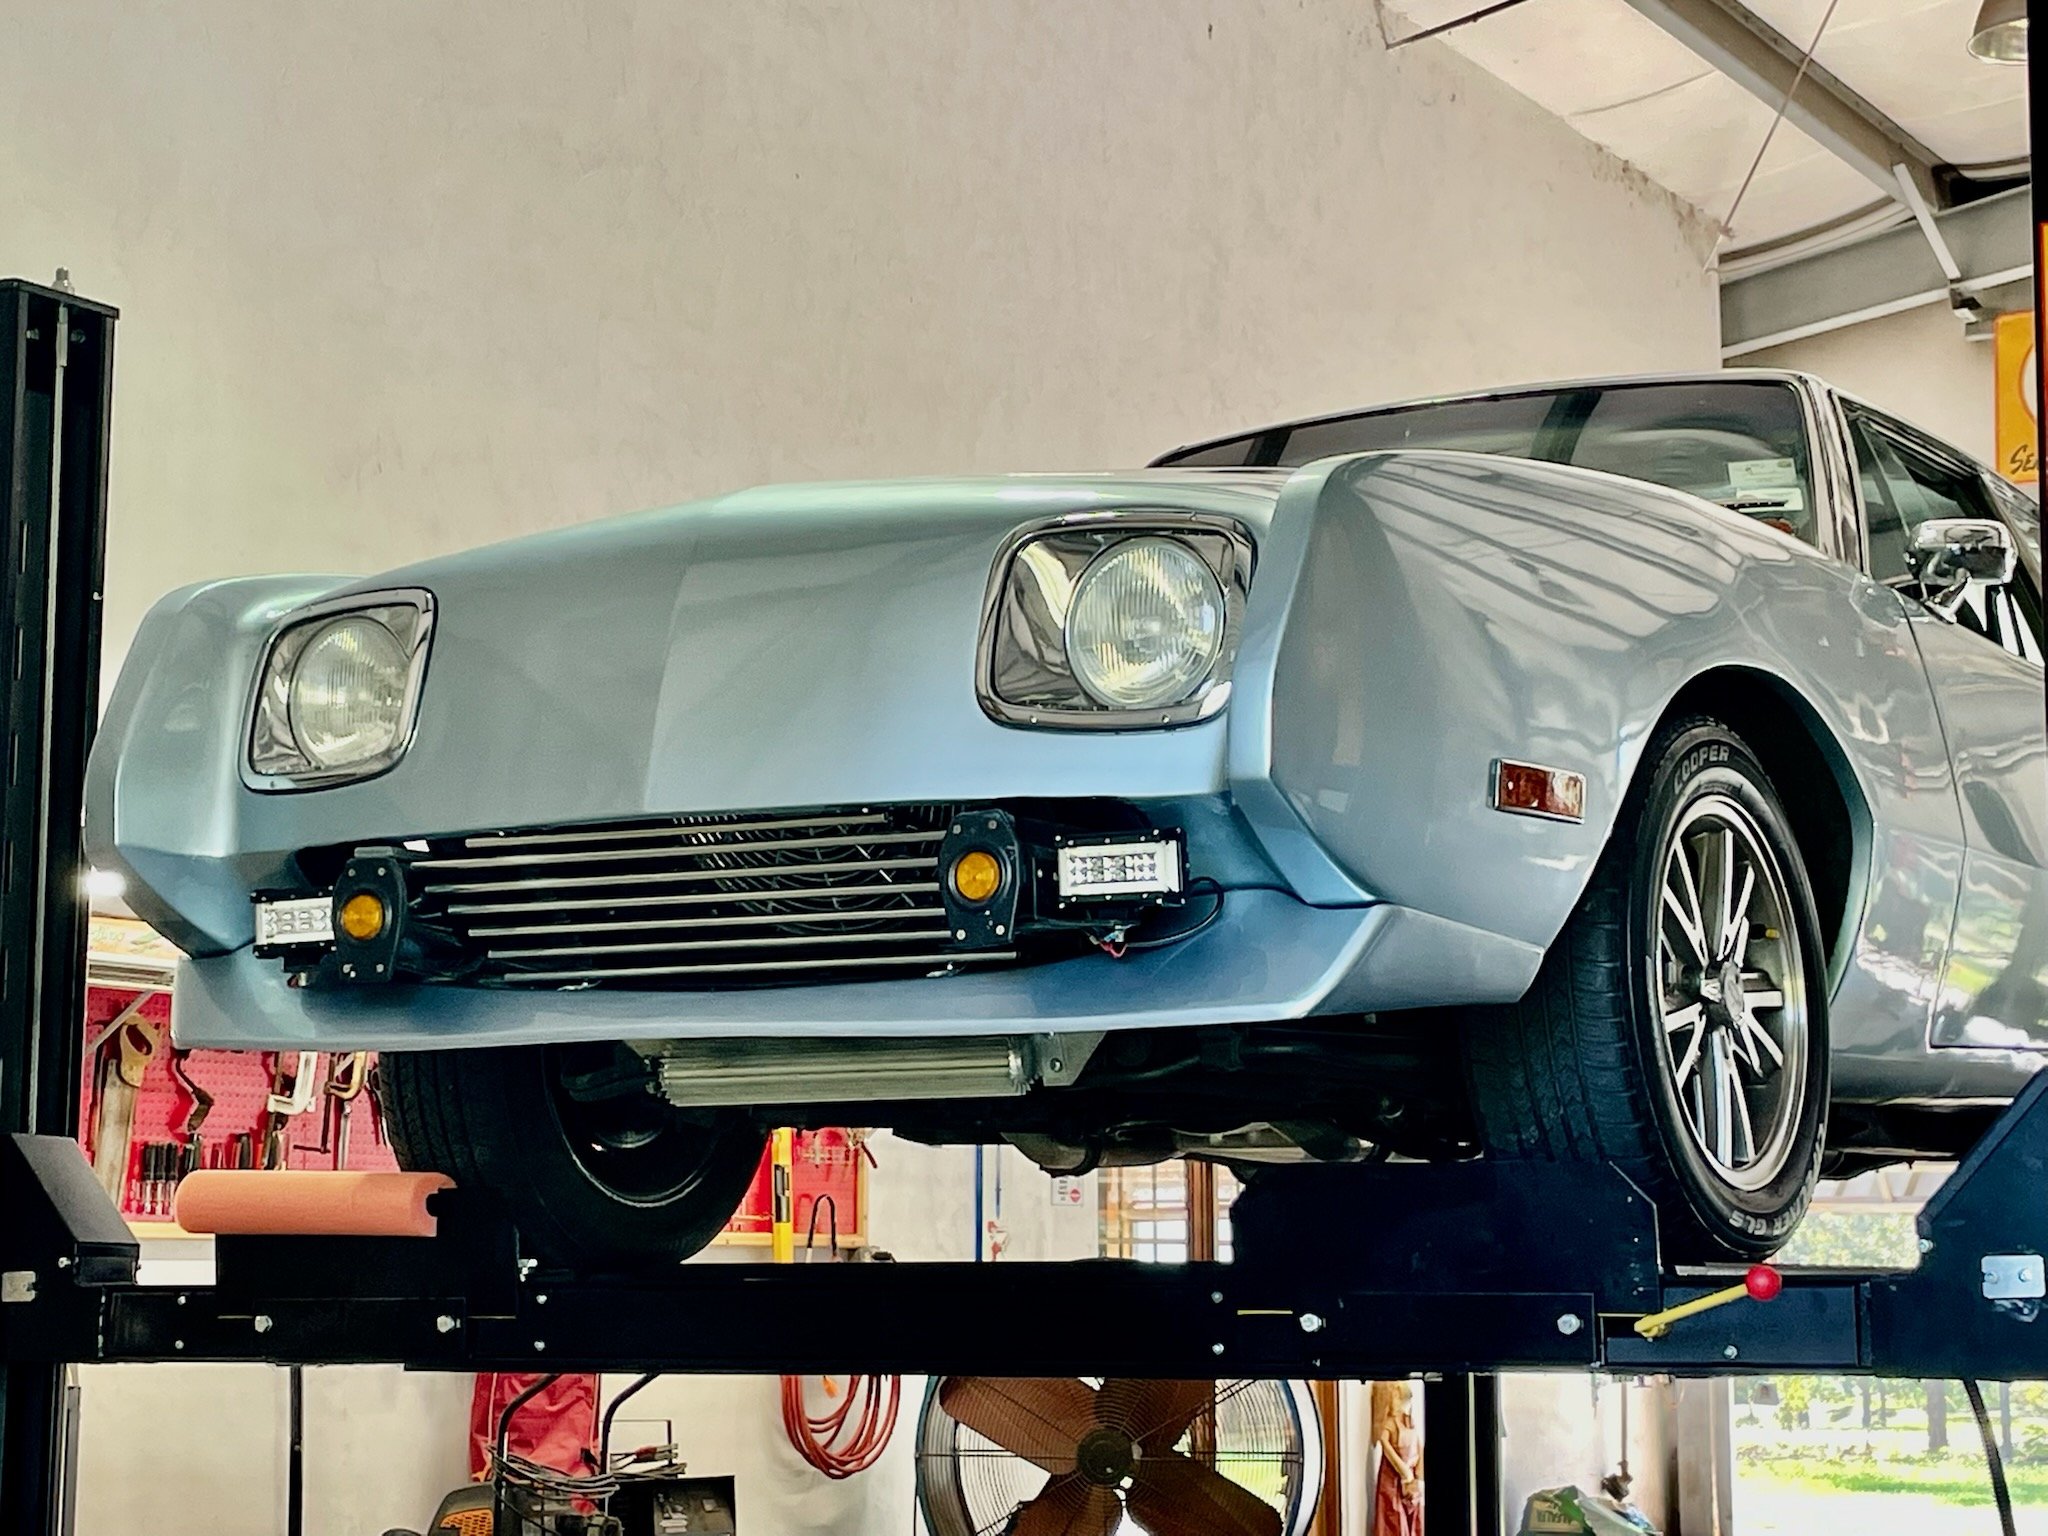
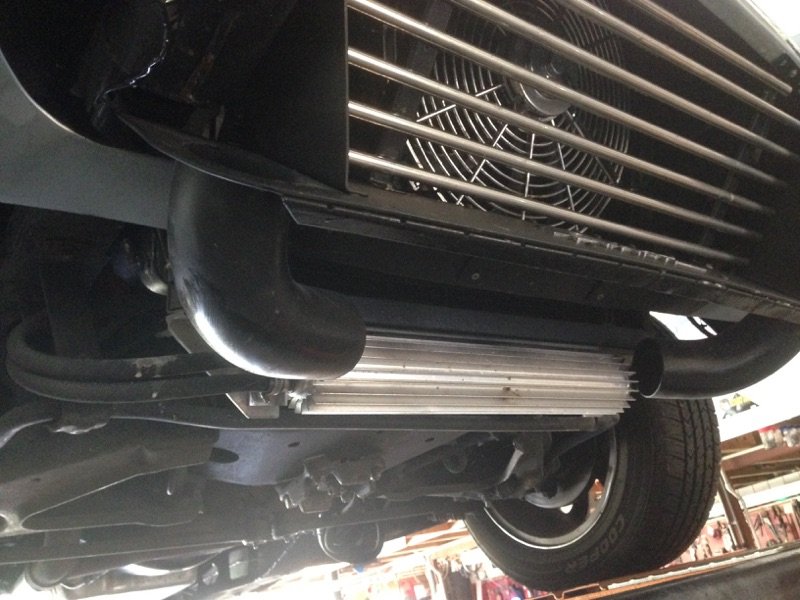
I plan to swap out my car’s fenders for bubble flares, either replicated from or heavily inspired by the Avanti GT. To match the more aggressive stance, I’ll be running a seasonal wheel setup: (4) 17×11s for summer, and (4) 17×9.5s during other months. Let’s be honest, this car is going to be snoozing through any snow. But it’s not just about filling out the arches. These new fenders are an opportunity to finally address one of the Avanti’s long-standing issues: trapped air. Between the planned extractor louvers above the headers and the potential waterfall vent behind the radiator, I’ve already laid some groundwork for heat and pressure relief. Now, I want to take it further by integrating functional vents into the fenders themselves—helping evacuate pressure not just from the engine bay but also from the front wheel wells. The result? Less front-end lift at speed and more consistent cooling performance, especially in stop-and-go traffic or during summer heat soaks. What’s cool is that the shape of the flare itself can actually assist with extraction. As air flows around a properly designed fender flare, it tends to build up higher pressure on the fore side (the front of the flare) and creates a low-pressure zone along the aft side (behind the peak of the flare). This pressure differential helps pull air out of the wheel well or engine bay when there’s a vent placed strategically in that zone. In other words, the flare isn’t just visual muscle—it’s doing real aerodynamic work by encouraging air to exit where you want it to. That’s why pairing the flares with functional vents isn’t just style; it’s performance. https://1drv.ms/f/c/1149023786558411/EtD9MmTbJyVCsgjrc4f2uusB0mHhRDu03O_dFFkXLmWYYw?e=umvTcu I'm planning to install a belly pan aft of the firewall. The Studebaker frame features an X-brace with holes in the I-beams for routing exhaust pipes, which keeps everything below the center of the car tucked—a great foundation for aerodynamic smoothing. By adding a belly pan, I aim to reduce turbulent airflow under the car, potentially lowering drag and improving high-speed stability. If I can design a front skid plate that integrates cleanly with the suspension components, I can smooth the airflow transition beneath the bumper. This would further enhance underbody airflow and overall aerodynamic performance. Combined, these modifications should significantly reduce both lift and drag. Beneath the rear third of the car, I’m looking into incorporating a diffuser to further optimize underbody airflow. My idea is to mount the diffuser’s roof using gas springs or a similar semi-active fastener system. This setup would allow some compliance—letting the diffuser flex between tension and slack to accommodate uneven road surfaces. The strakes would feature angled leading edges to guide airflow effectively while reducing the risk of catching on debris or inclines. With this dynamic mounting strategy, the diffuser can lift slightly over obstacles while still performing its aerodynamic role at speed. Much of this thinking has been shaped by what I’ve learned from Kyle Forster’s YouTube channel, KYLE.ENGINEERS. With his PhD and experience as a Formula 1 aerodynamicist, Kyle provides fantastic insights. A tip I picked up from his appearance at the World Time Attack event in Sydney—while reviewing Feras Qartoumy’s race-prepped C6 Corvette—stood out in particular: it's important to leave some lateral clearance between the rear diffuser and the inner edge of the wheels and tires to ensure optimal flow behavior. Refer to my dual hoods section for a moment. Similarly with my desire to run a diffuser on a street car, it'll be bolted on. This means I could unbolt it and stow it at home. However, while equipped on my long distance drives the diffuser would help me get better highway fuel economy, especially because I will always leave the belly pan equipped.
-
I’ve got plenty of ideas for this build, but at the end of the day, functionality comes first. If I can’t be at least 75% confident that a component will improve a measurable aspect of performance—whether that’s road holding, weight distribution, cooling efficiency, or drivability—it doesn’t make the cut. I don’t mind reworking a non-functional piece to make it useful, or tweaking a functional one to make it better. Every element on the car must serve a purpose. An aeronautical engineer once told me they shoot for a 1:2 airflow ratio: for every unit of air coming in, they want two units going out. The idea is that if the system can exhaust more than it takes in, it naturally creates suction that draws more air in. It’s a self-balancing setup that keeps pressure stable and performance consistent, even when airflow varies. That concept stuck with me. It’s part of why I’ve got “Take car to A2 Wind Tunnel in NC” on my to-do list. I trust what I can discern, but I believe in verifying what I can. I’m not expecting every single feature to be locked in from day one. Ideally, I’ll knock out most of them while the car’s fully torn down—this is my blank canvas, after all—but I’m okay with an initial build followed by revisions. I live in a region with a clear off-season, which allows for winter disassembly, iterative improvements, and spring reassembly. Rinse and repeat as needed. Maybe I’ll be done by revision two (build three)… or maybe I’ll go further depending on how much is built from the onset. At the core, these three principles guide everything: function comes first, testing backs the choices, and the build evolves in stages. I’ve been studying a range of cars for styling inspiration but haven’t committed to many specific design cues yet. Naturally, selecting one direction tends to exclude others—styling elements can’t just be layered indiscriminately. While the build is a tribute to the SCCA-raced Avanti GT, the performance goals I’m targeting push it into territory more akin to an Avanti GTD, GTS, or even something approaching GT3 RS levels. I’ve been looking pretty closely at the A-pillar fences on the Cobra Daytona Coupe. They’re a neat bit of aero trickery—on that car, they help direct air into an inlet at the rear quarter window. But what really caught my eye is how, on a different platform, they might actually help tighten up the airflow peeling off the windshield. Instead of letting all that turbulent air roll into the side flow and make a mess of things around the side glass, these fences could narrow the wake and clean everything up. Less turbulence means less drag, and if I’m lucky, maybe even a bit more high-speed stability. While I’m working in that area, I’m also planning to swap in some sleeker side mirrors—leaning toward something sporty, functional, and won't disrupt the airflow too much, like what you’d find on a recent 911 GT2 or GT3. Simpler solutions exist, but power adjustments are a huge help because adjusting a far side mirror manually when solo can be quite the process. https://1drv.ms/f/c/1149023786558411/EhghQujBDjdCocGGWluNdT8B3z0c69bfLvDYipAqW-FB5Q?e=Y47H4l I picked up a spare hood for a reason—my plan is to repair it and cut in some strategic openings to improve airflow. Ideally, I’ll add a 'waterfall' extractor behind the radiator and maybe build an isolation box to guide the air more efficiently. If that setup doesn’t pan out, I’ve got a backup plan: louvers. The isolation box is optional, depending how other elements come together. At the very least, I’ll be adding a louver above each exhaust header, strategically placed to make hot air escape. But I’m not stopping there—if there’s enough space underneath the hood, I’ll throw in some short fiberglass or light metal walls beneath those louvers to really boost heat extraction above the headers. I might angle these walls out just a bit for extra efficiency, or maybe build a three-wall setup with the front wide open. I’m still researching the best approach. Because I have two hoods, one will stay close to stock while the other is built to perform. And, as much of a pain in the derriere as it is to install a hood—getting bolts, latches, and edges correctly aligned—I bought the spare with the intent of occasionally swapping them out. https://1drv.ms/f/c/1149023786558411/El5mk0POU-JMmQXOR7FzndsBouw5fyJYwNxOKCTRCkgU9w?e=2Da2WO My front bumper will resemble the Avanti GT's, which I believe Avanti Motors based on the third-generation Camaro Z28. I found an aftermarket version made by Duraflex, which they call the GT Concept. This version retains the factory Chevrolet styling while adding two more openings, ideal for duct routing. Fog lights or driving lights would occupy one pair of openings. In the other pair I am considering split ducts, using a portion to feed air to the engine and the remainder for front brake cooling. Blake era Avantis had two openings cut into their inner fenders with ducting routed to the front of the car providing the engine's air intake. I intend to keep utilizing both openings. With any front bumper substitution I shall cut off what I do not need. For example, with a third-generation Z28 bumper, I would remove and discard the top area where the Camaro has its headlights, and use only the lower portion. https://1drv.ms/f/c/1149023786558411/EgwpzlRPjZ1Ljo5RfC0nRMgBhSziB1ojfiotnuoeRcXd_w?e=JBP6az
- Yesterday
-
RQB3263..... I SEE NO REASON WHY THIS FAN SHOULDNT WORK JUST FINE..... I THINK JIM'S PROBLEM IS SOMEWHERE ELSE .... VERY NICE INSTALLATION ..JIM'S PROBLEM IS EITHER INADEQUATE AIR FLOW OR WATER FLOW.... AND THERE ARE MANY CAUSES FOR BOTH....MOST LISTED HERE..... MAKE A LIST AND ELIMINATE EACH.... KEEP IN TOUCH
-
I tried an electric fan also. It makes less noise as the original fan on the waterpump. But, the engine did overheat and I needed to go back to the original mechanical set-up. What also could be the case is that the temp sender in your fresh new block is not according to Avanti spec. I did put an resistor in series with the temp sender to get correct readings. You can also try to put the old sender in your new 350. So, this did not work although I put a lot of effort in it:

-
Would anyone know how much A/C freon {lbs} a 1978 Avanti took back in the day ? Thanks David K.
-
Sorry guys the last post had the wrong question.... Does any one know where I can get a shop Maintenace manual for a 1985 Avanti?
-
where does the connection on the bottom of the master cylinder go to? Brooks
-
where does the connection on the bottom of the master cylinder go to? Brooks
-
Can someone please tell me the battery tie down used for this group 51 battery? I'm trying to do it without drilling new holes. Thank you!
-
The ‘high fuel tank situation’ has been a chronic Avanti problem since day one!
-
Close Ron, but no cigar. My post wasn't as clear as I had intended. The carb is off being cleaned and reassembled, but the fuel line had dripped at lest a quart before I saw it. I did jack up the front of the car and that fixed that, so it's not really the problem with starting, it's just that the fuel level was higher than the inlet to the carb. The other question, (now separate from the dripping fuel line), is could the purge valve be causing my flooded starting conditions?
-
If you are saying that gasoline is leaking onto the engine where the metal fuel line threads into the carb body, then the only reason for that is the fitting isn't seating correctly when tightening. If so, then double check the flare on the line and carb to be sure they are clean and smooth. If so, then you will use the new filter/gaskets PLUS apply about 3-4 loops of plumbers' tape around the threads of the "Nut" threads to aid in sealing. You want the tape to only be on the threaded area of the nut. Be sure both threaded sections are clean before assembly. A little rubbing alcohol used on the threads before wrapping and installing will help dry off the threads to help the plumbers tape do its job.
-
RQB3263..... EXHAUST/TAIL PIPE/MUFFLER BLOCKAGE ...COLLAPSED MUFFLER.....ANOTHER POSSIBILITY
-
Thank-you everyone. I guess I have my work cut out for me!
-
RQB3263...... BRAND NEW DOESN'T GUARANTEE CORRECT OR QUALITY .... WELL THATS ANOTHER STORY.....CHECK WATER PUMP BELT TENSION ... AND IGNITION TIMING....IN COMBINATION BUT MORE THAN LIKELY ONE THING RESTRICTING AIR OR WATER FLOW AND NOT A MAJOR PROBLEM WITH YOUR NEW ENGINE..... INTERESTING KEEP IN TOUCH HERE... BILL IN FLORIDA
-
RQB3263..... MICHEAL PHILLIPS 215-260-8377 AIR DAM SUPPLIER MANUFACTURER
-
RQB3263/81/305 .... THERE ARE STILL SEVERAL THINGS YOU CAN DO ... ALL TOGETHER MAY HELP .... INDIVIDUALLY NOT SO MUCH ...AIR DAM WILL HELP DOWN THE ROAD ... I GOT MINE FROM MICHEAL PHILLIPS IN PA....I BELIEVE HE IS THE ONLY MFG./SUPPLIER.....PICK A TARGET TEMP I SUGGEST 200 DEGREES RUN IT TO THAT POINT AND SHUT IT OFF AND COOL DOWN... TIME IT AND DO IT AGAIN ...EACH TIME IT SHOULD TAKE LONGER UNTILL IT WILL RUN AT 200 CONTINUOUSLY ... THIS WILL INDICATE YOUR ENGINE BREAK-IN IS COMPLETE ... CHANGE THE OIL AND FILTER .... ALSO INSTALL A TRANS COOLER AND GET THAT HEAT OUT OF THE RADIATOR ... I NEVER COULD UNDERSTAND THAT ... REMOVE THE HEAR RISER VALVE FROM THE EXHAUST MANIFOLD ... IS YOUR ELECTRIC FAN BLOWING THE RIGHT DIRECTION ?? BE SURE THE THERMOSTAT IS 180 WITH 4 OR 5 .. 3/16 HOLES DRILLED .... HOW ABOUT THE WATER PUMP IMPELLER NOT IMPOSSIBLE IT HAS THE WRONG IMPELLER... IVE SEEN IT BEFOR ...ALSO IN THE SUMMER TIME I SPACE THE HOOD LATCHES UP 3/4 INCH REQ LONGER BOLTS... 5 MINUTE JOB ...AND SWITCH BACK AT THANKSGIVING ....

- Last week
-
Yes…an air deflector directs more air to the radiator that would otherwise create turbulent airflow under the car. It serves no purpose idling but really helps at speed.
-
New info: I received my carb kit from Quadrajetpower.com, and began dismantling the carb. The good news is that the carb is clean inside, has already had the throttle shafts bushed and the well plugs epoxied, so it appears to be remanufactured, though not recently based on the outside grime. Remember the engine ran well, idled well, accelerated well, no issues other than being flooded at start, and blocking the choke open did not help. What is troubling, is that even with less than 1/2 a tank of gas, fuel keeps dripping out of the fuel line where it went into the carb. (I've not yet completed the carb, so the line is open, save a piece of towel to keep trash out). Best as I can measure, the carb is above the fuel level, though that can be tricky to figure. I loosened the fuel cap to see if pressure had built up, but no sound of air whooshing, and the fuel keeps dripping. I'm starting to wonder if either the vapor canister is flooded or the purge valve is bad, causing that, and indirectly flooding the engine after sitting overnight. What do you all think?
-
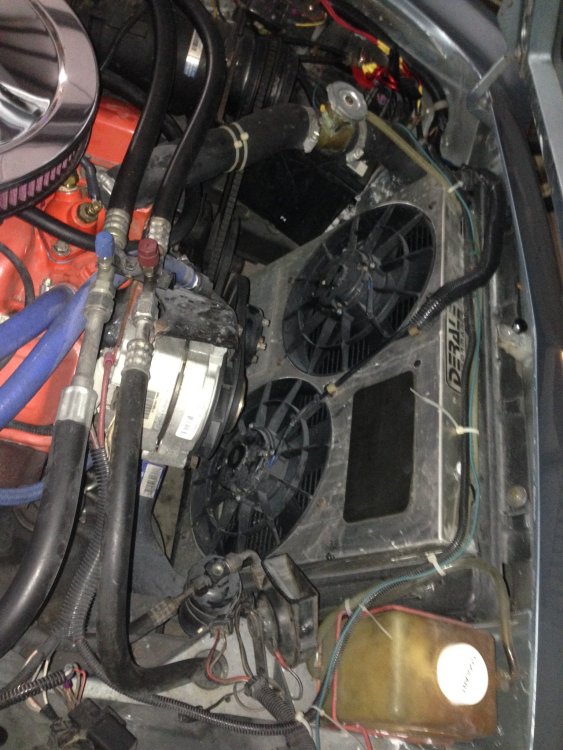
I pulled the trigger and bought a 350 long block freshly professionally rebuilt. I have a brand new aluminum Avanti radiator. I have a heavy duty racing water pump and electric fan. The new engine needs to be run a 2,000 rpm for 30 mins to break in. I can't run it for 15 mins without the temp guage pegging to 240 and it overheating. I've purged the air out as well. I am lost why this thing won't run cooler. If I can't fix it soon, it will have to be sold at a huge loss. A friend told me that Avantis have an inherant air flow problem through the radiator. He said some people got more flow installing an air dam. Has anyone tried this? Or does anyone make an aftermarket add on?
-
Thank You my Friend, I got my fuel pump on today and drove it for the first time since March of 2017 and the tail lights and side marker were on while the car was running. When I turned the key off they went out.... thanks for the information//// Brooks
-
Above the interior rear view mirror (front centre ceiling)
-
could someone tell me where the headlight switch is for my new to me 1985 avanti?
-
From Avanti Magazine Issue 187 Summer/Fall 2019 article by Curtis Fischbach AOAI Michigan member 1. The latch assemblies mounted in the header were from ASC, Inc., of Southgate, Michigan. The handles were shortened since the Avanti was narrower than the cars ASC, Inc. had made them for. Most of these latch parts could be found in the Renault Alliance convertibles.
-
Be aware it’s easy to damage the two rubber o-rings when splitting the cases for a thorough clean out… Think space shuttle ‘Challenger’ !!