


Avanti83
-
Posts
1,282 -
Joined
-
Last visited
Content Type
Profiles
Forums
Events
Posts posted by Avanti83
-
-
As with a previous thread, I always like to start with gas flow when these things happen. Your gas cap clue could be the issue with a plugged/non-functioning cap vent. You might want to drill a small hole in the cap and see if the issue continues to goes away and then replace the cap. Be sure the hole isn't covered by the gasket.
I'd also check for where the gas filters/filter are and replace them. If the issue continues after that, a bad rubber gas line could also be the cause.
I'm not discounting Gunslingers comments on the module as heat soak can cause this problem also and those modules should be pretty inexpensive by now.
So far the cost has been pretty low, if it continues - you could replace the pump, add a fuel pressure gauge or find a shop that deals with older Chebby power and see what they think.
-
Drive it to your local parts store and try a GM cap from the same year. Those are pretty universal back then. If the GM won't work. measure the opening size and go from there.
Be sure the door will close, you may need to bend the ears or position the cap differently. That's how I found the one for my 83.
-
Speedway aluminum radiator I put in my 74. Fits just like the one in my 83 but I had a local shop TIG the mounting brackets on it. Total bill for radiator and mounts was under $200.
http://forum.studebakerdriversclub.com/showthread.php?87316-63-Avanti-Radiator-Replacement
-
12 hours ago, WayneC said:
There are usually a few for sale on eBay as well, search "Avanti (shop, workshop, service) manual".... you want the one that says "Workshop Manual" on the cover.
About $40 to $50 shipped.
While you're at it, get an Avanti parts manual as well.
Some of the information won't pertain to the '83, but much of it will, and its all the information we've got, aside from vendors and a few websites.
Excellent advice. Also remember you can use any Chevy manual from the same year or one earlier for engine and transmission issues.
-
They??? A little hard to roll down the manual passenger side at speed, me thinks. Nothing wrong with converting to manual as it's a simpler system and less prone to failure but for me, I like to be able to control air flow and adjust the passenger window on the fly. That's why I went to the electric Nu-Relics option. ?
Bob
-
Good luck, every place the tape isn't installed it will sag eventually so at least use a substantial amount of tape. Hope it works, the #8090 will.
-
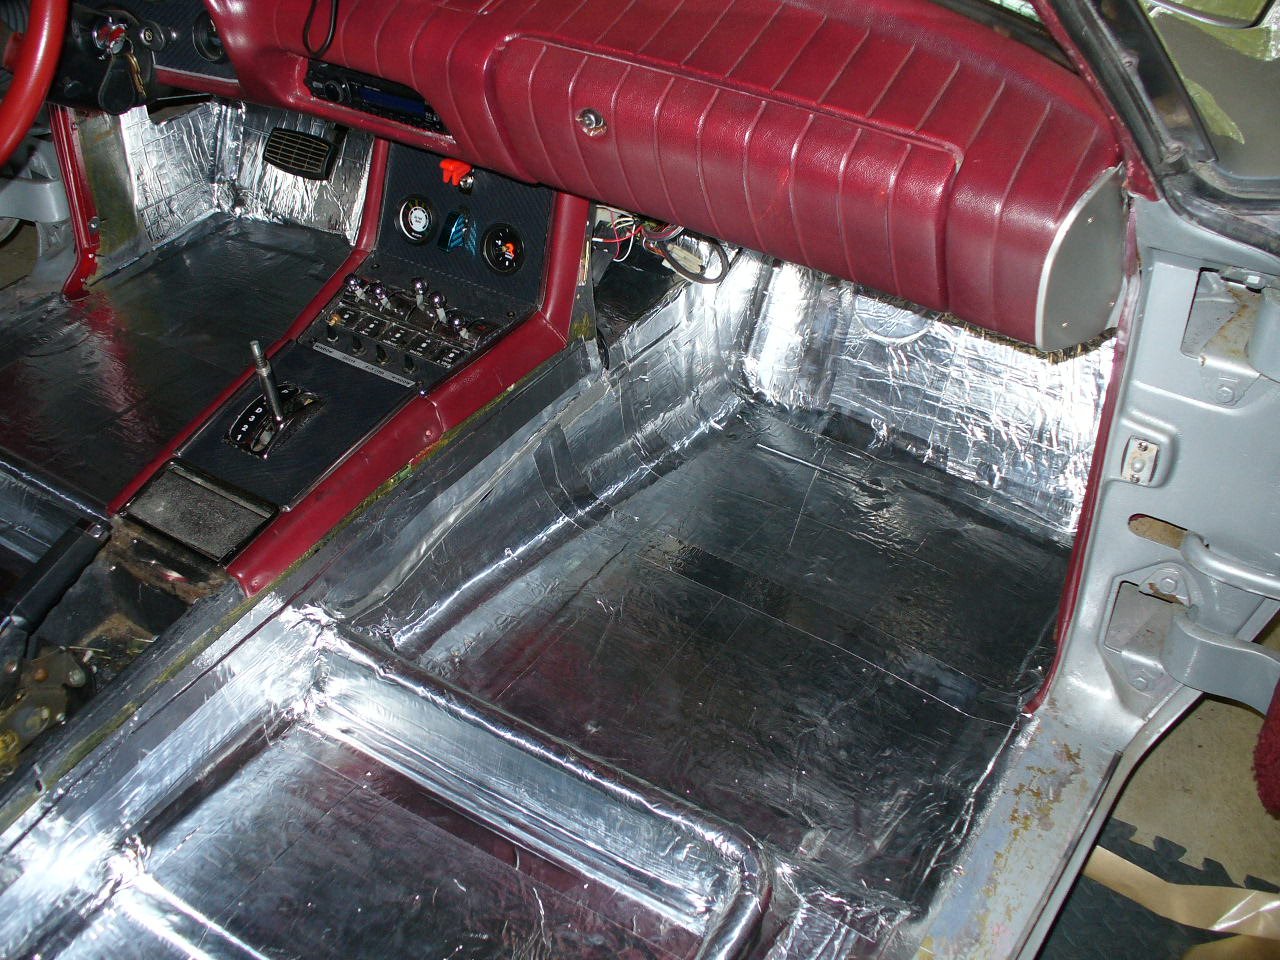
Megamat by FatMat. Add two layers to the firewall and footrest areas. Others will talk about getting material from the big box stores, but if you do be sure it does not have asphalt in it.
My 83 has no air and was "tolerable" running in 93 deg weather a few years ago on the way home from a zone meet. It was not baked by engine temperature and with the windows open and air moving it was fine. Did the same on my 74 but it has air.
You will need to use small pieces under the dash to get complete coverage. Tape all joints with aluminum foil tape available at the the big box stores.
Put a cheap rubber mat on the floors to protect it. If you tear the hell out of it, add another layer before carpeting but the stuff is amazingly tough.

-
As with most things Avanti, it's probably borrowed from another manufacture's parts book so there may be another source but when looking for parts for these vehicles, the go-to source is Dan Booth at Nostalgic Motors in Wixom, Mi. He bought out the old Avanti Motors parts stock. You could call him as he may have both NOS and used parts. Never inexpensive but way cheaper than other high end classics.
-
I finally decided to convert my 74 from manual to power windows. This is the post from the SDC detailing the installation.
-
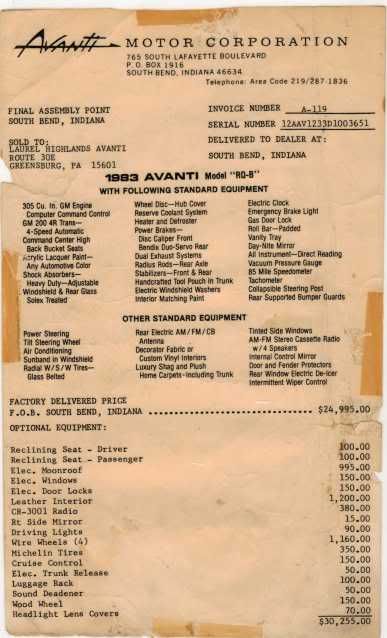
Makes sense as I would have thought that $1160 was way to much for wire wheel covers.
-
This is the window sticker from my 83. It came with the wire wheel covers listed as an option. My only question is why would you buy them with the price listed. They are still setting on the shelf of my polebarn if anyone wants to make an offer.
-
I'm curious about this question. This is a 79 Avanti as best I can tell.
A couple of questions.
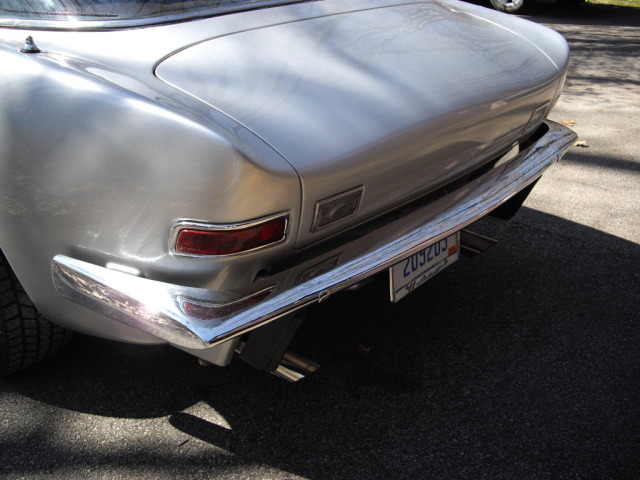
The front bumper group appears to much like my 74 so how does the bumper differ from the newer and older models with chrome bumpers that have no impact guard? They look the same to me as I bought a front bumper from an 82 and it just replaced 74 bumper exactly.
On my 74 IIRC, the impact bumper, not the three piece bumper assembly, was attached to the frame with a couple of "shock absorbers" mounted to a bracket that required the front of the frame horns be removed to allow installation. I ash canned the impact bumper but that required that I remove the frame mounting portion of it and bolt it back on to support the radiator and front body mount.
This is the mount reinstalled on my 74 frame. The 45 deg cut is where I separated the body mount from the impact section.
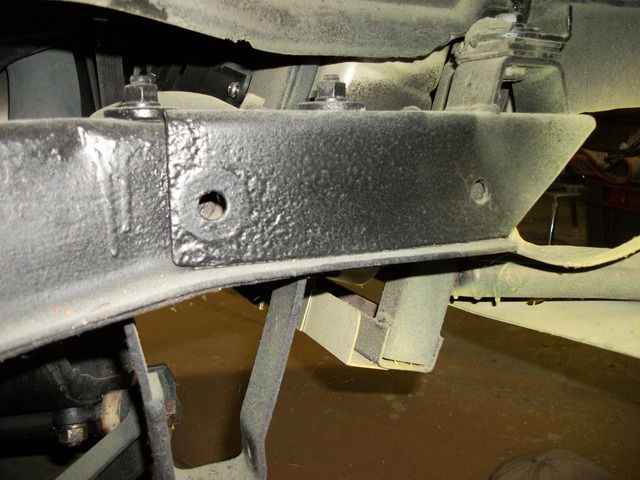
To eliminate the "cow catcher" the rear portion of the mount must be reinstalled or a frame extension installed.
Not being critical but what am I missing? What was included in the car that left the plant with a "replacement" bumper?
-
On 5/22/2018 at 12:58 AM, Cbitz233 said:
Sadly the only shop i have around me is only mechanical. They won't touch anything with wires. And the one I do have is called Iron Horse Classics and they are always booked up up to like 2 months in advance..
Go to your local parts store and ask them who installs Chevy starters. I'll bet they'll give you a suggestions. Probably the most available part for a chevy V8 is a starter and very inexpensive from a parts house.
If all else fails, Any Chevy dealer can do it.
-
Here's discussion on the topic from the SDC Forum.
http://forum.studebakerdriversclub.com/showthread.php?102860-70-Avanti-Wheels
It's actually pretty easy to measure what will fit if a shop wants to take the time. It can also be done by the owner with a few tools.
-
Not if you use a pair of these.
Otherwise you can run new cables but one must connect to the starter one the other side of the engine. Still not a bad job.
-
Nate's interchange lists KYB 343130 and KG5504 for Avanti rears. IIRC, The SDC reference was for Koni's which are probably even better.
-
12 hours ago, Lancer said:
What brand and model number shocks have you found for an '83. So far I have only found KYB's for the front and nothing for the rear -- HELP! I would appreciate your input and thoughts.
")
Here's a post I made on the SDC forum from Bob S's website. It will give you the monroe number for cross reference and a link to Nate Nagle's old post on interchange.
http://www.studebaker-info.org/Tech/SOB/sob55075.html
Bob
-
Like Gunslinger I had a 2 1/2" setup fabricated by a local exhaust company for my 74. Mine is different as I used 2 1/2" vette OEM Ram's horn headers and had the shop only fabricatde the head pipes without the flared ends to mount them to the manifold as my car was shop bound in my polebarn being rebuilt. They would have rather fabed the whole system but I wasn't going to put it on a trailer in the winter. I welded in the necessary parts. I just took the old 2" pipes in as a pattern.
On my 83 I used a 2 1/4" stainless exhaust from Don Simmons (Advertises in AOAI and SDC magazines) that was adapted to again a set of 2 1/2" Ram Horns. I Bought the complete system from head pipes to exhaust tips except mufflers.
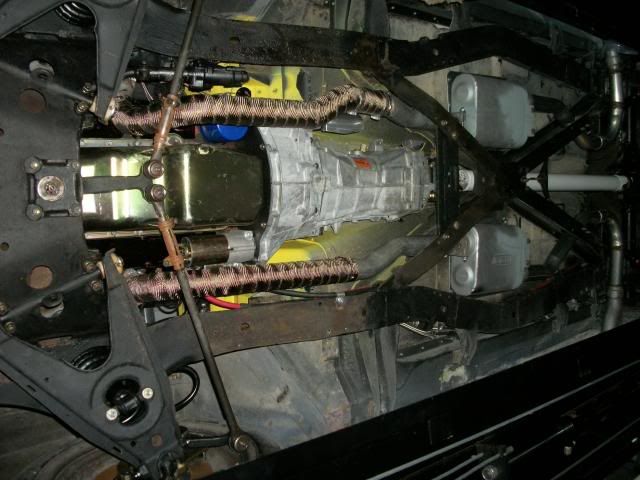
Here's the underside of the 74 now
-
Shock goes up through the lower A-arm and shock bolts to the arm by a "pin" that runs 90 degs to the shock length. Some suggested replacement shocks have a "pin" that may be narrow enough to not span the distance and allow the bolts to make sufficient contact. Several fixes are possible if this is the case.
1- Get new shocks from a Stude vendor
2- Use larger washers to bolt the shock on
3- Use the pin from the old shock
4- Weld washers on the pin to lengthen it.
-
Nope, the front coil is contained by the A-arms and the shock just bolts in.
Be sure your shock have a pin in the bottom mount that spans the distance between the mounting bolts.
-
IIRC, Run the tool parallel to the length of the handle from the long end to where it connects to the door. You will feel it slide into a slot as you jiggle (technical term) up and down and in and out. When you feel it engage just push further until the clip pushes out. Recall there can be a plastic shield between the handle and the door panel so you will need to be sure you try both sides to find the slot.
I'll be gone until Saturday but if you still have issues, I'll post a couple pictures of mine as they are currently off. You could also Google (remove GM interior door handles) of about the same year and I'll bet you'll find pictures.
-
Avanti is curved.
-
10 hours ago, Paul K. said:
When you say "entire interior" do you mean every area that is carpeted or covered with leather or vinyl?
Good question.
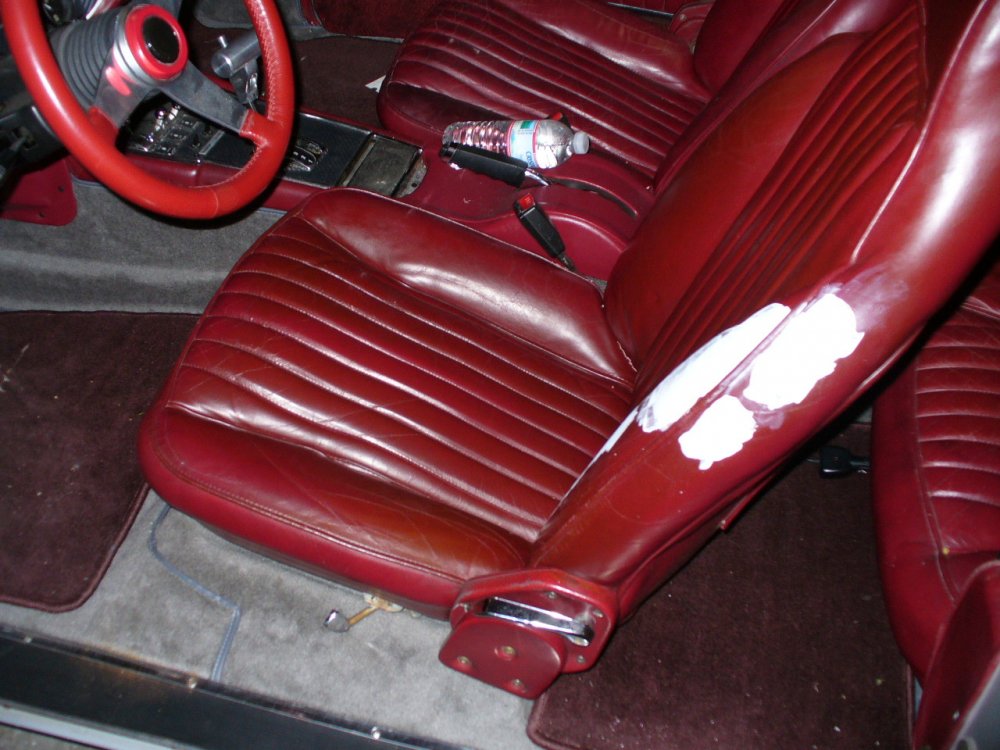
If you just want to redye it then you can probably get by for under $500. I did my 83 leather seats with a leather dye from Leatherque.com. But that was just the seats and I didn't change colors. If you need seat covers, they will need to be custom made.
Any vinyl will also need to be sprayed the new color but SEM and other companies make a good spray dye. I used spray dye in my 74. When I bought it, it had a smoke/mold/crud stained vinyl interior in a light brown and tan color. I removed the entire interior and cleaned the heck out of the door, interior panels and back seats. The front seats were in bad shape so I replaced them with a set from a Pontiac G6. All of the vinyl was replaced on the console with marine vinyl and a new carpet was installed.
I have a couple of years of work into the interior and am just finishing the door panels currently.
There's under $1000 here but i'll bet a complete replacement including replacement would set you back a minimum of $3000 at a minimum but it's probably closer to $5000 up.
Here's a video of the 74 last fall. Back seats and side panels are resprayed black. rear window panel and seat supports are black stretchable marine vinyl as are the console pieces. New carpet and G6 front seats. Dash is a modified 89 unit reupholstered locally.
Let me know if you need something more specific.
83 leather seats before and after redye. Carpets been replaced.

-
As Jim said above, I like the clean looks of the 63/64 body and bumpers. Nowhere did I mention removing the bumpers just the POC extensions and rubber add-ons. I also don't like the side lights and trunk rack.
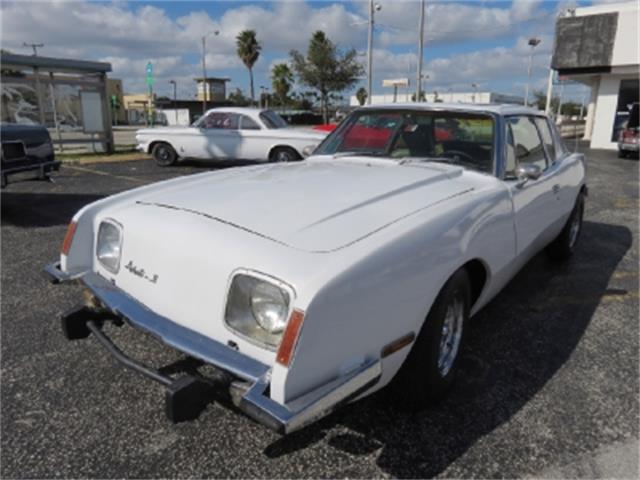
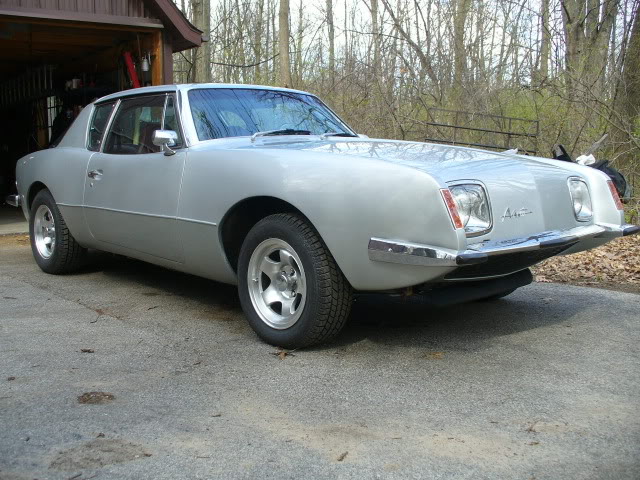
My 83


Engine year
in 1965-83 Avanti
Posted · Edited by Avanti83
If the parts you refer to are external parts, then forge ahead but you are still in the bad performance/emissions years of the SBC. If you are doing a rebuild using 78 spec parts, do yourself and your Avanti a favor and ash can the cam, cam gear and possibly the carb.
A decent street performance cam and new cam gear will take the bad timing and performance from the old engine to a much better level of preformance and driveability. A new carb will give you tune-ability to allow the new parts to perform well.
Realistically, SDC's were very similiar until about 98.