All Activity
- Past hour
-
 Jim S changed their profile photo
 -
I ran power as directed, and get nothing. I ran 12+ straight to the black (fan wire) and nothing. Does anyone know where on the box it is grounded? I have the dash out, but don't see any ground wires. If it's grounded somewhere, I may have a dead blower motor? I can't begin to imagine what it will take to get that thing out!
- Today
-
You might check with him and see if he has any rear glass. Mike
-
Thank you!
- Yesterday
-
One should be +12v (red) and hot when the ign key is on, it goes to the main power terminal of the fan switch. The next one (green) should go straight to the A/C temperature switch on the same panel (the other wire on the temp switch goes to the compressor. The last one (black) goes to the blower motor.
-
The wires for my AC unit were cut by the previous moron who was "restoring" my car. The are 3 wires going to the AC fan switch. There's a red one, a black and a green wire. Does anyone know where these should go? Also the compressor was removed and there's a blu wire hanging in the area where the compressor would mount. I hope that is for the clutch. Can anyone verify this? Thank-you!
-
https://www.pelicanparts.com/More_Info/9115218170001C.htm?pn=911-521-817-00-01C-M100&bc=c&SVSVSI=
-
Doing some research, I went to the Nostalgic Motor Cars website to see if Dan Booth is advertising any Avanti II cars for sale. He's currently selling a 1982 and a 1983. Both have defroster elements on the rear window. That partially answers one of my questions. Now I just need to find a source, if any are available.
-
Thanks MFG.. ronmanfredi I intend to use stainless steel lines for the fuel lines & continuous positive & ground wire in the troughs so there shouldn't need to be any maintenance..
-
Doing this would eliminate the ability to service those.
-
I replaced the rear window in a 1983 Avanti about seven years ago. At the time, the heated rear windows with integral defroster wires were readily available, however the earlier non- heated windows were (at the time) very hard to find. (that situation may have changed)
-
My questions below are relevant to the Avanti II. I need to replace the rear window seal in my 1963 Avanti. The window is also scratched in multiple places, so while I have the window out, I'd like to just go ahead and replace the glass. I'm not doing this soon, but I'd like to get it done in the next two years. Questions: What years, if any, did the Avanti II have a rear window defroster (wires or surface elements) in or on the glass? (I'm not concerned about originality. I want to make this car a three-season driver, and I'd like to have a functional defroster). If this glass is still available, what is the part number? Thank you.
- Last week
-
Since you’re fitting new troughs, I think running fuel & battery lines through them is an interesting concept… Never heard of anyone doing that before, and it seems, to me, an excellent idea! Please keep us posted on this.
-
I'm getting ready to fit new hog toughs to RBQ2434... Why can't I run the battery cables within the right side (battery is in the trunk) & the fuel lines within the left side???
-
as you can see from the production order further up in the feed the car's destination was Milan, Italy. So, i would assume that it was really delivered to Italy, but I have no idea what happened then until it was registered in 1966/67. Some people proposed it could have been used for a film set, but I have no indication for this. Maybe the orginial buyer just stepped back and it took time to find a new buyer as the company was going out of business back then ...
-
Yes.. exactly… probably about 22… and I will never forget that deep air sound! But the sound a wound up Paxton makes on my Avanti has much more of an ‘angry’ sound.. at least to my old ears!!
-
Or the car was not import to Milan by the buyer's order. The distributor (Compagnia Generale Auto) has ordered two cars and the sale of the grey one has taken time.
-
When younger I rebuilt models and spent long hours making them the way i wanted. You did a LOT of work, well beyond my talents and I like your finished car. great job.
-
Man your going to make a totally new car out of that thing. Another excellent write up and finished job.
-
Modifying and adding a rear trunk spoiler!
Stacey replied to ronmanfredi's topic in 2001-2007 Avanti models
You did a great job on the addition of the spoiler. Thanks for showing us your work. -

Holes Drilled in Bottom of 1964 R2 Carter AFB Serve What Purpose?
CarbDoc replied to CarbDoc's topic in 1963-64 Avanti
Thanks! -
thanks for the info, Leo! - The first one, 4641 in grey is mine. 🙂 However, the car was delivered in 1963, but was then only registered in Milano by the first owner in 1966/67. It would be interesting to know why the car was not used for three years at the beginning. Could that maybe be connected to Studebakers going out of business?
-
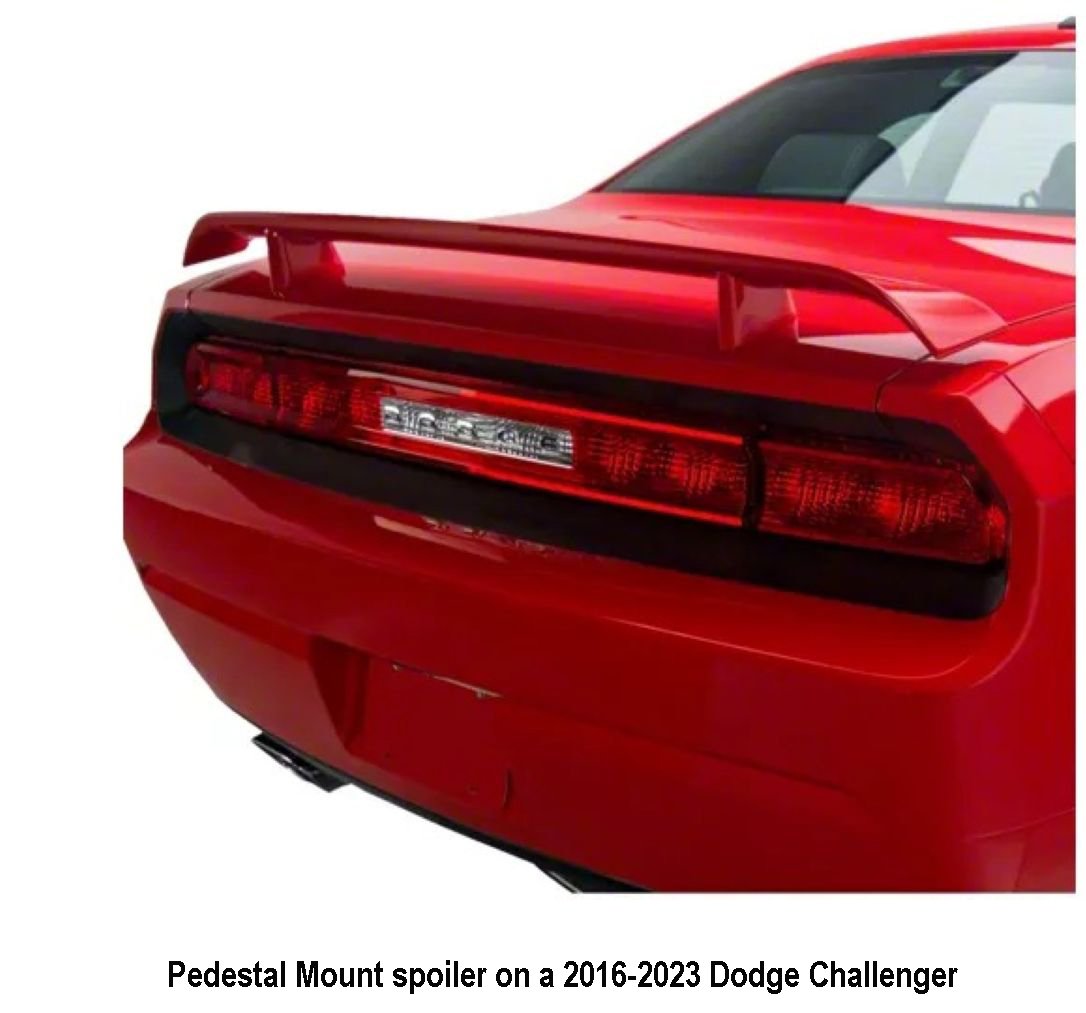
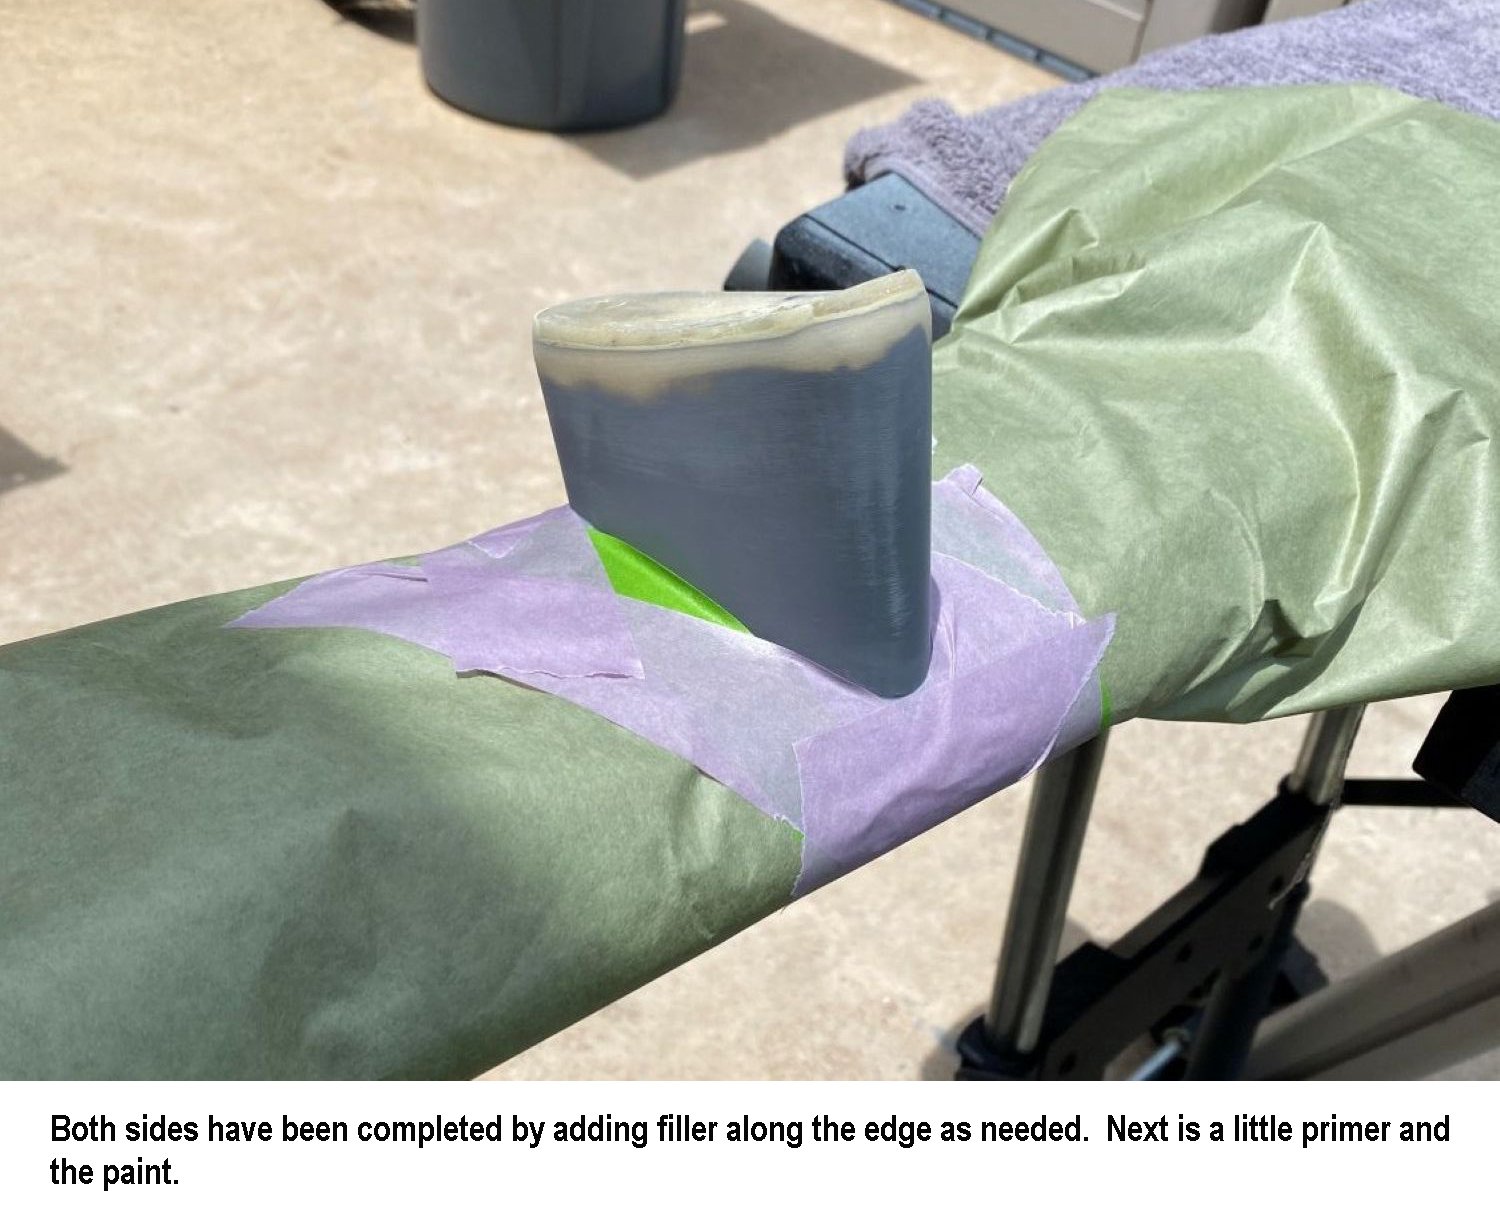
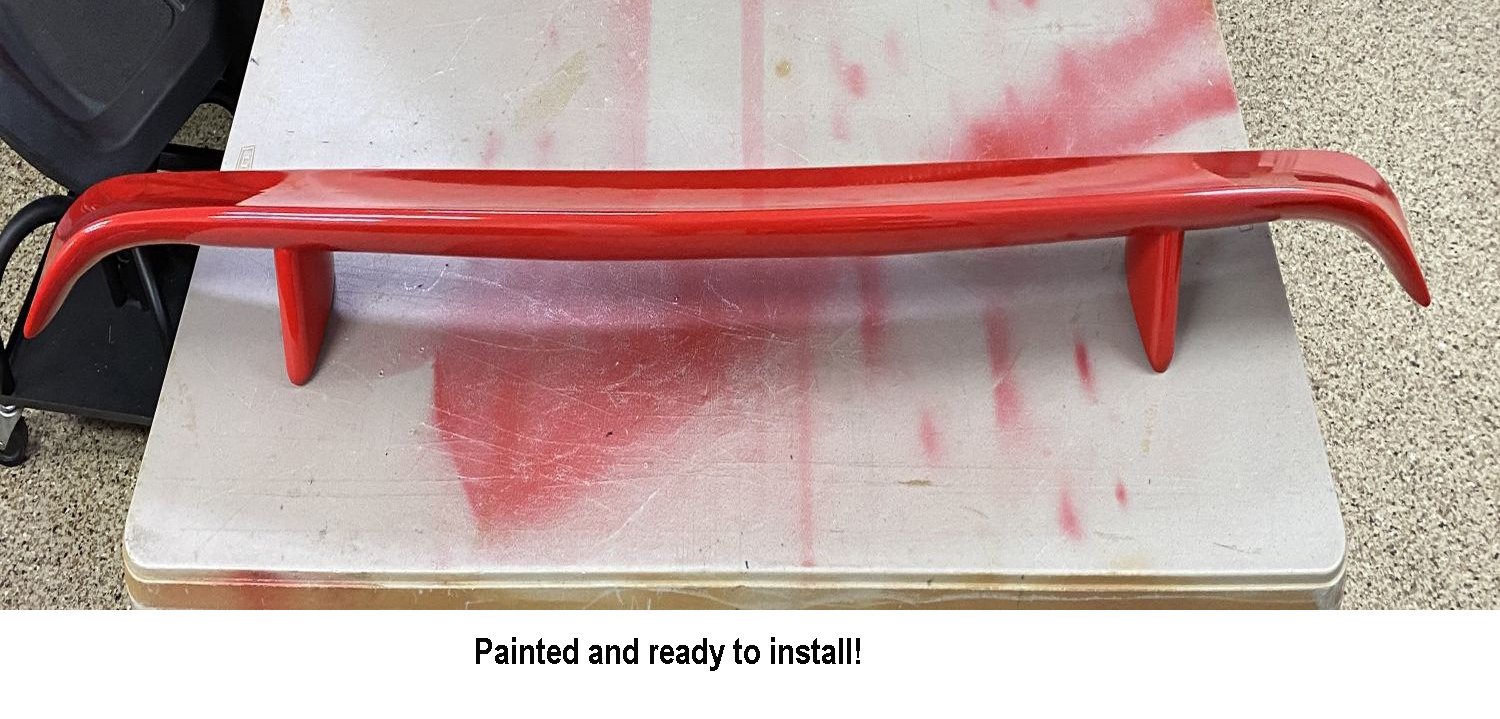
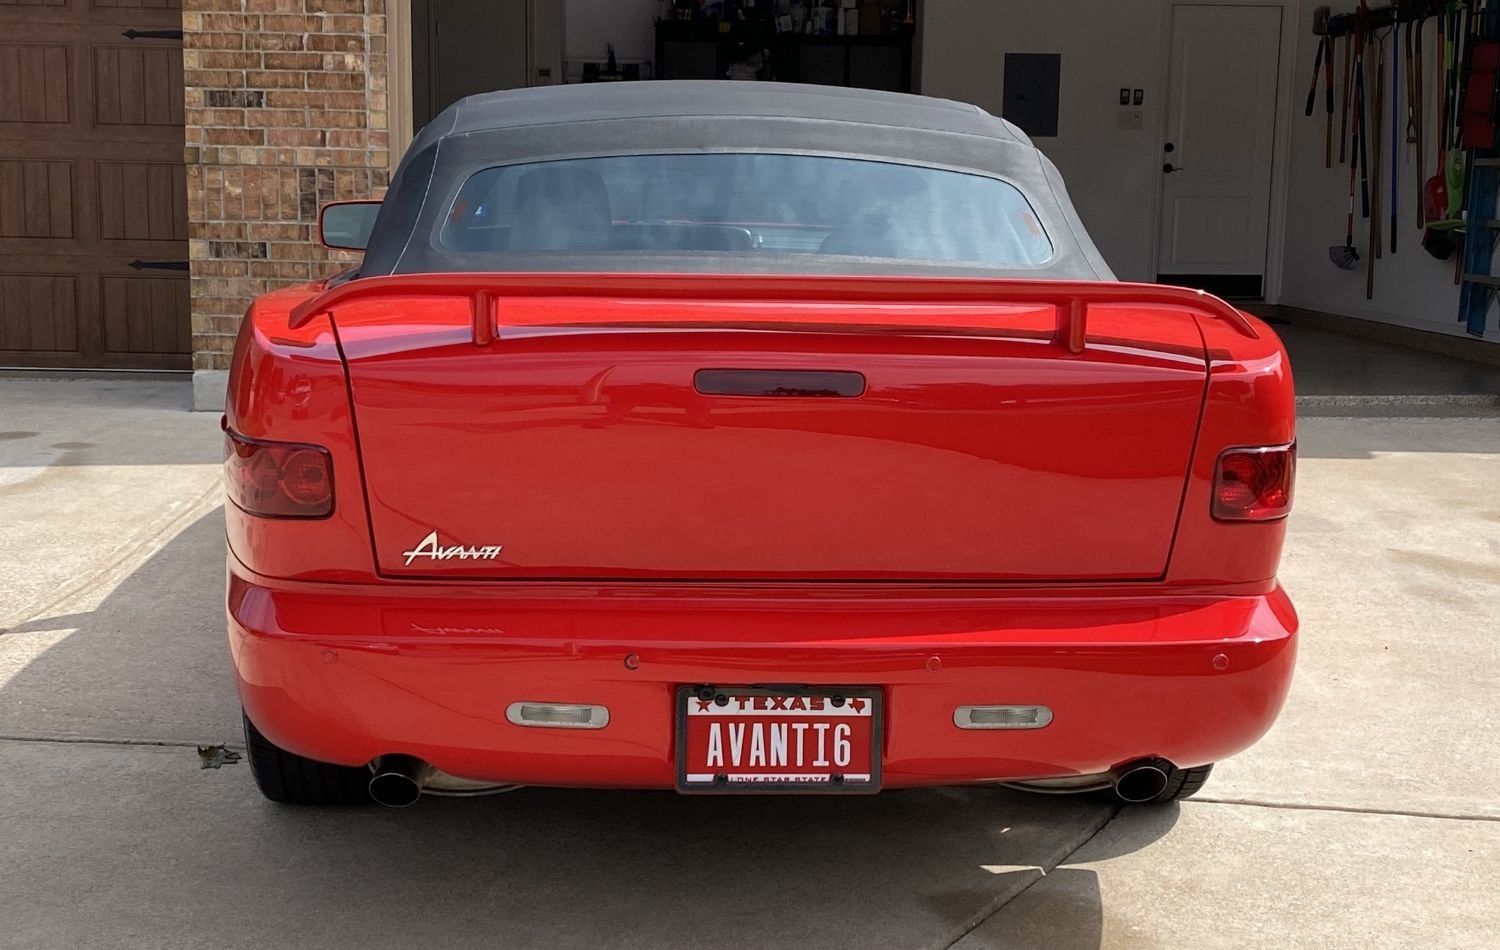
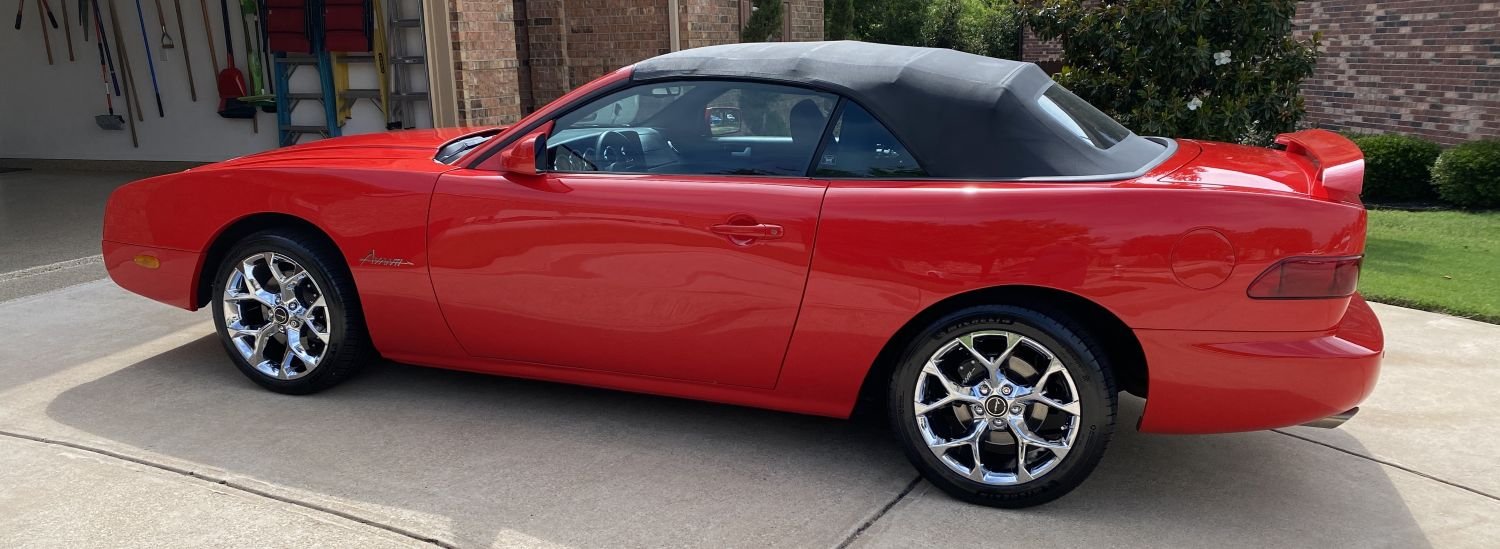
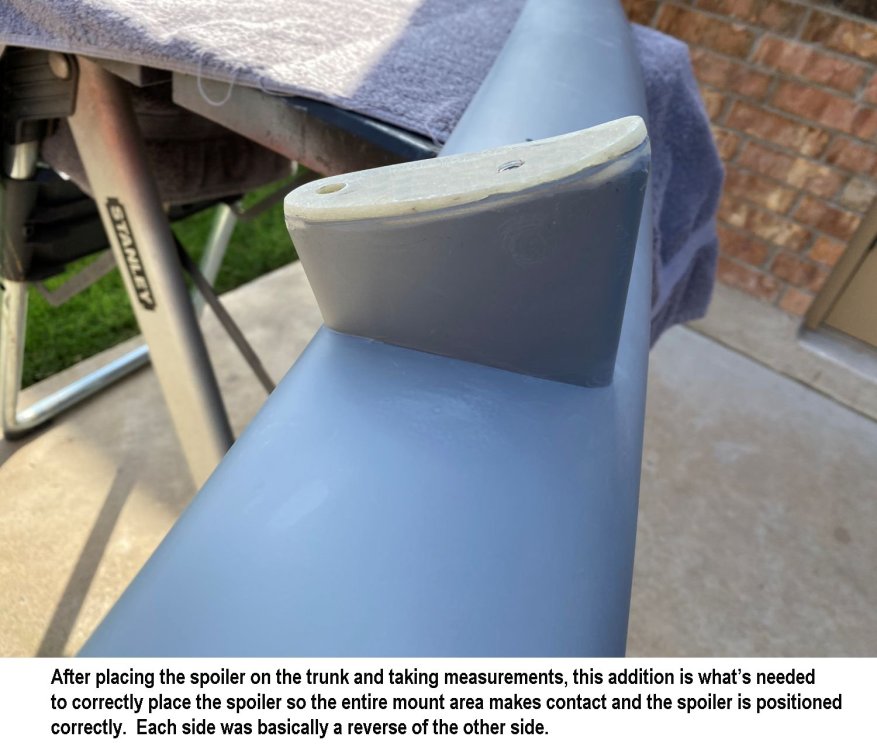
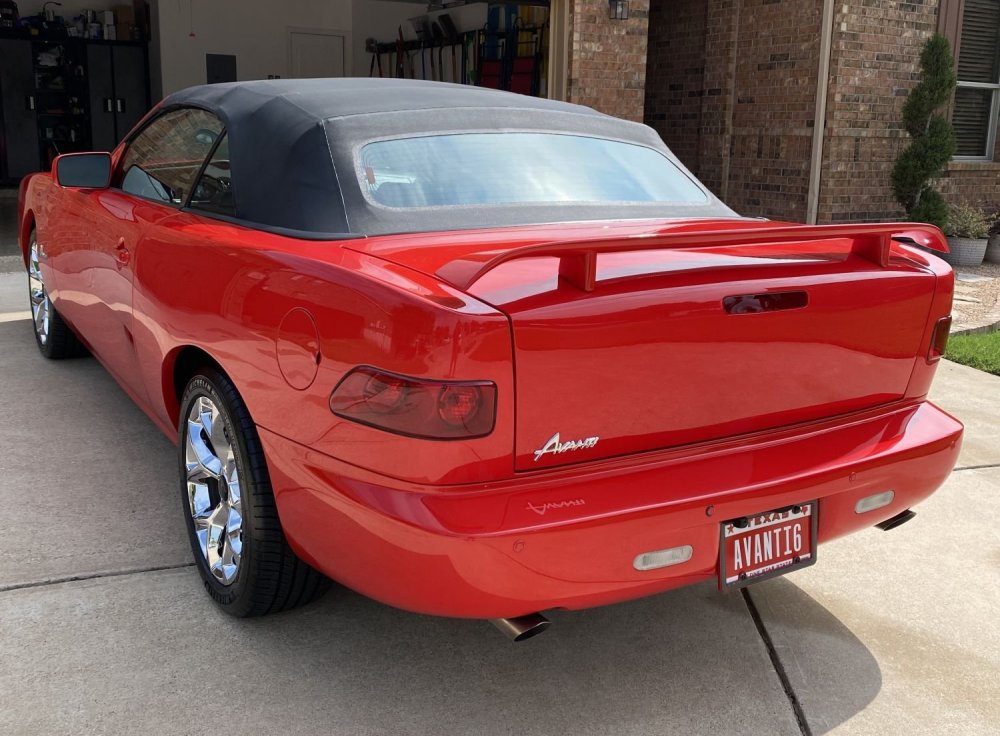
At Mustang Week Texas just a few weeks ago, we won an award for our 2006 Avanti being there. The event also gave me the opportunity to see a lot of different options for the back of our car. The Avanti trunk and rear fenders are completely unique when compared to the same year Mustang but the ideas you can get from seeing all the custom designs were incredible. I now knew that I wanted to add a rear spoiler to the car and this would be #1 of 2 changes that I’m going to make to the back of the car. I also knew of the complexity of making a 1 off piece, so I wanted to find a premade fiberglass spoiler that I could modify to work with the multi curved trunk. I bought and returned a couple spoilers that just wouldn’t work. After returning the last one, we had a chance to go to a large monthly car show in the Austin area. As I looked at the back of many different model sports cars, I noticed one that had a back end which was about as flat as our car. The other thing that I noticed was that some of those cars had flat top mount spoilers, edge mounted flip up spoilers and pedestal mount spoilers. Flat and edge mount were out due to the arch at the top edge of the Avanti trunk, but the pedestal mount was promising. I took my iPhone tape measure app and measured our car and the car that looked like it might work and holy cow, the width was within 1/2” of each other. After eyeballing the fender angles and spoiler design, I knew I had the car. 2016-2023 Dodge Challenger! The next day, I located an aftermarket factory design Fiberglass spoiler that was primed and ready to paint, so I ordered it. Once arrived, it was time to decide where to mount it and how much modification it needed in order for it to mount correctly to the Avanti trunk. I basically had to add 1/8” to 1/4" of fiberglass to the edges of the mount of the spoiler so it matched the curvature of the trunk and so that the edge of the side of the spoiler was gapped to the fender correctly. Here it is:


-
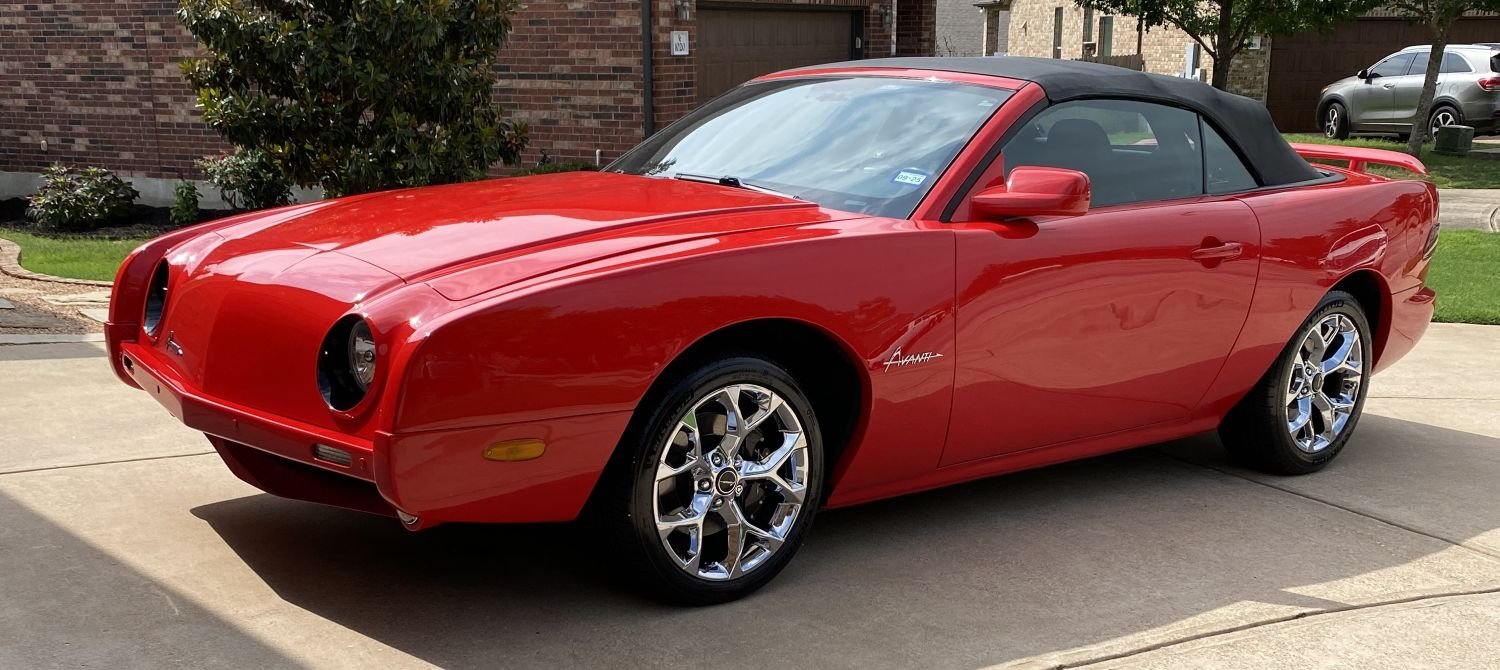
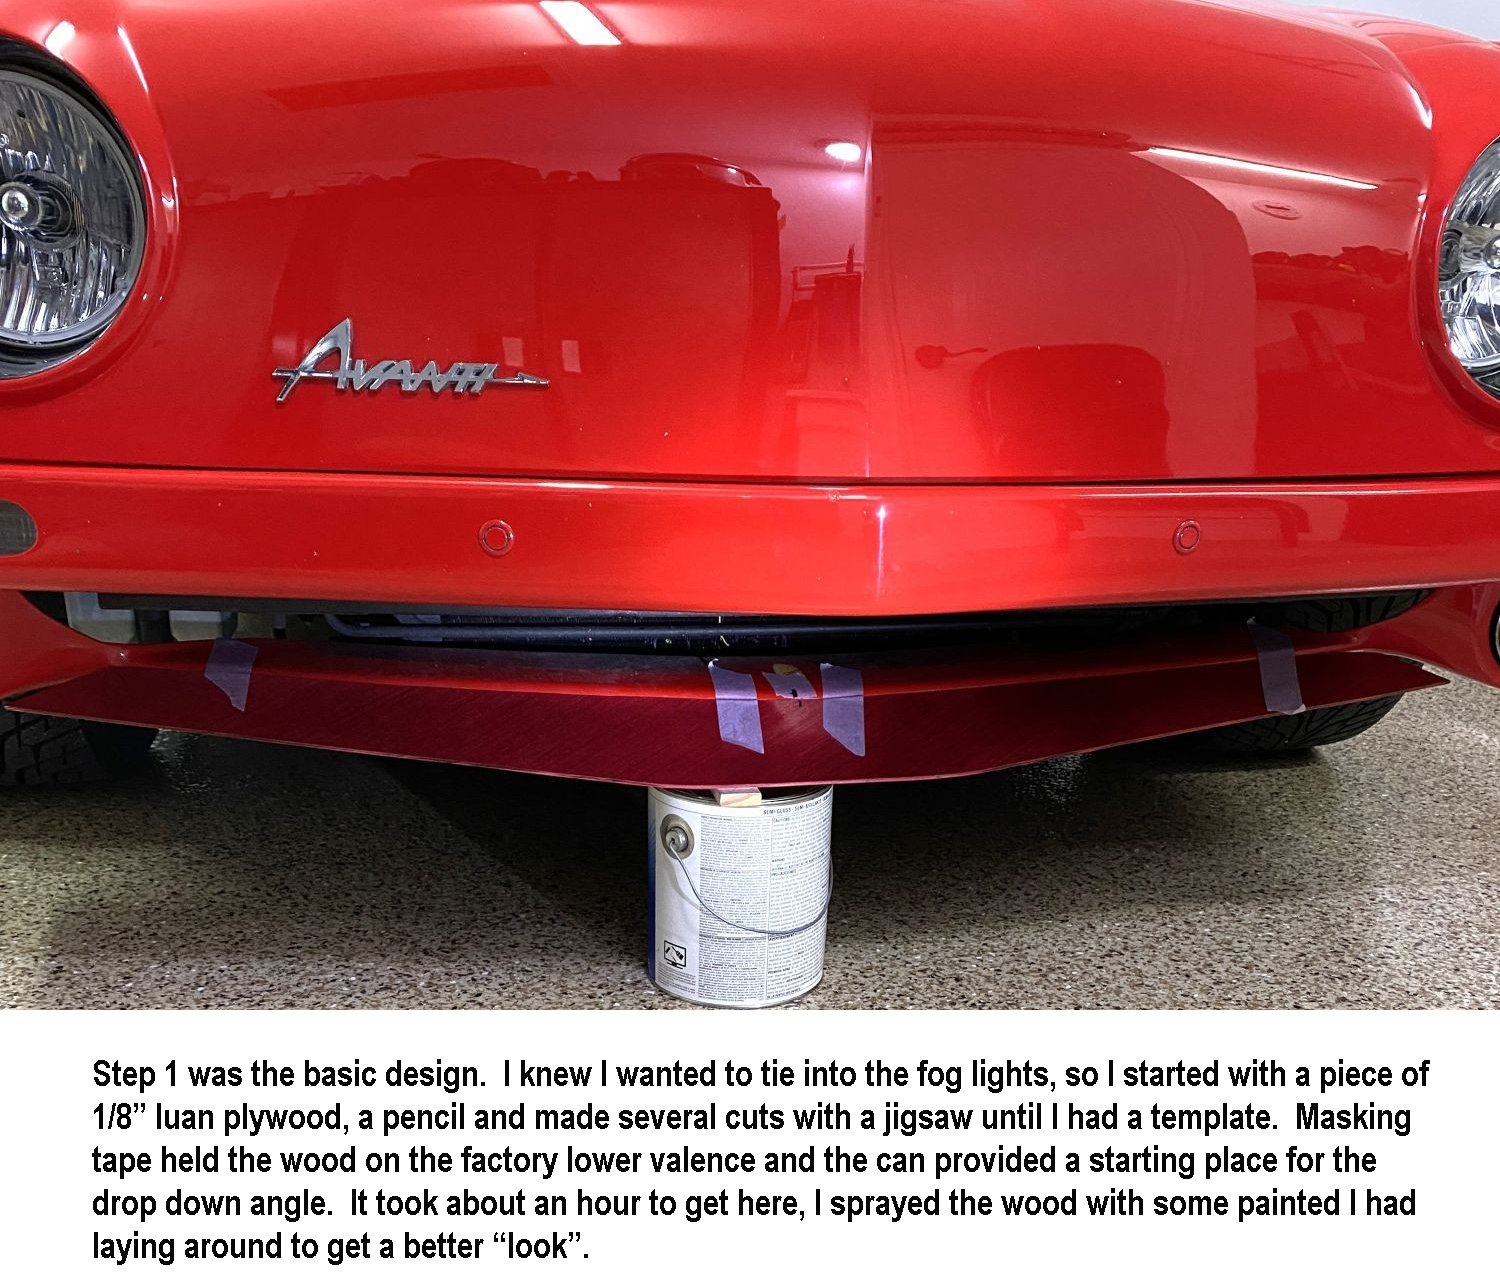
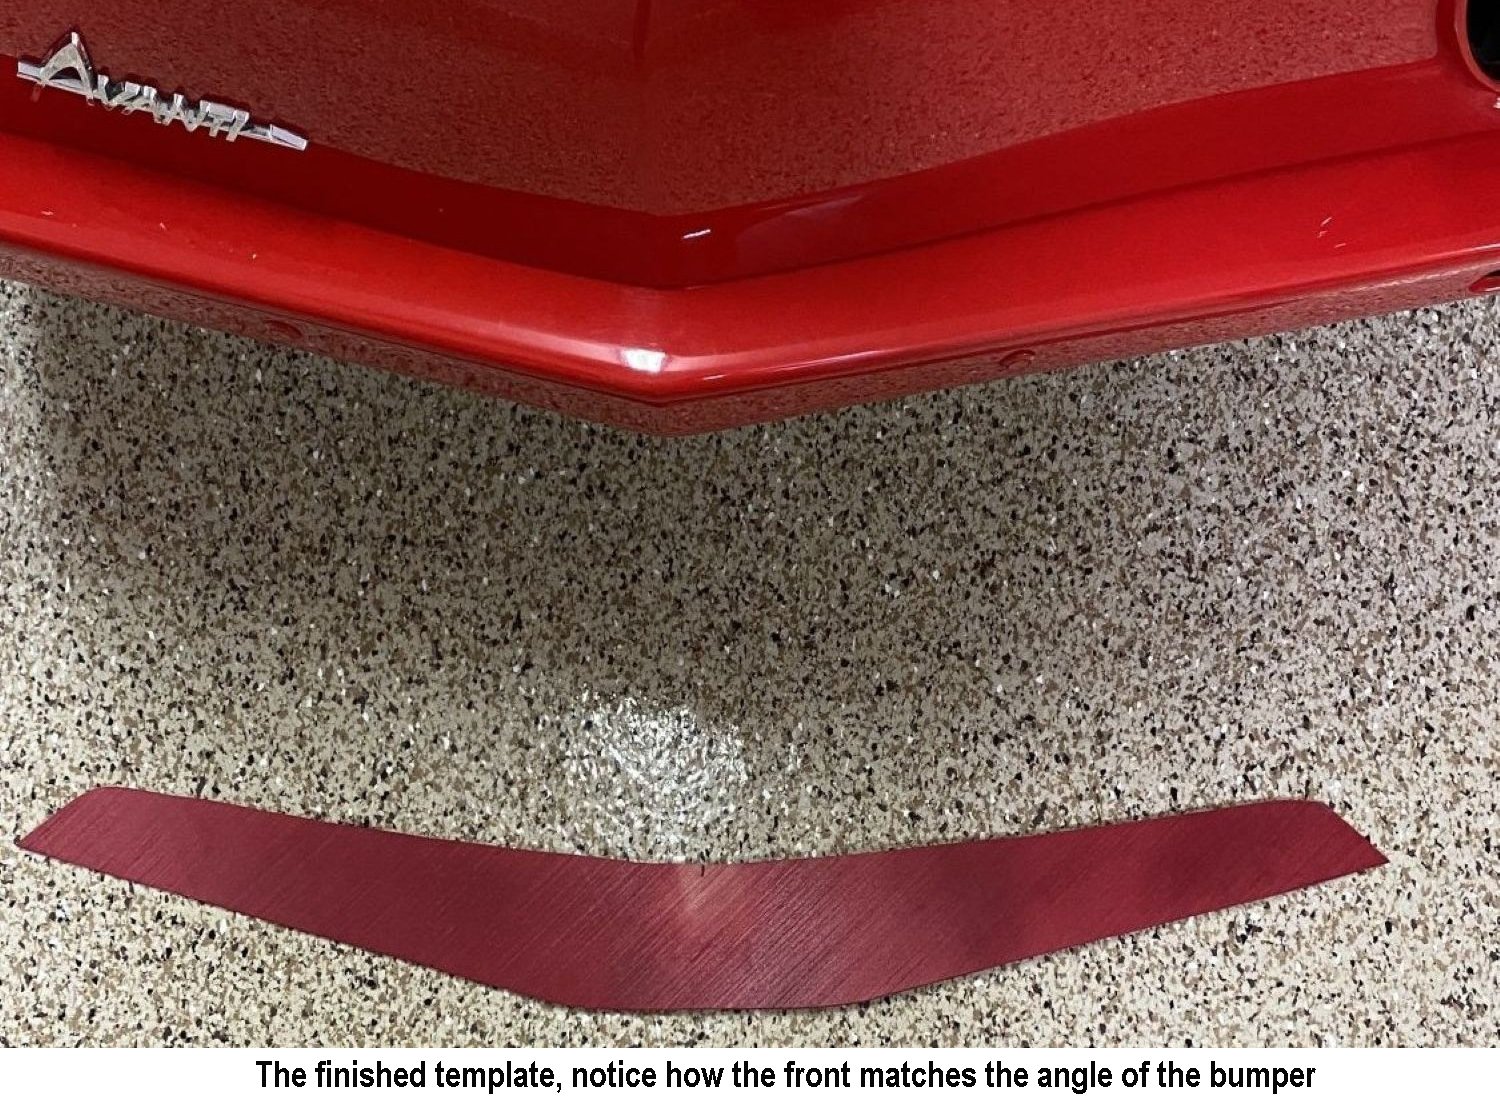
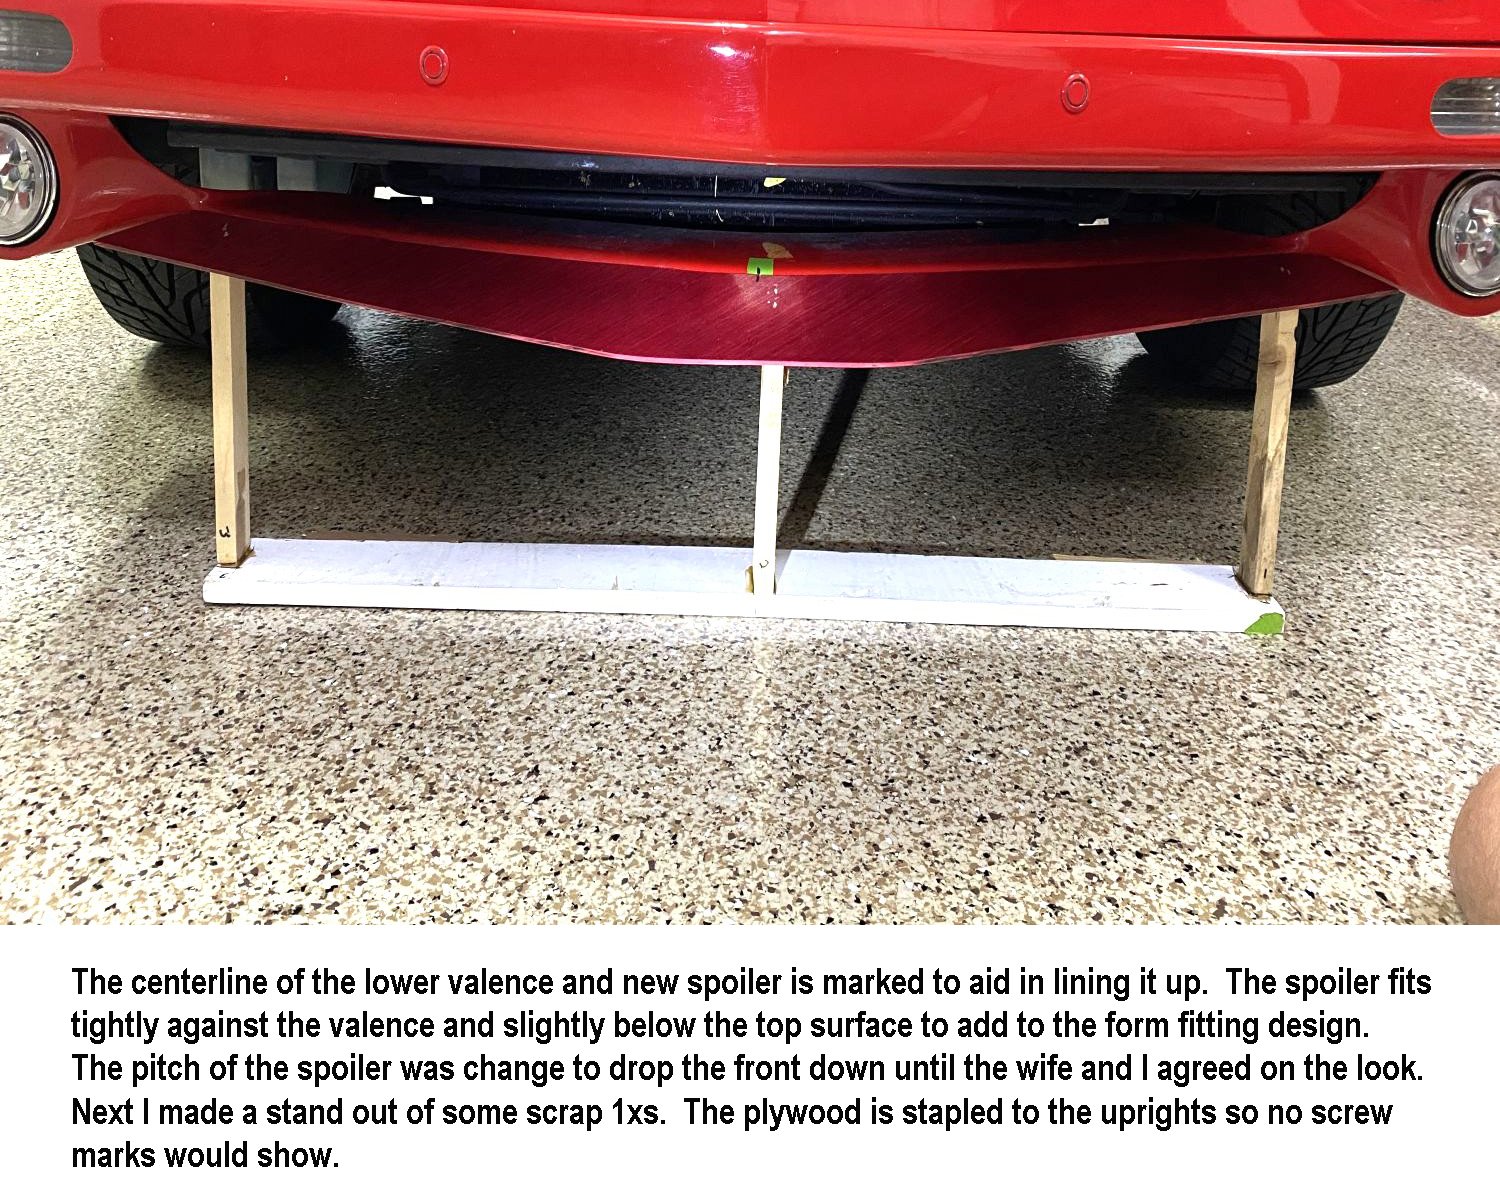
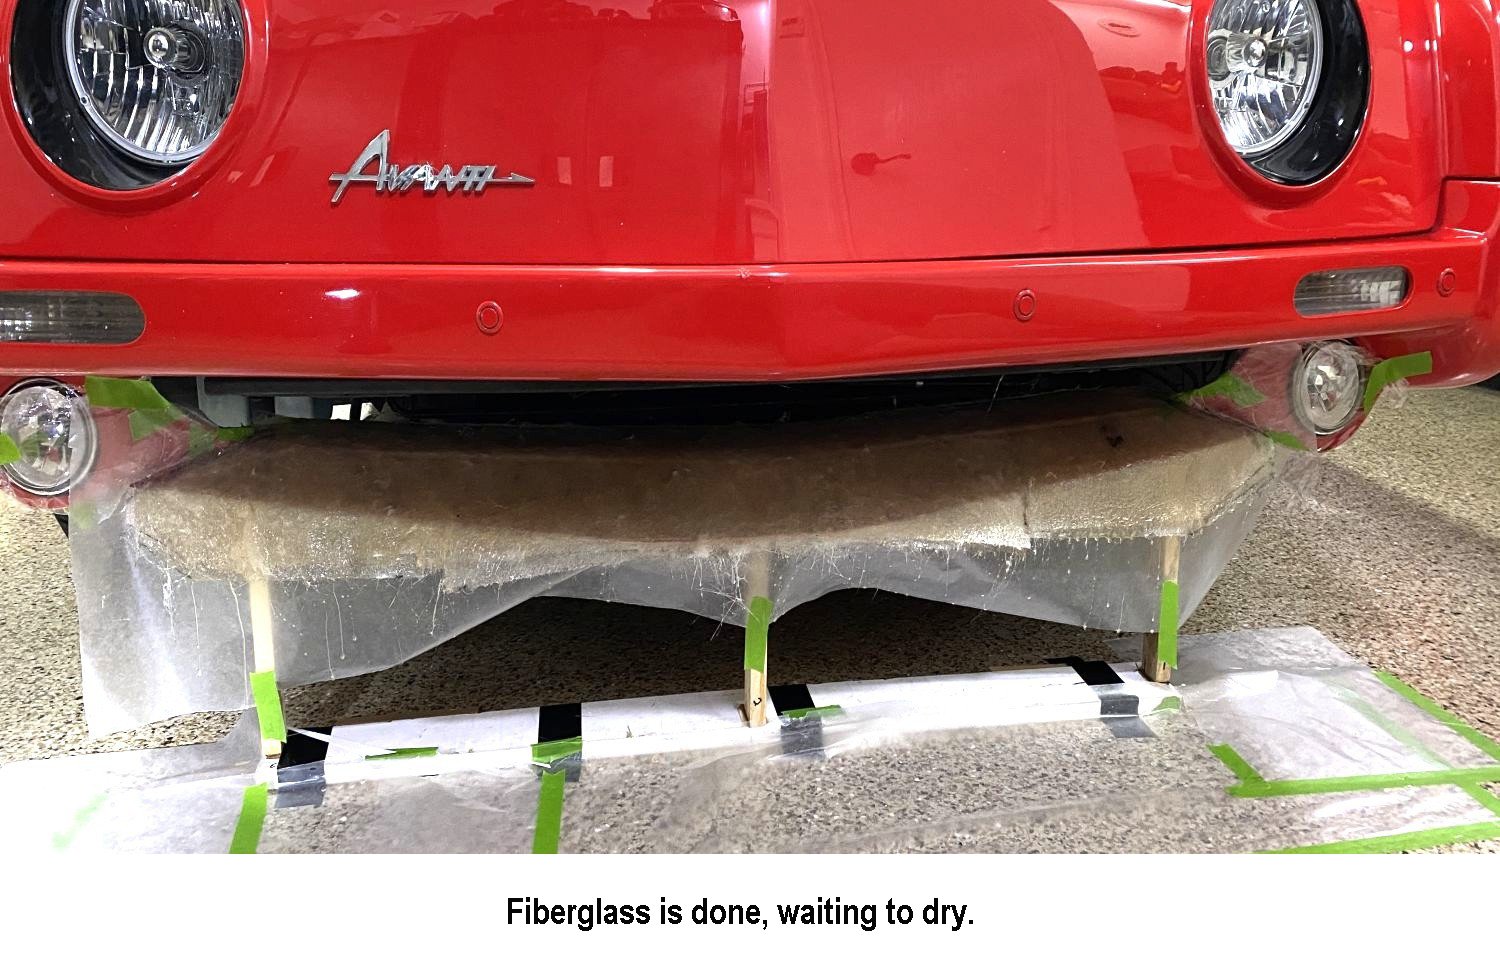
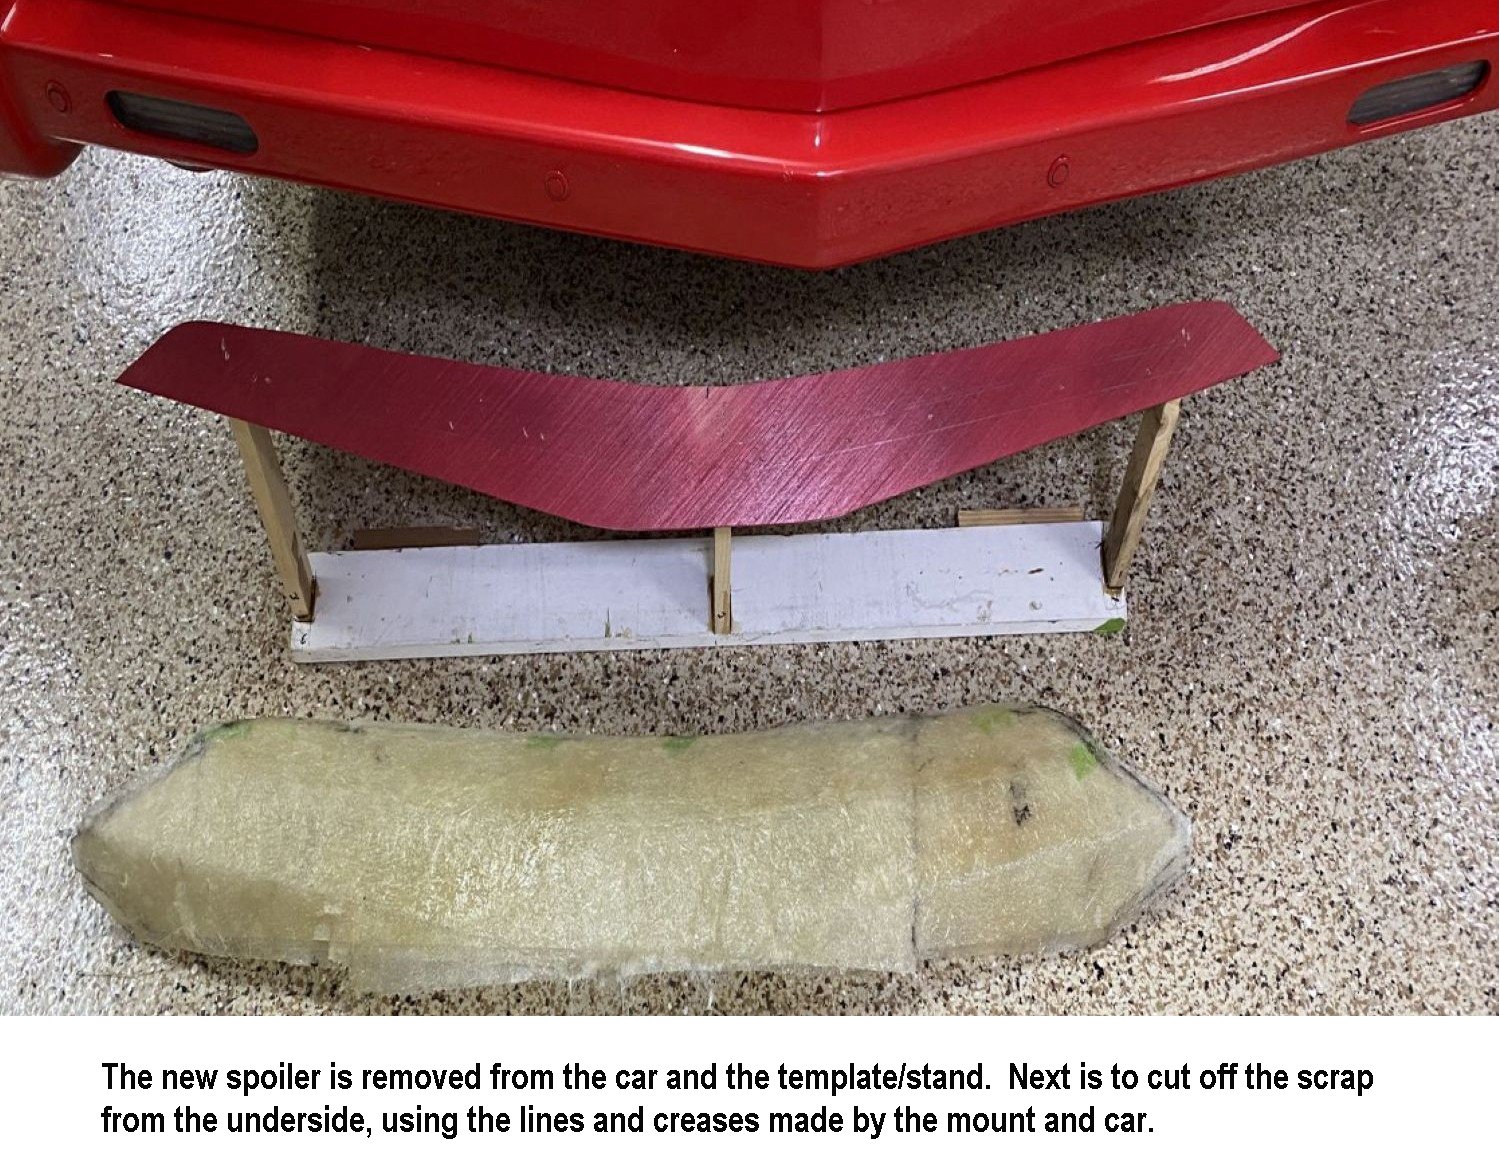
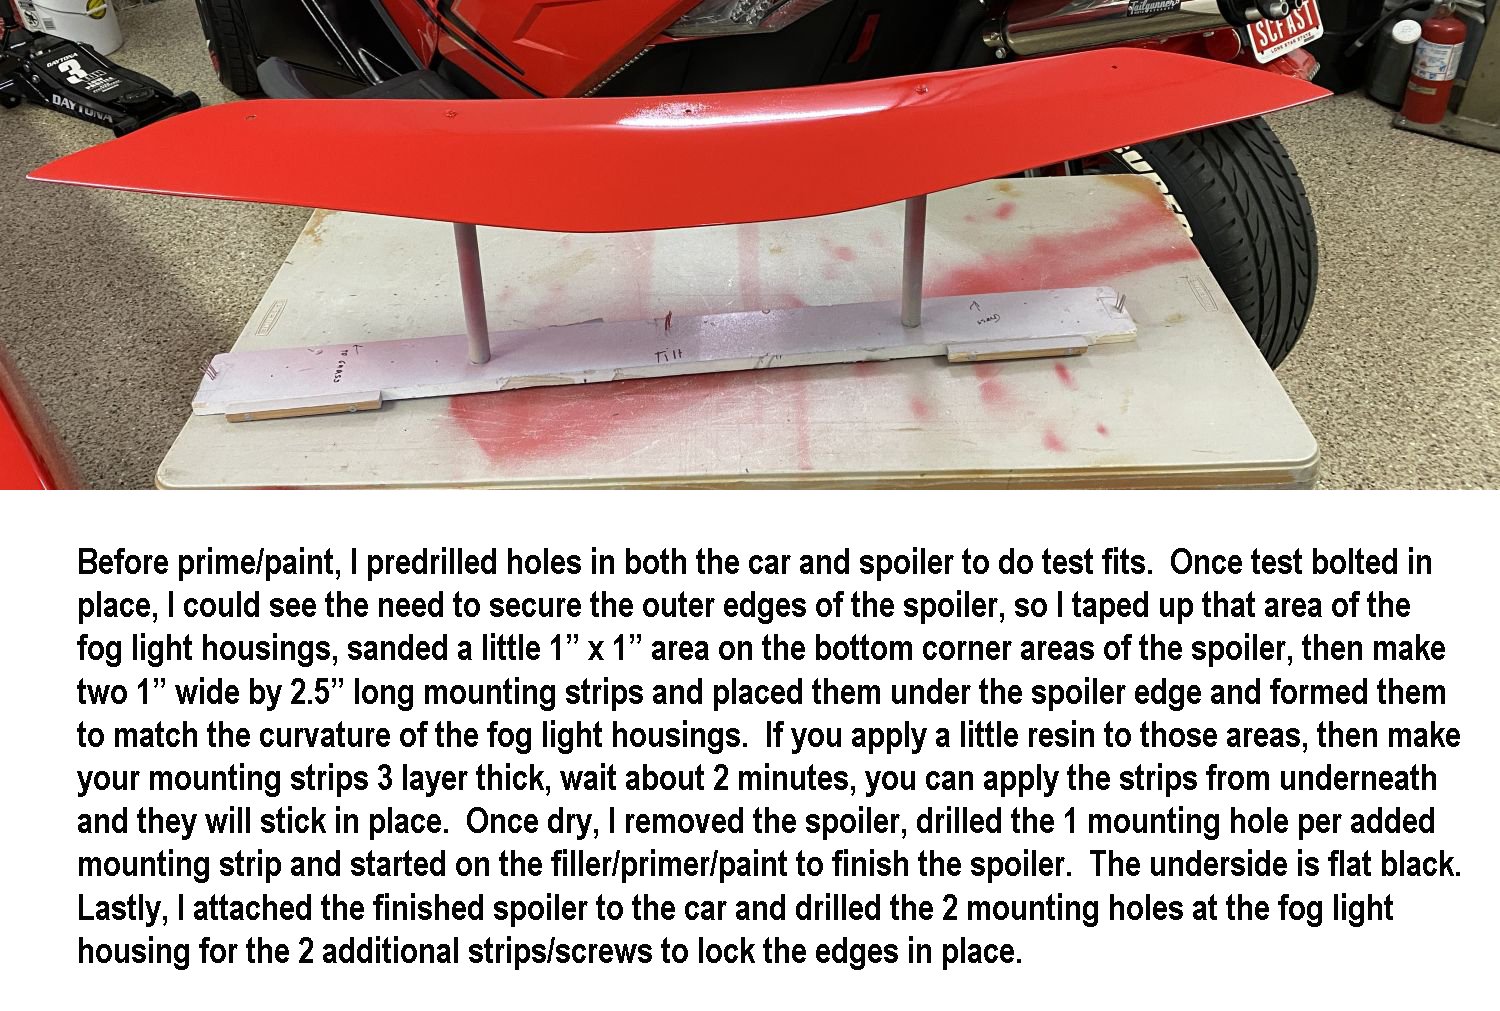
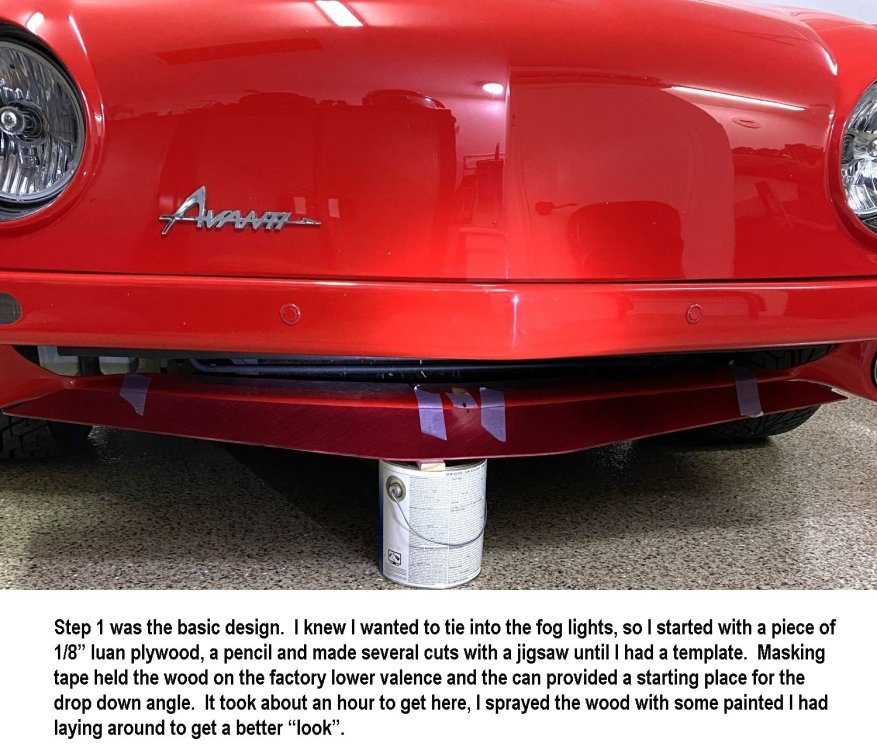
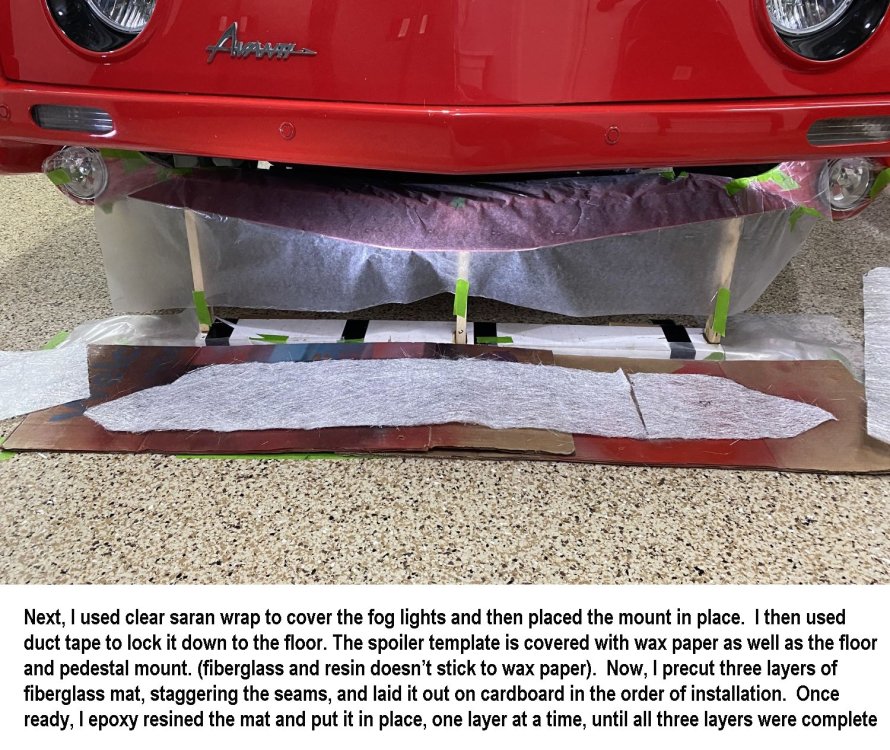
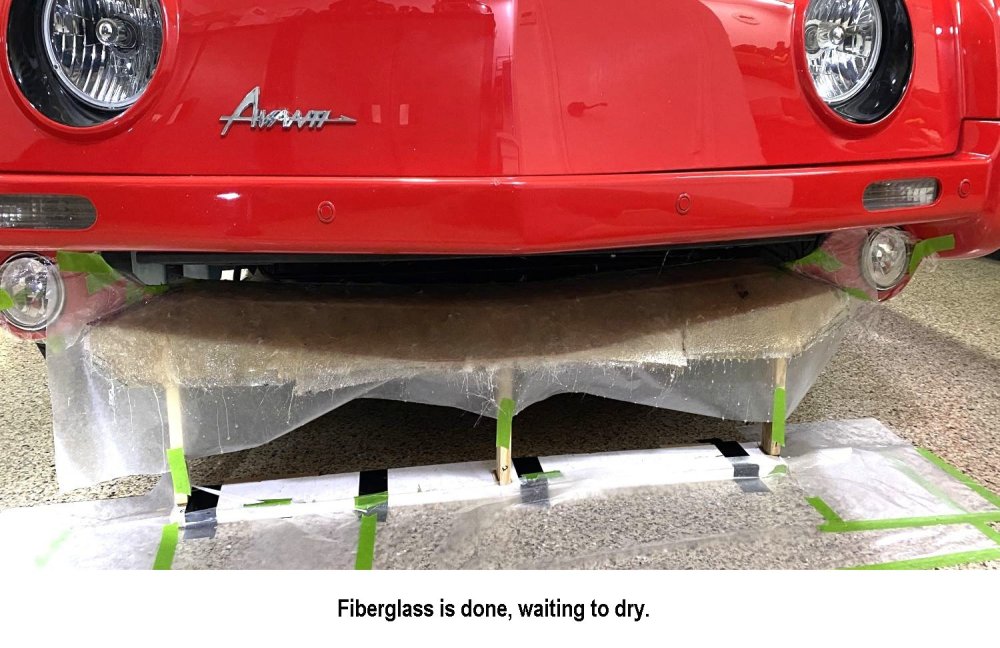
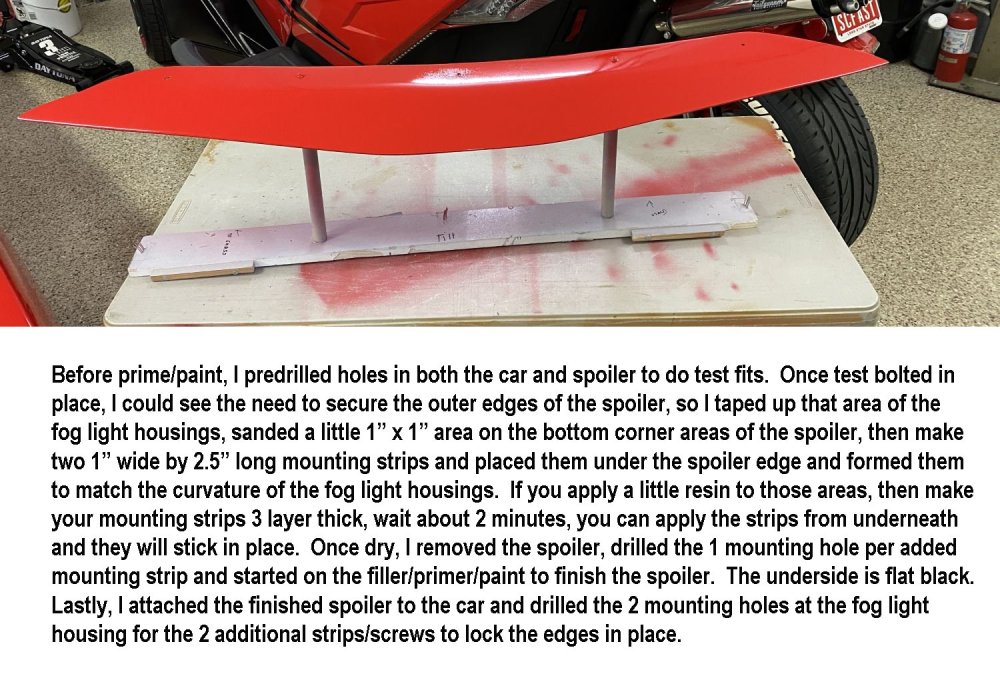
In the continuation of customizing our 2006 Avanti, I knew that the front-end design would look good with a front spoiler. Since the car was only made for 2 years, I also knew there wasn’t going to be any already made to purchase, so it was time to make one. It was important to keep the design classic and reserved, yet functional. The lower fog lights provided an excellent location to place the edge of the spoiler so it looked factory. The spoiler would mount to the top of the lower valence piece with 5 bolts and the edges would mount to the Fog Light area so there wouldn’t be any chance of vibration. Here’s how I did it:


-
Maybe I was just more impressionable at twenty years old but it sticks like glue in my memory. I’ll bet you were in your younger years when that tri power GTO made its mark in your memory?
-
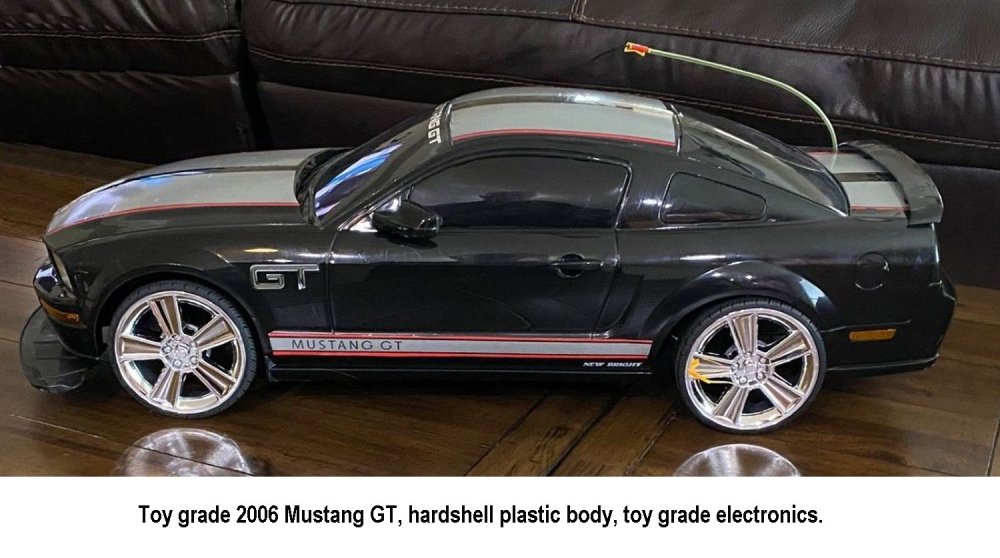
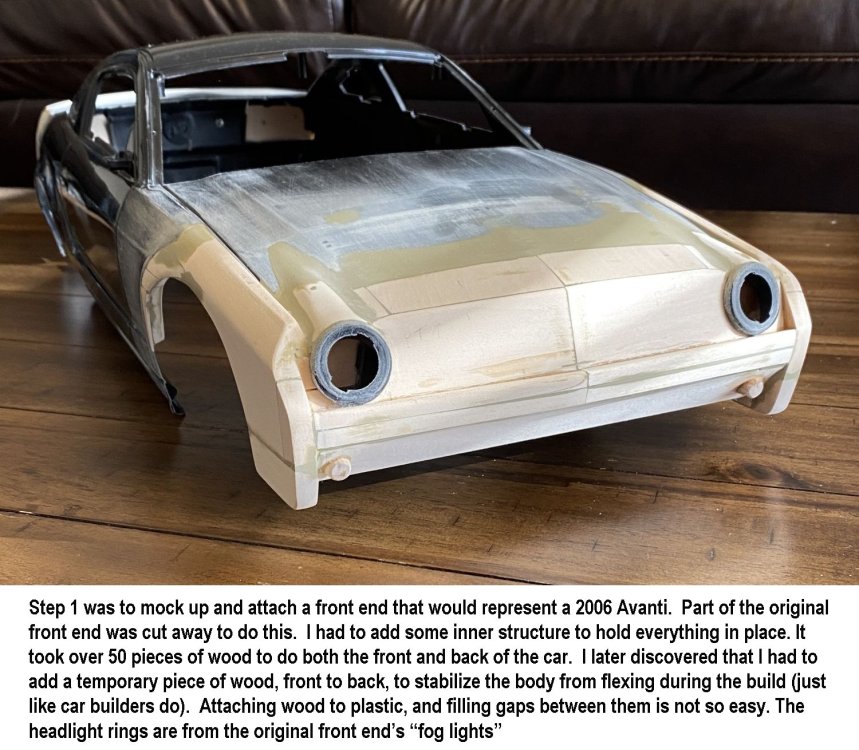
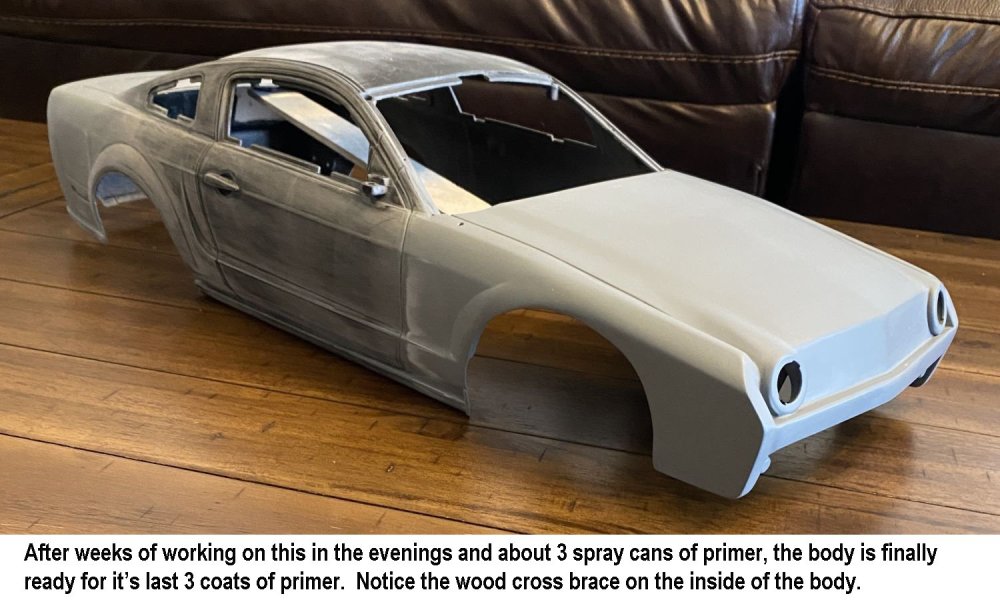
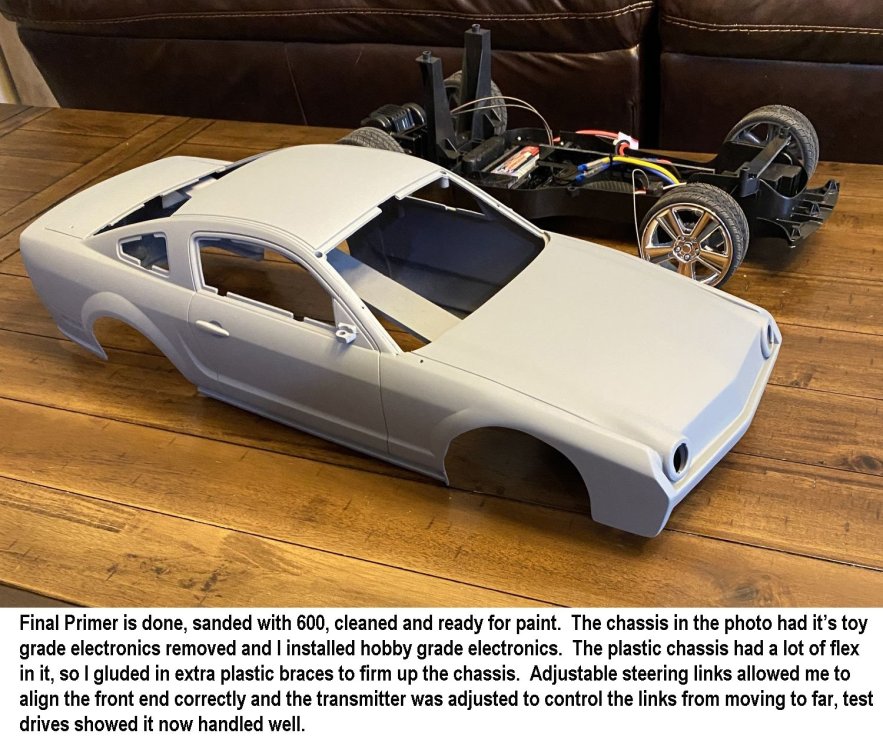
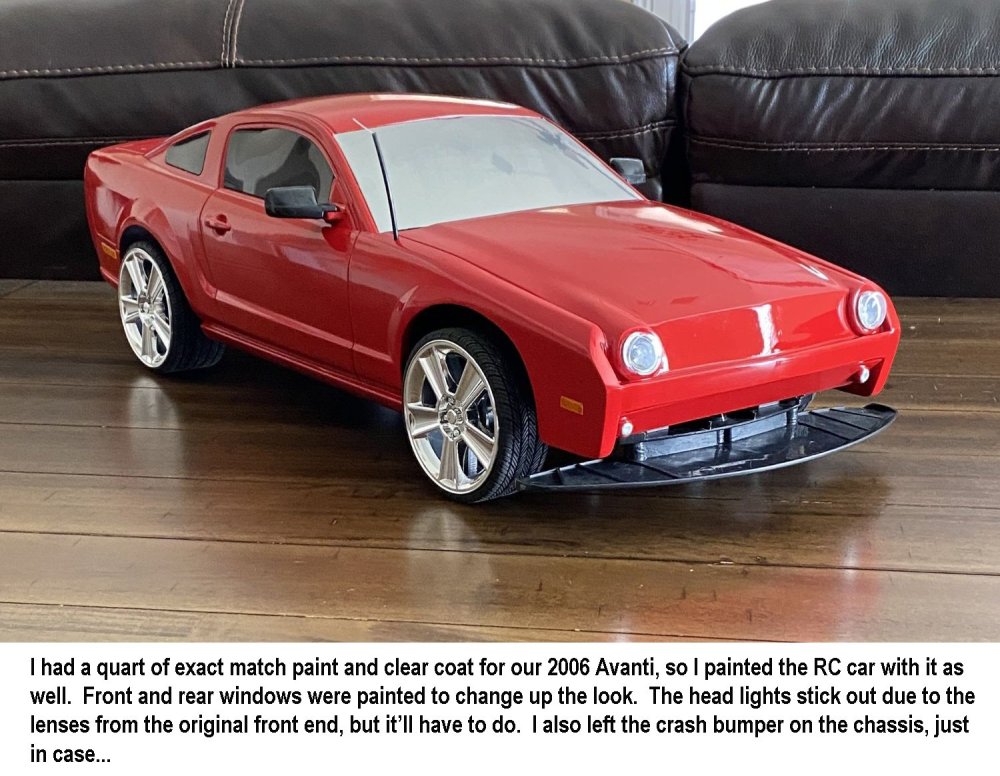
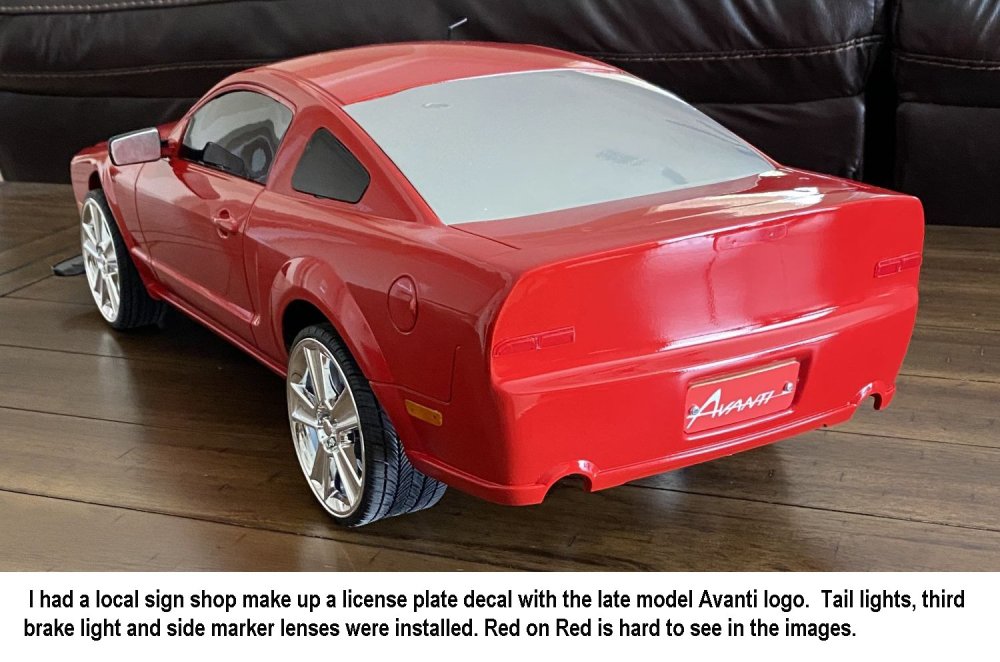
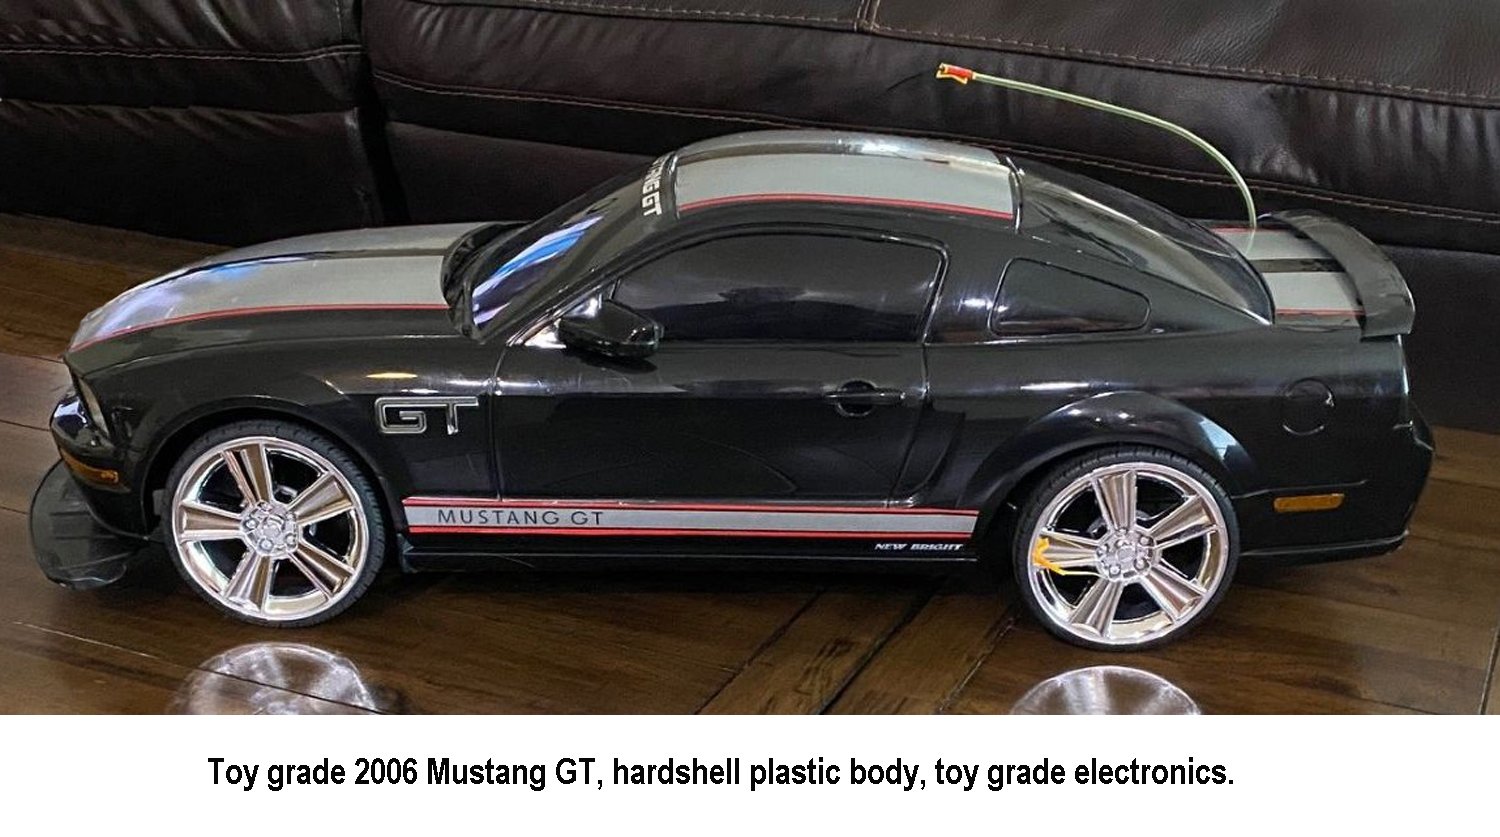
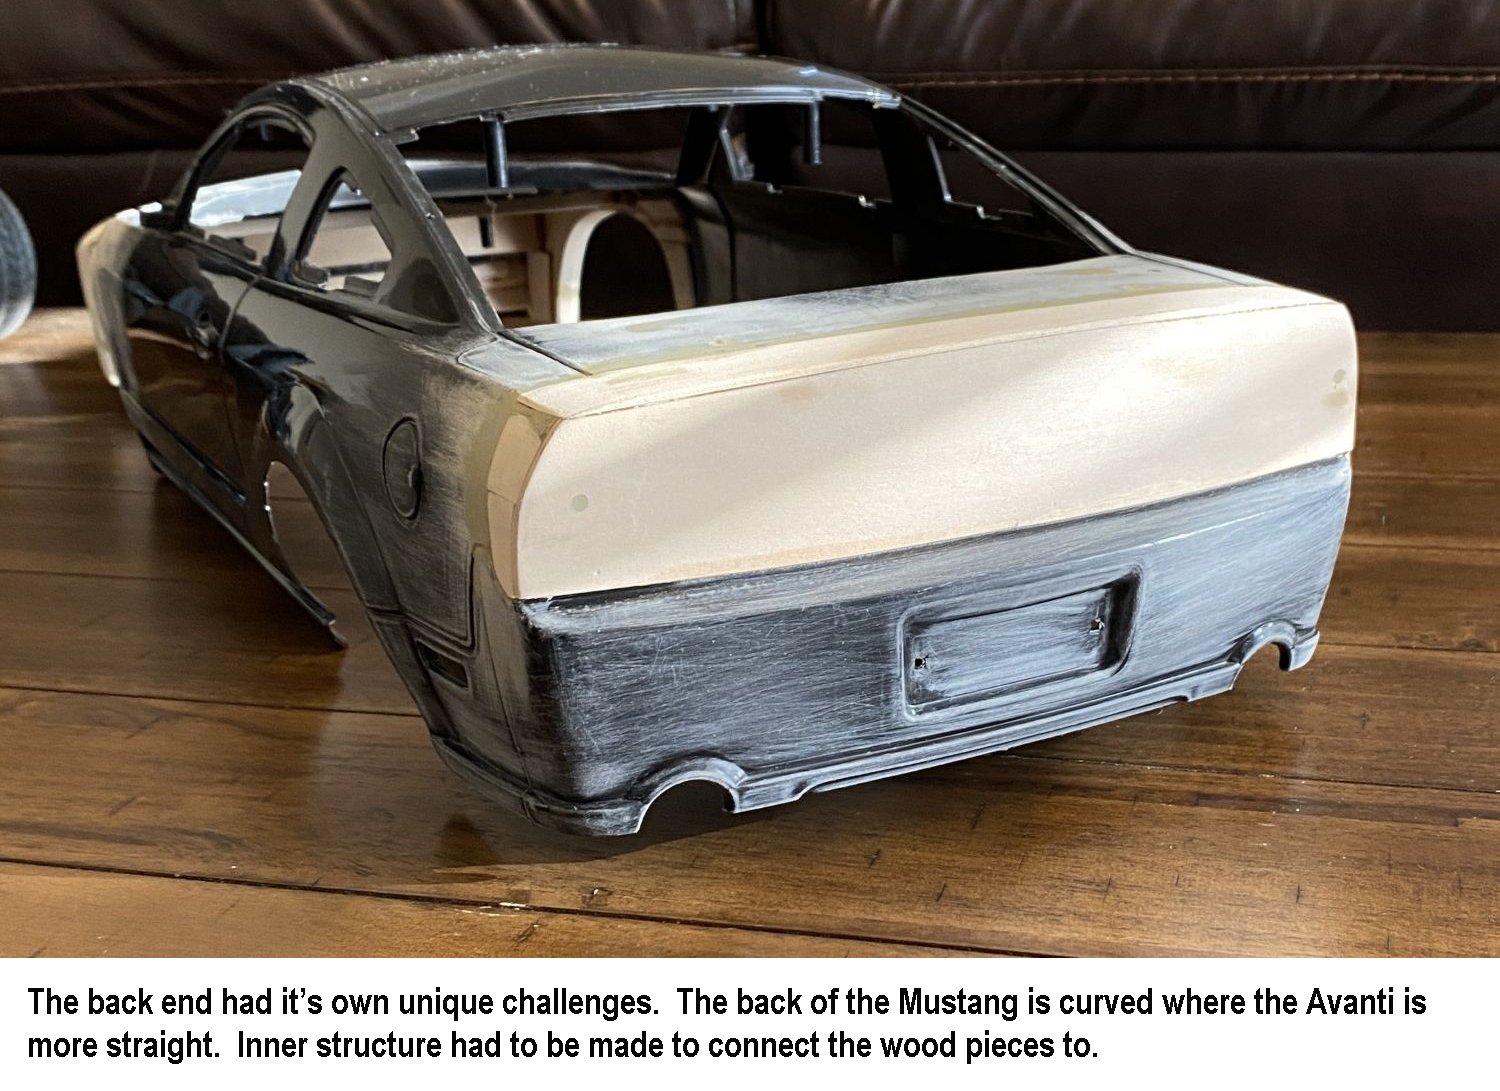
As I continue my customization of our 2006 Avanti, I thought to myself one day that if Avanti Motors could take a 2006 Mustang GT and convert it into an Avanti, then could I do it with a RC Car? And I didn’t want to do the standard 1/18-1/24 scale car, I wanted a larger one. So I started my search and eventually found an original, new in the box, 2006 Mustang GT toy grade 1/10 scale car. The plastic body on these were much thicker than today’s Lexan, so I figured it would be an easier car to work with. At 27” long, it’s pretty impressive too. The seller of the car was a collector who had it for years and was selling off his toy collections, so I was just lucky in my search. The only 2 negatives that come with an old toy grade car is the cheap electronics and thin brittle chassis plastic in parts of the chassis areas. So, I upgraded the electronics and added some pieces of 3/16” black plexiglass that I had laying around, to beef up the chassis while making a battery box, etc. It took about 3 months of off and on evening work to pull this off. Check out the build…