

Jim78
-
Posts
273 -
Joined
-
Last visited
Content Type
Profiles
Forums
Events
Posts posted by Jim78
-
-
6 hours ago, wildfelr said:
RQB3263....looks like you added a second socket ....VERY NICE....these sockets are available at Car Quest cheap,,,,
Yep. WAAAY too much time on my hands.
 Retirement is wonderful!

-
6 hours ago, grobb284 said:
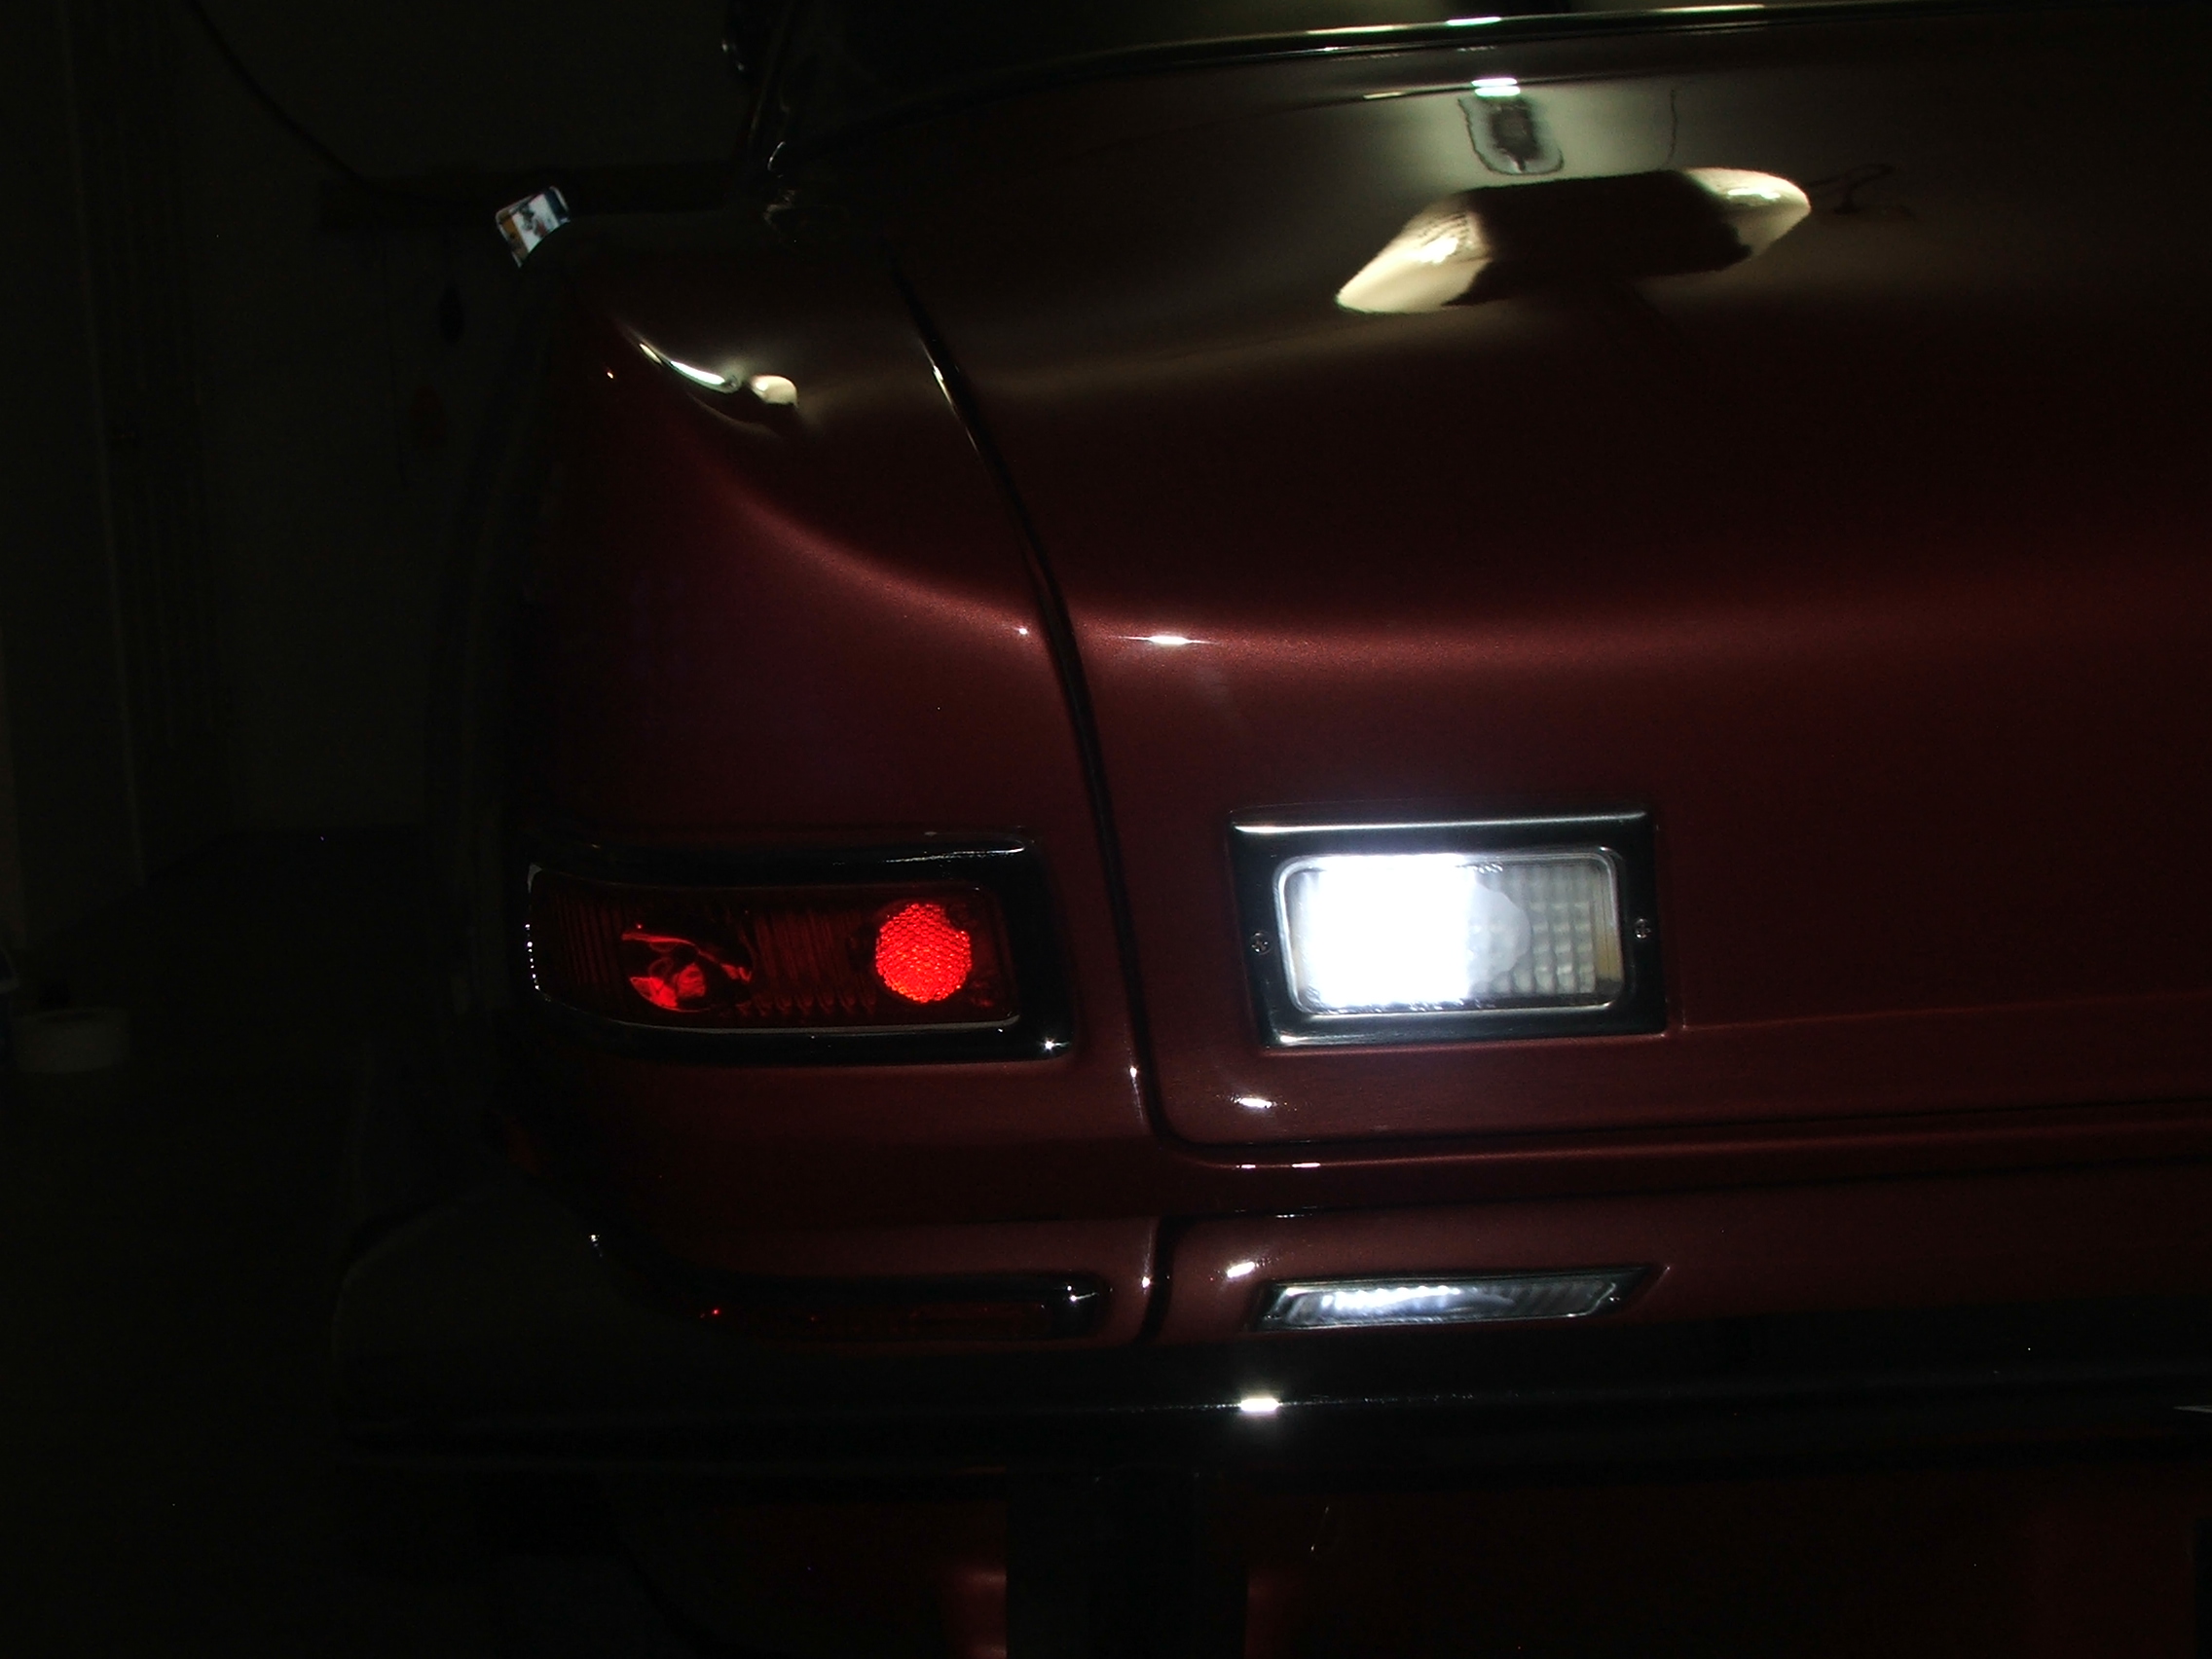
So, do you power the white grid only for backup, red grid for braking, or do you power both at the same time? Any photos when lit?
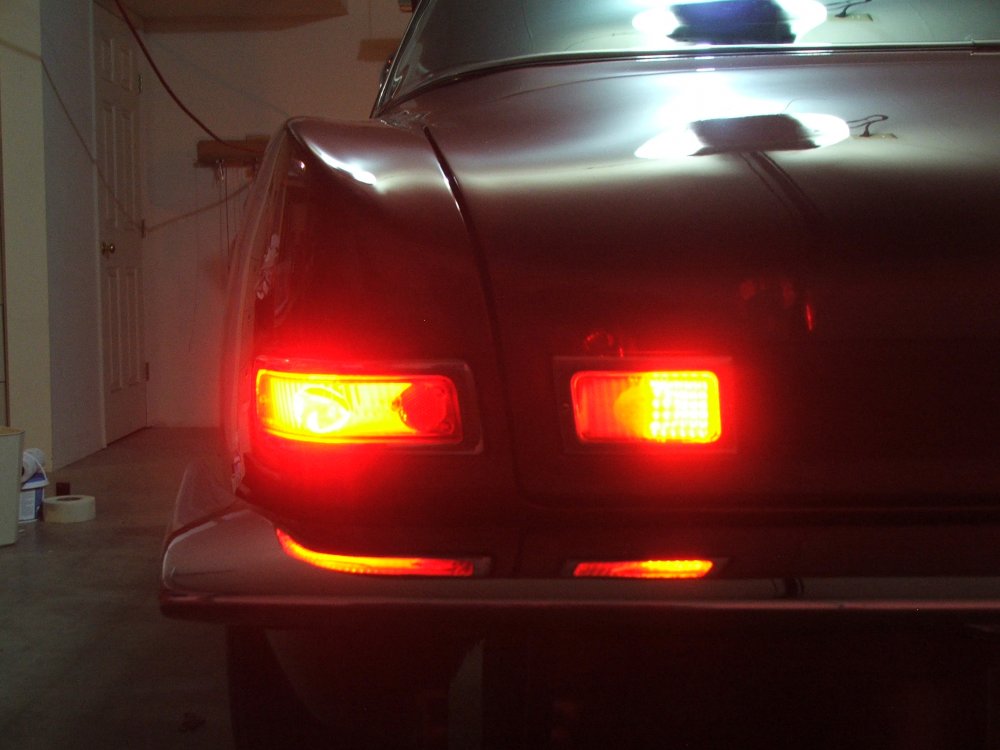
The white grid functions the same as the original B/U lights. The red grid has two levels of brightness, and functions the same as the original tail lights. It's a little hard to photograph, but here's what it looks like. The 1157 LED bulbs that I'm using in the original lights work very well. There is a link to these in my post above. FWIW, superbrightleds.com is currently running a 15% off sale on all merchandise if you use the promo code HOLIDAY17 at checkout. I've been using their stuff for various automotive and industrial applications for years, and have been very satisfied with their quality.

-
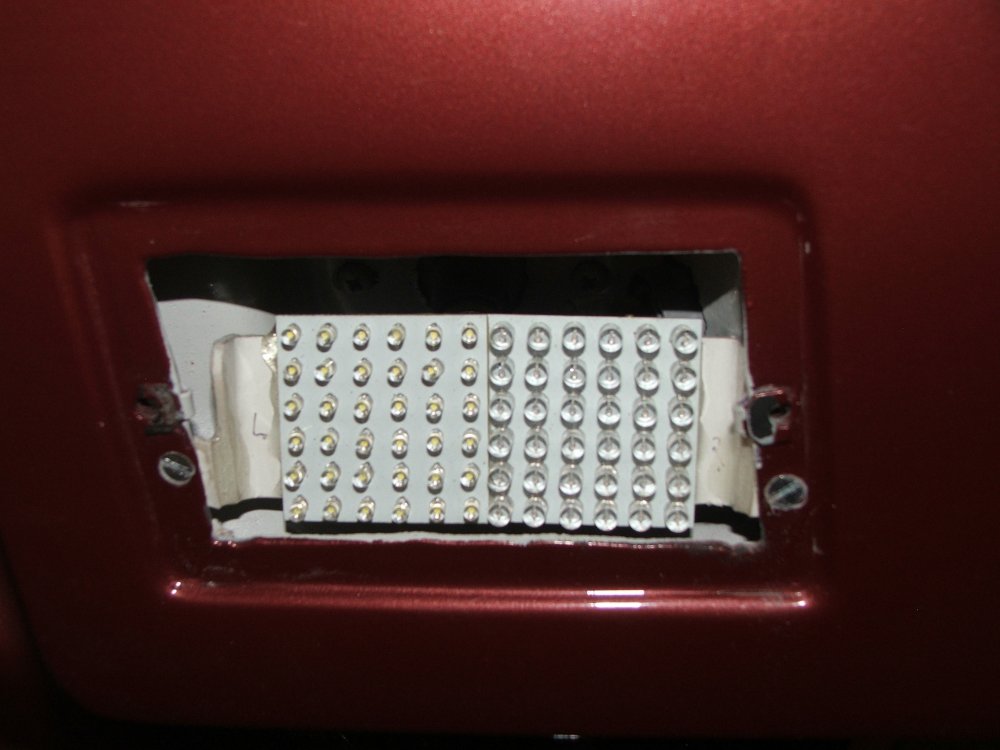
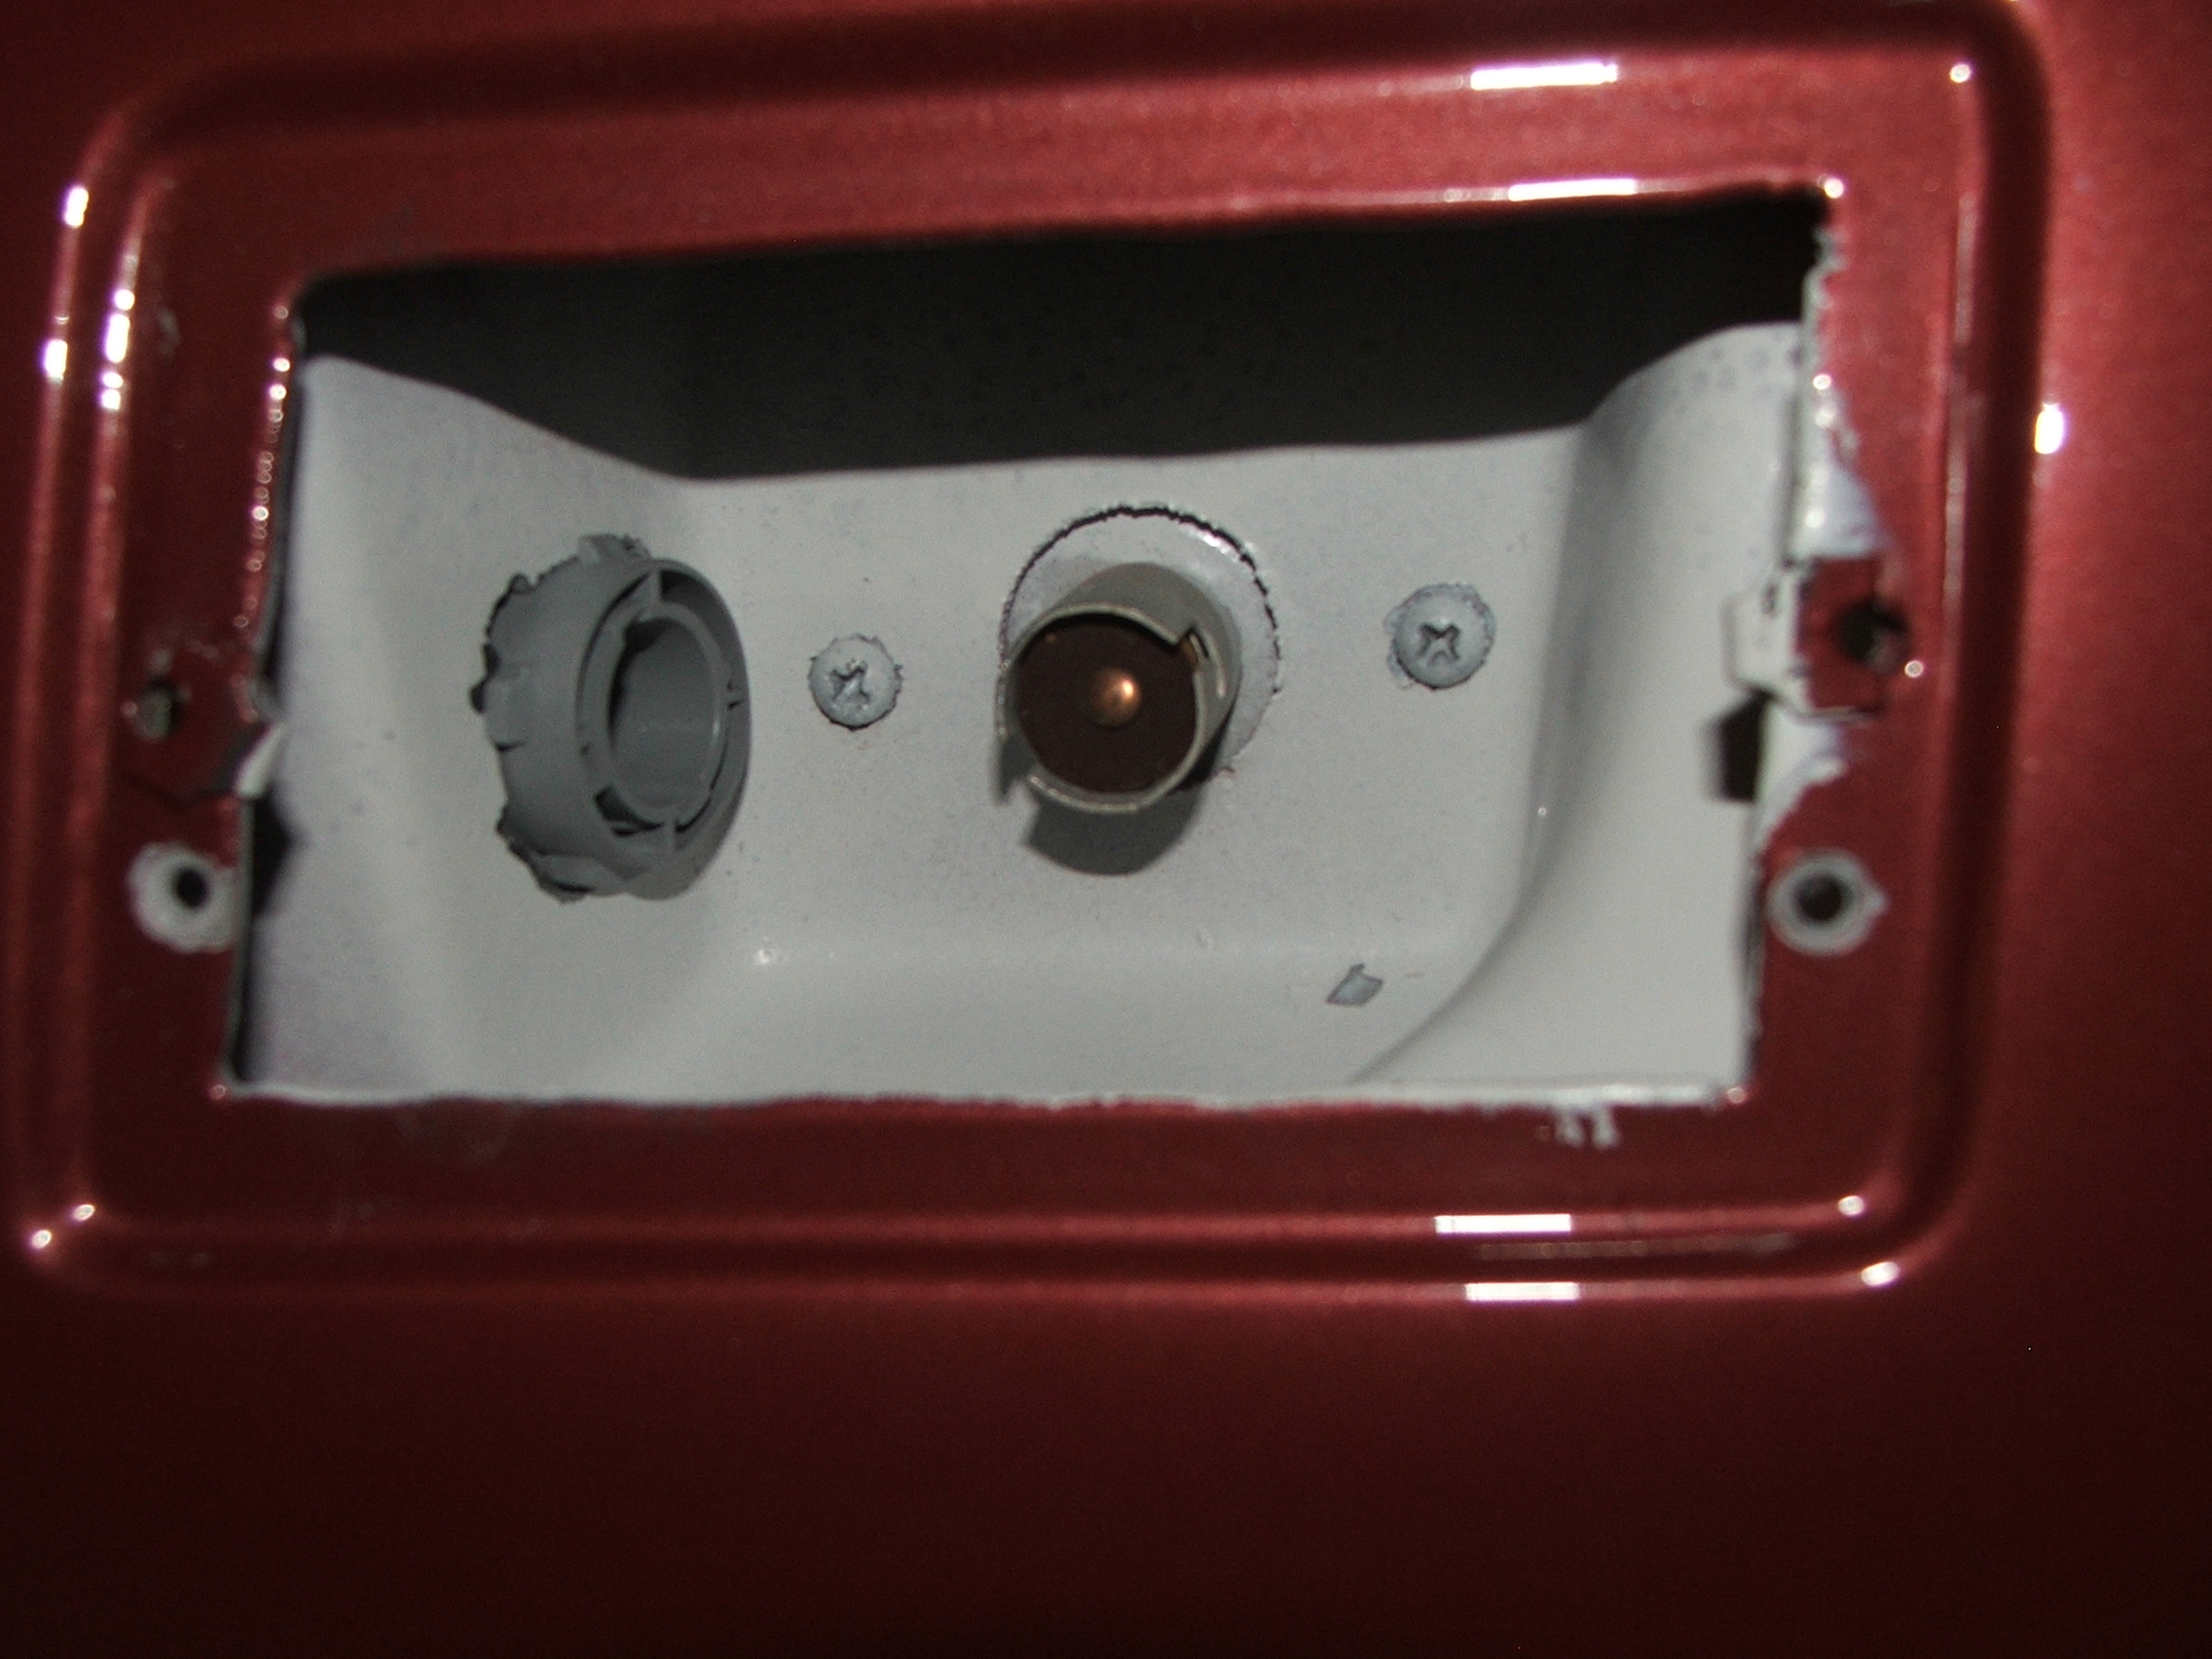
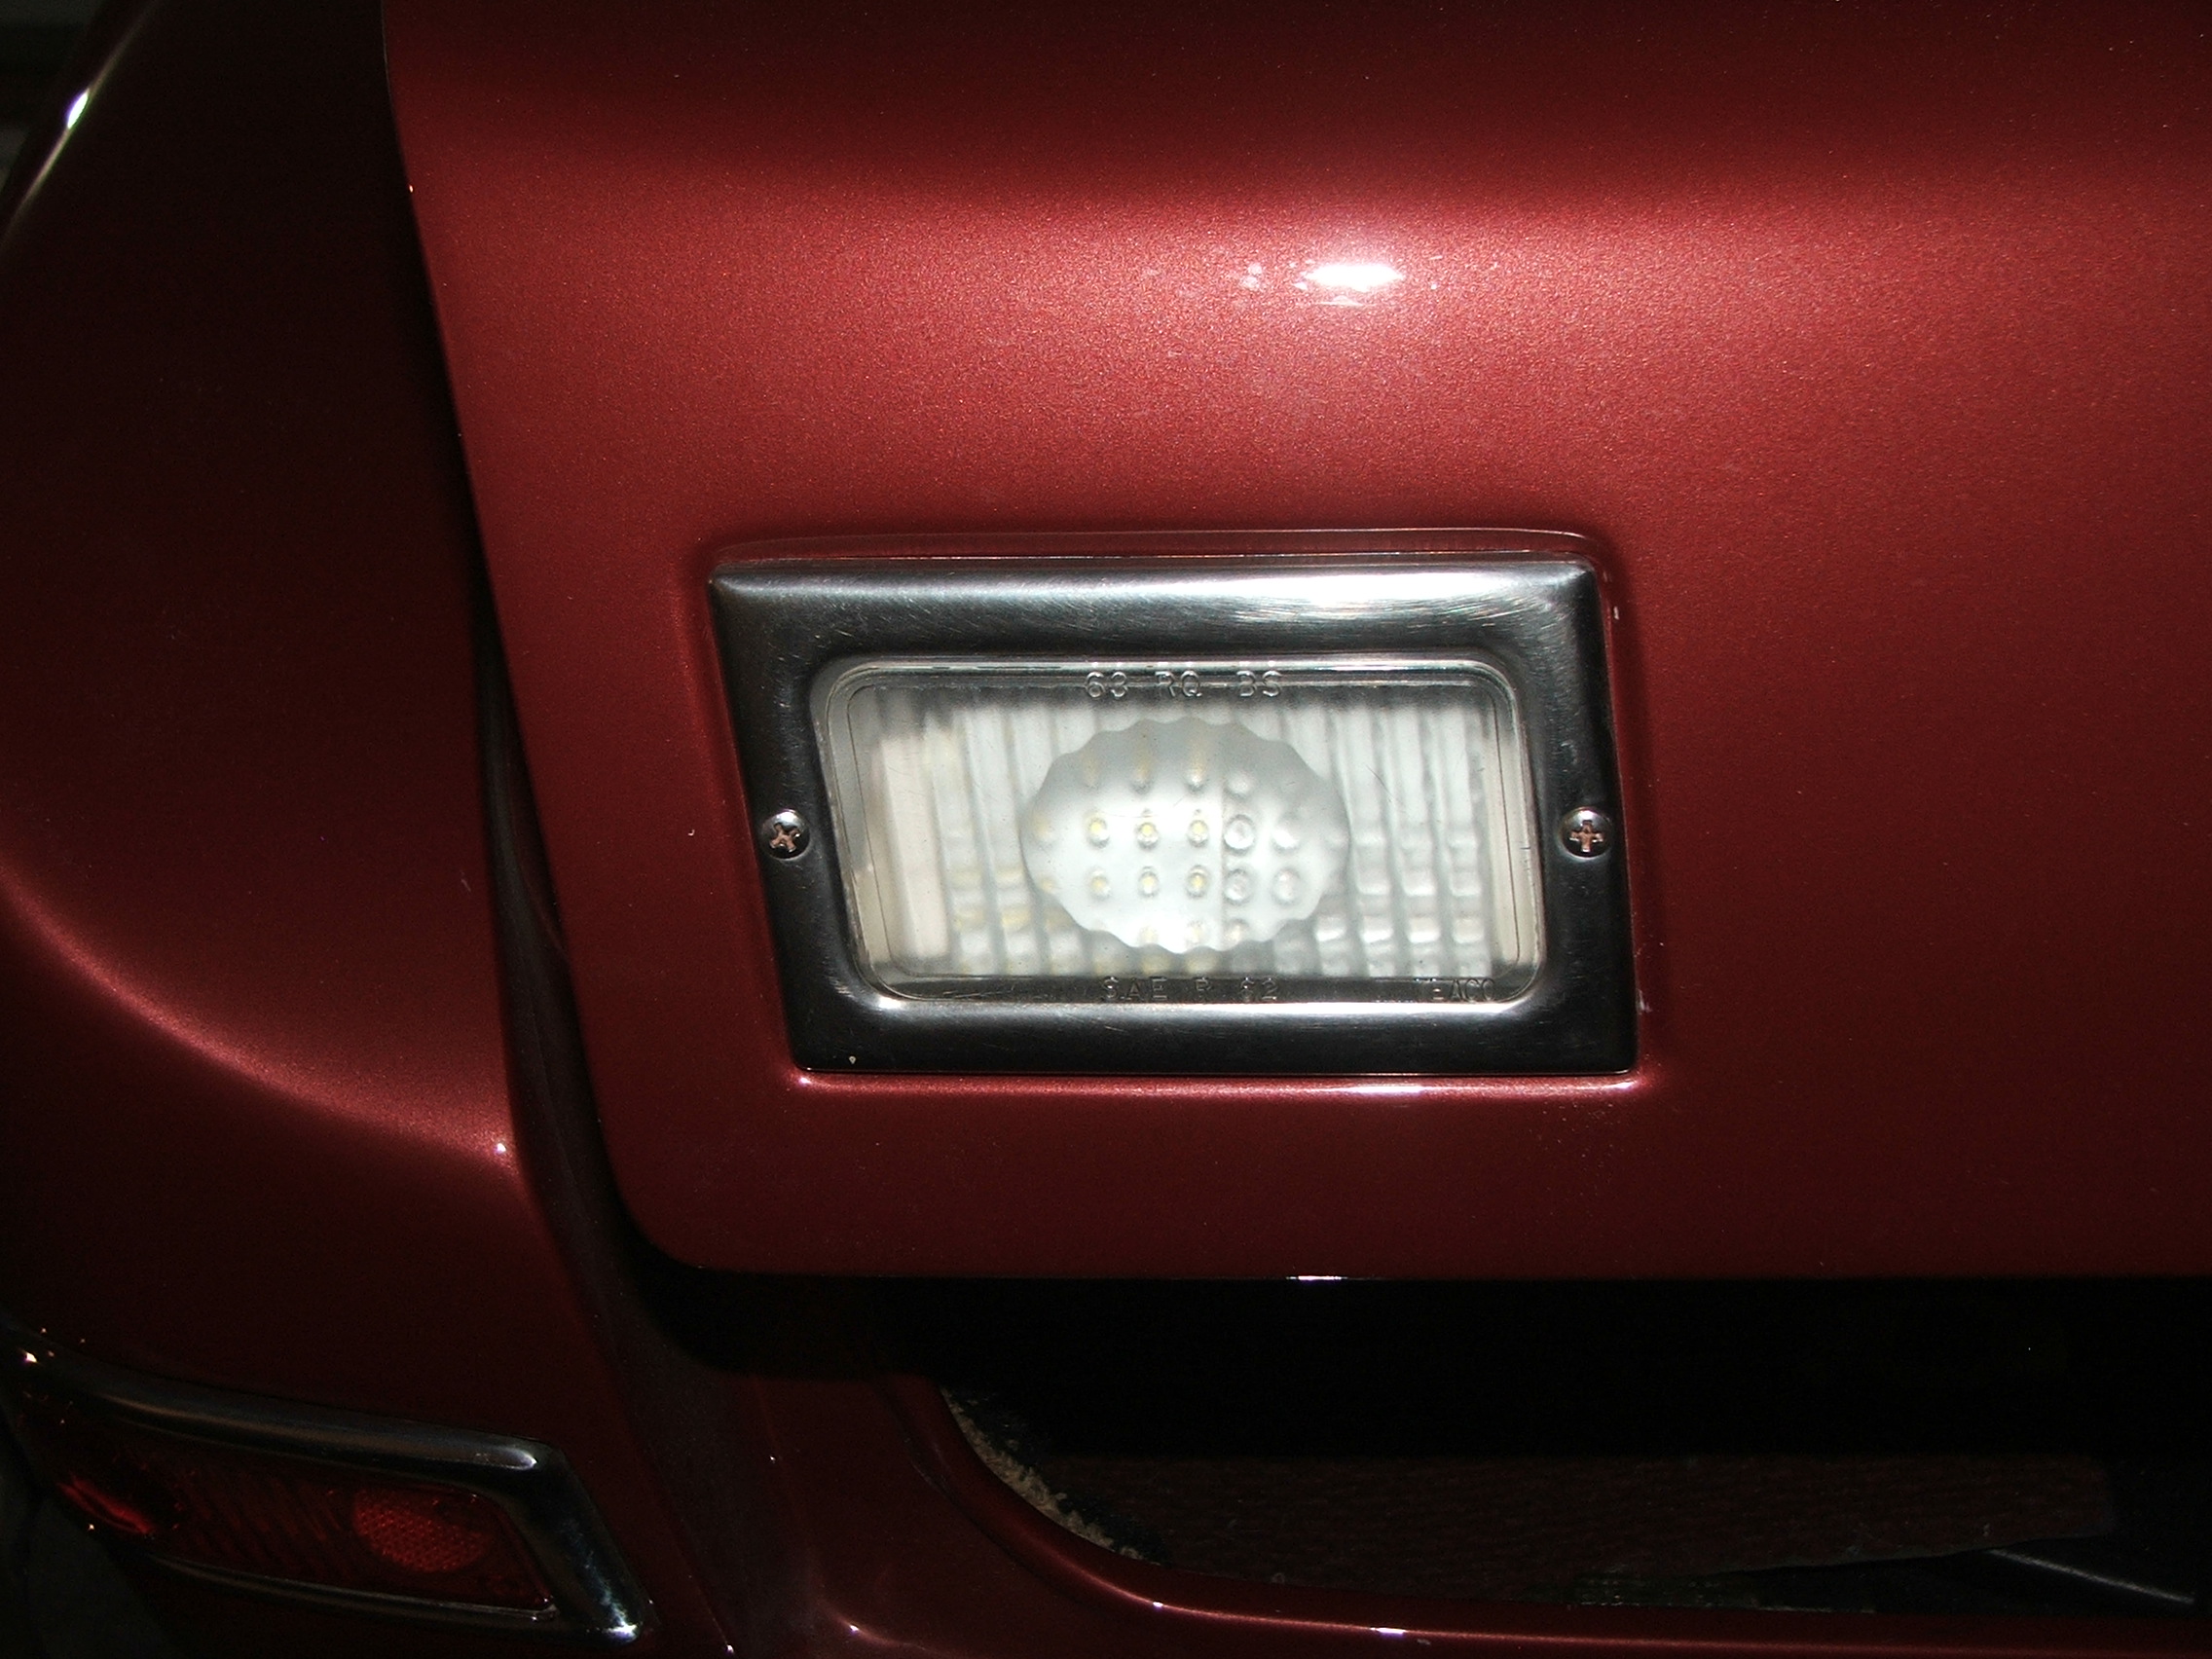
I took a different approach to adding tail/brake lights. Wanting to retain the original appearance, I built LED lights that are half white, and half bi-level red. These are 36 LED grids from superbrightleds.com So, I still have back-up lights, but have more red.
For the existing taillights, I used :
These work well with the angled sockets, and give good omni-directional light.


-
Bob's site is an amazing source of information. Thanks, Bob, for all of your work to put it together!
-
OK, I'm starting to get a clearer picture of what you're describing. How do the other detent positions feel? If all are "soft", it would suggest a bent or broken spring. If the rest of the positions "snap" in, it would suggest that there is an issue with the comb. When the lever is in R, and you push it into P, is there the same resistance that you would feel between other positions?
-
There has been some recent discussion of using an electric power steering unit, as would be found in most new cars. It looks like this would be a reasonable alternative to the old hydraulic system, with fewer issues than installing a rack and pinion.
https://shiftsst.com/store/electric-power-steering/studebaker.html?mode=list
-
8 hours ago, dynolou2 said:
If you go to remove USE caution as it can and has been proven to fly and disappear into the darkest corner of my shop. Lou Cote
BTDT, Lou!
If moving the external arm allows 6 positions (PRND21), the comb and detent ball are probably OK. Needing to, and being able to, push beyond the P position would suggest that there is damage to the park latch itself. I would guess that somewhere in history someone put the transmission into P while still moving. At least fixing that problem wouldn't involve having to remove that #^%$* little detent ball.
-
1 hour ago, A83 said:
I put the spinners on - do you think they will loosen with time as the caps are bolted to the inside piece and pressured against the wheel but not actually locked in position on the wheel.
I've had no problems at all with mine over 15,000 miles.
-
18 hours ago, TED DIMON said:
Was the early narrow jack a Studebaker design or was it a common jack that other car manufacturers also used. If so, does anybody know the other car make, model and years that are the same. It would make my search for one a lot easier and probably cheaper. I'm a purest and would like a jack that is as close to a 1969 original as possible.
While I understand an interest in originality, the jack is well hidden and probably would never see the light of day. I recall that the original jack in my '63 Avanti was a skinny, rather flimsy (if not dangerous) type. Back when this car was my daily driver, I swapped the jack out for a broader based, 2-speed model.
-
17 hours ago, A83 said:
So do you glue the medallion over the existing magnum logo or take the logo out?
I glued mine right over the Magnum logo, no muss, no fuss. I did, however, use clear silicone to glue them in. They have held up fine for a number of years.
-
On 7/22/2017 at 1:10 PM, A83 said:
Thank you very much they look great will try to order some now
Kevin
Well, I figured that I might order a set of spares, while I was thinking about it. I ordered them on line, but got a call today telling me that they are no longer in stock. So, time for plan B, whatever that might be. Maybe we have a member who has the capability of making 1-3/4" Avanti logo decals.
-
-
picture deleted for limits
-
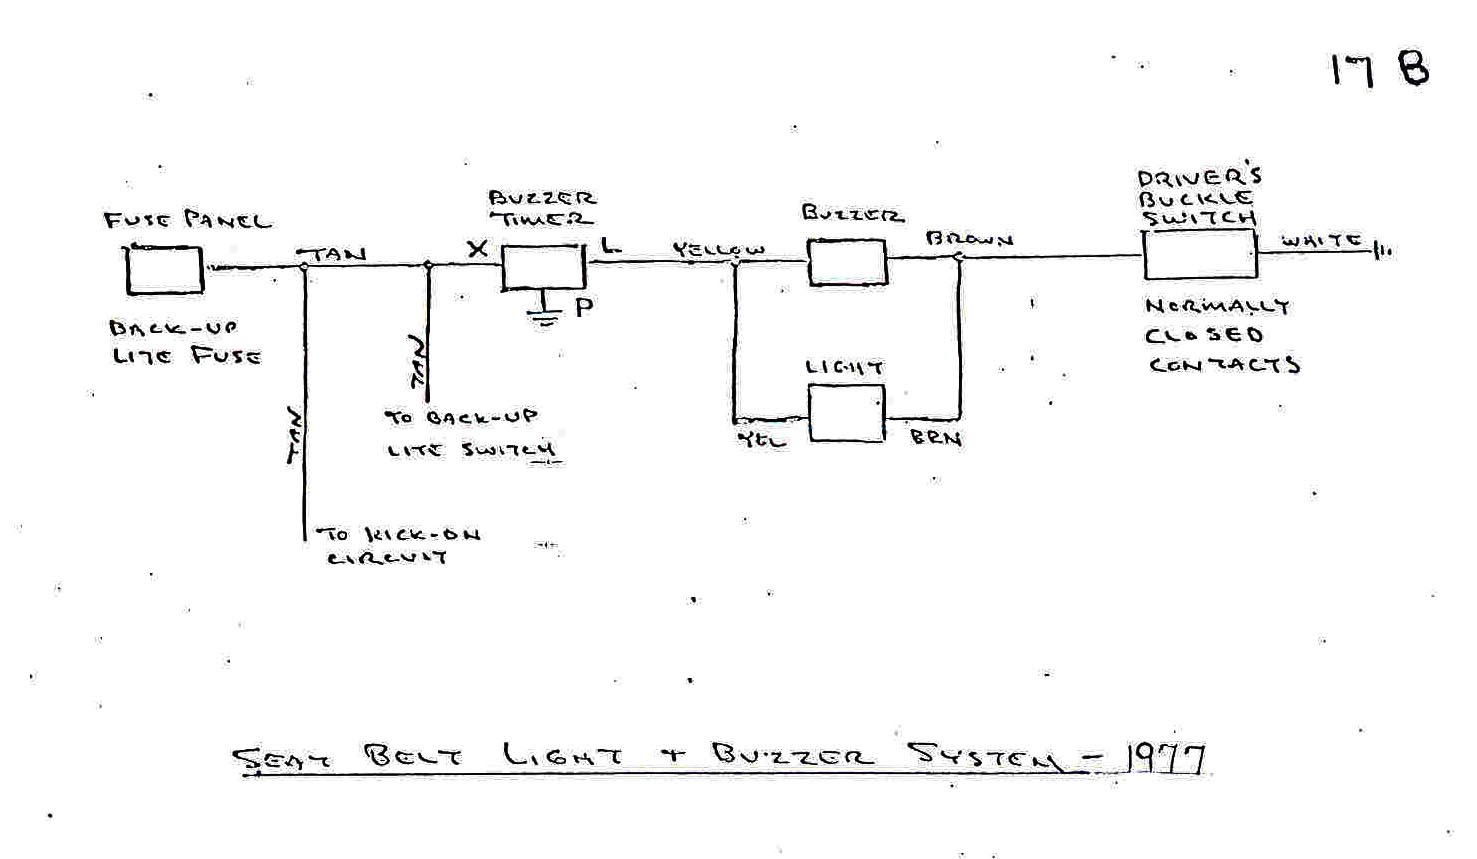
It sounds like the buzzer circuit is wired to the wrong terminal of the relay (N.O. vs. N.C.). Finding the relay is the challenge. I would disconnect the buzzer temporarily, and listen for the click of the relay (somewhere under the dash) while an assistant turns the headlight switch on and off.
-
Most owners seem to be more concerned with removing that annoying buzzer than with making it work.
") The seats do not have occupant sensors. I suppose that such circuitry could be added. Based on your other posts, it looks like you have bigger issues for your electrician to deal with before this one.
The seats do not have occupant sensors. I suppose that such circuitry could be added. Based on your other posts, it looks like you have bigger issues for your electrician to deal with before this one.
http://www.studebaker-info.org/Tech/Diagrams/aec/AE-B-10.JPG
-
There was very little (none) documentation of the Avanti II electricals from the factory. Here is a page from Bob Johnstone's site that you and your electrician may find helpful.
http://www.studebaker-info.org/Tech/Diagrams/aec/aec.html
-
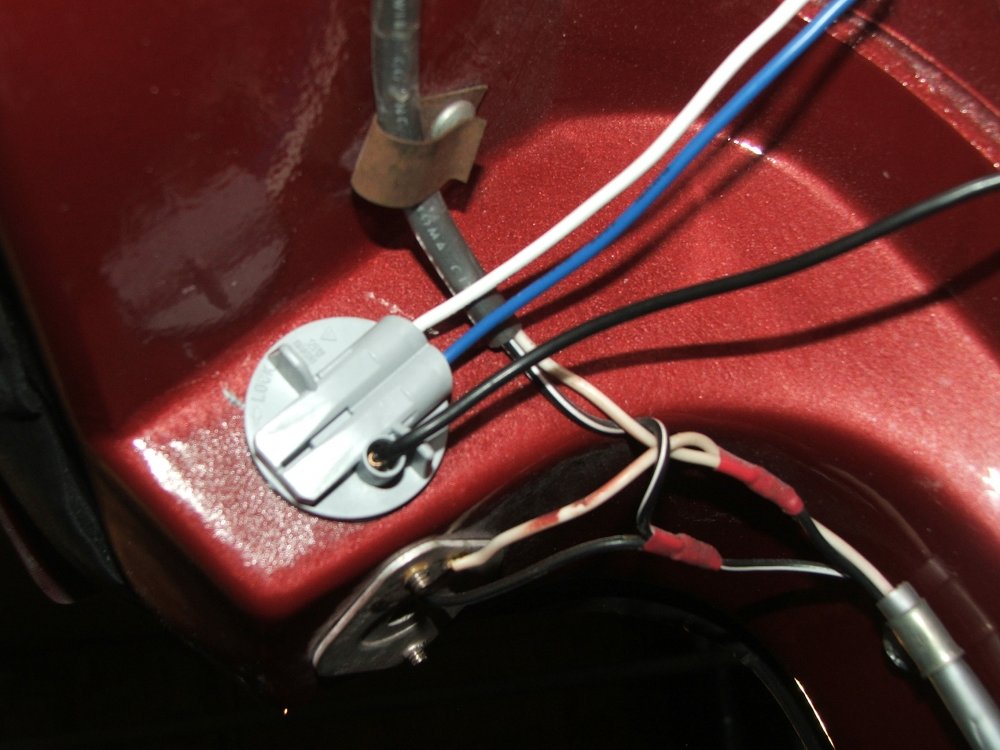
Not sure, but I would guess that this may be the power for the cigarette lighter in the console ash tray. Use a continuity tester to check. The white wire would show continuity to the negative (-) battery cable, and the blue wire to the positive (+) cable.
-
Here is how the A/C is wired on my '78 model. The fan control has an On/Off function but with variable resistor, rather than a 3-position switch like yours. Functionally, the power is supplied by the yellow wire. When the fan switch is turned on, full 12V power is sent via the black jumper to the thermostatic switch. So, the fan must be turned on to enable the thermostat. In turn, the thermostatic switch controls the power to the compressor clutch and throttle kicker. The other black wire from the fan switch is the variable voltage power to the fan motor. If you are not already familiar with it, Bob Johnstone's Studebaker site has a wealth of technical information, including Avanti II. The tech pages can be accessed at
http://www.studebaker-info.org/rjtechoct2014p1.html
I hope that this is helpful.

-
One option is to retain the Magnum center caps (straight or spinner type) and glue a 1-3/4" diameter Avanti logo into the center. I did mine several years ago with medallions purchased from Studebaker International. They had both black on silver and silver on black. Their part numbers were 26-006 and 26-001. I see the 26-006 is still listed on their site, but not the 26-001. Price is $2.00 ea. I didn't trust the self-adhesive backing, and applied mine with clear silicone.

-
2 hours ago, TED DIMON said:
If I understand this correctly, your 1970 Avanti is RQA 0330. My 1969 is RQA 0375 (engine # V03128BQ) Is it possible for there to be a 45 car difference with the higher VIN being a year earlier? I can understand the 6,000 difference in engine numbers......GM may have been shipping the engines randomly.
The Engine number V0328 indicates that it was built at the Flint engine plant on March 28.
-
11 hours ago, Mike Sal said:
I just ran across what appears to be something on the order of a window sticker (or invoice) for my RQA 0330. The list of "standard equipment" mentions "350cu. in. Stingray Engine", but no code number. I also have the build sheet (September '69) which also only says "350 cu. in. Engine". The engine number listed at the top portion of the build sheet shows number V09078BQ (I think the first digit is a V.....it's hand written on the form).
Mike Sal
The V indicates that it was built in the Flint engine plant. 0907 is September 7. No luck in decoding the 8BQ suffix, are you sure of these digits? You can verify them by checking the numbers on the block. These are found stamped on a pad, on the front of the block, passenger side, just below the head. Depending on the configuration, you may need to move an accessory to see this pad.
-
If you have access to a pair of "drive-on" ramps, they make this job easier. Get an assistant to sit in the car and rock the steering wheel back and forth through the free play. Then follow the motion down through the system. Check the steering box to see how much difference there is in the motion of the input shaft versus the output. Also, check that the steering box itself is not loose on the frame (I have encountered this on my Avanti). Then get under the car and look for lost motion at all of the joints. Pay particular interest to the center bellcrank. Any looseness there will result in steering play.
-
I agree with Gunslinger. When I had my '63, I was always concerned with the originality of the car. With my '78, I am much more comfortable with changing things to suit my preferences, which is in line with how the Avanti was marketed at that time.
-
When I bought my '78, I was so pleased to find one that had crank windows (and no sunroof).


LED Tail Lights
in 1965-83 Avanti
Posted
The single-brightness 1156 type white grid that I used is the white, 100 degree beam angle version of
https://www.superbrightleds.com/moreinfo/tail-brake-turn/1156-led-bulb-36-led-pcb-lamp-ba15s-retrofit-car/501/
The dual-brightness 1157 type red grid is the 100 degree beam angle version of
https://www.superbrightleds.com/moreinfo/tail-brake-turn/1157-led-bulb-dual-function-36-led-pcb-lamp-bay15d-retrofit-car/175/#/attributes/43
It should be noted that LEDs are by nature very directional, which is why I selected the wider beam angles. I also fabricated the bracket so that the grids are vertical when the trunk is closed (since the lenses are not). I wired mine so that the low level red comes on with the head/park lights, and the high level comes on with the brake and/or turn signal. In my installation, the wiring to the B/U sockets remained unchanged. I picked up the head/park voltage at the left tail light socket and ran that to both new 1157 type sockets. The brake/turn voltage was spliced into at each existing tail light socket. Ground was already available at the B/U light sockets on the trunk lid. So, I added three new wires to the existing harness going to the trunk lid. Didn't do anything special with the new wires. I hope that this answers your questions.
Since your installation doesn't include B/U lights, it should be much simpler. I had questioned whether it was worth the effort to do the dual color thing, since I really don't see why one really needs B/U lights on an Avanti. But, it became more of an engineering exercise to be "cute" and have both functions in the same housing. If I had decided to go with red lenses and a single level of brightness (brake and turn only), it would have been a simpler matter to just plug in a red LED 1156 type bulb, and use the existing socket, wired to the respective brake/turn wires of the original tail lights. There are a few different ways to skin that cat.