ronmanfredi
-
Posts
319 -
Joined
-
Last visited
Recent Profile Visitors
7,251 profile views


ronmanfredi's Achievements
")


-
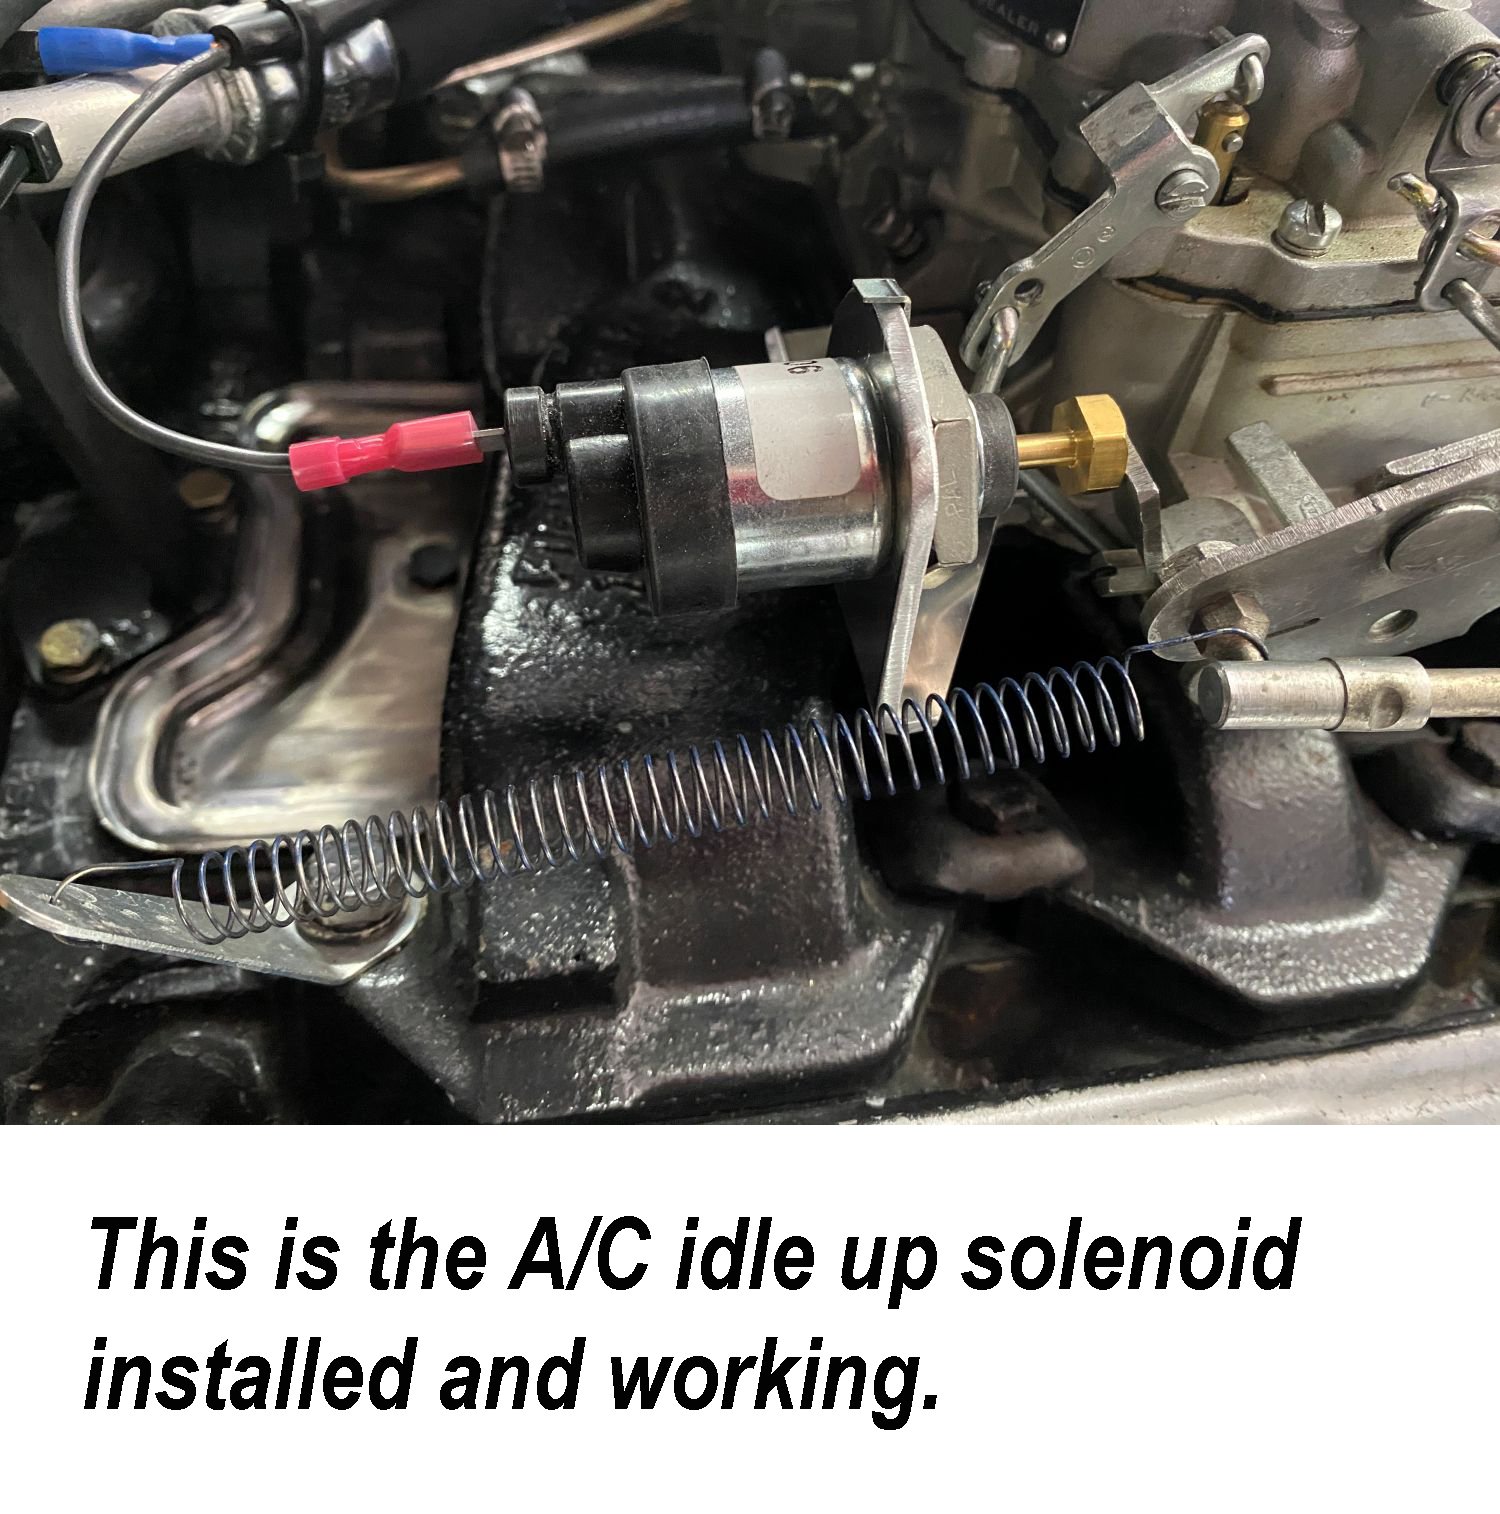
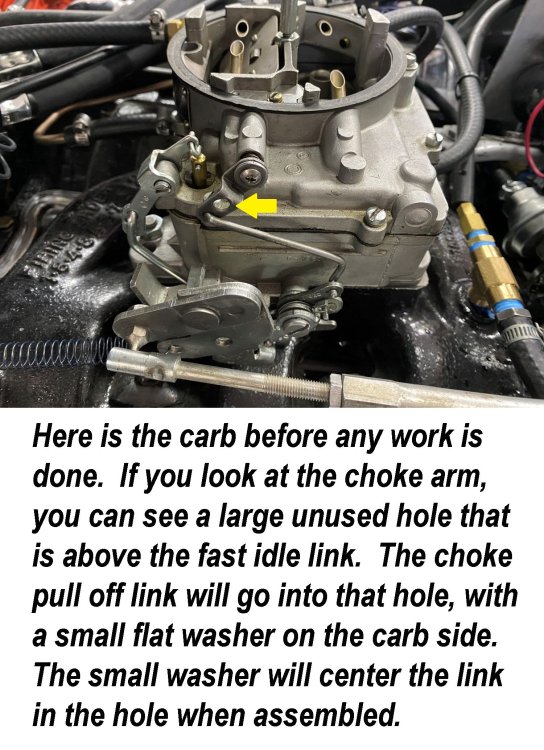
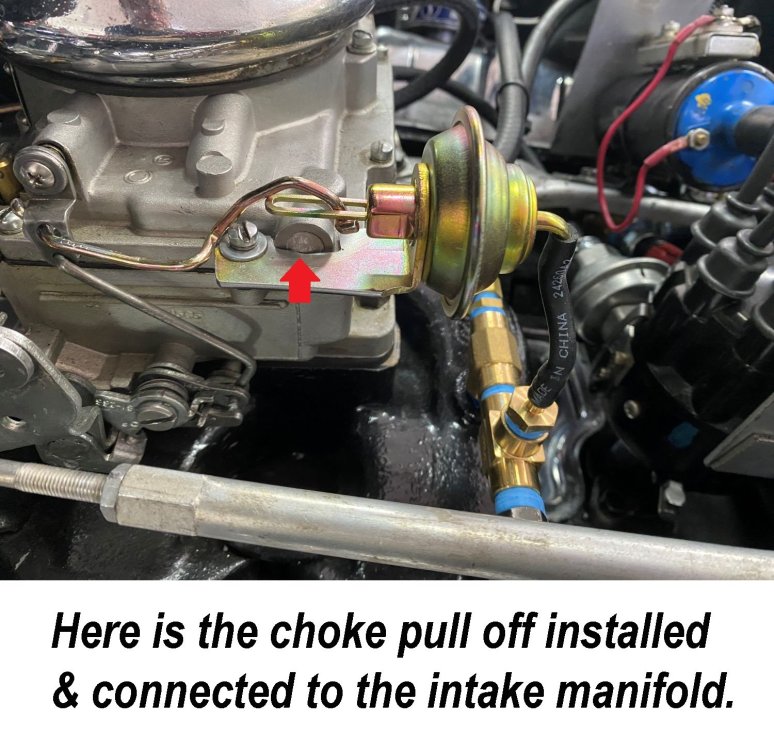
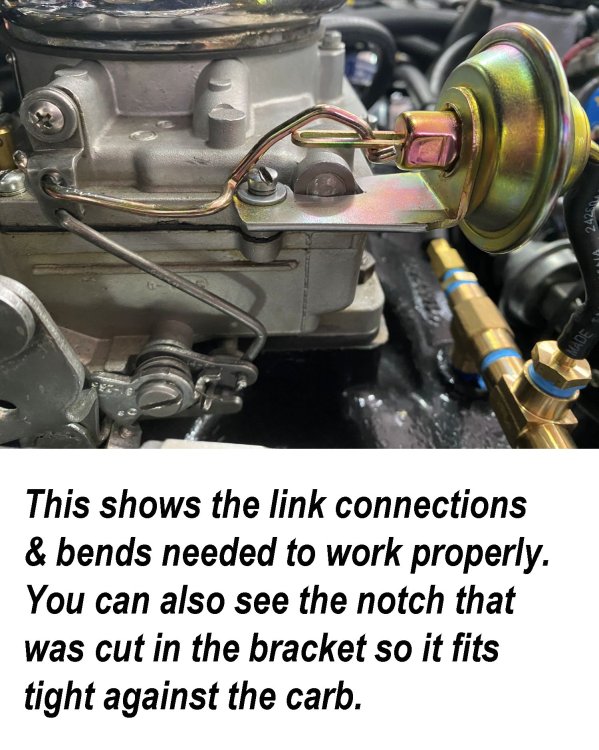
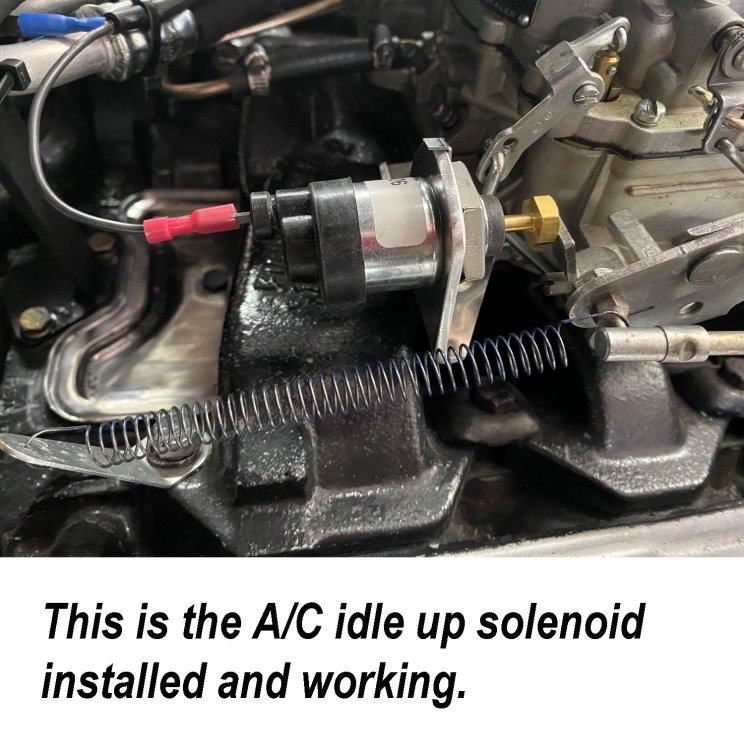
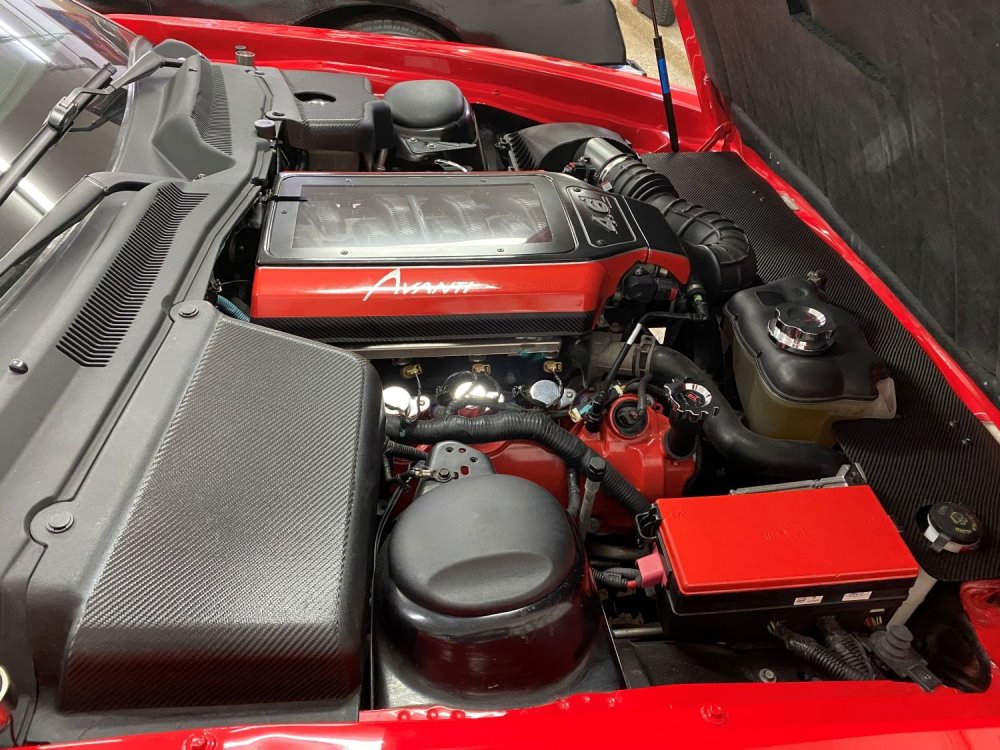
We recently purchased a 1963 R2 from a long time Avanti owner, who bought it to restore. He got the drive train, suspension, brakes and fuel system done and decided he couldn’t go any further due to age. I knew that this was the time to purchase this halo car and that I wanted to complete this now "custom restoration". (If you've seen our 2006 Avanti, then you'll understand). I was an educated auto tech in the 70s-80s which provides me an edge on working on cars of this age. Right out of the gate, I saw a problem with the carburetor on cold starts. With the choke operational, the car would run extremely rich on cold starts since the choke plate would remain almost fully closed. Most carbs have a vacuum operated choke pull off diaphragm which prevents this, but not this one. In doing some research, it appears that Carter never provided this on this model carb. So, I started looking and found a GM choke pull off that I thought would work. I also found a linkage piece that I hoped I could use to connect it to the carb choke plate arm, in an oversized available hole in it. First was to mount the pull off using one of its brackets mounting holes along with cutting a notch in the bracket to fit tight up against the carb. Once done, the next thing was to start experimenting with the linkage until it worked correctly with the choke fully closed and let the choke plate open all the way without binding as the car warmed up. I probably bent it 15 “small” times until it worked the way that I needed it to. Lastly, was to connect the vacuum line to the intake manifold. With all of this done, I did a cold start and the car started right up, the choke plate opened with around a 1/4" gap and the car idled perfect. Both carb parts came from eBay. The Choke Pull off is Rochester 17050733 for 1975-1976 Oldsmobile 455 engine. The link was a secondary vacuum break link for 1968-1974 Quadrajet Carbs. Next, I had added a custom modern Air Conditioner/Heater system to the car and needed an idle solenoid to raise the idle speed when the A/C was on since the car has an automatic trans. In looking at the limited options available, I chose the Standard Motor Products ES9 Solenoid, without any bracket. Holley offers the same solenoid with a bracket that might work, but they are charging over $150 for the bracket itself. I knew I could make one for labor only using some scrape aluminum angle iron that I had laying around. Once I cut the basic shape, drilled the 2 holes needed, and notched the bracket to fit tight on the carb, the bracket lined right up. I smoothed out design and started up the car and it worked like a champ. The spindle that pushes the throttle is adjustable and comes set midway in the range. I didn’t have to make any adjustment at all. Here are a few photos.

-

Wanted: Tilt Steering column for 1964 Avanti
ronmanfredi replied to ronmanfredi's topic in Avanti Parts
I sent you a PM. -
Wanted: Tilt Steering column for 1964 Avanti
ronmanfredi replied to ronmanfredi's topic in Avanti Parts
CJ's isn't open anymore, the owner passed away. -
I want to add a factory tilt column to my 63 Avanti. Does anyone have one they would part with or know where I could get one? Thanks!
-
I found a rebuilder for mine a couple of years ago, but the cost to repair it was around $500 due to the labor involved to disassemble it. I discarded it and went with a different radio.
-
Your rattle could be the vertical window channels that guide the windows on each end which may need replacing due to the felt being worn out. The outer weather strip at the top of the door is to prevent/reduce the amount of water that can enter the door from rain the inner to prevent the glass from rubbing on the inner door trim.
-
John Hull's book, "Avanti, the complete story".
ronmanfredi replied to aardvark's topic in 2001-2007 Avanti models
In your particular case, due to the year model and build location, John Hull should have the build sheet for your car. I know he charges for the information so you'll need to decide if you want to inquire about this with him. Also, a lot of the information that I put together came from John and Don Linder. The rest was done through research, which is ongoing also. -
The same goes with Dan Booth. He has a habit of quoting one price and then when you get the invoice it's much higher (like heart attack higher), so I now pin down the price with all the sellers.
-
John Hull's book, "Avanti, the complete story".
ronmanfredi replied to aardvark's topic in 2001-2007 Avanti models
I really don't know, maybe in his late 60s-70s. He recently built a new house and moved a few states away from his last location and mentioned he had dozens of boxes and filing cabinets of stored records that were being moved. He's always busy with projects to make money plus with AOAI and SDC so it's just what is a priority for him. -
I used him for all suspension parts on my old 82 model.
-
Most other sealants will prevent you from removing the panel again down the road. You need 3M 08578 and can get it from Amazon or most auto parts stores can order it.
-
And they work like a champ. Start the car and watch the corners of the hood move down...
-
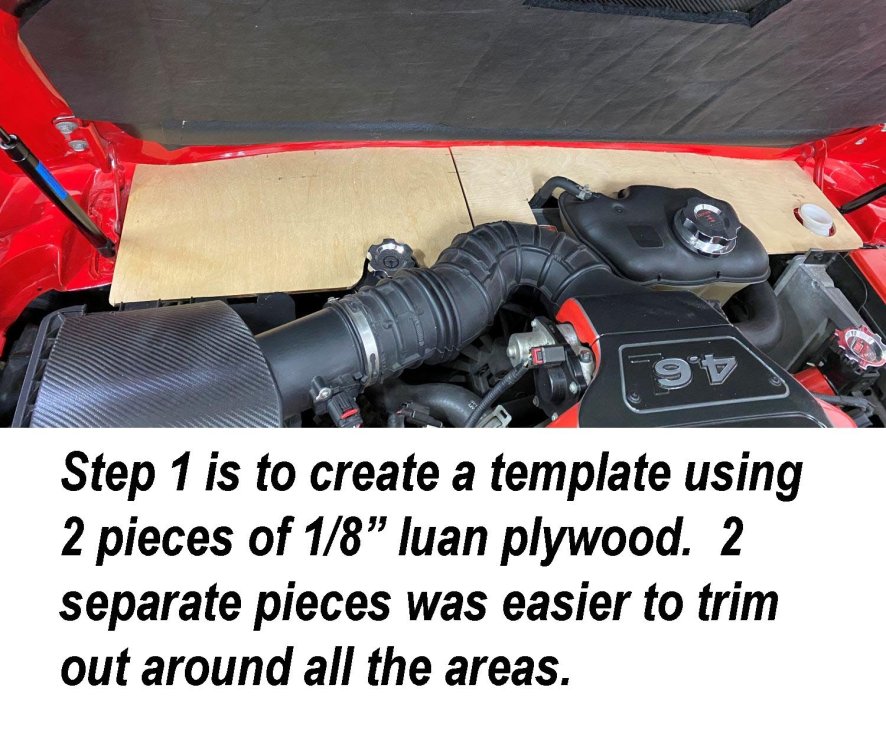
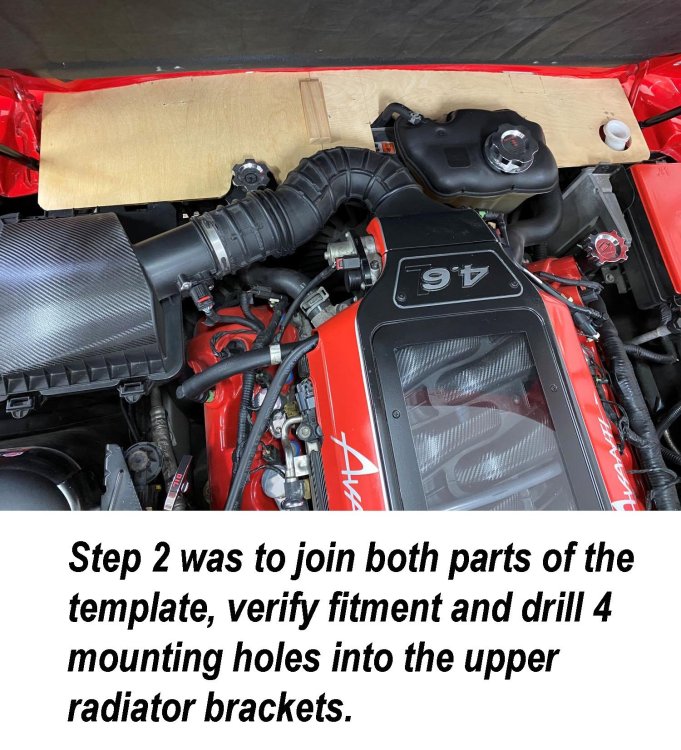
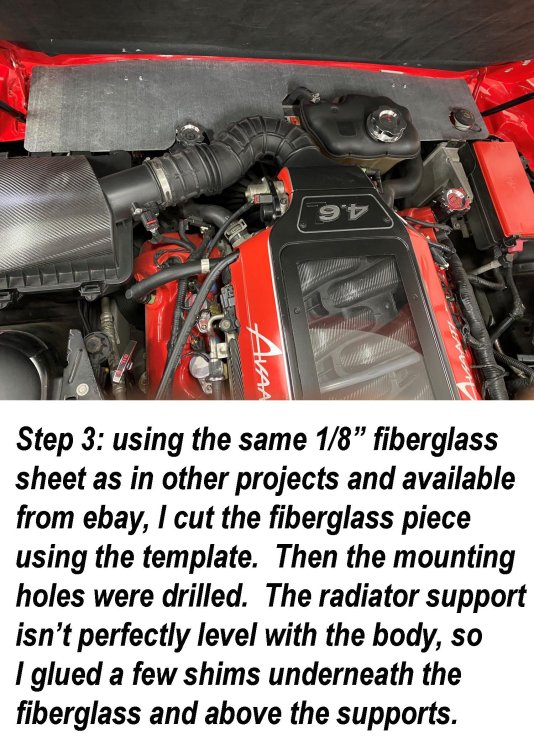
With the 2026 AOAI meet coming up in just a couple of months, I knew it was time to do one last engine compartment upgrade to our 2006 Avanti GT before we take it to Palm Springs. I’ve done a lot of appearance work under the hood yet there was one area around the top of the radiator that just didn’t look finished and that needed to be corrected. After opening and closing the hood a dozen times, I knew that I wanted a waterproof panel that was strong, that wouldn’t show in the front hood edge to front body nose gap when opened or closed. It also couldn’t go past the hood struts either. I wanted it to wrap around the individual parts mounted in the engine compartment, while not rubbing up against any part mounted to the engine. After measuring for the basic size, I cut two 12” x 22” pieces of 1/4” Luan plywood to create templates since I knew there would be several hours trimming, test fitting until everything looked right. Wanting them to be uniform in shape when joined together and being able to remove it if needed was another consideration. The Avanti front nose cap in front of the radiator has a lot of curves up and down, left and right that affected how level the piece would sit so test fitting and trimming was mandatory. And of course, the finished piece had to look good. While I was working on the final template layout, I order a sheet of 12” x 48”, 1/8” thick, epoxy based marine fiberglass off of eBay. The seller is a boat company who sells 1/8” – 1/2” thick panels cut to the buyers’ specs who I’ve used several times for flat panels. Here are a few photos of the process and the results.


-
John Hull's book, "Avanti, the complete story".
ronmanfredi replied to aardvark's topic in 2001-2007 Avanti models
When we started the AVX-2007 project, John mentioned that he was confident that he did have a lot more records of 2003-2005 models packed away in the dozens of storage boxes and cabinets. He just needs the time to locate and publish the info. On the records he doesn't have, he told me that he knew some other sources of records as well. It's all about what is a priority to him considering all the projects he is usually involved in. BTW, I do follow up with him about this a couple times a year. -
The Avanti II lines are on the passenger side and come from the fuel tank as rubber hoses to the metal lines in front of the right rear wheel. Leaks can occur in those old rubber lines, plus the filler neck hose. The rear seat and rear panel needs to be removed to get to those lines/hoses. Once there, I'd suggest replacing all rubber hoses and don't forget to seal the panel when reinstalling the rear panel with fresh dumdum. There are 2 rubber hoses at the fuel pump that need to be checked/replaced as needed.