


Rick Allen
-
Posts
143 -
Joined
-
Last visited
Content Type
Profiles
Forums
Events
Posts posted by Rick Allen
-
-
43 minutes ago, 64studeavanti said:
I use compressed air to push the pistons out.
yea, I tried compressed air, 175 lbs of it, wouldn't budge, air will normally work if calipers are in reasonably good shape, after 50 years of sitting, mine were not but the grease gun did it,,,
-
2 hours ago, Fourward said:
Doing the braking system. The calipers are frozen beyond repair. I was thinking of getting new ones, they are available, $600. Then I thought well just get the Turner brake system, $700. I think I could install it, the heating those rings that go over the spindle and pounding or pressing in the bearings has me a little worried, but the rotors come with it along with everything else for only $100 more. The third option; if anyone has a set of calipers that actually work, and, at a reasonable cost, I would buy them and I can put them on in an hour. Anyone?Thanks.
I had the same problem on my '64 which sat for 50 years before i got it 2 months, put a grease fitting into one fluid port and plug the other one, I did that and surprisingly the grease push the piston out with little effort; try that and see what you got inside them before you go out and spend $500+,,,
-
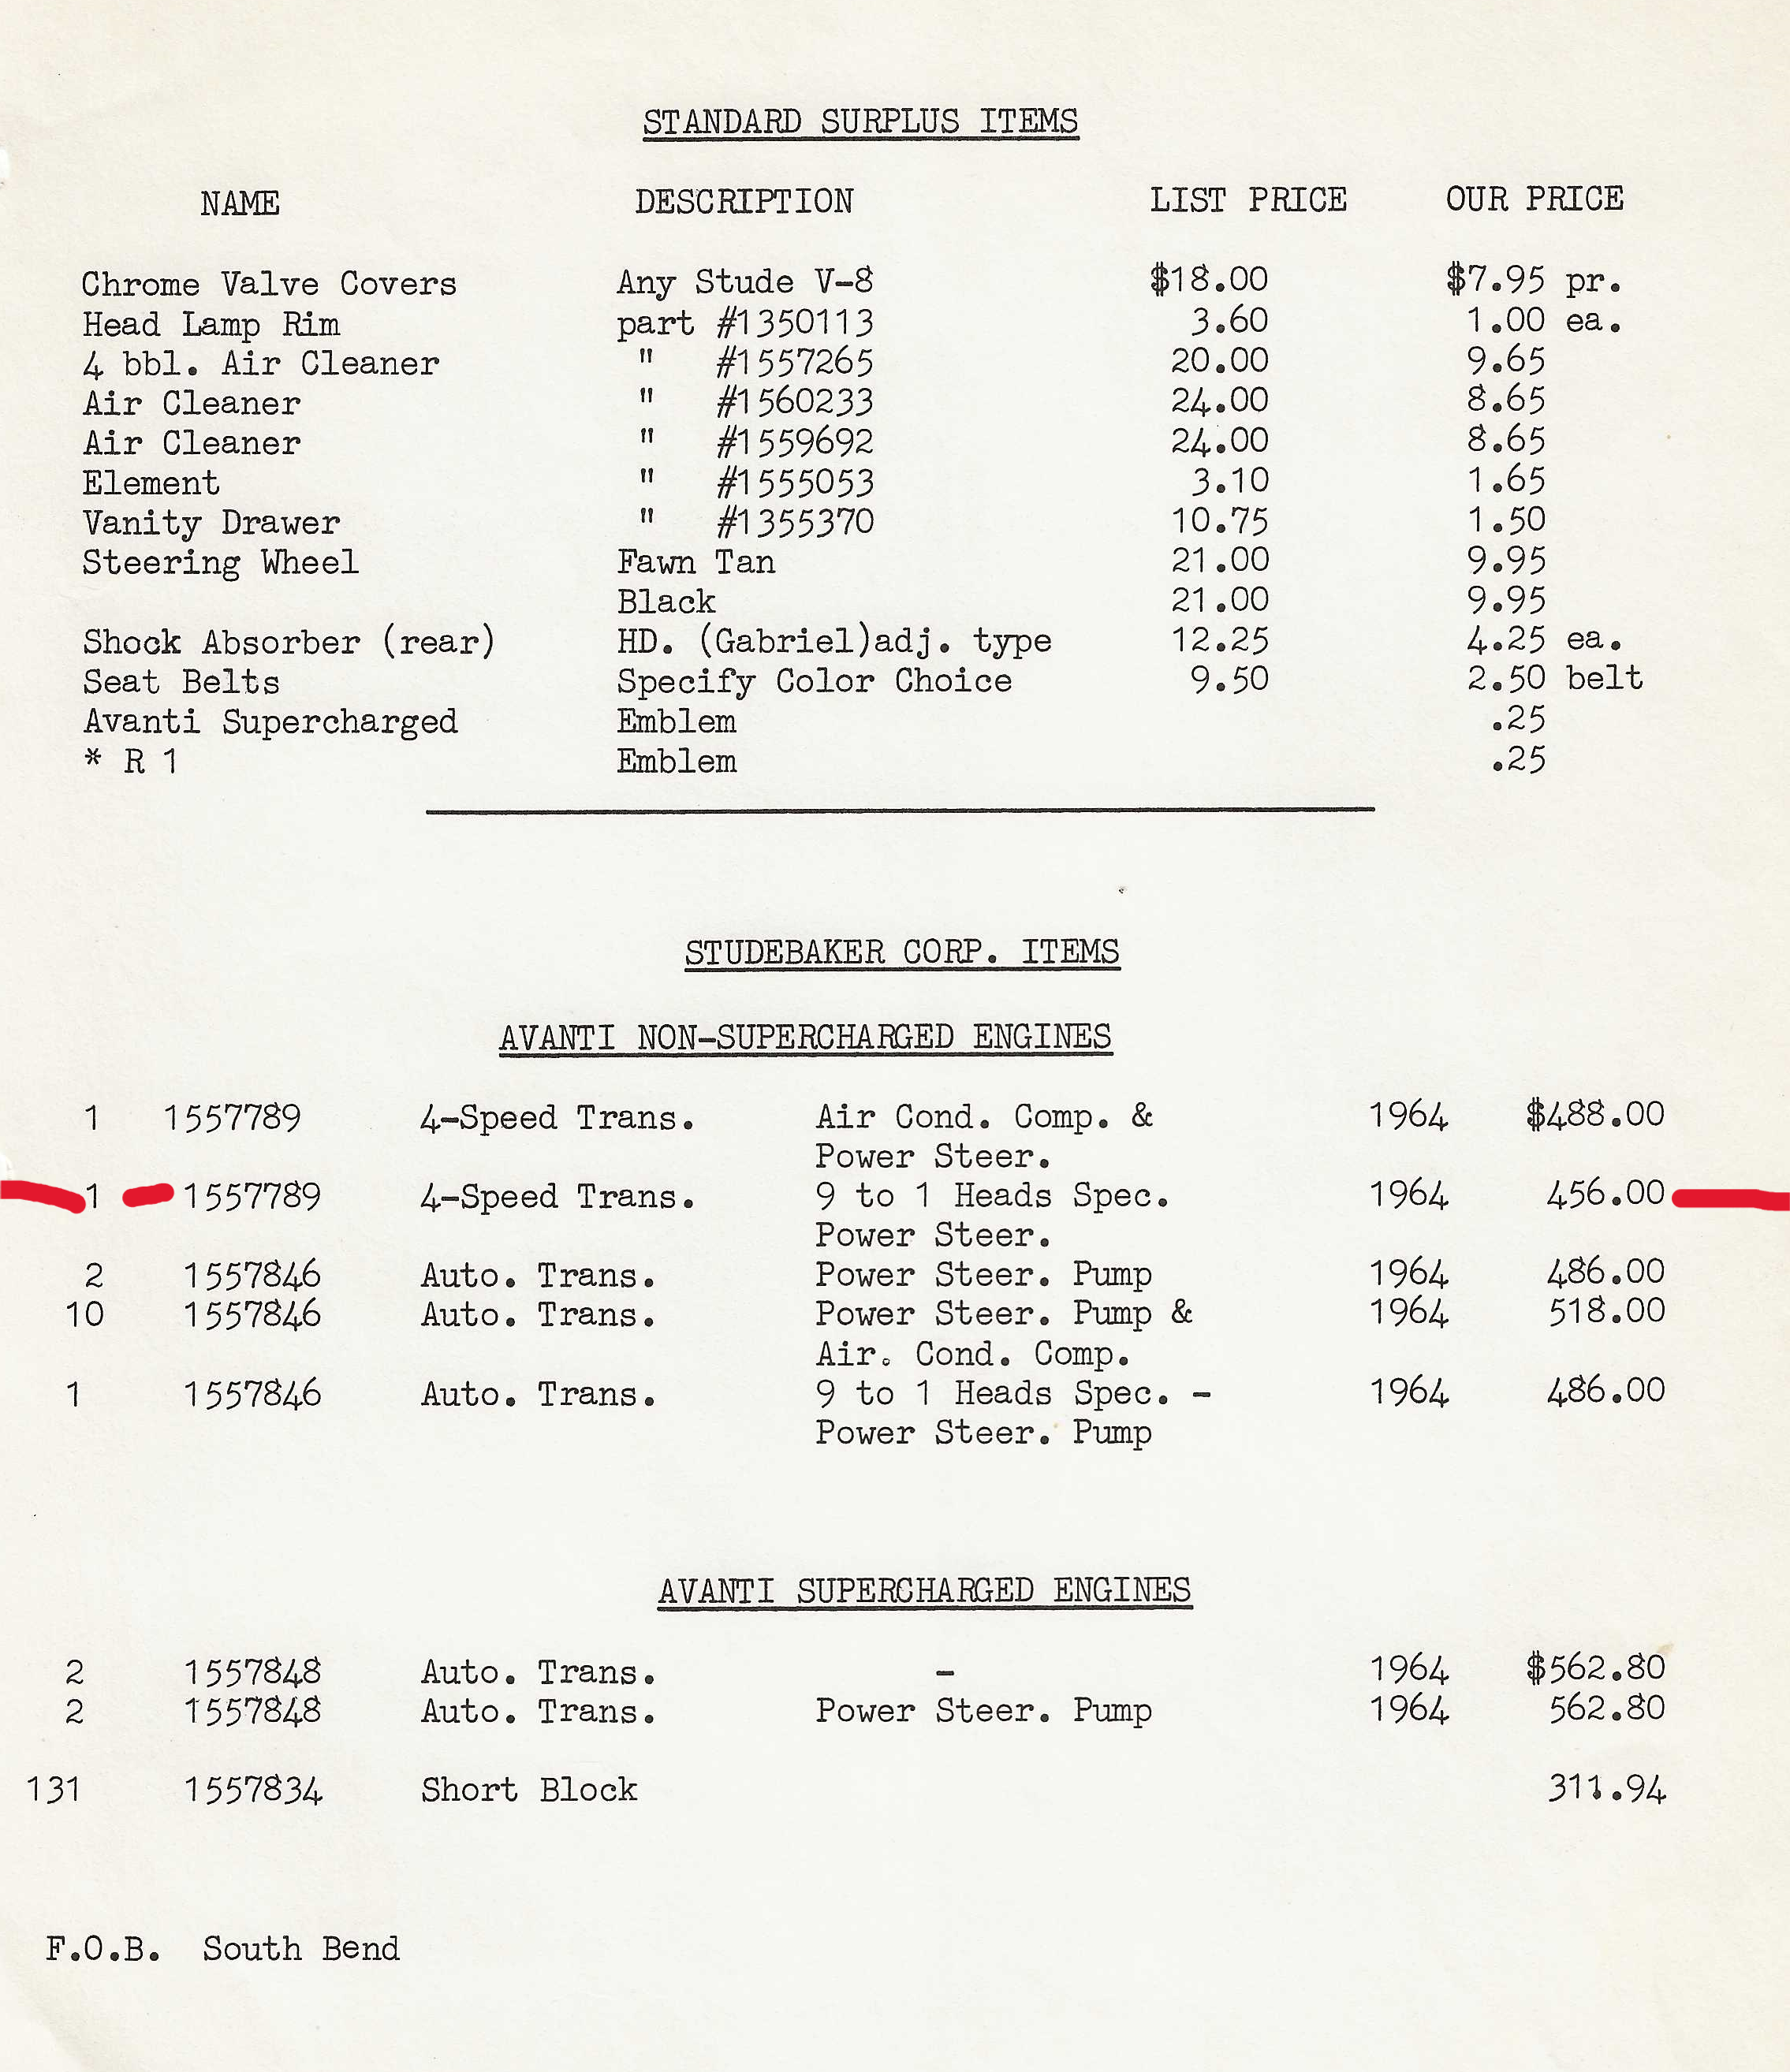
1 hour ago, regnalbob said:
Could be this one.
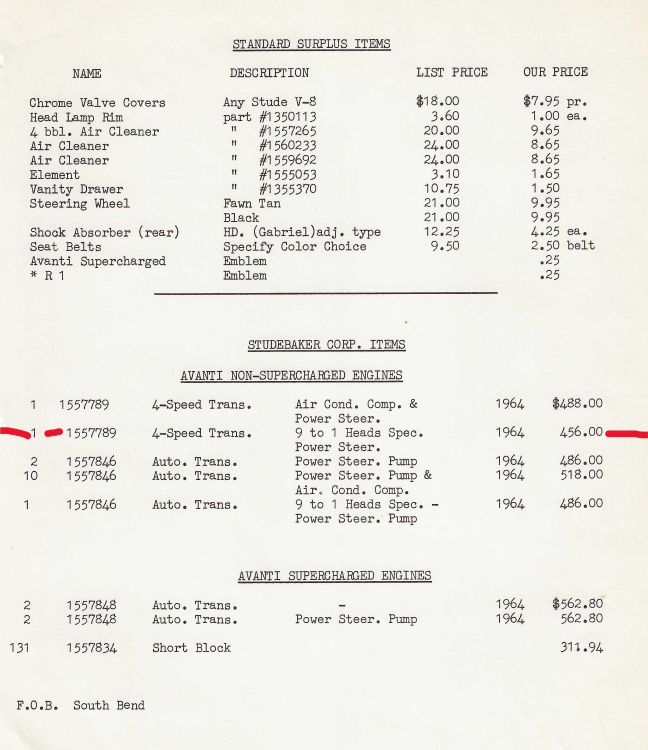
Yea, could be, surprising to me that Studebaker would put the lower compression heads on the non-supercharged Avanti engines unless they were just getting rid of inventory before they shut down the South Bend factory or was that an engine version that could be ordered on the Lark/Hawk?
-
Saw this after the auction ended (not that I would buy It), does the story that goes with it sound plausible?
Studebaker Avanti NOS R1/R2 Crate Engine and 4SPD Transmission | eBay
-
8 hours ago, 64studeavanti said:
Yes,
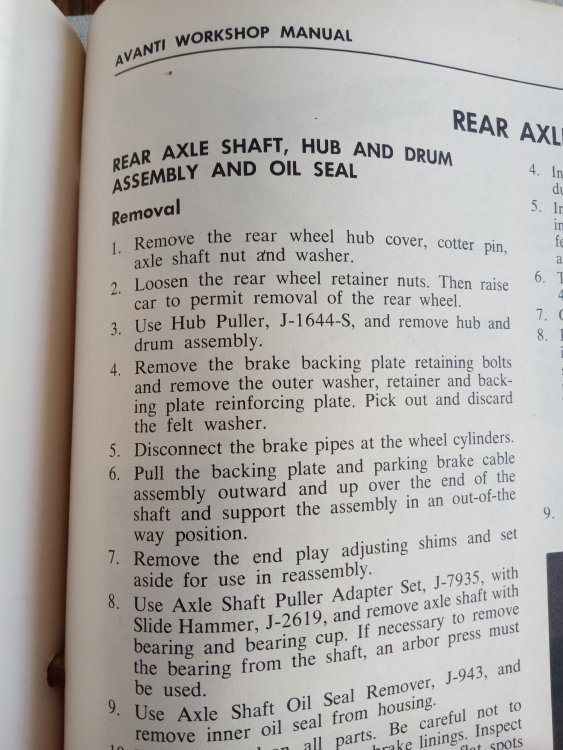
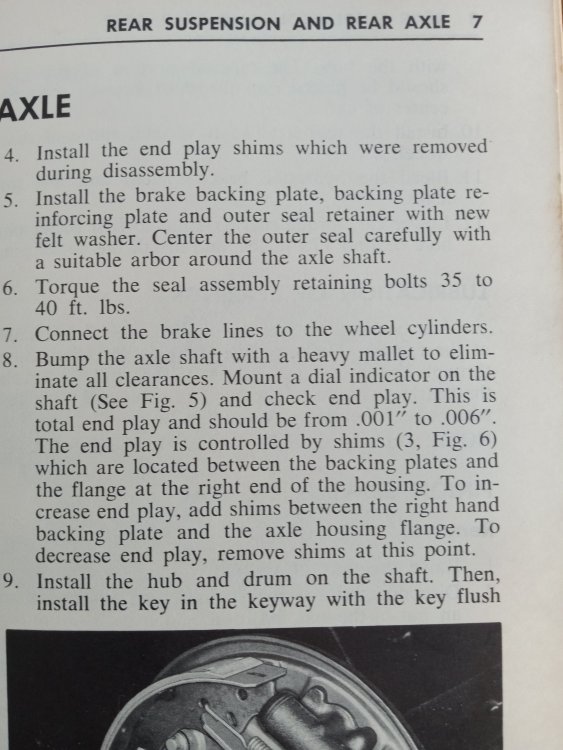
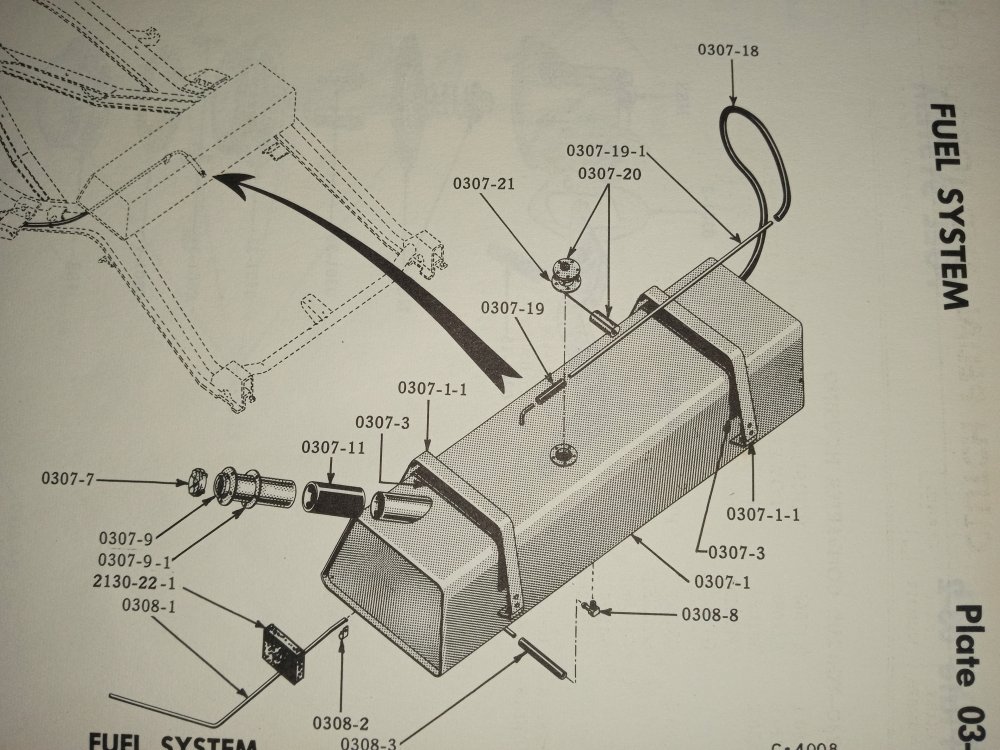
Shims on right side, followed by brake backing plate, followed by reinforcement plate, and finally, the dust seal. IIRC, there is a thin paper gaskets that goes between the dust seal and reinforcement plate.
Yeah that order makes sense according to the rear axle section of the service manual, I see the parts manual list the thin paper gasket as being four (4) per car so I assume one goes on each side of the reinforcement plate,,, thanks for your reply
-
2 hours ago, Skip Lackie said:
The illustration shows the proper order of assembly. The backing plate is illustrated in the brake section 11. It goes on last. The gasket is a sort of a absorbent paper-like material so it doesn't add to any adjustments. I haven't checked, but I'm sure they're available from most of the vendors.
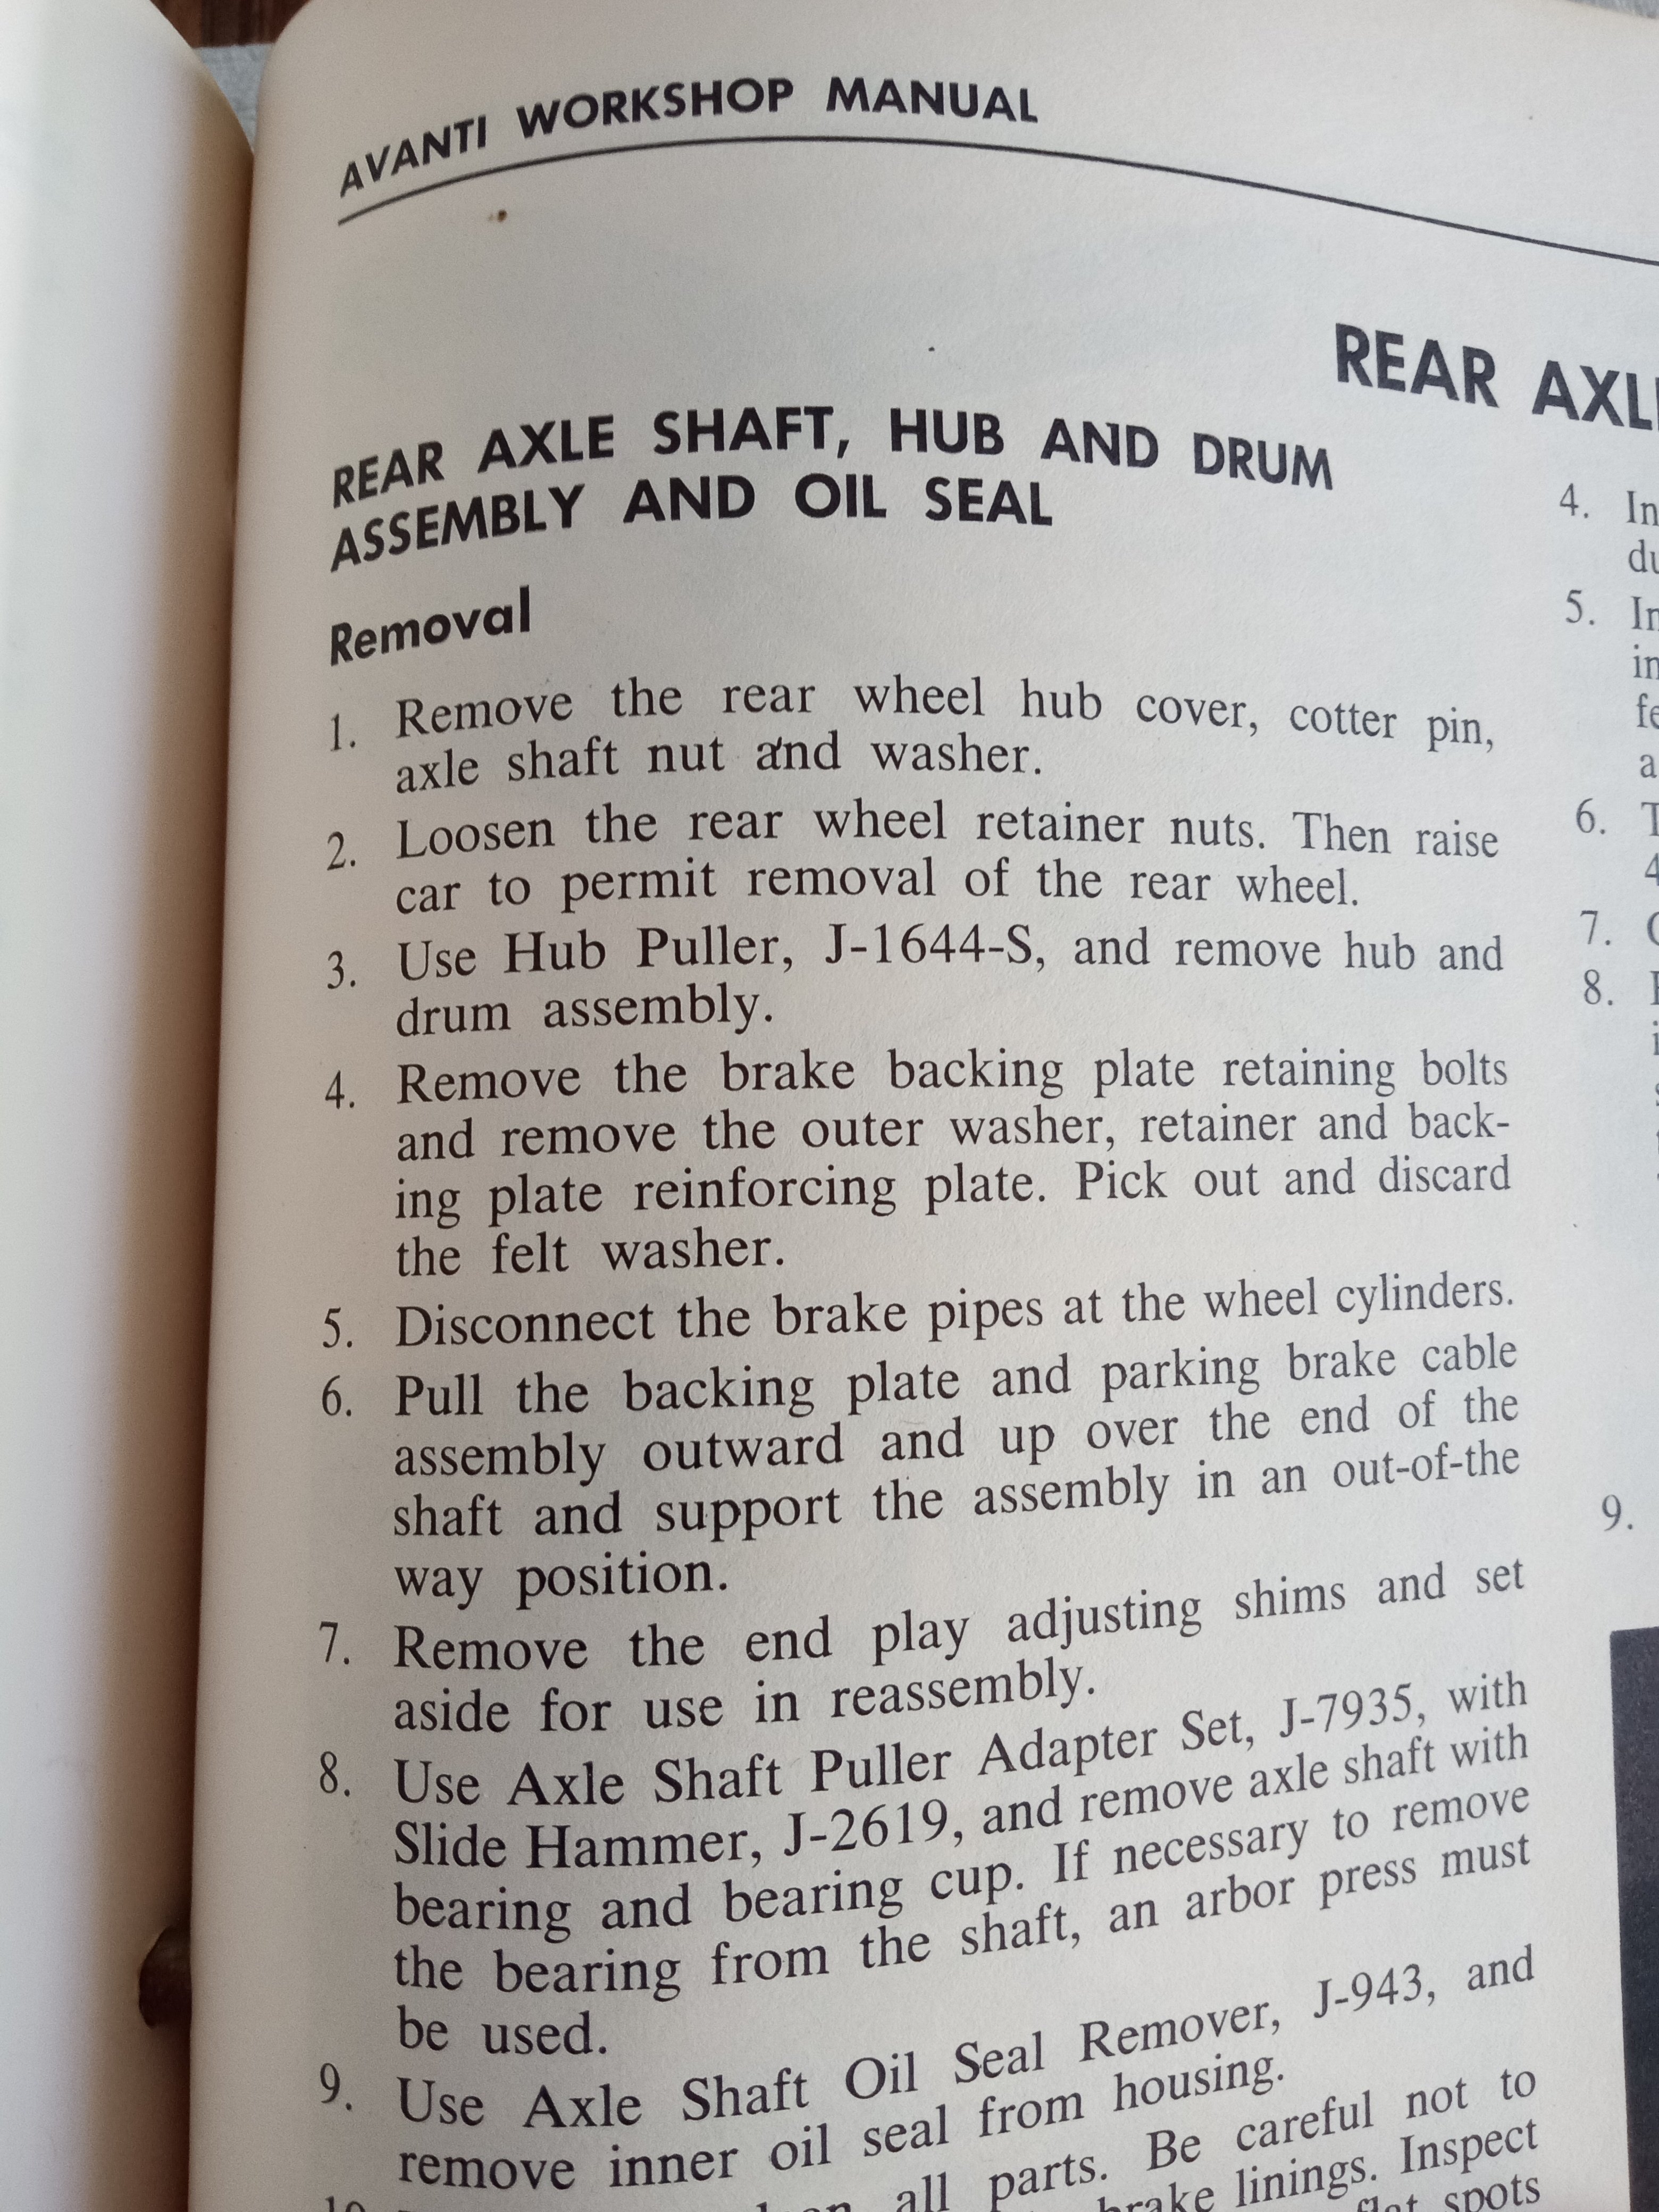
Thank you for your reply. Yes, I did check section 11 but it doesn't show the position of the brake backer plate in relation to the other axle components. However the workshop manual in both paragraphs of removal and installation (attached) ,seems to indicate the backer plate goes on against the shims and then the backer plate reinforcement plate next; or am I interpreting it incorrectly?,,,Any clarification is appreciated,,,
-
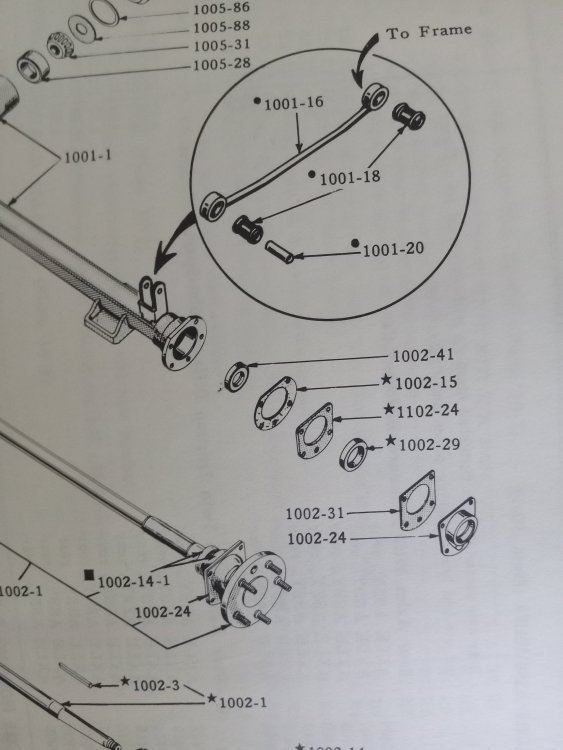
Parts book shows related parts but doesn't show the backer plate (see attached) Service manual says axle shims, then the brake backer plate against the shims, then what they call the "backer plate reinforcing plate", part book calls it part 1002-24, "washer and retainer". So is this the correct order for assembly, shims, then the backer plate, then the part 1002-24?
Also, what is gasket 1002-31 made of, the book calls it "paper", mine was destroyed but it seemed like more of a cork material?,,,
-
What was the cost of the wheels with the spinners?,,,
-
14 hours ago, Leo B said:
If you want to measure the end clearance, hit the right axle lightly, e.g. with a lead hammer, to the left and measure. After that, hit the left axle to the right and you'll see how much the right axle moved. With the shims, you adjust the amount of change. You can see the target value in the manual.
Thanks for the great information, right now this is beyond what I'm doing, I'm at the point where I'm replacing the rear brake shoes and related parts, cleaning and painting the backer plates etc,,,
-
31 minutes ago, mfg said:
Since you have apparently successfully removed the Stude Avanti's 'keyed' rear drum/ hub assemblies, I'd consider you an AVANTI MASTER MECHANIC!!!
It's all a learning experience for me!
-
On 5/17/2023 at 6:00 AM, John Brissette said:
You should consider purchasing a Shop Manual.
I only have the car a few weeks now but Ironically I do have an original service and parts manual which I purchased many years ago that came from a closed Studebaker dealership, but is in storage in a neighboring state, I'm heading there this weekend for that and other Avanti parts I've been accumulating,,,
-
8 hours ago, Dwight FitzSimons said:
What you found is correct. The end play is adjusted by shims on the right side, with none on the left. If your differential has never been taken apart then it is likely still shimmed correctly.
--Dwwight
Thank you, the car was last on the road in 1972 I don't believe it has ever been taken apart, glad to know those shims are correct only on the one side, I'm learning something new everyday,,,
-
Working on the rear brakes of my '64 R2, after removing the backing plate I found three (3) shims of varying thickness on the right hand side but no shims at all on the left hand side of the axle, is this not unusual and why would that be?
-
50 minutes ago, Dwight FitzSimons said:
Aren't the screws staggered in such a way that the sender can be installed in only one position?
--Dwight
They could be, I didn't check that far, I'm waiting for new gasket to come in but that's a good thought, thanks,,,
-
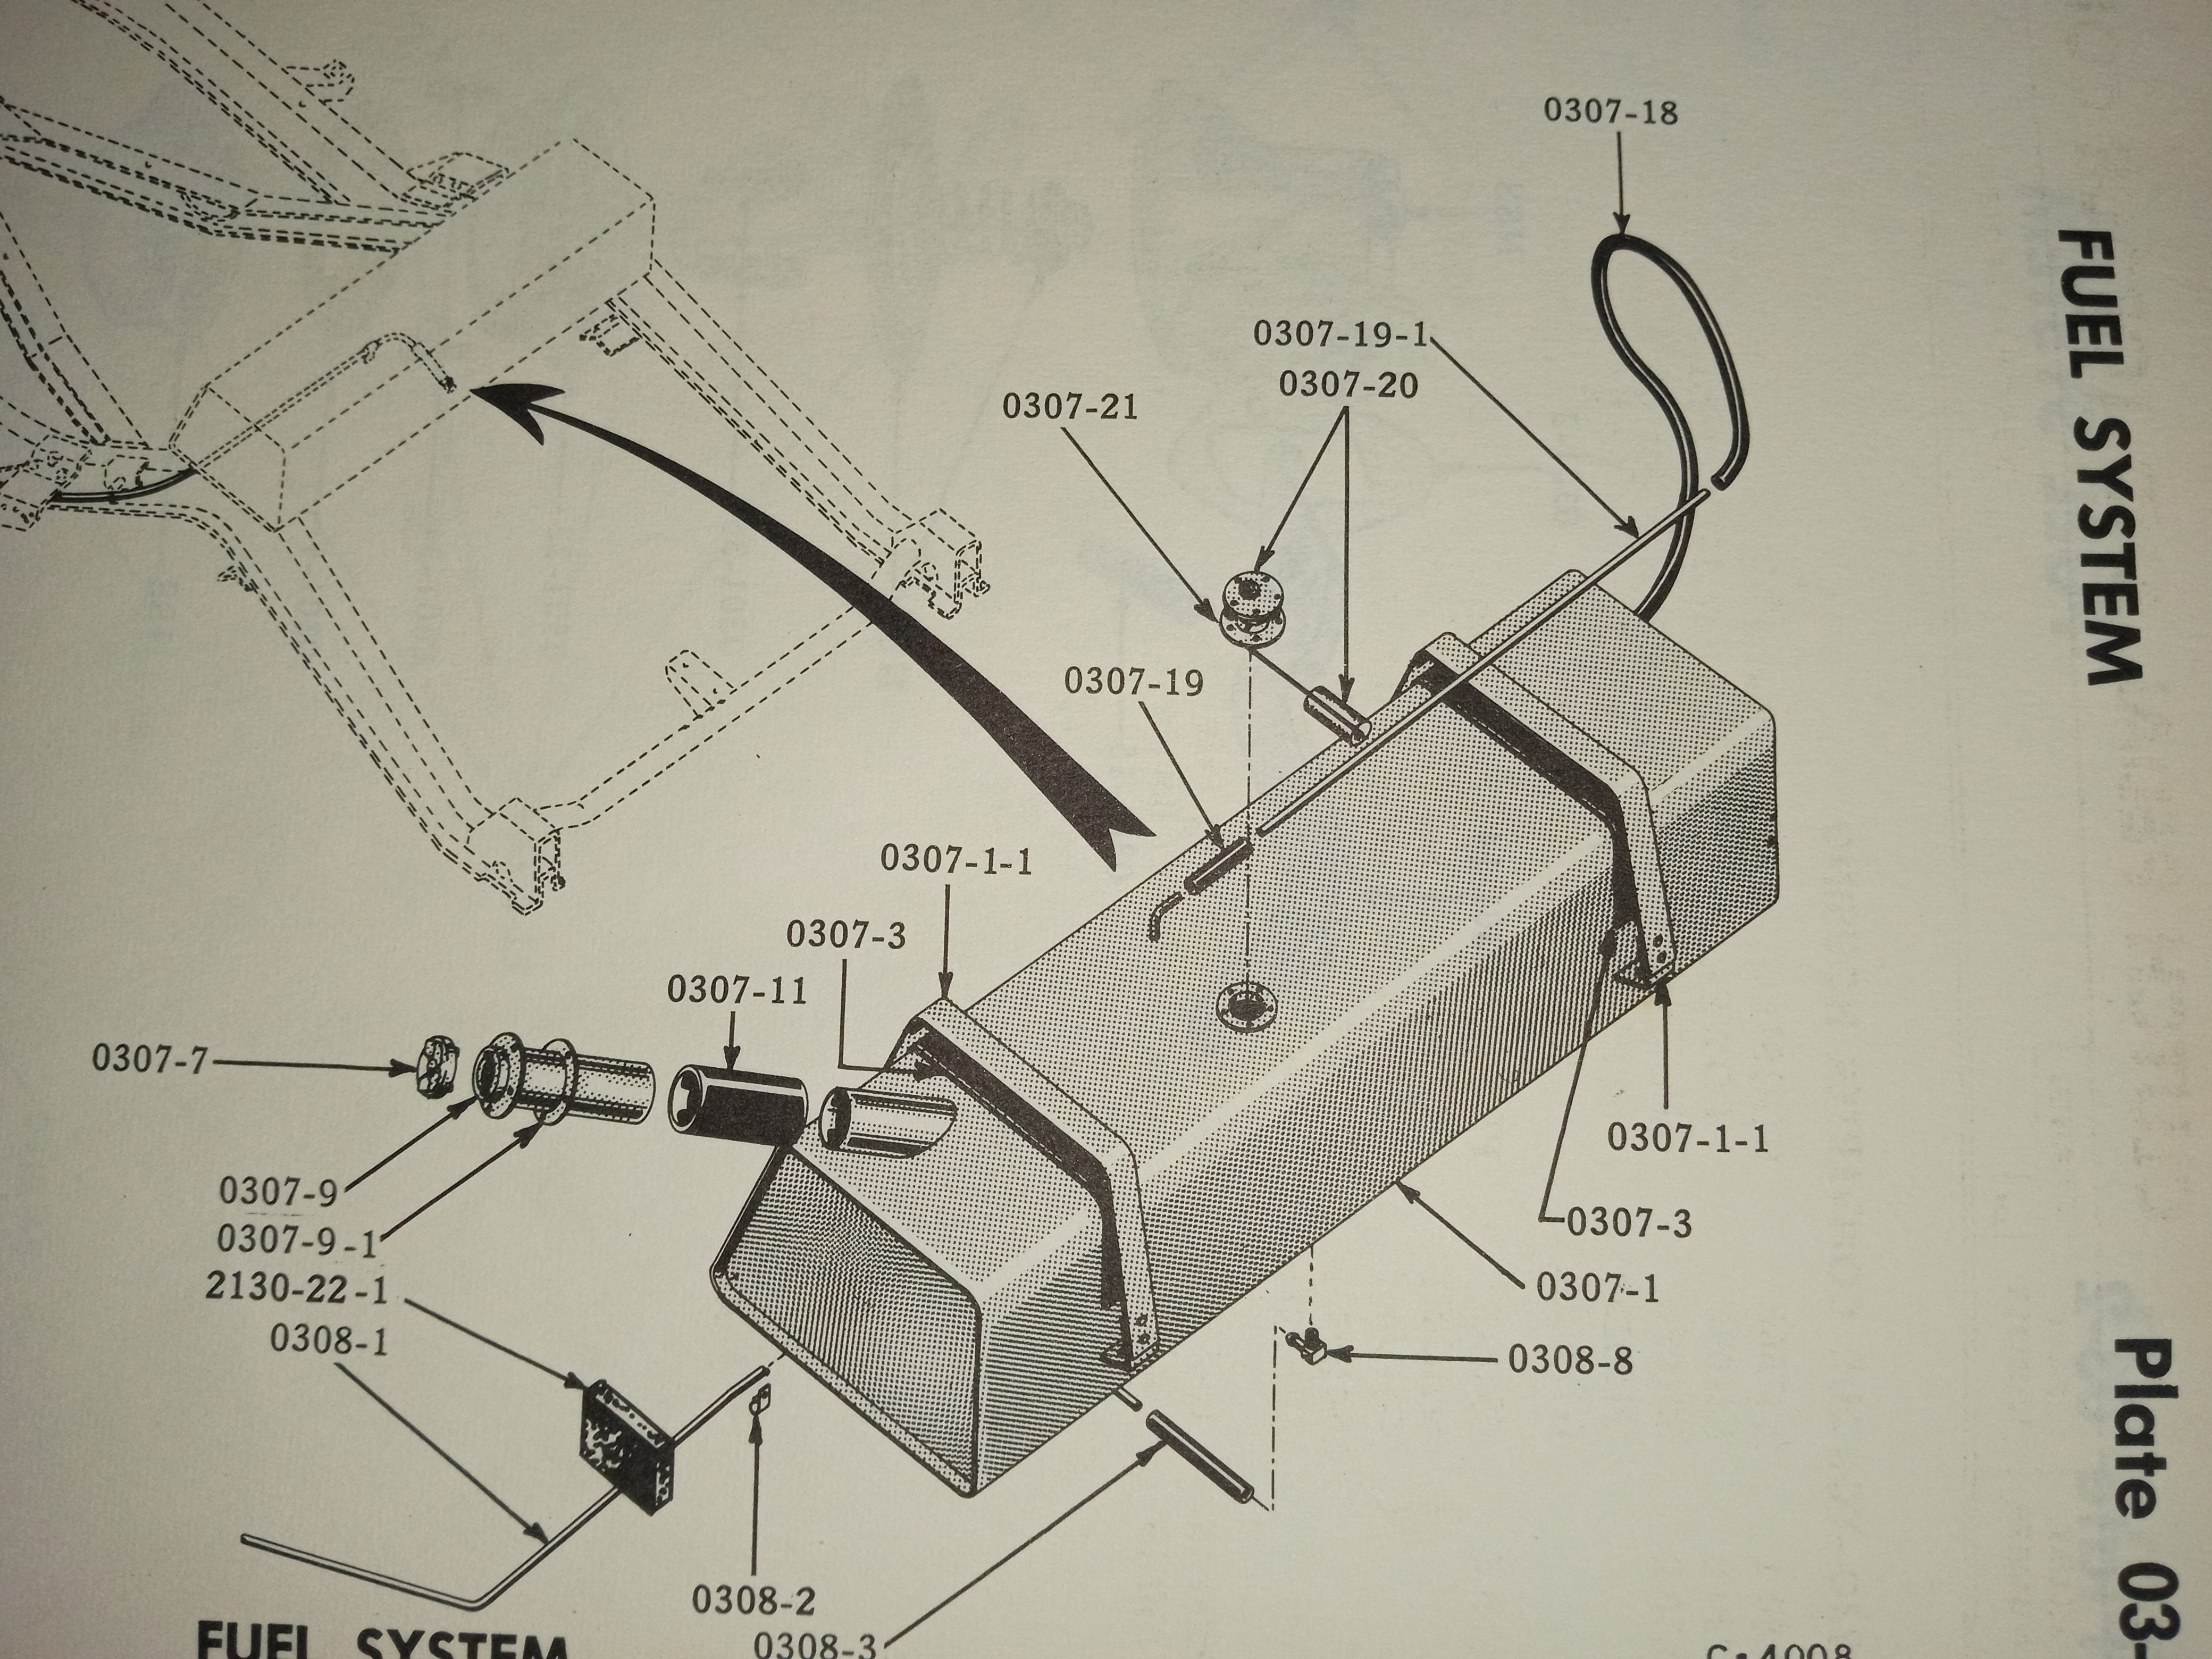
My '64 was completely disassembled when I bought it a few weeks ago including the fuel tank and sender. After cleaning the tank and coating the inside, I'm ready to install the sender but I'm not sure how to position the float as to it pointing forward or backward in the tank? The book shows the float pointing to the rear of the car toward the trunk but the way the tank is designed and the position of the sender hole opening, it seems that would put it too close to the back side of the tank. Seems to me the float should be installed pointing toward the front of the car however I guess it could go to either the left or right side also?
-
My recently acquired '64 did not have a glove box or console key either, I went to a local Mom and Pop locksmith, I gave them the trunk key number from my production order paperwork and they made me two keys.
Seems they had a computer program which would print out a sort of punch card, specific to the car make and key number which they input into the computer. The card is then taken to their key cutting machine and in a matter of 2 minutes they can make a key.
As I said they are an old established mom and pop locksmith and have antiquated key cutting machines but they seem to work well, they made me two keys for the glove box/console and cut me one key for my ignition for which I had supplied a key blank, they charged me $15 for all three keys.
-
My fuel sending unit is corroded and not usable, I have an aftermarket VDO sender which i purchased many years ago and wondered if it is a suitable replacement but I would have to know the OHM range for the original Studebaker unit; wondering if anyone has that information?,,,
-
12 hours ago, regnalbob said:
You have to turn the valve to the left (toward the engine) about two inches to remove it.


Thank you, that's what I needed to know,,,
-
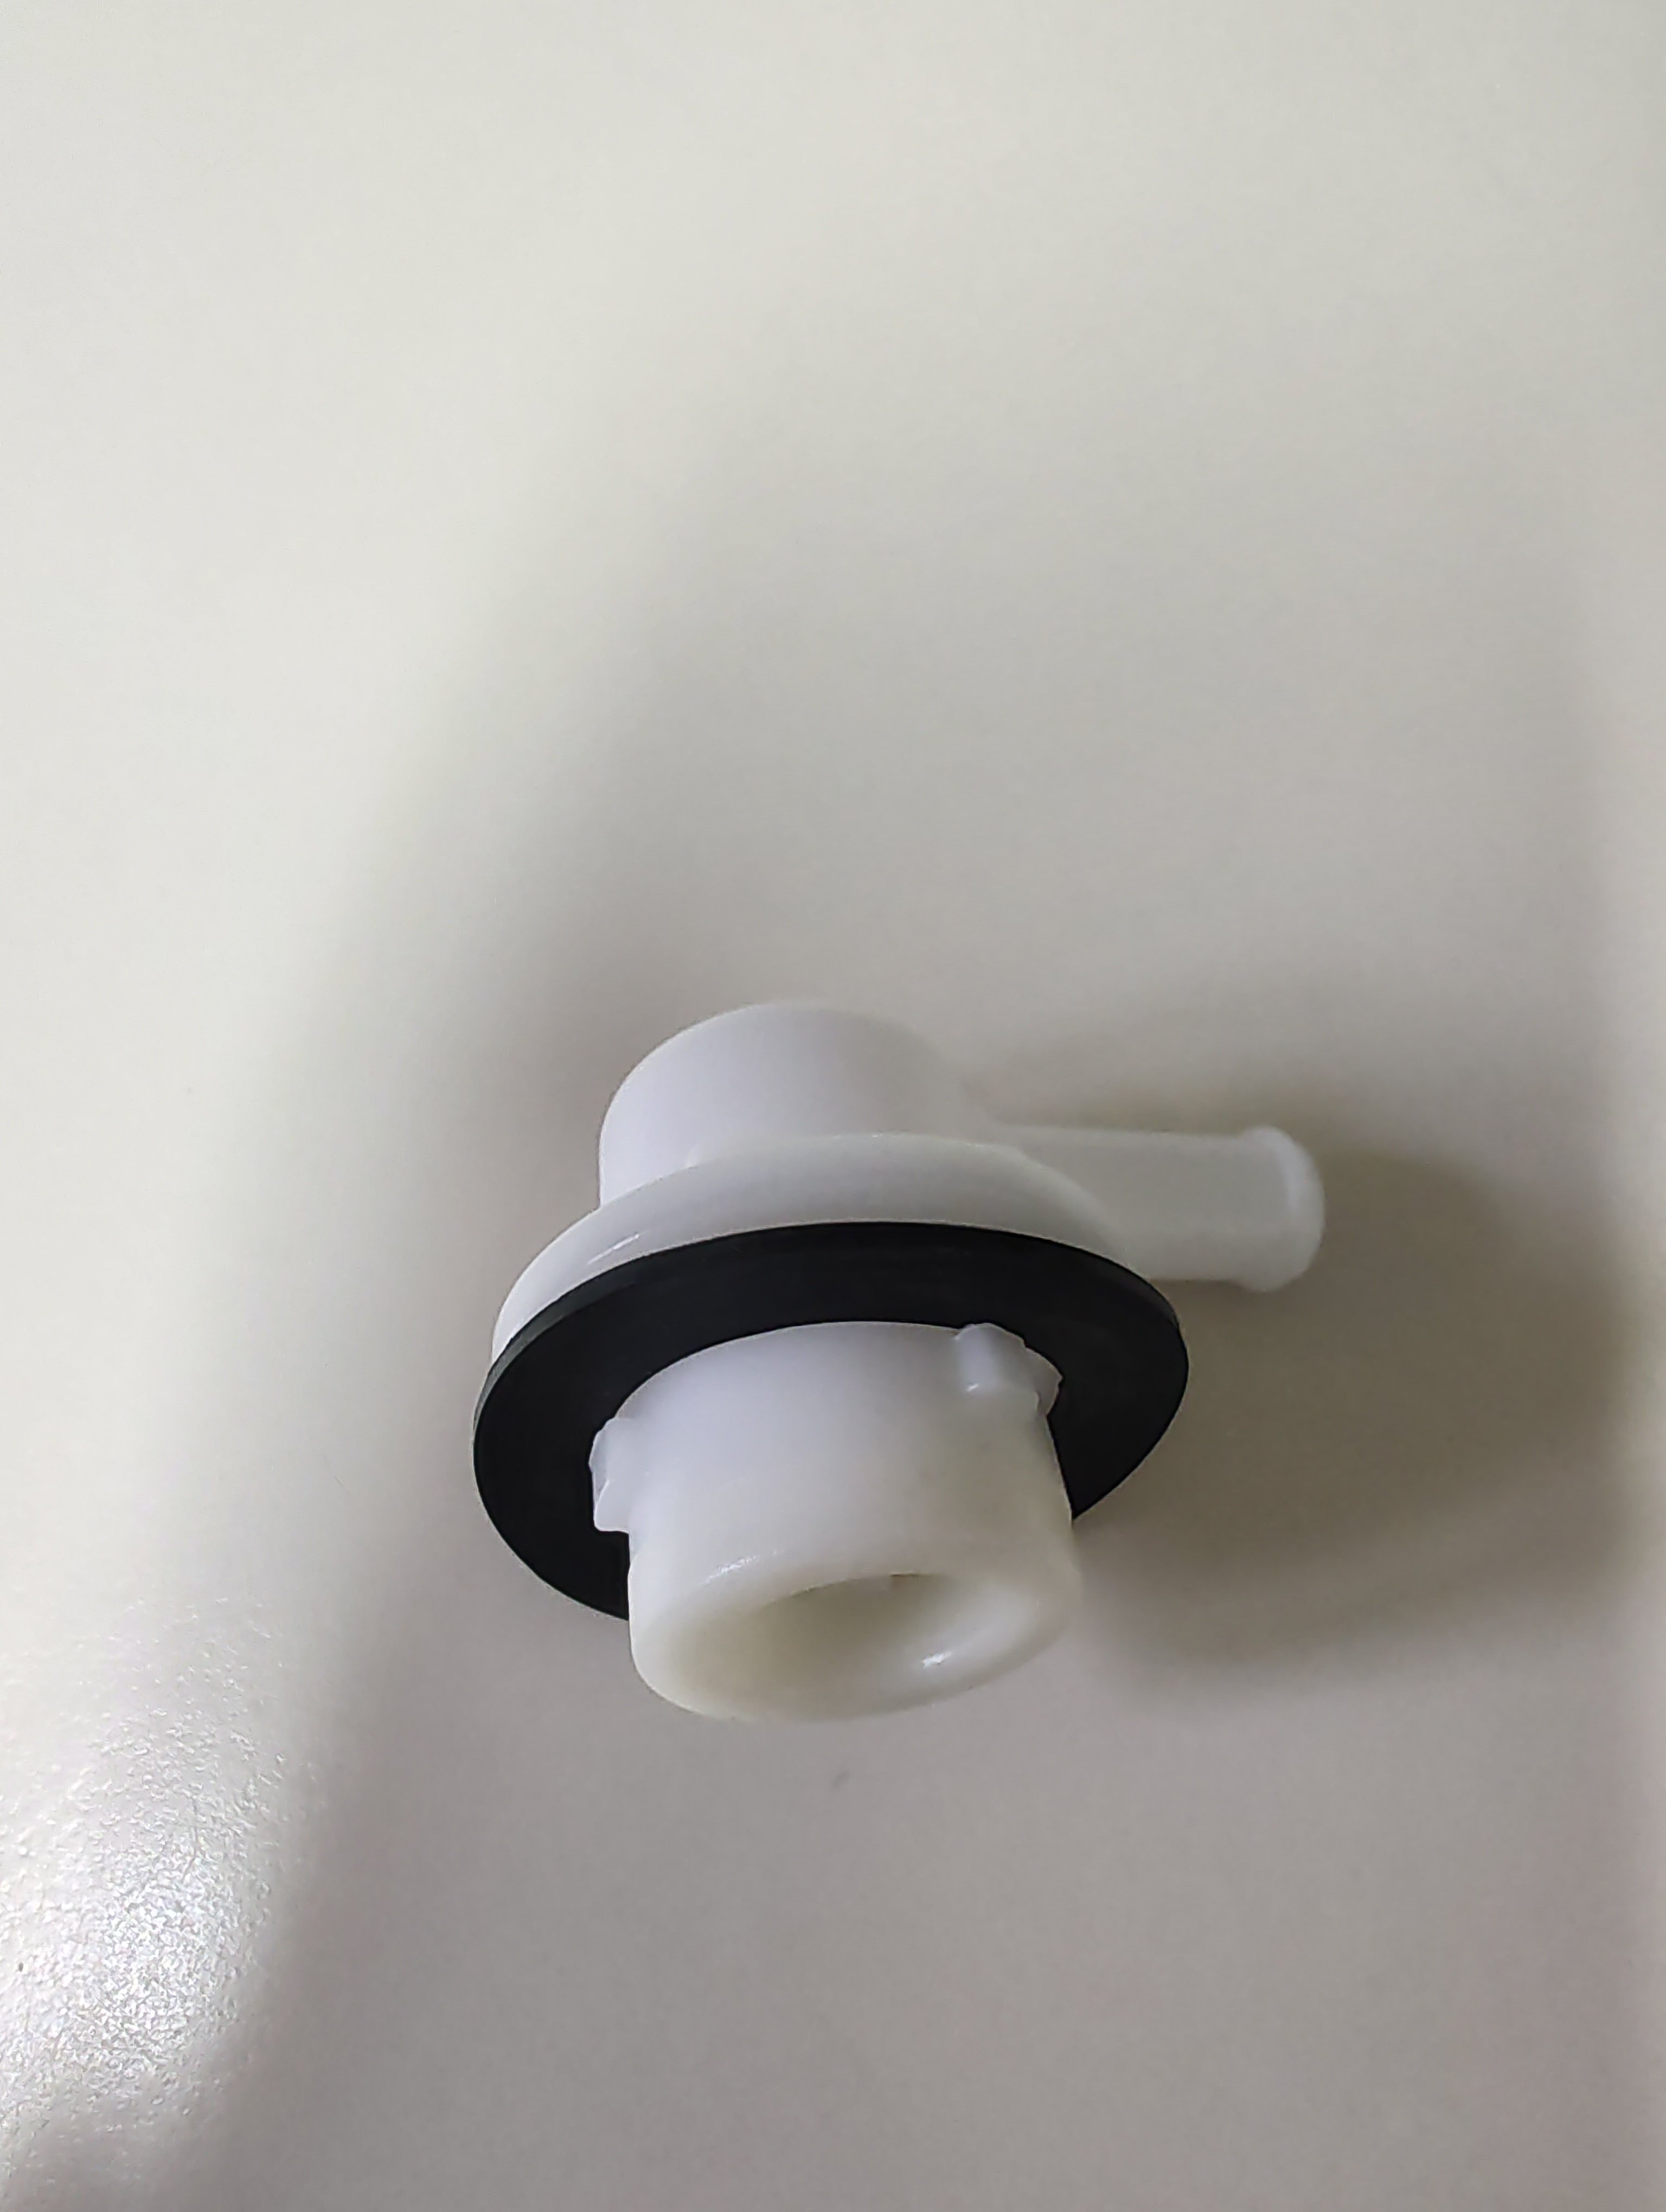
Having trouble removing the power brake booster check valve from my '64 R2 which sat in a garage since 1970, it's probable the original. I know most check valves from cars of that era simple were pressed in to the rubber seal and would just pry out; is that the case with mine or is there something I'm missing?,,,
-
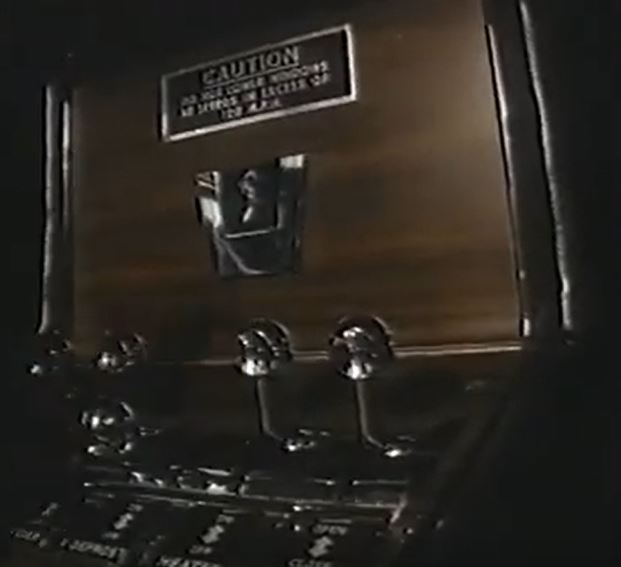
Reading some of the early problems the Avanti had, one of which beings that the rear window could pop out at hi-speed with the windows open, I was sure that the tag I found in my un-restored ’64 R2, was in fact a warning tag Studebaker had placed on the console below the radio.
Today I can across this video (link below) in which you can clearly see the tag on this ’63 (or could be early ’64 due to the wood grain dash, steering wheel, and all black interior).
I cut a picture out of the video to include in this post, the video only runs about 5 minutes and the interior shot with the tag starts about 4 minutes in,,,
https://www.youtube.com/watch?v=G8LYWXq9rB4
-
18 hours ago, Gunslinger said:
Once the radio is out the speaker and grille can be taken out from underneath by removing four nuts. The speaker will drop down and the grille will then pull out from above. If you plan on replacing the speaker…two things to make sure of…get a speaker of the same impedance (ohms rating)…and get a speaker the magnet is not so big it hits the radio body.
Thank you, that is the info I needed, the front and rear speakers I believe are original and suspect the front, like the rear, has a broken cone; too bad Studebaker didn't make the front grill removable from the top, it's a lot of work just to see the speaker's conditon,,,
-
How can the speaker gill be removed?
-
7 hours ago, Gunslinger said:
If your car has no a/c you can probably remove the radio from underneath…where the a/c evaporator would be. If you do have a/c the dash has to be removed which is actually not that tough a job…especially if you remove the steering wheel, drop the steering column and remove the bucket seats. You really don’t have to completely remove the dash…just enough to remove the radio from behind it.
If this is the route you take…tag any and all wires you have to disconnect…you’ll save yourself grief later.
No A/C; could it be made easier working through the top to remove any support brackets or wiring, before lowering the radio out the bottom, if so, does the speaker grill just pop out or is it held in with some kind of fasteners from below?,,, Thanks
-
Want to remove my AM/FM radio from my 64 Avanti, remove the faceplate so far, now two questions:
Does the radio pull out from the front, drop from the bottom, or come out the top after removing the speaker?
How to remove the speaker grill, does it just pry up from the top of the dash?


More Problems. Calipers
in 1963-64 Avanti
Posted
Did you remove the (guide) pins on the new Jag calipers to install on your original Avanti brackets? Seems to me there is no hole in the original brackets for the pins to fit into or am I wrong?,,,