


Palantirion
-
Posts
69 -
Joined
-
Last visited
Content Type
Profiles
Forums
Events
Posts posted by Palantirion
-
-
mod delete
-
An update: For the past week I had the car's vent tube plugged and the (non vented) gas cap cracked ever so slightly. It took a while to properly blow out the old gas fumes but since then there has been no increase in vent fumes.
While Ntenna's description is likely what happened during installation, and I would like to properly affix the vent tube internally so it would operate like stock, I have too much else going on to spend time doing that right now - if it can be put off. I rarely drive the car. Does anyone see a problem with me keeping the vent tube plugged and just using the cracked gas cap as a pseudo-vented-cap until such time as I can relocate the peak of the vent tube?
-
5 hours ago, brad said:
When you said you went through the holes, I was assuming you ran it all the way up into the 1/4 panel like was original. When they built the car, they ran the vent up into the 1/4 panel, and looped it over a clip to about 4" from the TOP OF THE ROOF ! Then they glued the outside skin on.
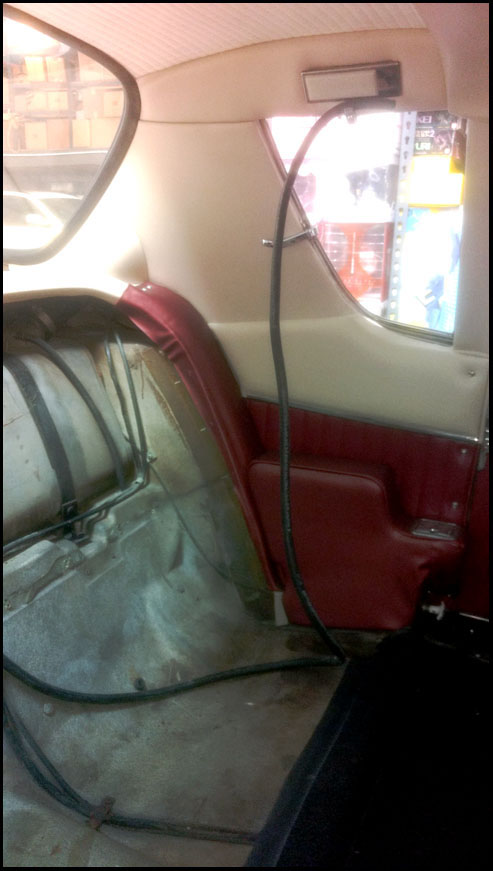
- Not having x-ray vision I cannot confirm exactly how the hose ran within the c pillar. But once I got it bent back through both holes I fed it evenly so that all the length from my first page pics was up in the c pillar - save for the 2-3' needed to go from the c pillar through the floor.
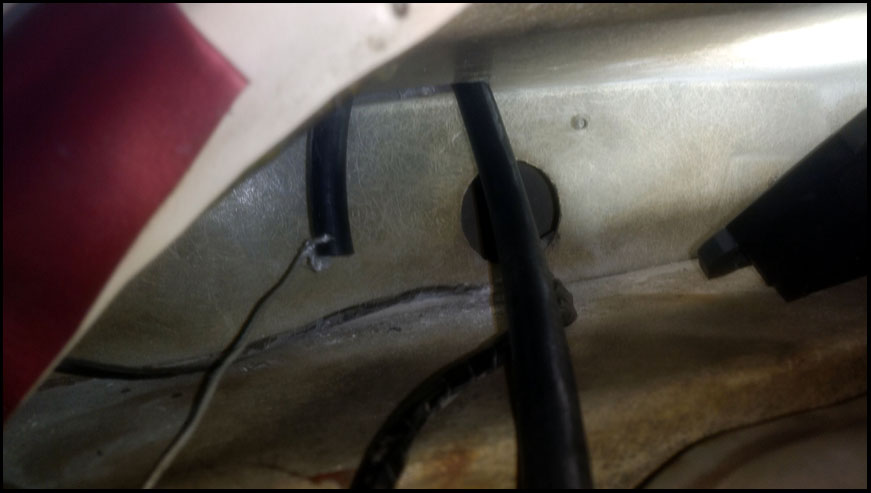
http://aoai.org/forums/uploads/monthly_2021_05/1784714215_2104-28newfueltankventtube(2)_72.jpg.856ef74392fbde9538dd37205c45e5e1.jpg
http://aoai.org/forums/uploads/monthly_2021_05/479298818_2105-12venttubeoncoathook_72.thumb.jpg.72cefee94d7c093fae5844f88a9161fb.jpgI felt no resistance while feeding the hose up, didn't hit anything like a clip or snag, so I am fairly confident that it stayed vertical. But I can't know for sure. I was thinking that maybe it is possible that another 2-3' (which I could add with a barb fitting) might help push the peak of the hose higher. But without being able to mechanically secure it within the c pillar it might also make it more prone to bending which might defeat the purpose. Going from my memory of removing the old hose I believe my replacement is actually a little bit longer.
What puzzles me is why, with the car just sitting and the warehouse kept at 75F (+/-2), there is still pressure being build up within the tank. Can someone explain why this would occur? AND why it didn't occur prior to me opening the tank to replace the sending unit and the vent hose.
-
6 hours ago, Ntenna said:
The second pair of holes is about 2” above the lower pair. I could be wrong, but I think the idea was to get the top curve in the vent hose well above the filler neck.
- Because of the tight space I was working in I never got a picture of what was up inside the two lower holes. But I could feel with my finger something like a plate a couple inches above the holes. It felt like a small plate, I didn't feel holes, and now I wonder about "running changes". Regardless, I had to bend my wire-string-hose apparatus over that plate because it wouldn't bend under it. And, from the length of the hose I pushed up into that space I'm sure it's plenty high.
p.s. I have a borescope. I remember this now. Would have been nice to have remembered it then.
-
7 hours ago, Avanti83 said:
By the same logic, if the top of the loop in the vent line is well above the tank top, why would the fumes go up and out the vent line?
- Exactly! It would have to be positive pressure. The vent line's primary purpose is to allow air into the tank to fill the displacement of fuel leaving the tank.
-
2 hours ago, studegary said:
Why wouldn't the vapor be able to come out of the filler neck?
- According to what I have read (and experienced) gas vapor is heavier than air. Thus is could not go up the filler neck unless the tank experienced pressurization.
-
3 hours ago, Ntenna said:
If you have not buttoned up the back area, suggest you cap off the fuel vent tube by the sender, find a non-vented gas cap and give it a day at the constant 75 degrees in the warehouse. If no smell, go back to vented gas cap, run the gas vent hose as you did out the quarter window, up to top of roof and back to middle wheel. Let stand for a day again. It's detective work for sure.
Goal is to be certain 1) nothing else is leaking, and 2) you got high enough with that vent hose. There are actually four fiberglass holes that have to be passed through to get that vent hose all the way to the roof.
- I buttoned the back up because of a show, but it's easy enough to pull the rear seat and bulkhead again. I like your idea for diagnosing. I do NOT like that you said there are 4 holes that the hose needs to pass through...makes me wonder how high the other two are and if my hose went up to that area and then got turned around a few inches too low. You wouldn't by chance have a picture or diagram of the layout would you?
FYI, I did try something a couple weeks ago...I removed my (non-vented) gas cap and then blew through the vent tube to clear any vapor, then I left the cap off overnight. The next day my warehouse stunk SO much more than before. And that confused me because the vapor shouldn't be able to push up through the filler neck, right?
-
-
4 hours ago, studegary said:
You have to allow for expansion with an increase in temperature. The car does not have a closed system, like a modern car. Unless you do a complete conversion on your car, you should live with the small amount of vapors from the system. The vent should work in both directions.
- I had thought about that, but two points that puzzle me:
1) The car is kept in a air conditioned warehouse (max 75F) and yet the vent still expels fuel vapor. The only differential would be from the temp dropping at night, rarely below 60F.
2) The car did not used to make gas smell. Not until the original vent tube started weeping fuel, which was then smelling inside the car. I was not getting fuel vapor from the original vent tube with the car in the same condition and space.Come to think of it, I didn't get any fuel vapor smell even year ago when the car was in a garage with a much wider temperature swing.
-
Aaaaaand we're back. I ran the new vent tube through the same hole as the original. The gas smell never quite went away. First I thought to blow out my shop to ensure no previous vapor was hanging around. Then I thought maybe there was something within the fuel system that might change after the car was run so I took it to a local show and back. I had it on my rack today after noticing the faint smell of gas vapor and vapor is definitely being pushed out through the vent tube. There was no dripping that I could see, but there is enough vapor to build up to visible moisture. Why is this happening?
I am considering using a 1-way ball check valve to prevent gas from escaping the vent tube while still allowing it to draw in air. But I wonder if there might be any negative consequences if the tank can't push vapor pressure out (except through the fuel lines) if it's outside on a hot day.
-
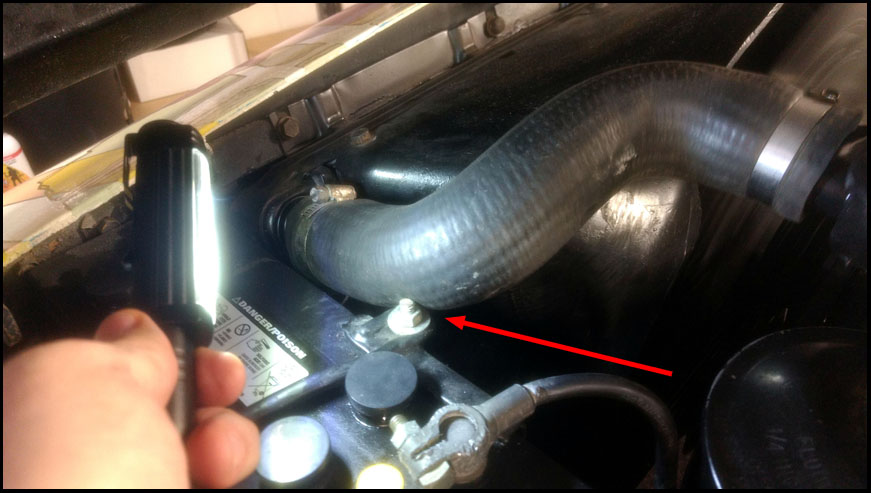
I was under my '64 Avanti today looking for potential rattles and leaks and noticed that the washer on this stud was completely loose. It seems to me that this is part of the parking brake assembly and that the nut and washer should be snugged up to the front end of the bracket to keep the wires tensioned correctly. Am I wrong?

-
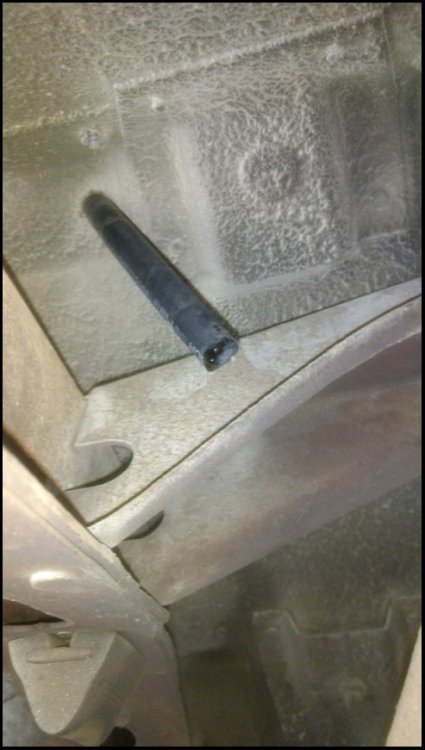
For those (like me most of the time) that think kids these days don't care about working on cars...well, most of the time they'd be right. But there are exceptions: A front desk kid at a local BMW shop (where I was having some other work done) suggested that I drill a hole through the tube and use string to guide it around the internals. He was on to something. I ended up having to use a long twist tie to curve around whatever is inside that panel and then used that to pull the string which then pulled the tube successfully through both holes! It took a bit of futzing to get the right degree of tension on the tube to make it line up and pass through the 2nd hole, but overall it was not a nightmare. Kudos to those of the new car guy generation.
-
*SOLVED* 😣

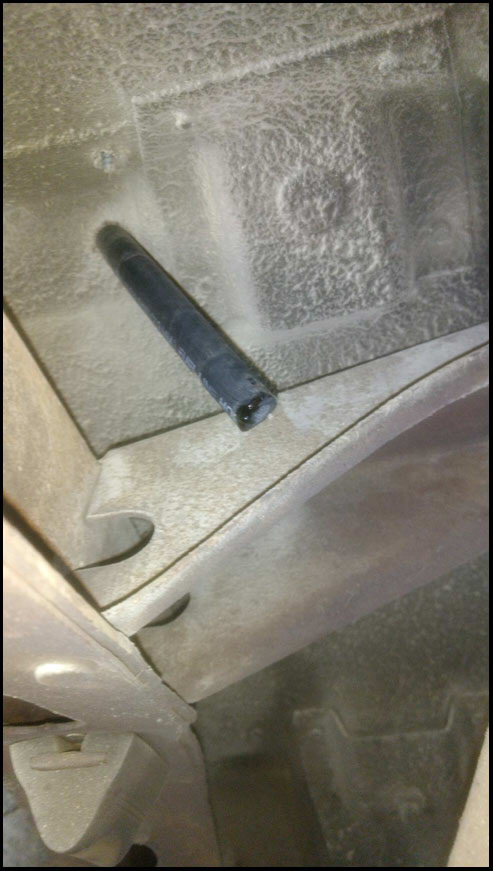
Using a Dremel I was able to cut out the panel between the two holes for the OEM vent tube, and eventually (rotating locking pliers against the panel for torque) I removed the hidden length of the original tube. It was nearly 2' long! Unfortunately I can't simply push the new tube up the gap because there is a second plate behind the panel I just cut, between the two holes. I can't see it, because of the tiny space, but I think it's fiberglass. I also am not sure if I should cut it - but it will be much more difficult because of the size of my cutoff wheel and the tight space. I was thinking of maybe trying to use thick armature wire as a guide to maybe force the new hose into turning inside the panel so I can run it like the stock hose. Does anyone know a good trick to make a rubber hose turn 180 degrees in a blind inaccessible cavity?
p.s. My gas cap is not vented, I checked: Blew into the vent tube with the cap on - blew gas vapor back at me. With the cap off it did not.
-
On 5/8/2021 at 5:21 PM, bob caser said:
You might want to consider making a charcoal canister for the vent hose. I have had the same issue over the years with a variety of cars that vented into the open air and it resolved the issue.
Bob Caser
Got a link to one I could buy that would fit the hose?
Or...what about using a check ball valve like this one?
https://www.amazon.com/gp/product/B08PSYF3GZ/ref=ox_sc_saved_title_1?smid=A1THAZDOWP300U&psc=1
-
4 hours ago, brad said:
The vent originally connected to a hard line, then the rubber line went up into the 1/4 panel, and was secured by a riveted on clip. then it went back down to the hole in the floor. That way it's up high enough that no amount of fuel sloshing would cause the vent line to fill up with fuel.
Also, check the fill tube large hose, they can hide cracks behind that are not visible unless you take it out. If you do, pay attention to the clocking of the fuel cap, so when tight the ear doesn't hit the filler door when it's closed. Also check the solder joints on both the return line and the vent line on the top of the tank. A poor trunk gasket, and also exhaust deflectors that have slots in the clamp end can all contribute to fumes.
I doubt I have fuel inside the hose, the engine has not been turned over since I started to fix the gas smell issue. The figure 8 arrangement was partly because I didn't know if it would be a permanent solution so I didn't want to cut the line shorter than might be needed, and also because the figure 8 would keep the hose longitudinally stable during driving - relevant since it wouldn't be stabilized by going into the c pillar area like the stock one.
Sending unit was replaced and is sealing well. The filler neck doesn't smell at all and is not sweating. The tank's solder joints are solid.
There is no large hole for the original vent tube to go up into the c pillar area, there are two small holes each barely large enough to accommodate the Studebaker hose. As I mentioned in my OP, I would have replaced the hose exactly if it were possible, but currently I don't see a way to do that. Open to ideas...pictures would be even better.
The gas smell is definitely coming out of the vent tube. And I confirmed this by temporarily plugging it. What I would like to know is: WHY? The vapor, which is heavier than air, would have to travel up the new hose twice before falling down and exiting outside the car. And I cannot have fuel vapor leaking out making my warehouse stink. It's chemically bad for all plastics, and a potential fire hazard.
As for letting fumes escape, since I have a vented gas cap would that not also allow equalization of air pressure? So why have a second vent (tube) if the gas cap is already vented?
-
Hello all. I recently had to replace my Avanti's fuel tank vent tube because I could smell gas coming out of the pores of the rubber. I believe it was original to the car. Certainly the sending unit was, which I replaced, and its gasket was nearly dust. However after all this I was still getting a strong gas odor from the car. I crawled around sniffing everything I could find and discovered that the smell was most notably coming from the end of the vent tube under the car!
I thought that since gas fumes are heavier than air that the figure 8 arrangement would have kept gas fumes from exiting the hose. I would have liked to have run the hose up in the c-pillar like the factory one, but there is no practical way to access that area. As a test I used a piece of a Home Depot bag and a rubber band to cap off the bottom of the hose, and the next day the gas smell in my shop was almost gone! But obviously that isn't a solution...so what is?
p.s. I am using a new Avanti fuel cap, I think I had bought it from Studebaker Intl but it's been 6-7 years. If memory serves it is a vented cap.
_72.thumb.jpg.2068274c5c8d93cf6442f4be935f4d56.jpg)
-
6 hours ago, regnalbob said:
.
The stud is not soldered to the tank. It is a weld stud.
The bracket is slotted and can be adjusted at the block to raise it so the tank will rest on it.
There should not be that much space between the bracket and tank.
-Hmm, well I wonder why I am studless then. Frustrating.
I can look into adjusting the bracket, that's a really good tip! Would you consider it resting firmly on the bracket (on on a silicone pad on that bracket) to be an appropriate long-term solution? There wouldn't be a connection in tension, and there would be more strain put on the water pump fitting than if it were secured via a positive connection.
-
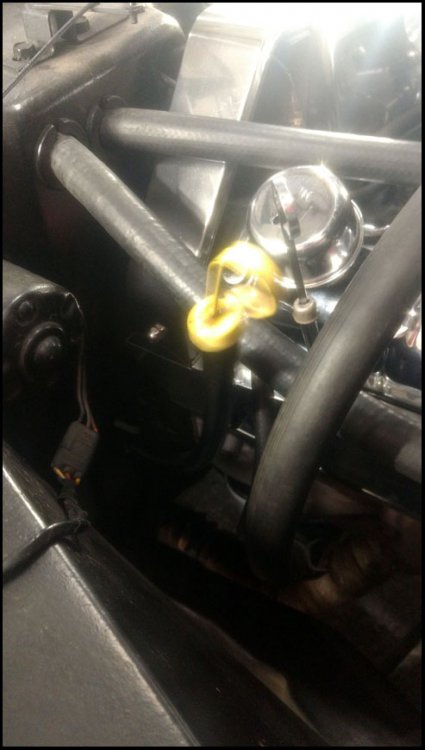
Did some work today. See pics of my improvised short term solution for the expansion tank. My car will be in an art museum for a month in a week and a half, and I don't have time to properly remove/repair the tank before then. A very ghetto repair, but now the tank doesn't vibrate out of sync with the engine any more. Drilled and tapped a piece of scrap pine (from a stake) for a spare bolt I found, then shaped it with a knife to fit with just a little upward pressure on the tank, then adhered a little pad of hi temp silicone to dull any micro impacts.
And speaking of vibrations. See the pic of the trans dipstick. It's blurry because it's bouncing a lot more than the rest of the engine vibrates. Makes me wonder if it's missing a bracket towards the top or something.
_72.jpg.bb9ea913fe6e4bbe21152107e0935410.jpg)
_72.jpg.dcea47712c2ec96a4abfb0a6440bb6d1.jpg)
_72.jpg.dc41edd842839abdc68196a43b542f76.jpg)
-
Thanks so much for the ideas guys!
And if during its last "repair" the stud on the bottom of the expansion tank was not brazed back on? Then what...
And if it is there, should there be a washer between the tank and the bracket? Something was there before, judging from my pic. Or perhaps a rubber washer?
p.s. Is the tank brazed together (what I had been told), or soldered? Because I can do the latter, have not attempted the former.
-
To excessively condense the story: I am taking back ownership of fixing my Avanti due to yet another incompetent mechanic. I have already solved several persistent leaks after discovering that certain transmission and oil pan bolts were not torqued to spec. And the upper dipstick tube was not connected to the lower, so the dipstick tip was just hanging in mid air. Fun stuff to discover 😒
I was chasing down the remaining leaks today and when I had my R1 (actually an R2 block with R1 innards, long irritating story) idling I noticed that the expansion tank was vibrating a lot more than the engine. I put a little downward pressure on it with my hand and its vibration sync'd with the engine's. Then I noticed what seems to be an unused bracket below it. I am concerned that maybe the brazing of the tank might fail sooner from the excessive vibration (it has failed before), so if I can secure it better I want to. Advice?
Also, the upper radiator hose is resting against the battery bracket stud threads. That's not right is it?

-
Thank you very much! Off to the store(s)...
-
I discovered last night that I need a new DS headlight bulb. Is this by chance a standardized 1963 part that I can get at Autozone? Or am I going to have to go through a specific Studebaker online retailer? Thanks.
-
Through some driving and cold calling I ended up finding a great mechanic here in Orange - specializing in pre-war restorations but with a racing background. He fixed several leaks that apparently eluded OCS, and is reasonably priced for the thoroughness of the work. His workflow is very dense and he is "appointment only", so if you want to contact him, PM me.
-
4th of July show went well, then Cruisin' For a Cure was 2 weeks ago. Tribute won "Best Hollywood", which was unexpected and awesome.
Then the engine threw a rod on the way home. So I'm dealing with that at the moment and still can't do a proper photoshoot! Thankfully I have a great mechanic and I hope she'll be back on the road in a month or so.
Pics to follow as soon as possible...
_72.jpg.856ef74392fbde9538dd37205c45e5e1.jpg)

'63 Avanti fuel tank vent tube issue
in 1963-64 Avanti
Posted · Edited by Palantirion
mod delete