


AD
-
Posts
41 -
Joined
-
Last visited
Content Type
Profiles
Forums
Events
Posts posted by AD
-
-
Did the bell housing bolt up the same? Yes, the TH200-4R transmission will bolt to your Chevrolet engine without a problem.
No change of starter or flywheel/flex plate? I had to change the flex plate because the mounting holes for the TH200-4R torque converter did not line up with where the TH400 converter was mounted. I bought the correct flex plate at NAPA and was able to reuse my original starter.
What about the the drive shaft? The transmission length is very close to the same. Are the splines different? The TH400 and TH200-4R tailshaft splines are not the same. At minimum, you will need to replace the yoke. In my case, I had to have a new driveshaft made.
In addition, you will also need:
1. TV Cable and mounting bracket
2. TH200-4R flex plate stone guard
3. Dipstick & tube
4. PRND321 shifter lens and linkage (available from Nostalgic Motors)
5. Lock-Up torque converter system (several ways of doing this, from a simple toggle switch to full electronic. I designed my own and will be happy to share the idea if you're interested)
-
I believe there's been articles in Avanti Magazine about doing this, and it's been discussed on this forum many times. I converted my own '72 Avanti from the TH400 to the TH200-4R many years ago, and while I did not document the process I'd be happy to answer any question that I can.
-
Could you post a picture of the hose you're trying to remove?
-
I've had to add a few additional pieces of weather seal on mine at a few places. Use a strip of paper about 3" wide and about 12" long, and put it in the door opening at various places and close the door. If you can easily pull the paper out with no resistance, you don't have a tight seal in that area.
-
Check to see if you have a small seal at the top of the vent window frame, where the door glass slides up to the top. If it missing you'll get a leak. It's P/N 1328454.
These leaks can be hard to find as the water doesn't always drip straight in; it tends to run along for a ways and then drip.
Another thing that can happen is that leaks can develop between the sunroof drain channel and the roof panel. So, even though water drains out through the drain tubes, some water can make its way from the sunroof drain channel to the underside of the roof, where it will then drip off at some other location. If the drain channel looks at all rusty, probe around with a pick and see if you poke through anywhere. If you do you'll have to remove the rust, clean the metal, treat and seal.
-
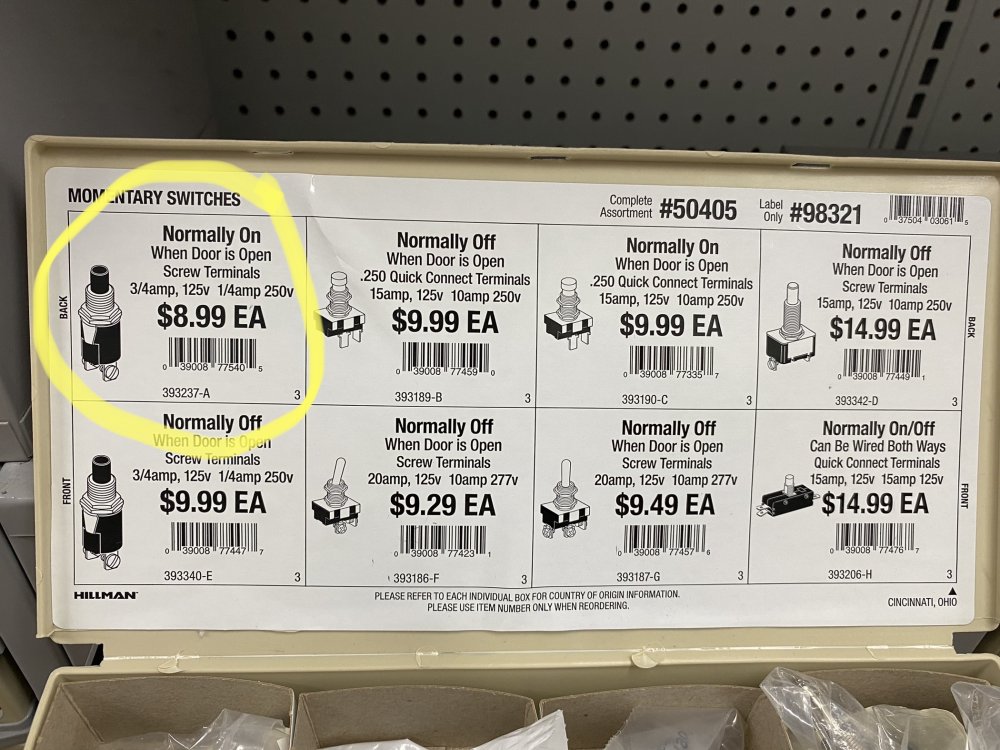
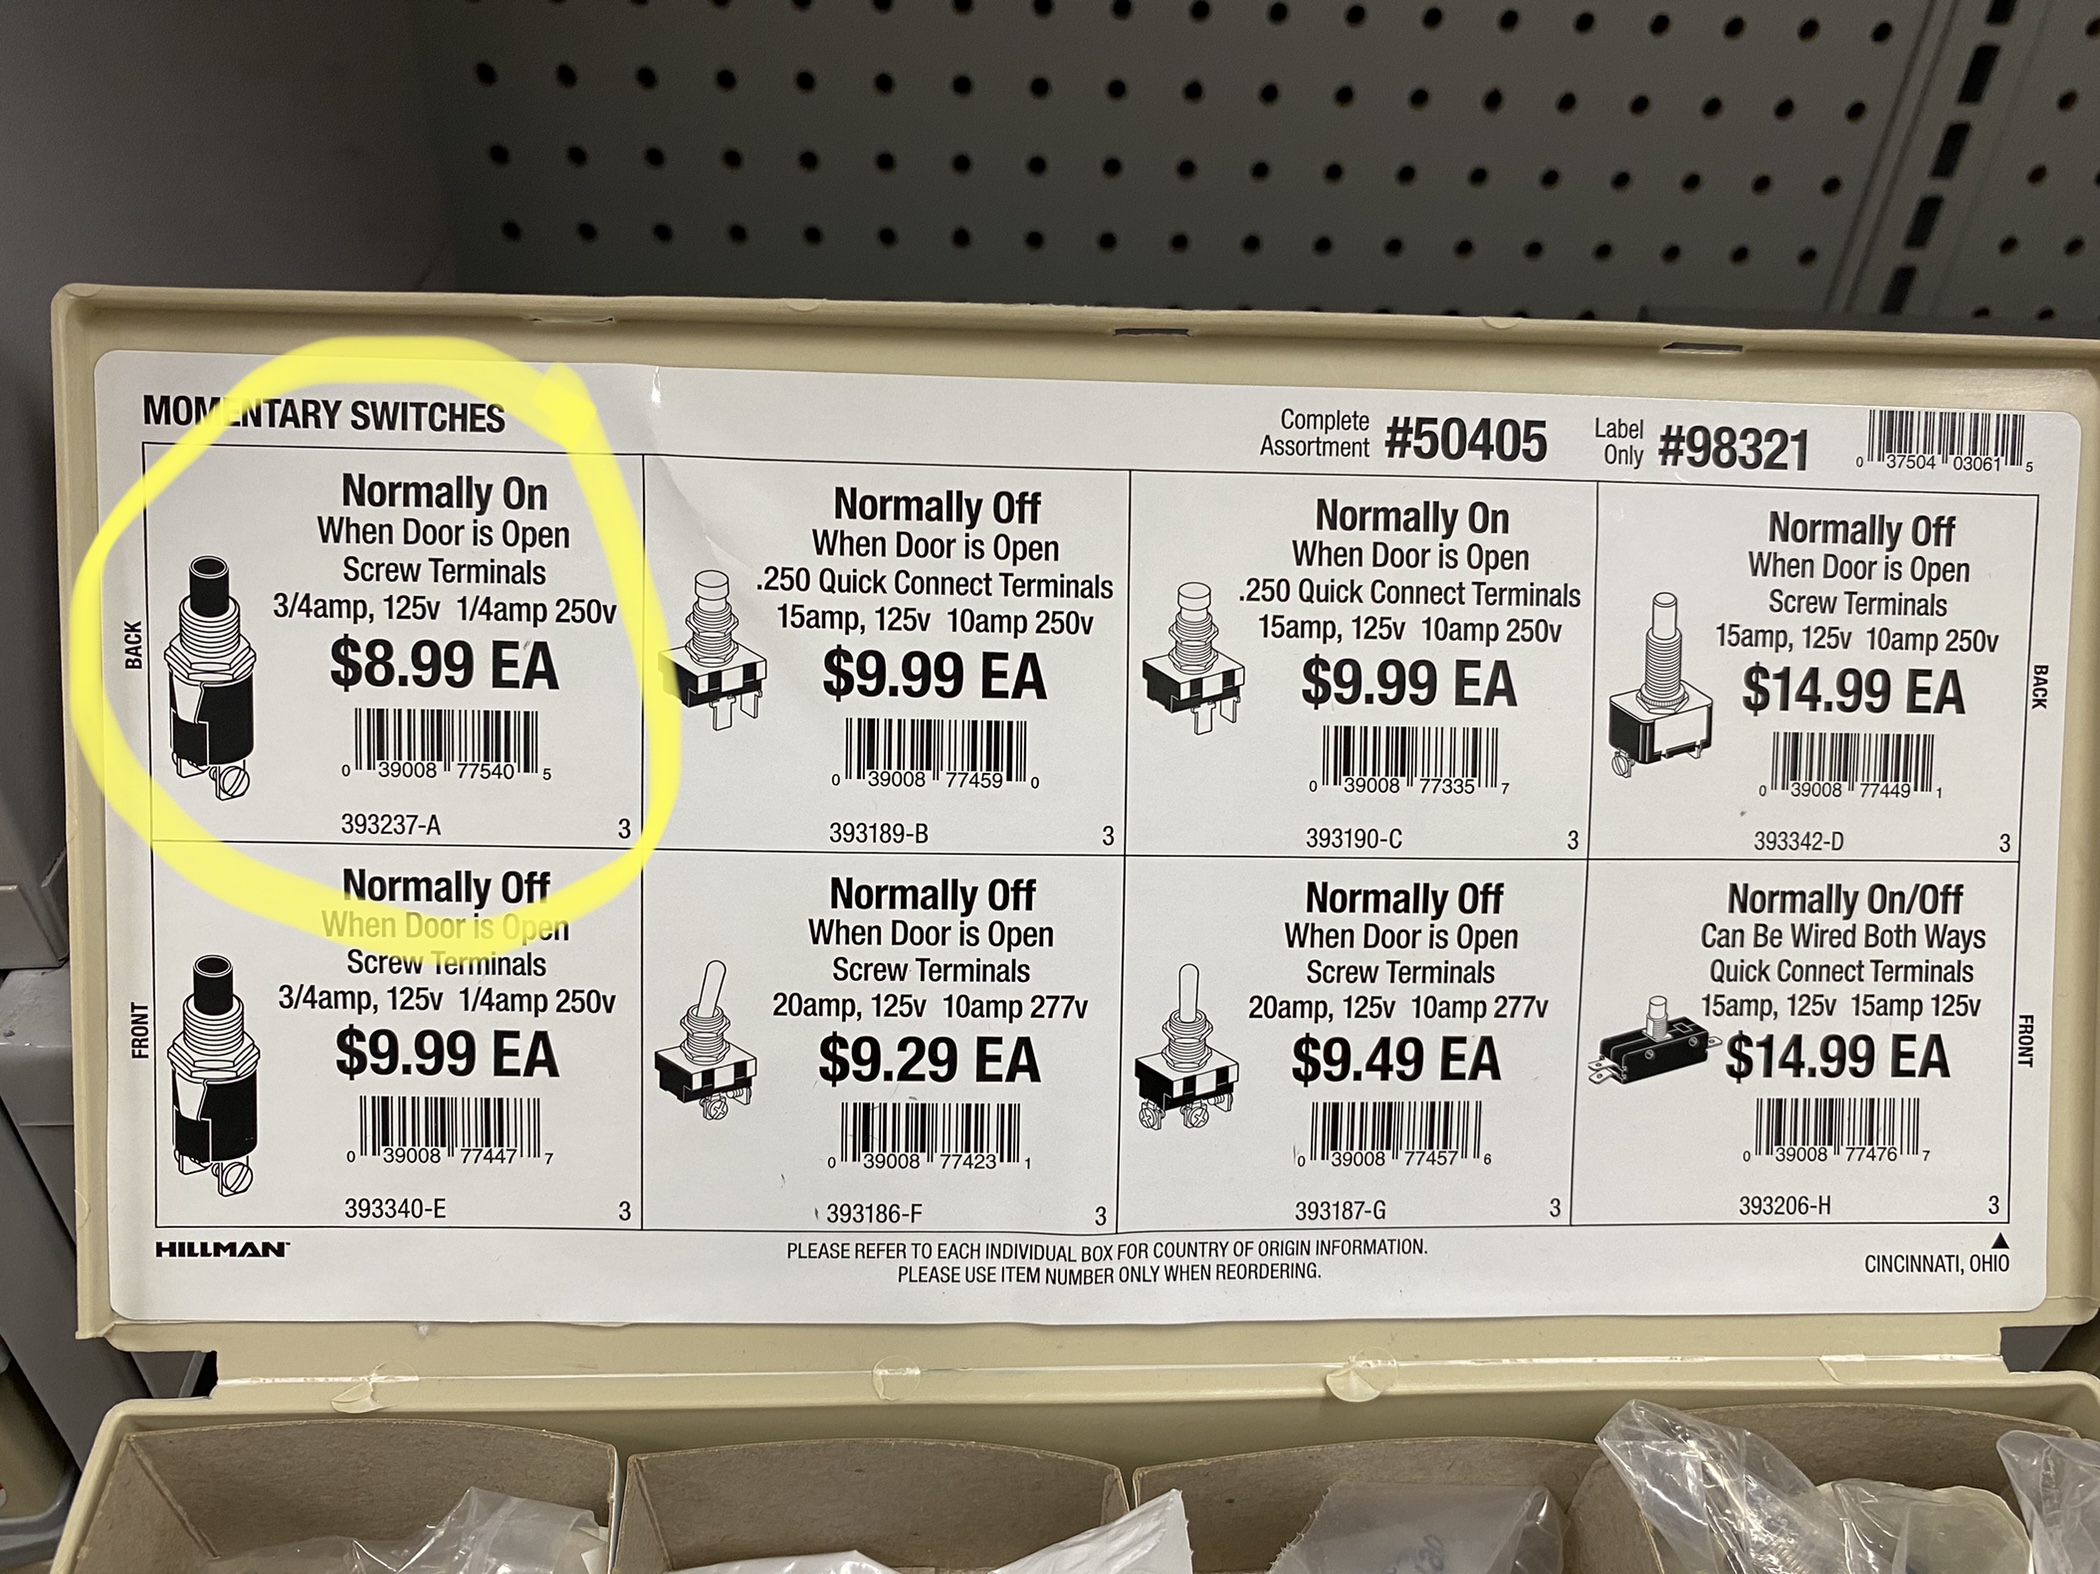
If the Avanti parts vendors cannot supply you with a replacement, you can probably adapt a similar switch and make it work. Here's a variety I found at Ace Hardware:
-
Wow that is really cool! Can you share some more pictures? I'd like to see how the Corvette suspension was attached to the frame.
-
NAPA lists Part #: PGB PBR2 for the outer bearing, and Part #: PGB PBR6 for the inner bearing. Bring your old one with to the store to make sure they match up.
Ihttps://www.napaonline.com/en/search?text=wheel bearing&referer=v2
f your Avanti has the original Dunlop / Bendix brake calipers make sure you keep track of the shims on the upper and lower caliper mounting bolts when you take things apart. You'll save yourself a lot of time when you go to put things back together. If the shims get mixed up you'll have to go through the procedure as per page 6 of the Brakes section of the shop manual to get the caliper centered on the rotor.
-
Find another tint shop.
When I moved to AZ I discovered I needed to get my Avanti's windows tinted. The first few tint shops I went to told me they wouldn't do it because the rear window would be too difficult. One told me they would do it only if I removed the window and brought it to them. (umm, no thanks). Finally I found a shop that would do the job at a reasonable price. It turned out great but they did say it was difficult.
-
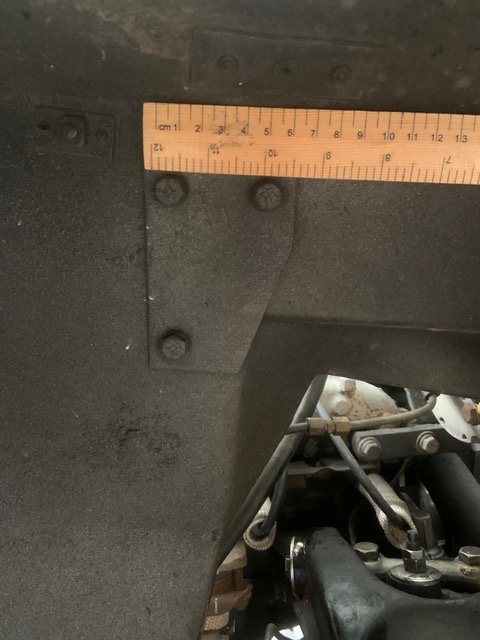
Zedman,
I was just doing some service work today on my "72 Avanti and I noticed a similar plate inside the right inner fender. The charcoal canister mounts to the other side under the hood. Could this be what you're looking for?
-
Take a look at Vintage Air. They will have everything you need.
-
I agree with what Avanti83 said above; it's probably best to rip out the mess you have and neatly run new wires. But, if you want to figure out what you have now, a 9V battery is useful in sorting out speaker wires. Just touch the two speaker wires in question to the terminals of a 9V battery, and you'll hear a noise from whatever speaker the wires go to.
As for the three speaker wires going to the back, many older stereos didn't run a separate pair of wires for each speaker. They use an independent + for each speak and a shared - (negative). So you'd have a L+, a R+, and one - that runs to both speakers.
-
I've had good luck using a "home brew" penetrating oil made from a 50/50 mixture of Acetone and Automatic Transmission Fluid. Brush it on the cable housing or wipe it with a rag wetted with this; it works pretty well.
-
I am told that the torque converter for a 200 4R needs to be locked when in 4th gear and that this is done electrically.
Yes, that's how the transmission is intended to function with a lock-up converter.
I was also told that if this was not done, the thing would/could burn up.
If the converter does not lock-up it will be slipping, which will generate more heat and shorten it's life.
I have also been told that if you keep it locked electrically all the time, it will only lock when that transmission is actually in 4th gear.
That is one of many possible ways. This will give a somewhat harsh 3-4 shift will a large rpm drop all at once.
Does this make sense and can any of you tell me what is the best way to set this up?
The "best" way depends on what you want it to do, how much you want to spend, and how elaborate you want the set-up to be. It's possible to just control the lock-up system with a toggle switch and activate/deactivate it manually. There are also aftermarket electronic control devices (look at Summit Racing, JEGS, etc) that will sense vehicle speed and lock the converter once the car reaches a certain speed. I have mine set-up so that once the car hits 4th gear and the manifold vacuum rises, the converter locks. It will then stay locked until he manifold vacuum drops very low, like when climbing a steep hill or passing. In this way the system is somewhat automatic but not computer-controlled.
-
It could be that the cork float has deteriorated and become soaked with fuel so that it's not "floating" all the way up when the tank is full. I'd check the wiring between the sender and the gauge first, using the resistors as Grob284 suggested. If that checks out ok, remove the sending unit for testing and inspection.
By the way, there should be a small panel in the trunk ,above the tool pouch, that can be removed to gain access to the fuel gauge sending unit. You should be able to inspect the wiring connections and see if anything is corroded or loose. You might decide it's easier to remove the back seat and gain access from the other side to remove the sender though.
Replacing a TH400 with a 200-4R
in 1965-83 Avanti
Posted
1. TV Cable and mounting bracket. Anywhere special to get this? They are available at TCI (tciauto.com) Bowtie overdrives (bowtieoverdrives), Summit Racing and JEGS
2. TH200-4R flex plate stone guard. Not sure what this is. Are you talking about the bottom cover under the torque converter? Yes, it's just a cover to keep debris out of the ring gear.
3. Dipstick & tube. I have a 200-4R from another car. Can I use the one that came with it? Yes, that should work.
4. PRND321 shifter lens and linkage (available from Nostalgic Motors). Pricey but I have talked to him about this.
5. Lock-Up torque converter system (several ways of doing this, from a simple toggle switch to full electronic. I designed my own and will be happy to share the idea if you're interested) Would love to know about your idea and design. I'll work on a write up with a description and drawings. Basically it uses two vacuum switches and a relay.
Another thing you will need to check are the speedometer gears in your TH200-4R transmission. You may need to change one or both of them to get your speedometer to read correctly. Here's a link that should help: https://www.tciauto.com/speedometer-gear-calculator#2004R