


AD
-
Posts
37 -
Joined
-
Last visited
Content Type
Profiles
Forums
Events
Posts posted by AD
-
-
@aardvark, have you tried contacting John Hull and asking you question?
-
One tip to add from experience - As you remove the driver's door interior panel, be mindful of the wires on the window switches. There is not a single disconect plug but rather several wires with spade terminals that connect to the switches. Note which wire goes where before you disconnect them to remove the door panel. You'll save yourself a few cuss words and a headache later on.
-
Kodjo,
Could you please explain how you adjusted the gauge after you took it apart? Is there an adjustment screw or did you have to bend something?
Thanks for all of the data.
-
Ron, I think you have found a good clue. Make sure that the inside of the lamp socket is clean and shiny. I think on a lot of these the ground wire was soldered to the base of the socket so check that too to make sure it's not failing. You might also try a different bulb just to rule it out. Good luck and let us know what you find.
-
Ron,
I believe that this wire runs all the way to the front of the car and might ground somewhere behind the dashboard. On the wiring print it looks like it ties in with the ground for the fuel gauge. Have you tried running a jumper wire from the lamp socket to ground and seeing what happens? If you do this and things act normally perhaps consider just running a new ground wire from the lamp socket and attach it at one of the body mount bolts in the trunk.
-
Bill,
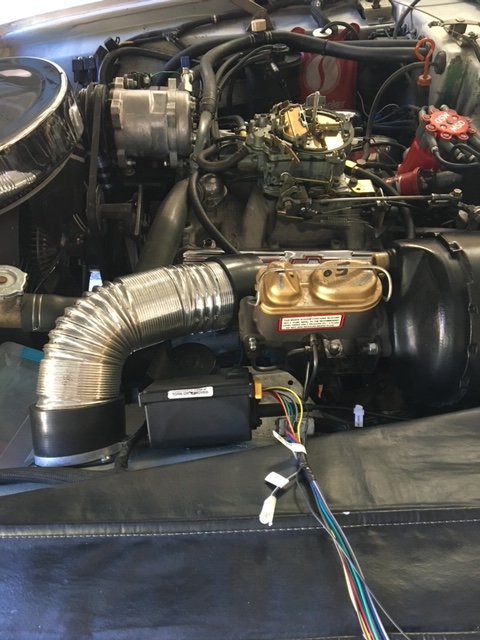
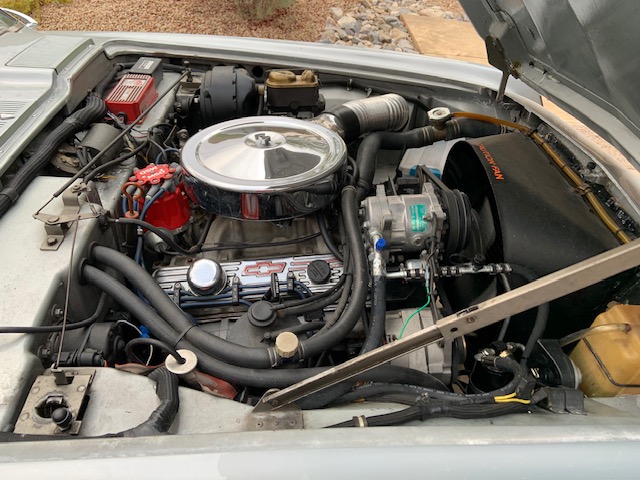
Your car would've originally had a York compressor installed. Vintage Air makes a bracket to adapt the Sanden compressor to the York mount. I did this on my '72 many years ago. This is not the only way of course; there are several companies that make brackets to mount the Sanden compressor to a SBC.
-
Nice work! Let us know how the electric fan set-up works out.
-
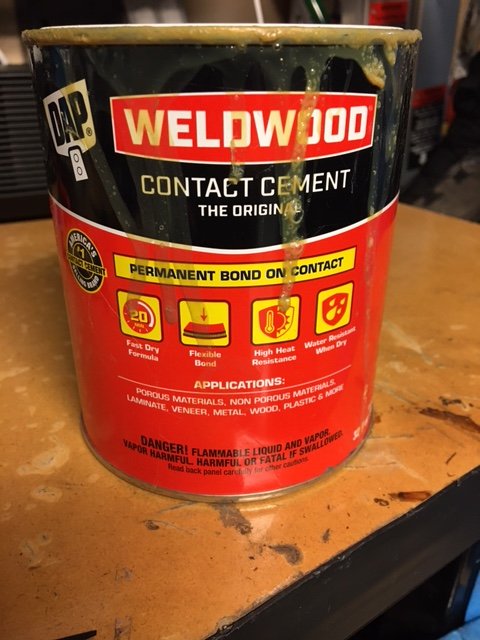
I used DAP Weldwood contact cement, available at Home Depot. I live in AZ where it gets pretty hot, and the pad has been holding on OK.
-
I believe those lights were used on Datsuns from the late 1960's -early 1970's. Take a look at these:
-
I installed the Classic Industries Hog Troughs on my Avanti II 30 years ago and I remember as being one if the messiest jobs I've ever done. I think I filled two trash cans with rust flakes and rusted metal from removing what was left of the original hog troughs. It sounds like you're on the right track -good luck with your project. There are a lot of rivets to install, so if you have a pneumatic or electric rivet gun it will make things easier.
-
On 5/18/2023 at 4:40 PM, Gunslinger said:
If your car has cruise control…it may not work properly with LED brake lights.
I had this exact problem! A found the solution after quick look through the troubleshooting section for my Global Cruise control:
"Installed LED tail lights and cruise control not working
Answer: When using LED tail lights, the violet wire at the cold side of brake will not read ground through the brake system. A five function relay will be required to let the violet wire read ground and then lose ground when the brake is applied. Connect the relay using the selected terminals below:
85 to cold side of brake (+12V when brake is pressed)
86 to ground
87 not used
87A to violet wire from cruise harness
30 to ground"
After spending about $14 at NAPA and 1/2 hr for install, I had my cruise control working again.
It's easy to forget that the "D" in LED stands for DIODE, and when installing LED lamps we're adding diodes into a circuit. Sometimes that may not cause a problem, and other times we're not so lucky.
-
I believe your radiator may have been replaced at some point. The stock system has one cap in the T-fitting between the two upper radiator hoses, and no cap on the radiator itself.
If your current radiator is in good shape and you want to keep it installed, then I believe your idea to eliminate the filler cap in the upper hose will work, The only downside I see is that it will be more difficult to fill the radiator - the cap on the radiator will be pretty far forward and the hood may be in the way. I guess you could use a long funnel. You might also need to jack the front of the car up when filling the radiator so that the filler neck is at the highest point in the system, otherwise air will be trapped.
-
Take a look at this post~
-
It looks like you have progressive rate springs. They should be installed the way you have it pictured, with the closer spaced coils at the top.
-
Have you tried contacting Rogers Protofab? They make some custom accessory brackets for Studebaker engines.
https://rogersprotofab.com/automotive-projects.php
-
There was an extensive write-up on electric power steering on this forum a couple of years ago~
-
Thanks for sharing the pictures. I've never see most of these either. Any chance you could scan them into PDF's?
-
I'm interested. Any idea on pricing?
-
Are the caliper pistons installed properly in the cylinder bores?
Do the pads fit properly without binding in the caliper? (I've had some pad sets that were slightly too large and had to be sanded down on the sides to fit properly)
Are the brake calipers properly shimmed so they are centered on the rotor?
It's normal for the caliper to drag on a bit after the brakes are released but it should be fairly free after a few revolutions of the wheel.
As mentioned above, if the booster pushrod is out of adjustment this will also cause the brakes to drag. If you feel that the brakes are dragging, one way to check this is to loosen the nuts between the booster and the master cylinder to separate them. (with the car on jack stands, do not drive it like this) If the dragging goes away the pushrod is too long and needs to be adjusted.
-
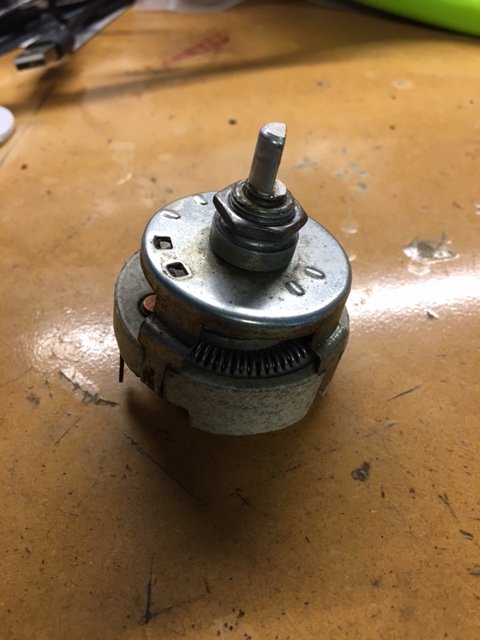
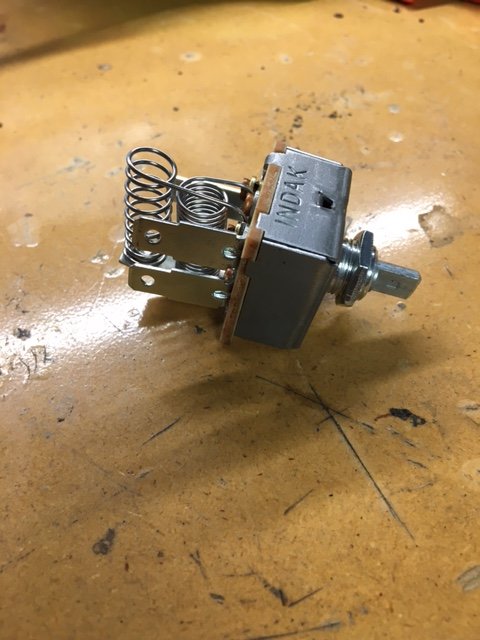
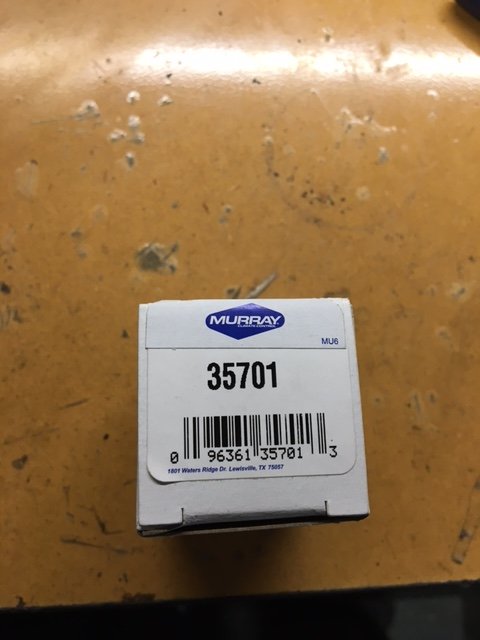
An update on this old topic~
The fan-speed rheostat in my Avanti quit working recently and is beyond repair. (it only lasted 50 years!). I searched for a bit and could not find the replacement P/N 35700 mentioned above. They seem to be no longer available. Luckily, I found the P/N 35701 switch for $22 at O'Reilly's Auto Parts. It's not a rheostat; it just has off-low-med-high but it gets the job done. I'll keep looking for a proper rheostat replacement and if I find one I'll post an update.
-
1. TV Cable and mounting bracket. Anywhere special to get this? They are available at TCI (tciauto.com) Bowtie overdrives (bowtieoverdrives), Summit Racing and JEGS
2. TH200-4R flex plate stone guard. Not sure what this is. Are you talking about the bottom cover under the torque converter? Yes, it's just a cover to keep debris out of the ring gear.
3. Dipstick & tube. I have a 200-4R from another car. Can I use the one that came with it? Yes, that should work.
4. PRND321 shifter lens and linkage (available from Nostalgic Motors). Pricey but I have talked to him about this.
5. Lock-Up torque converter system (several ways of doing this, from a simple toggle switch to full electronic. I designed my own and will be happy to share the idea if you're interested) Would love to know about your idea and design. I'll work on a write up with a description and drawings. Basically it uses two vacuum switches and a relay.
Another thing you will need to check are the speedometer gears in your TH200-4R transmission. You may need to change one or both of them to get your speedometer to read correctly. Here's a link that should help: https://www.tciauto.com/speedometer-gear-calculator#2004R
-
Did the bell housing bolt up the same? Yes, the TH200-4R transmission will bolt to your Chevrolet engine without a problem.
No change of starter or flywheel/flex plate? I had to change the flex plate because the mounting holes for the TH200-4R torque converter did not line up with where the TH400 converter was mounted. I bought the correct flex plate at NAPA and was able to reuse my original starter.
What about the the drive shaft? The transmission length is very close to the same. Are the splines different? The TH400 and TH200-4R tailshaft splines are not the same. At minimum, you will need to replace the yoke. In my case, I had to have a new driveshaft made.
In addition, you will also need:
1. TV Cable and mounting bracket
2. TH200-4R flex plate stone guard
3. Dipstick & tube
4. PRND321 shifter lens and linkage (available from Nostalgic Motors)
5. Lock-Up torque converter system (several ways of doing this, from a simple toggle switch to full electronic. I designed my own and will be happy to share the idea if you're interested)
-
I believe there's been articles in Avanti Magazine about doing this, and it's been discussed on this forum many times. I converted my own '72 Avanti from the TH400 to the TH200-4R many years ago, and while I did not document the process I'd be happy to answer any question that I can.
-
Could you post a picture of the hose you're trying to remove?
Regarding Avanti Hogtrogh replacement
in Avanti Pub
Posted · Edited by AD
Zedman,
Thanks for the very accurate summary of what's involved with this job. I did this on my own Avanti way back in 1993 (pre-digital photo era) and your report brought back a lot of memories! I remember that the roll-bar bolts were quite challenging as the only access was through the ashtray openings in the rear armrests. Removing the old, rusted troughs was one of the dirtiest jobs I've ever done - I recall filling an entire garbage can with rust!
Thankfully, this is a job that if done properly, only has to be done once. My hog troughs are still holding up well 31 years later. Good luck with the rest of your project.
Adam DeRosa