


rufcar
-
Posts
59 -
Joined
-
Last visited
Content Type
Profiles
Forums
Events
Posts posted by rufcar
-
-
Sent the valve off to Myers last week. Arrived on Tue. Got it in today. I still have the PS belt to reinstall. Had minor leaks but were from the fittings not being tight enough.
Re routing was a PITA because this time I attached the hoses 1st. Soon I will know! Tkx for all the advice! jim
-
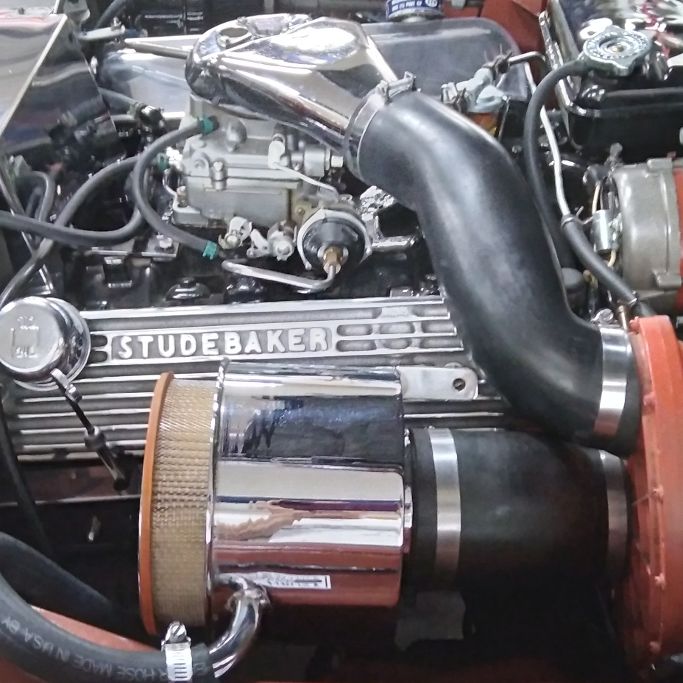
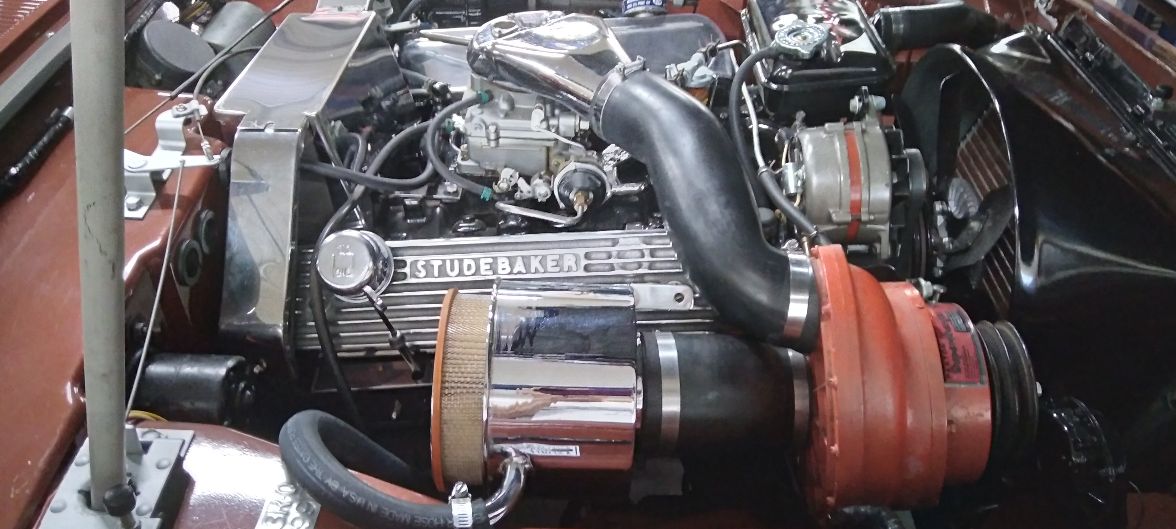
my 63 has those same covers. If you have an R2 you need to manipulate all the blower components in order to fit. I also had to make up a spacer for under the blower bracket and then use a threaded rod inside the nut to make it all fit properly. It is due to the fact the original cover was rounded and it had room. No its raised with a square edge and you need to adjust every part to make it all fit. On the attachment you can see the bolt hole and this is after some manipulation of parts. I do have sitting on the proper bracket underneath too which attaches to the header bolt. I bought a threaded adapter and turned to round and cut it fit underneath. Then I used the acorn bolt with a threaded roc to attach after moving it all again. I have thin rubber 1x1" sq under the oil breather as it sits tight to the fender. yes I know thats not the correct breather hose but i know this one fits.

-
Like corvettes if you didn't undercoat and your tire throws a rock into the fiberglass it might chip through. I have chipped paint through steel fenders without undercoat.
-
Kodjo thank you
-
Kodjo, that's what I'm asking, what is the generic unit? Tkx
-
I never found a definitive answer on the current type clutch for my r2. I appears very generic anybody currect replacement?
-
That article sums it up. I have another bolt I had that was appox 5/8" shorter but it's still too long. A friend has the factory puller shown in the manual. It will be here on tue. Tkx
-
I tried that one today but the bolt hits the freeze plug at an angle. It needs to be a good 1/2 to 3/4" shorter. Tkx
-
I cannot get my pitman arm off. What tool can I buy they will work? All the tools I have are too large. Tkx
-
The main supplier has been out of stock for awhile. Any one have one? I use these on every jeep I have restored.
Tightsteer 200x
Tkx jim
-
well done!
-
I understand but it will tie up my lift for a long time. My only option is to remove the PS belt so I can drive the car around and do the job over winter if I dont have any other cars of my collection on the lift.
If I do that do i need to remove all the new hoses 1st? once I remove the starter will a the standard puller fit in that space to pull off the pitman arm? Tkx
-
I have now changed the front seal 3 times still leaks like a sieve from the pitman arm area. I had it perfect but once I had those ram hoses wrong I cant seem to get it to seal tight. For the record the 1st time I have the deal in backwards and the spool valve slipped right in. Once I reversed it with a new seal I had to slowly tap it it back in with a block or wood. I did add a touch of vasoline to help it slide in. Why wont it seal properly? I have never mixed up the parts, I always installed the same as the were and they match up to the drawing. Though I did not back it off one flat so is it possible I crushed the seal?
-
At 73 you just think you know it all.
Suprise!
Tkx for the tip.
-
Update after I did the PS valve it appeared to fine and within 2 days it started to leak. I took it apart again (easier this time)and saw I had the front seal in backwards. reassembled, waited a week. Today I installed the PS belt. Fired it up and The wheel spun out of my hands to the right. I installed the ram lines in reverse. I swapped them out (another 10 min job LOL) all appeared fin. Fired it up and it all works as designed but. under that hard load with the wrong lines I must have blown that new seal as it was again leaking under pressure from the valve front seal. I have spares and I will tackle that again this weekend as tomorrow is Corvettes at Carlisle and its only 40 mi from me. More later.
-
Leo, they came with the car. But as the saying goes for every action there is a reaction. I had a hell of time mounting the blower parts. Though not on this picture I turned a special extension to mount the blower chrome bracket to the valve covers. Since these are square they take up the space the air filter and hoses normally fit. But i did get it all in and the bracket underneath that mouths to the one exhaust header bolt too. I have it all apart today again as I am mounting the power steering belt and re mounting everything else.
I have several large syringes I use for filling or emptying small containers. I added a small hose and sucked out all the blue fluid fluid and pushed in the F type. A local friend who I didnt know once owned 4 of these told me its extremely important to keep them clean inside and change fluid every 2 years or 2500 mi. He suggested I drive it now maybe 10 miles and flush it all out again. He is an engineer so I know they go to extremes. With my system it does not take very long and is very easy.
-
I guess as usual I'm answering my own questions! lol I found out there used to be a blue fluid as one of my drag race friends told me he used to use many years ago.
Plus after further research It might be best to suck it all out with my hand pump and just install the Ford type F and be done with it. My Drag race friend owns a huge automatic transmission shop and didn't see any problem mixing the Ford fluid to what I have but I believe its better to take out as much and just add the new and be done with it. Just like every transmission where you don't get the fluid out of the Taurus when you drain it. It is always a mix of new with old.
-
My recently acquired 63 r2 4 speed came with the blower attached and unfinished. The PO said it came in a box when he mounted it and had no idea of the blue colored oil in it?
I need to add some more hydraulic fluid and I wanted to match what is in it. Does anyone have any idea what it could be? Im guessing snow plow hydraulic fluid as it is the only one I know that is blue. It works but it low. It is down to the bottom line. I have it in stock as that is what I use on my Myers hydraulic snowplow pump.
Anyone thoughts please? Tkx Jim f
-
I decided try again but this time I but the screw drivers behind the steel collar and it came off. It took time twisting pulling oiling etc but I was able to finally get the spool valve out. Everything looked good . I washed it all down clean it all out and re-assembled. I still need to install the PS belt as it has not run since 73. All parts have been rebuilt so fingers crossed when I get that far.
-
I want to install new seals in my PS valve but the end cap won't come off. I tried 2 wide flat screwdrivers underneath both sides but its under some type of spring pressure? It does turn easily though. Instructions say remove both screws and remove end cap? Drawings don't show anything specific inside other than the nut and assembly one must remove. ?
Jim
-
Got it I used the C clamp and it assembled nicely. I want to vacuum test so I set the gauge and blocked the opposite hole no leaks. Yes?
-
I started to reassemble my valve today and It appears that I need to use a small C clamp to pull top and bottom together to bend over the tabs? I dont remember having that much pressure from the flat temperature unit during disassemble?
-
this is another lead to purchase the same washer from another company in Detroit: https://www.detroitmuscletechnologies.com/ranco-water-valve-repair-seal-set-for-small-5-8-od-leg-valves/
-
figures as my local NAPA guy (owner of store) said NLA. Just shows you if you get the right person doing the correct numbers.
Jim Facinelli box 978 Elizabethville pa 17023 Thank you.
Sun visors
in 1963-64 Avanti
Posted · Edited by rufcar
My 63 had no sun visors and the screw locations where covered over. Can some one show me a picture of that area with no material on it and possible screw locations? I cant feel any holes. If not maybe someone can give me the measurements on each side of 1 sun visor from its edge to the enter of the rod hole something 1 or 2" Im doing this blindly as I have zero starting point except to work backwards. I have the new rods but have no idea how far to push them in. That might help me search for at least 1 screw hole. Tkx Jim