

Raymond Compton
-
Posts
28 -
Joined
-
Last visited
Content Type
Profiles
Forums
Events
Posts posted by Raymond Compton
-
-
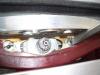
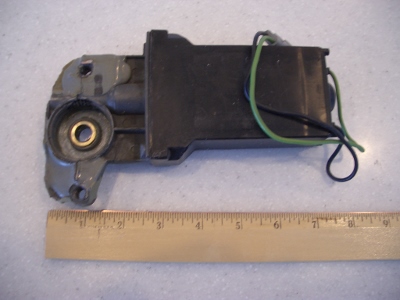
Yahoo! Success! I bought the motor/gearbox that was listed on eBay. The output gear was, in fact smaller than mine. Examination shows that the larger gear is most likely pressed on to the smaller gear. I tried prying mine of the shaft and it did not come off. Rather than risk damage, I removed the gear from the "new" gearbox and installed mine. I also swapped motors in the hope that mine would function and avoid having to change or splice in the correct power plug. It all went together smoothly and I installed the assembly this morning. The sunroof now opens and closes properly.
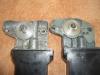
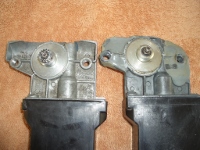
In the end, I only used the gearbox case from the Cougar application. Here are pictures of the two assemblies with the broken one on the right. Note the screwdriver on the right hand screw that attaches the gear box to the cable track. Thiese two screws are hidden under the center, curved, cable guide that is seen lifted up in the picture.
-
You are right, that looks to be the same. The output spur gear looks to be smaller though that may be an illusion. I got mine cleaned and lubed though when I put it back in, the JB Weld threads in the mounting holes failed and the motor/trans fell off the ceiling of the car. Soooo... Rather than JB Weld it back in, as it was before, I just went ahead and bought the eBay motor. I don't think it was all that expensive. The motor alone I have seen in that price range when the offer was aimed at Mercedes/BMW folk. Should have it by the end of the week and will post the results.
-
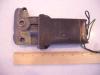
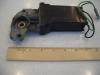
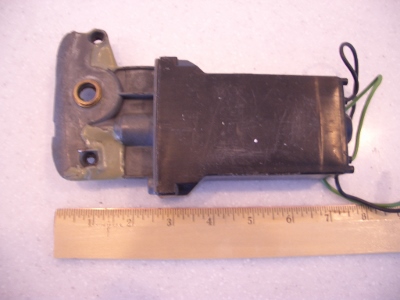
I just received my sunroof motor/transmission assembly back from Dan Booth. His guy could do nothing to repair it. I have taken some pictures of the assembly and posted them here in the hope that someone has a similar one or recognizes this style from another application. We know these two things about Avanti Motors, one, they used components that were available, off the shelf, and two, when that supply was used, they would use the next available similar part.

-
To "Silverstude", unfortunately, according to Dan Booth, they did reinvent the wheel with several different versions of the motor/transmission configuration.
to "Paul K" I will get my still broken and dying motor/transmission assembly back from Dan Booth tomorrow, according to UPS. I will try to post a picture by the weekend. We have had snow most days here in rural central Utah and it takes about four hours for my wife and I to clear our long driveway.
-
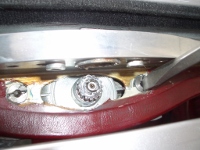
In the time that I have owned the car, the sunroof motor never had enough torque to open/close the panel. Thinking that the problem was a partially burned out motor, I removed the motor/transmission assembly. What I found was that a long time ago, someone had removed the motor and did not understand how it was fastened to the cable track. They broke the case before discovering the two well hidden screws. The case seems to be repaired with JB Weld and function OK but looking really bad. Dan Booth now has this assembly to see what his "electric motor guy" can do with it.
Meanwhile, I am looking for a replacement. The car is a 1974 and the sunroof motor transmission is essentially a one piece assembly. I have seen the motors, as used on many cars of the era, from Mercedes to Cougar to Rivieras, on eBay but they seem to be detached from the transmission. The Cougar, for example, has a short drive shaft between the motor and transmission.
Does anyone have one of these motor/transmissions to sell or know of which cars used the joined motor/trans configuration?
Thanks all. -
The ad in the Fall Winter Avanti magazine for replica Halibrand #7011 wheels caught my eye. Having lusted for those wheels since the introduction of the Avanti, I found the ad almost too good to be true. No matter the hobby, we have all seen ads that were, to use the computer term, "vapor ware". Ads placed to determine the level of interest for the new product, which may or may not ever become available. When I saw a posting on the Studebaker Drivers Club forum that the wheels had arrived at Real Rodders Wheels, I gave them a call. Yes, the wheels did exist and Jon Myer was making the spinners in a partnership deal. I ordered a set of five, to have a spare. I sent a check, to save the credit card charge and in about a week, Pat O'Brien called to notify me that the wheels had been shipped. They arrived yesterday, two days after the call. If you have seen the ad for the wheels or the picture on the http://www.realrodderswheels.biz/ web site, they do not do the wheels justice. I think that these reproductions are much better looking than the originals, which by modern standards, look to be roughly finished. Anyway, if you have ever wanted these wheels for your Avanti, Hawk, or Lark, now is the time. Limited market, limited production items such as these wheels tend to disappear from the market all too soon. When I bring my Avanti II out of winter storage in March, I will post pictures of the mounted wheels.
-
Hi Adam,
I am going to work on cars tomorrow so I will see if I can work in sun roof research.
The project is installing a HD fan in my GT Hawk. I know, it looks simple but there is a spacer issue. Both Jon Myer and Dave Thibeault insist that the HD fan for the '62 Hawk is 5 bladed. The parts manual shows a 6 bladed fan. Certainly not beyond Studebaker to decide that the 6 blade fan was not necessary after the manual was published. Not necessary in that they did not sell enough A/C equipped Hawks to justify stocking a special fan for that car. The book shows that the part number is good for '59-'64 Hawks as either HD or A/C. Anyway, I'll see how the 5 blade works.
With the assumption that mine are original, my seals are nowhere near flush with the roof/sun roof surface. I will place a small scale on a couple of pictures so that you can see how far below the roof surface the seals are.
The site that you linked to above says they only have two seals maybe I should order one too, just in case. The photo seems to show the seal in two pieces, one much longer than the other. So, that reinforces my thought that the seal is sized for the biggest application and you trim to fit, both the three sided part and the rear piece. Now, I'm curious as to how this works.
Any idea if these guys, the shop, or the Couger people, have any expertese in installing these seals? I'm guessing that the installation is the same, regardless of the application.
If the sun roof and the cowl vents drain in to the hog troughs, I bet the rear quarter windows do too. I know that I made sure that the drain hole at the bottom front of the window channel was clear before I reinstalled the windows with the new rubber.
I'll let you know what I find and e-mail you the pictures.
Ray
-
Hi Adam,
Sorry for the delayed reply. We were busy this weekend with our county fair car show. We managed a "Best in Class" trophy for both the Avanti and GT Hawk.
Anyway, if you could describe exactly the picture you want, I would be happy to take close-ups of my sun roof weather seal. I have opened the roof a couple of inches several times with no ill effects but have never opened it all the way. If I can get what you want with a partial opening, that would be great. Maybe you could e-mail me pictures of yours and I could duplicate those shots on my car.
With that sunroof being fairly widely used during the early '70s, have you found any expertise on the relevent BMW or VW forums? Maybe those guys know of better seals? I would expect the BMW 2002 crowd to be as rabid as the Avanti crowd. The way you describe the seal, I would not be surprised if there is only one seal set and you cut it to fit your size sun roof, joining the pieces at the rear corners. Was that how your earlier replacement set worked?
Even though the ASC/Golde roof was used on other American cars, they don't seem the type to have a large, active following. Maybe I'm wrong but having lived through the '70s as an adult, I view that period as the black hole of American auto manufacturing. Those cars, except the Avanti, were mostly awful when new and have not improved with age.
Let me know and I will get you the pictures. This will be invaluable if/when I need to do the same thing.
-
Hi Adam,
First, it was great meeting you at the 2012 meet. I trust that your trip home was uneventful. We made the 1600+ miles home to central Utah with zero problems.
My '74 has the metal sunroof and does not leak. We got a major stress test coming home with seriously heavy rain about Iowa City, IA. The rain was so heavy that my wife had to slow to about 10 MPH just to see the stripes on the pavement. Anyway, no leaks, so I think that the seals are intact.
The fact is, I have not opened my sunroof completely since buying the car last summer. No point in angering the seal gods. I would be happy to open the roof enough to get pictures of the areas in question. If I understand your request, you are looking for a joint between a rear seal piece and the side piece. How many pieces make up the seal anyway?
You said that you have replaced these seals once. Were you able to find original seals or are yours repros of some sort. My meager experience with other seals on these cars is that repros vary widely as to hardness and even if the proper shape may or may not seal as original. Any thoughts?
Anyway, let me know if I can help.
-
First, all of the above advice is excellent. Gunslinger makes many good points. He knows a lot about these cars.
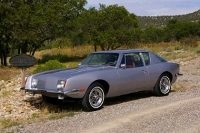
I might be a bit late here but here are my thoughts on the subject of Magnum 500s. My '74 has 15x7 Magnum 500 rims. They were not original as the car was built with Borrani wire wheels but the Magnums have been on the car since at least 1975 and probably were obtained at the Avanti factory. At least the records I have show that the long time owner of the car regularly took the car to the factory for upgrades such as the Recaro seats and the "Blake" suspension mods.
The car has had the Turner brake conversion on since 1984. This last spring I replaced all of the brake parts, including slotted rotors and 4WD S-10 calipers. The 4WD calipers do not have the protrusions that need to be ground off and also position the flex hoses better. There are no clearance issues between the calipers and wheels or the calipers and frame.
I run 205/70R-15 tires. They are the current "cross" for the original F78s and look about right to me. They are basic Bridgestones with a narrow whitewall. You can get a more agressive stance with something like 225/60R-15. My car had Firestone Firehawk tires in this size when I bought it. Of course, your sidewall stripe choice is more limited as these types of tire seem to be raised white letter sidewall.
One point to ponder is the outside diameter of the tires you want to run, regardless of the wheel size. Unless you want to play around with speedometer gears, stick to 26"-26.5" diameter tires. Most of the on-line vendors seem to have this number in the specs for each size.
-
The blower on my A/C howls at any speed leading me to believe that there is at least one bearing failing. Adam DeRosa sent me a video of his A/C and his definitely does not howl. The car is at the body shop getting the final touches on a paint job. When I get it home, eliminating the noise is one of my top projects.
I understand that the blower assembly is a pain to remove under the best scenario but, as you can see below, I wish to make it more complicated.
All of the interior carpet and molded plastic side panels are out of the car, exposing the blower assembly. Is it possible to remove the blower without disconnecting the evaporator? Because my A/C is a R-134 conversion, the evaporator and its fittings are still R-12 flair fittings. Right now, they do not leak and I would hate to introduce a leak by opening those lines.
So, does anyone have any insight in to the possibility of getting the blower assembly out without disturbing the evaporator?
As always, any and all suggestions are welcome.
-
What in the world possesses a body shop to go ahead and paint a car knowing the color is not the color the customer specified? Seems like they are just throwing away their time and money. I once had a shop install a convertible top that was an incorrect color, even though they thought the color choice was very strange (the shop had also just painted the car and the installer missed the fact that the label on the top that arrived with my order number on it didn't match my order; he installed a green top on a blue car). One would think that if they spot something that looks amiss they would at least pick up a phone and call the vehicle owner.
Hope they covered the expense of their mistake for you; in my case luckily I had ordered through the installer, so the company that sold me the top re-sent the correct one and paid for the re-install, probably because they knew the installer would stop recommending them to future customers if they tried to stick him with the bill.
Yes, I did not understand why they proceeded with painting if there was any doubt. Especially since I remind them that if there is ANY question about ANYTHING, give me a call. I would be happy to drive up and sort it out. The paint shop bought the paint and the body shop the respray so the only thing I lost was time.
Anyway, the car is repainted in the proper color and looks great. Within the next week they will have it "cut and buffed" then we will put the windshield and rear window back in. After that is done we will bring the car home for the mechanical stuff including brakes from M/C to lines and a rear end rebuild while installing 3.73 gears and a limited slip differential.
I am going to starta new thread about pulling the A/C blower to see if anybody has been able to remove the blower without pulling the evaporator.
-
I finally finished with the front vent window frames. The drivers side had the top of the casting broken out at the end of the window run channel. I would guess that the "up" stop was not adjusted to stop the window before it hit the end of the channel. I filled the area above the rubber and steel stop with JB weld and covered the top with "chrome" trim tape, the solid aluminum type. It looks pretty good and if I am careful to adjust the "up" stop in the door so that the window does not actually touch the stop at the top of the frame it should be OK.
The passenger side casting was not damaged but the ear at the top of the window run channel that fastens the channel to the casting at the top was broken. Since I was using the fuzzy Velcro technique for restoring the felt, I wanted to keep the original channel so that the finished product would match the already completed driver side assembly. I ended up with a small piece of sheet metal riveted to the channel where the top rivet fastens the channel to the casting and bent in a "L" shape then drilled for the screw that goes through the very top of the casting. After riveting in the rear vertical weather strip piece I then glued in the fuzzy Velcro in to the channel, let it dry overnight and then trimmed it. By the way, the Velcro method does a beautiful job and actually looks better that the new replacement felt channels that I have. The window is held snugly but moves easily so I expect no rattles and no excessive load on the motors.
Last, I spread some JB weld in the casting cavity as I assembled the rubber stop and channel assembly to prevent any movement that would eventually break the sheet metal tab. After installing the large rubber weather strip in to the casting and fitting the vent window the whole assembly looks like new.
I have also cleaned and lubricated the power window mechanism and all of the channels in which the nylon rollers run. Of course I replaced all of the rollers with new and have new clips for the rollers when the assembly goes back in to the door. One of the power window mechanisms was so stiff from hardened grease that I could hardly move it manually. I am amazed that the window motor was able to run the window up and down. It should be effortless now.
The rear quarter window weather strips went in nicely though the process was tedious.
The car got painted last Tuesday but the color is wrong. The paint shop made an error in cross referencing the Avanti Motor Corp. paint code and ended up with a light Champaign instead of the proper "Silver Moondust Metallic." Both the paint shop and the body shop knew there was a problem before painting but failed to call me until after the car was painted. I did not insist on checking the color because I thought that the make, model, year, and paint code would be a no brainer for any automotive paint store. Anyway, we try again Monday. I am going up to the body shop Monday morning to double check the color before they paint.
Once I get the car back, one of my first projects will be the A/C blower. I understand that it is a pain to remove. All of the interior carpet and molded plastic side panels are out of the car, exposing the blower assembly. Is it possible to remove the blower without disconnecting the evaporator? Because my A/C is a R-134 conversion, the evaporator and its fittings are still R-12 flair fittings. Right now, they do not leak and I would hate to introduce a leak by opening those lines.
As always, any suggestions are welcome.
-
Thanks, somehow I missed those instructions.
The workshop and parts manuals were among the first purchases that I made after getting the car.
With no snow in the seven day forcast I hope to have the weatherstrip and the window run channel fuzz installed within the next few days. Moving snow here takes all morning with about .7 miles of driveway and lots of porch and sidewalk square footage.
Thanks again,
Raymond
-
Thanks for the info. I have that NAPA data sheet though I have not checked on availablility. The Norton stuff seems to be the right product.
The link to the Mustang weatherstrip How-to is great. I will refer to it again when I get going on the weatherstrip project. According to the body shop it will be after the first of the year. meanwhile I want to get all of the weatherstrip installation that I can do without the car around. it appears that the front vent window weatherstrip channel must be removed by drilling out the rivets to be able to get the weatherstrip in the channel. Is that correct?
I will have to check but I think that I have the yellow weatherstrip adhesive. No reason was given for preferring the black though any oozing out would be less noticable than the yellow.
Thanks for the insight in to silicone seal issues.
Raymons
-
Thanks Wayne,
Yesterday I ordered some caulk from the auto body supply shop that is made by Norton, the sandpaper people. Today I found a similar product at Wal-mart made by Duck, the tape people. Between the two I should have it covered.
Also, do you have any technique tips for using this to re-install the rear quarter windows?
Again, thanks,
Raymond
-
I'm no expert, but good body shop supply stores carry grey caulking strip (3M?).
It hardens some over time, though never getting rock hard. I think that
silicone caulk/sealer would also do the trick, at higher cost.
Thanks Wayne,
The problem has been finding the grey 3M stuff. I have some and can find the black easily but maybe 3M has discontinued the grey stuff. I also found "Frost King B2 Mortite Caulking Cord" on-line which seems to be what I am looking for. I also found a referene to a NAPA #4414 but their web site does not show it. I will check next time I am near a NAPA store. The nearest is about thiryt-five miles away so I don't just pop off. My success rate for phone inquiries is only so-so therefore I prefer face-to-face. The nearest body shop store is sixty miles away.
I'll keep you posted
-
Hi Everyone,
Continuing with my "replace all the rubber" project on my '74 Avanti, I am trying to determine the best products to use when installing the various parts. So far, the 3M #08011 weatherstrip adhesive and the 3M 08090 super trim adhesive seem to be the right products for glued on weatherstrip and carpet and carpet pads, respectivly. I also have some "dum-dum" putty. When I removed the 'A' pillar, 'B' pillar, drip molding, and rear quarter windows the sealant was very similar to plumbers putty or old fashioned wresidential window glazing putty, grey in color and non-hardening. So far, nobody around here has any idea as to what the current equivalent is. The "dum-dum" seems to be too stiff and being black, it will show any seams next to my silver paint.
Also, any hints, caveats, etc. that any of you have on the subject of rubber/weatherstripping would be appreciated. Again, I do not want to be at the steep part of the learning curve if someone else has already figured it out.
Thanks
-
Yesterday morning I started with the project of installing the new weather strip for the wind wings (forward vent window). I had pried all of the old, hard rubber out of the molding and drilled out the rivets holding the rear vertical strip. It looks to me that it is best to install the large rubber piece that covers the bottom, front, and top of the opening first and then install the rear strip. The first question that I have is: is that the best strategy? The large rubber piece fits in to a channel riveted in to the frame. Well, it actually does not fit easily and that channel piece is riveted to the frame similar to the rear vertical strip. Should I drill out those rivets, remove the channel, and insert the rubber in to the channel and then rivet the assembly back in to the frame? Adam DeRosa had mentioned that he had used Pop rivets to attach the rear strip. Careful examination seems to show that the factory also used Pop rivets and then either ground them down or used a rivet set to flatten them so that they do not hit the vent glass. Another option might be “flush on both sides” Pop rivets. I see that I will have to grind the shape of some of the heads to fit in the rivet recess in the window channel if I install the rivets from the channel side, which appears to be how Avanti did it. The larger "holes" in the channel for the rivet heads, which go against the frame piece are not all centered on the frame holes. How about installing from the seal side? The Avanti manual calls for 3/32x1/8 rivets which I would guess are normal steel "tinner's rivets." If using Pop rivets, exactly what size and type of Pop rivet should I? There is a fastener specialty shop on the way to the body shop that is working on the Avanti and I should be able to get whatever I need from them. Since I would like to avoid reinventing the wheel and am new to this type of project, there is no detail too small when it comes to help and suggestions.
As always, any and all help is greatly appreciated.
-
My memory was very fuzzy, so I'm glad if my suggestion helped.

Now its your obligation to report back and tell us where you pried, how, and with what tools.
Sorry it took so long to get back. I was so happy to get the straps off that I never thought to check back here. Anyway, To the best of my recollection, I used a putty knife between the outside edge of the cover and the leather panel and used a screwdriver to pry the outside edge. The cover then just popped off. As I mentioned, the force required was much more than I had expected and I probably should have put a layer of shop towl under the putty knife to further protect the leather.
-
Thanks again.
I was able to get the covers off. The force required was several times what I was initially willing to use.
-
Thanks for the suggestion. This is about what I have tried though with a card stock backing. I will try the putty knife. Also, this is from the "outside" edge, right?
Thanks again.
-
I have been prepping my car for a trip to the body shop. We had a catastrophic right, front tire delamination/blowout last summer which did a fair amount of damage to that fender. Since the previous paint job was just masked around rubber and trim, I thought that this would be a good time to remove all of the rubber and weather stripping, paint the car in its original “Silver Moondust Metallic” (again) then install new rubber ,windshield, and install new carpet over one of the foam/aluminum sound and heat insulating materials.
So, the small but maddening problem that I have is that I cannot figure out how
to get the small chrome covers off of the ends of the door pull straps to unbolt
them from the door so that I can remove the door panel and get to the window
mechanism. They look as if they should just pop off but however I am doing it,
it is wrong. I need to find out the correct technique so that I do not damage
the leather door panel.
Any help or suggestions would be appreciated.
-
Hi Raymond-
Yes if you could scan and e-mail me your radio manual that would be great! My e-mail address is: adamderosa@yahoo.com. If you're unable to scan it, you can mail a copy to me at 36399 N. Streamwood Drive, Gurnee IL 60031. I will glady pay for the postage, just let me know what it costs.
Thanks a lot!
Adam DeRosa
Hi Adam,
Your Blaupunkt manual and schematics went out today via First Class Mail. You should have them early next week.
Good luck with your project.
Raymond

Looking for Bosch motor/trans for GOLDE Avanti II sunroof
in 1965-83 Avanti
Posted
These are the biggest pictures that the web site will allow me to upload. It, in fact, limited me to two pictures and would not accept the third in this series. Right now, it would only allow me to upload a file of 57kb, much smaller than even these pictures. Is there something that I am missing in the upload process?
I did not adapt anything. I just substituted my motor and driven brass/steel gear. Or the other way of looking at it, I replaced only my broken gear housing with the good one from the eBay purchase. An expensive project considering that I only needed and used the gear case but well worth it as I have been looking for the proper gear case for four years and this was the first one that I have seen for sale. Getting the sunroof to operate properly is my last major project on the car.