


Billy Shears
-
Posts
85 -
Joined
-
Last visited
Content Type
Profiles
Forums
Events
Posts posted by Billy Shears
-
-
On 2/5/2023 at 2:33 PM, Dunkin said:
I will contact them. I understand that Studebaker Intl. has some but not selling them anymore, does anyone know anything about this? Thank you
You're not missing out because you can't get the pads from Studebaker International; they were not made off the original molds the way Dan Booth's are, and they didn't fit quite right. I got my dash pad from Dan, and it really does look fantastic. It's not hard to install either, once you get your dash removed, and all the gauges and so on taken out. Sending it off to Just Dashes is also an option, and it's what I would have done had Dan not started making reproduction dash pads. The result might be just as nice looking from Just Dashes -- I don't know; I haven't seen one of theirs, but I do know the dash pad from Dan looks quite good, since I have one in my car. Whether you go with a reproduction pad from Dan, or get Just Dashes to do it, you're going to be paying about the same thing. I did price them both before buying, and I can't remember which was higher, but I do remember that there was really not much difference in it, so in the end, I decided to support a vendor who supplies a lot of parts specific to the Avanti -- if we want to keep the vendors who sell us the parts we need in business, it's probably wise to send business to them rather than elsewhere.
-
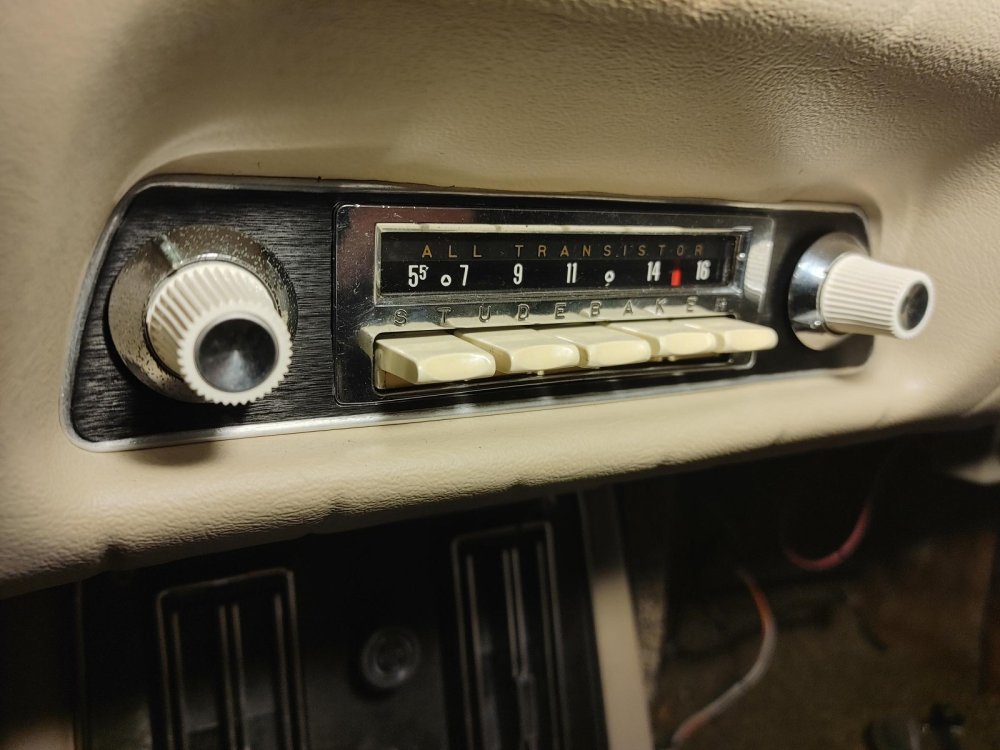
For the '63 I restored, I bought a used Studebaker Avanti radio on ebay for $25. The seller didn't know if it worked or not, but I didn't need it to. There are a number of people you can send a classic car radio to, and they will restore it with modern electronics, make it stereo (which the originals weren't), Bluetooth compatible, install a port that you can plug an iPod into that will tuck up under the dash, and if you want, connect it to a CD changer that mounts in the trunk. I sent mine off to one of them. I didn't bother with the CD changer, which is an option I'd undoubtedly have selected if I'd done the restoration ten years earlier, but nowadays, with other ways to store music, why waste the trunk space?
If you go this route, you get an original-looking radio, with modern stereo sound. You change from AM to FM by turning the radio off and immediately turning it back on. I'd have loved to have an original Avanti AM/FM radio, but they're rare as not much was played on FM back then, and it was an option most people didn't select. The only one I've ever seen for sale was offered at $1200. I wasn't willing to pay all that just to have the FM markings on the dial.
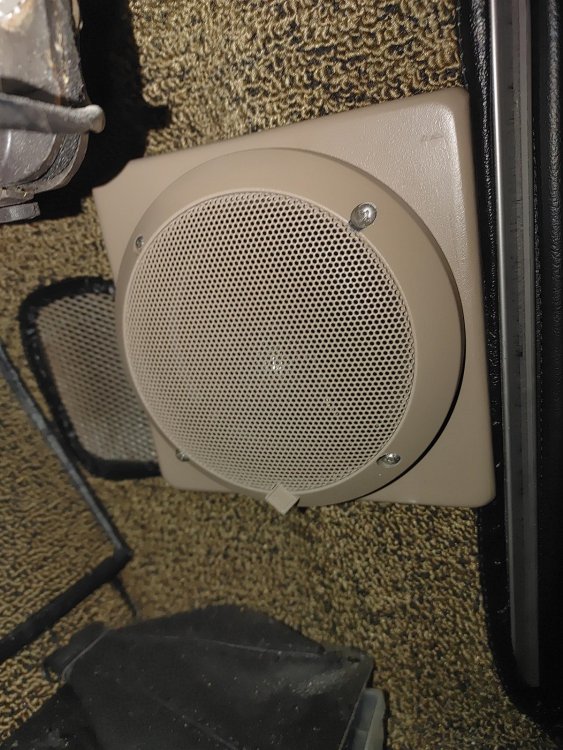
I replaced the central speaker with one of those plastic tray inserts that Avanti Motors offered on later, stereo-equipped Avanti IIs, and that Dan Booth sells; and I put a pair of speakers in the rear shelf, and a couple of smaller speakers in the kickpanels (for which I had to fabricate a box). Unfortunately, the nature of the car limits the size of front speakers you can use.
-
For the armrests, the only screws are the three screws in the front, but there are also two spring clips on the underside of the armrest that go into two holes on the fiberglass panel the top of the armrest (the part you rest you arm on) sits on. Once you have removed the screws, you should be able to pull the armrest off by lifting it straight up.
For the sail panels, what holds them on is glue. I used DAP Weldwood. Be warned though, the vinyl ends wrap around the window openings for the rear window and the quarter windows. To do a proper job of reupholstering, you are going to have to take those windows out. Once you've glued the new sail panels in, the windows will get reinstalled, and the sealing compound you waterproof the windows with will go over the vinyl where it wraps around, underneath where the rubber weather seals will be.
I just finished redoing my interior. Sorry I didn't take any photos though.
-
Studebaker did have a color called "regal red" in 1963, which was a fire engine red, and I've seen in on Larks. It was never offered on the Avanti though. If one wasn't too much of a purist, one could go with that, and at least it would be a Studebaker color, though not accurate for the Avanti. The Avanti red was a metallic "tomato red" with a hint of orange in it (I think that may come from the metallic flakes in the paint being gold instead of silver colored; I read somewhere that was the case). It's a good looking color, but I had my car repainted, and I wanted to use a non-metallic color, as you can't make an invisible touch up to metallic paint. I almost went with the regal red, as I really think red looks good on an Avanti, but in the end, I wanted to stay more original, and went with one of the only two non-metallic colors Studebaker offered for this car: Avanti white. I only did that after much hesitation, as I really like red on Avantis, and I have never been a huge fan of white as a car color. I have to say, having gone the white, I am very glad I did. Avanti white is not a bright white, it's an eggshell white, almost exactly the same as Ford's Wimbledon white, and I think it looks great on an Avanti.
-
21 hours ago, DaytonaR2 said:
One huge problem in cooling problem is the open bottom of the fan shroud. This creates a leak of fan vacuum draw from the radiator. This winter I plan to make a mold to create continuance of the shroud radius around the bottom out of fiberglass to maintain the fan vacuum draw through the radiator. I intend to make it a simple bolt on piece. This should aid cooling during stop and go traffic and parades etc. As it is currently a significant air draw leak. I am doing this even though mine does not get hot. I just want as much draw as I can pull through the radiator so that the ac condenser in front of it is more efficient during stop & go.
Another, perhaps simpler solution is probably the one I used -- buy the sold shroud that is available, then get yourself a fiberglass repair kit and do the following: after marking a line on your shroud where you will cut it in half on either side, apply a good coating of car wax to the inside of the shroud where that line is, extending above and below. Next, use your fiberglass repair kit to create a pair of tabs that will extend above and below the line where you will make your cut. Build up a couple of layers until the tabs are thick enough, and let them dry; after they are dry, you can pop them right off thanks to the wax you put on the inside of the shroud. Once they are off, sand the edges neat, and clean the wax coating off the inside of the shroud. Cut the shroud in half where you marked your lines, then go back and use the resin in your fiberglass repair kit to permanently bond the tabs to the lower half. After that's dry, clamp the two halves back together, and drill a couple of holes on each side of the upper half of the shroud (and the tabs on the inside where they overlap). Now you have a two-piece shroud that does not have that open area like the horseshoe shrouds do, and which you can take off and reinstall easily without having to remove your fan.
-
On 11/19/2021 at 12:47 PM, DaytonaR2 said:
Does anyone aware of any replacement seat springs (rear) being available? Mine are rusty beyond imagination.
Mine were as well, owing to a leak in the rear window seal that let water accumulate both under the rear seat, and in the trunk (where it rusted the jack into a solid lump of iron oxide). I got an entire rear seat assembly -- seat bottom, seat back, and fiberglass backing panel -- from a parted out Avanti II. That will probably be your best bet.
-
On 9/24/2021 at 11:31 AM, Avanti83 said:
If you want a spoiler that works - https://studebaker-info.org/Tech/Cooling/SOBradiator/sdc42115sobrad.html A fair number have done this mod.
I think people are going to have to start looking for an alternative. I did this to my car, but let me tell you, I had no end of difficulty tracking down one of those spoilers. Now that the Saturn division of GM is defunct, almost every place where you could obtain one of those no longer stocks them.
-
2 hours ago, Avanti83 said:
Just to be sure we're all on the same page, Dan doesn't recommend a dry installation. As above he recommends 3M bedding compound prior to the installation and the Butyl rubber sealant afterwards.
Yes, which is precisely how I did it (and which should be clear from my description). It sounds to me though like Brad is referring to using the a bead of the 3M bedding compound (or some other non-hardening sealant) on the glass window itself before putting the rubber seal on (and then another bead of 3M bedding agent on the widow opening when you install the window into the opening). After a few dry runs to make sure everything fit, I did indeed put the 3M bedding agent on the window opening. But I did put the rubber seal ring onto the window glass dry, then put the stainless trim back on, then once that was installed in the window opening (using the 3M badding compound around the fiberglass windown opening), I used the butyl rubber sealant to seal the rubbers seal ring to the glass window itself. Essentially the same procedure was used to install a new windshield as well. As I said, my results have been quite good.
-
43 minutes ago, brad said:
You really do not want to install the rubber on the glass dry, and try to seal it up later. It just doesn't work well at all. Thee is a reason the factory recommended non hardening sealer when putting the rubber on the glass AND also when installing the assembly into the body opening. Follow shop manual procedures and you won't get bit.
The Avantis weren't always quite waterproof from the factory, from what I've read. I followed the proceedure I used because it was precisely how I was advised to do it by Dan Booth, who's been doing these for decades. So far it's worked, and I've had no leaks. I think he follows that proceedure because it's what Avanti Motors did, and the Avanti IIs were waterproof from the factory.
-
20 hours ago, Milt said:
Finally am ready to paint my car. It has been painted before. It is obvious that during that paint job that the rear window was not taken out.
How hard is it to remove and more importantly replace the window. I have not found any links to someone doing this. I do have the shop manual, but some better pictures would help. I have read threads about people getting mis fitting new seals for the window, but nothing on the whole procedure.
Thanks
Removing it is not hard; putting it back in is a pain in the butt. I just recently reinstalled mine after getting the car painted. Here is the procedure I followed.
Removal
You'll want to install a new rubber seal, so cut the outer edge of the old rubber away with a sharp razor blade – don’t try running the razor blade along the rubber; grab the rubber with a pair of pliers and pull on it, pushing the razor blade against the rubber where you want to make the cut. Cut the rubber across the top, then all the way down both sides, and then you can stop. You will see a Phillips screw on the small, stainless joint piece on the top, or you will see three such joints, each with its own Phillips screw on later cars. There will be nuts on the inside. Either get a helper to hold a wrench on these nut(s), or take a pair of vice grips and fasten them onto the nut(s), and then turn the screw(s) from the outside. Once the screw(s) is/are all out, then the window then pushes up and out. Get in the back seat and put your hands in the center of the upper edge of the glass and push. Move to the side and push, then move to the other side and push. When the window is then raised up at the front edge, get out of the car, and lift it up and then pull out from the bottom, and lift it over.
Before pulling the stainless trim out of the rubber, take ¾ inch-wide masking tape, and put it on the glass wherever there is a splice of the stainless steel. Take a ball point pen and mark where the edges of stainless splice pieces are. This is very important when reinstalling the window; if you don't do this, the stainless trim will not be positioned just right, and you will not be able to get the window to seat. When that has been marked, tap back and forth on the stainless to move the splice pieces; they will probably be stuck from years being in position. Once you have them loose, slide them to one side, and you can pull out the stainless. Now you just have to clearn the old sealant off your window.
Reinstalling
Put your new rubber seal around the window. Look for the seam that marks where a line in the mold was -- it will look almost like the rubber seal had two ends that were glued together. I put that seam where the top splice piece, with the Phillips screw was (it will be the center screw if your car has three on the top). After you get the rubber installed, put the stainless trim in its grove and get the splice pieces lined up with the marks you made on your tape. If you try to reinstall the window now, the stainless will almost certainly try to pop out of the groove in the rubber seal as you work the window into position. On the advice of Dan Booth, who has installed lots of these, I sprayed Gorilla glue on the stainless and rubber, and tore strips of Gorilla tape in half down the middle, stickting the tape to the rubber and the stainless trim to hold them together. The tape by itself doesn't stick quite well enough, hence the spray glue. Once that is all done, spray more Gorilla glue on top of that, and then put more tape (whole pieces, not torn in half this time) to tape the stainless and rubber to the glass. This should keep everything together solidly so your stainless, rubber, and glass stay together in position during the installation.
Now, with the aid of a helper, or preferably two, do several dry-run installations to practice getting the window set and roping the seal into place with some 1/4 inch curtain cord. The shop manual shows you how to do this. Lay the window on the opening along the bottom and lower the top down to get it lined up. Don't forget to use a little dish soap to lubricate rubber and make roping it in easier. Once you have practiced and gotten it to go in a few times, you can tackle the real installation. Get 3M Auto Bedding & Glazing Compound, black, 08509 (you will need a caulk gun, and may need two tubes, though probably not, if you don't have to pull the window up, clean everything off, and start again). Put a bead about 1/4 inch wide all around the lip of the window opening, put your window in place, and rope it in. You may also, to get everything seated, have to give the window a few whacks near the top with a dead blow rubber mallet to seat it in. I did. You hit the window, not the stainless (you'll dent it), and you can hit the window surprisingly hard without fear of breaking it, but don't try to pound on it John Henry the steel driving man.
After all this is done and your window is seated in the opening, peel your tape off the top splice(s), then take an awl and make a hole through the rubber where your screw(s) need to go, then install your screw(s). Now your window is set in. Remove the tape and clean up the residue. It's a mess, but your stainless and rubber should be in place. When you've cleaned all that off, there is one more sealing step to be done. For this you will need a butyl rubber sealant. I bought mine from Dan Booth, but you can find it online. It is CR Laurence Windshield and Repair Sealant CRL1716, and along with it, you will need to purchase the CR Laurence Adhesive Pump 181AG. You will use this to seal the rubber to the glass. Run the tip of the adhesive pump nozzle under the edge of the rubber and apply it all around the window, and let it harden a couple of days, then use a razor blade to trim away the excess that squeezes out. This stuff is pretty thick, so a helpful tip is to boil a large pot of water, then (after taking the pot off the boil) sit the can in it for 20 minutes to warm up. The heat will make it thinner and much easier to pump.
Hope this helps.
-
31 minutes ago, Desert Driver said:
As far as the safety of fiberglass in the interior...guess what? The whole car is made of fiberglass, so what's the big deal?
The big deal (which I thought I explained) is there's a difference between this and the fiberglass body, which once attached to the chassis, is integral to the car's structure, and a separate piece in the interior, held in place by nothing more than tension, and which can potentially detach. As I said, probably it really is a non-issue, but I am already modifying the appearance of the interior in a number of other ways, so I don't really mind a slightly different appearance, which no one but an Avanti afficianado would ever notice in the first place.
-
On 4/14/2021 at 9:50 AM, Avanti83 said:
As far as original, I can't help but in my 74 that has serious deviations from stock I used carpet from Menards with a tight pile.
Well, there really was no "stock" in Avanti IIs. What you have may be different from what the car originally came with, but Avanti Motors would make the interior whatever the customer wanted, offering a range of materials they had in stock, or using customer-supplied materials if that's what the buyer wanted. Studebaker, of course, only offered a limited range of options, same as any other mass-manufactured car. The advantage for Avanti II owners is that you can restore or modify it to be whatever you want as well, with no need to feel bad about it not being "stock."
-
On 4/13/2021 at 6:10 PM, goldhawk said:
Billy Shears, Did you ever get a suitable headliner for your Avanti? Thanks in advance, Rich Childers richchiders@hotmail.com
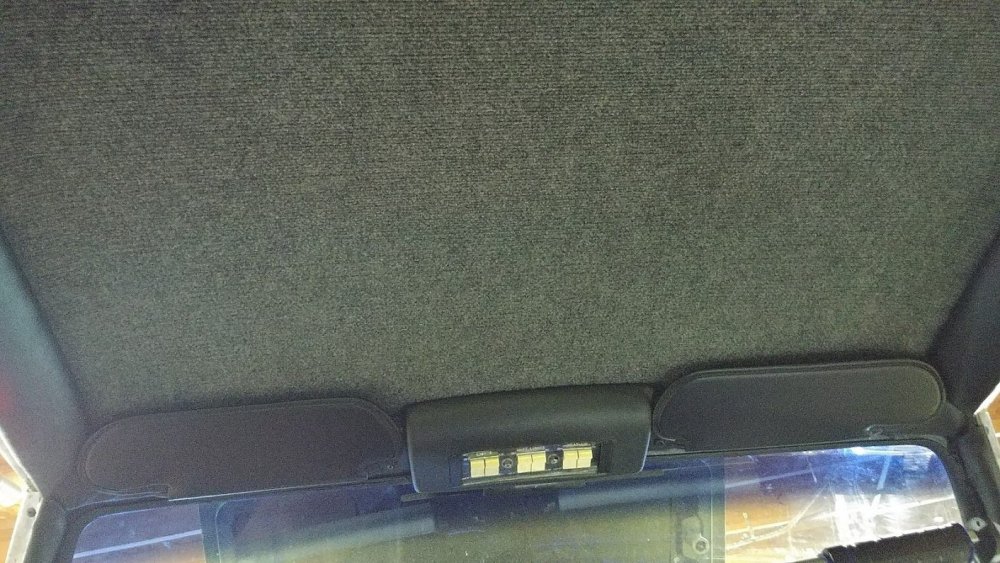
No, I never did find anything that looked original. I did find some textured white vinyl that looks good however; it has a very small diamond pattern texture. I was hoping to find the correct checkerboard texture, but the only thing I could ever find that looked like that was the solid fiberglass panels the SI sells, and for safety reasons I am leery of having a fiberglass piece that could potentially detach from the roof and and/or break into sharp-edged fragments in the event of an accident. Probably not a huge worry, I know, as any accident bad enough to do that would likely cause all manner of other injuries as well, but still... As a police officer of 20 years experience, who has worked a lot of accidents, it's not something I want to take unnecessary chances with. Same reason I put in 3 point seat belts and Recaro seats out of a mid-eighties Avanti II (along with Avanti II rear seat armrests to conceal the seat belt reels). I put in Avanti II sun visors too, as the originals, designed to match the contour of the overhead instrument panel pad are so small they are frankly useless. I also had an original AM radio I bought on ebay for $25 rewired with modern electronics for AM/FM stereo, bluetooth compatibility, and an iPod jack, with 2 speakers on the kick panels, two on the rear shelf, and an Avanti II plastic tray made to fit where the original dash speaker went -- which has an added benefit that you can reach the wiper motor for maintenance through the dash now, if need be.
In the end, because of the Recaros, and the black anodized instrument overlay I bought from Dan Booth (which I think looks absolutely gorgeous installed), and the other mods, I don't mind the incorrect vinyl on the ceiling so much. I do wish the Recaros, weren't so obviously eighties-vintage seats, as everything else in the interior looks period-correct, even if someone familiar with Avantis could spot certain elements as not factory correct; but I'm willing to accept that visual deficiency for the improved, comfort, safety, and greater range of adjustment.
-
2 hours ago, Tim G said:
I haven't checked the bonnet diameter or overall height yet, but I am concerned about the height including adapter. I'm thinking the bonnet will fit since the 2300 has a 4 barrel diameter on the top. As I investigate more I'll follow-up.
Tim
With the Hamilton EFI, it was not possible to use the stock carb hat -- the modern throttle body is the same size as a modern Edelbrock carburetor, which is just slightly larger than the original. I used the low-profile one sold by ProCharger. I also needed a metal ring of the same diameter approximatel 1 1/2 inches tall. I should warn you, this made for a hood clearance problem. I asked Dan Booth at Nostalgic Motors how to solve it, and he suggested shimming the front end of the body upward just the inch or so that was necessary. When I loosened the fastenings that mount the body to the frame, the front end of the body flexed upward the required distance all on its own, and this was with the hood raised, to the engine, throttle body, and carb hat was not pushing it up. I shimmed it and fastened everything back down, and there was no problem. Will yours do this if you do the exact same thing? Who knows? These cars all seem to have had fiberglass bodies essentially hand-built onto the chassis, and that being the case, the dimensions are not always exact from one car to the other.
-
I've been successfully running an EFI conversion on my supercharged Avanti for several years now. Hamilton Fuel Injection He adapts an early 90s GM throttle body EFI. I mounted the ECM just under the dash, on the passenger side, using a bracket and cover from a late Avanti II, which used the same system.
-
Has anybody else had any issues with the replacement rubber headlight rings for the round 1963 headlight covers not fitting the headlight covers correctly? These would be the ones from Studebaker International. I went to put the headlight covers back on my repainted Avanti, and I had ordered new rubber rings because the old ones were pretty tired -- in fact one cracked badly when I removed it from the clear plastic headlight covers. When I put the new ring on, it's too large in diameter. There's enough extra room to put a finger through easily. I can make them work on my original glass covers, but I would prefer to keep the valuable originals stored away and run the plexiglass repros in case a vehicle on the road ahead of me flings a stone into one. Small likelihood, I know, but the repros are easily replaced, and the originals not so much.
Is there another source of headlight rings, to find ones that fit better? I checked with Dan Booth, and he has stuff for the 1964 and later square headlight bezels, but nothing for the round ones.
-
If you've checked around with the usual parts vendors and come up empty, then I'd imagine you'll probably have to wait and see if one comes available on ebay. Those things are pretty rare, and accordingly pricey when they do turn up.
-
4 hours ago, MARK said:
Billy, regarding the dash pad from Dan Booth, is that the material type that adhere on top of the original dash that was molded plastic? Im just curious as years ago when I had an Avanti II and the original dash was cracked on top, I bought a black carped type pad that used velcro to secure it to the top of the dash
thanks, just an inquiry
Mark
No, it's not the carpet pad that covers the dash and conceals cracked vinyl -- my car had that sort of dash cover when I bought it; no doubt purchased because the dash was sun-damaged and cracked all to hell. No, this is a new dash cover -- vinyl-covered foam -- that's glued on after you tear off the old, original vinyl and foam dash pad. When the installation is done, your dash should like like it did when it came from the factory. It's not cheap, but it costs about the same as sending it out to Just Dashes and having them recover the dashboard (which is really your only other alternative), As I said, I bought the new dash pad from Dan and installed it myself, per his instructions, and it looks great.
-
I am in the process of redoing my Avanti's interior -- almost all of it myself -- and I got a new dash pad from Dan Booth (the repros he's making on the old tooling; I'm very happy with it and it looks fantastic), and I got the interior kit from Rene Harger. I'm about 2/3rds done now, but one thing neither Messrs. Booth nor Harger have is a headliner. I don't really want to use the solid fiberglass pieces that Studebaker International sells. Does anyone know of a decent facsimile of the checkerboard pattern headliner material they put on these cars from the factory? The closest I can find is a diamond pattern, which I don't really like the looks of.
BTW: I am never restoring another old car again as long as I live!
-
8 hours ago, brad said:
The script for the metal cars is different from the Avanti. The originals came out in 1956 and had rectangular mounting pins, and special barrel nuts that no other company supplied. Avant scripts have round mounting pins. I have seen flat spring steel push nuts on the pins, and also some with acorn tinerman nuts.
The original one from my car has the rectangular mounting pins. I think I am going to have to have it rechromed -- at considerable expense -- and reuse it after all. I was hoping to go with the much cheaper alternative of using the repro from Studebaker International, and store the original away. But alas, I find the repro doesn't fit right. When installed, you can see a couple of the holes in the trunk lid around the edges of the nameplate. The original covered those up.
-
This may be a silly question... Does anyone know what sort of fastener or nut is used to hold these on. I know the 1/8 inch thread cutting sheet metal nuts hold on the hood ornament, the "pirate buckle" ornaments on the C pillars, and the Avanti nameplate on the front. The Studebaker nameplate on the trunk uses smaller diameter posts, and the nuts that hold all the other emblems on are too large. I had to get a replacement nameplate from Studebaker International, and of course it doesn't come with the fasteners.
-
On 3/10/2018 at 3:36 PM, mfg said:
I agree that the asking price for these is very reasonable.....Who would have thought that glass Avanti headlamp covers would EVER be re-made??
Still, after breaking two of the originals in the 'old days', and remembering how easily the glass cover become covered in 'road rash', I would not want glass covers on anything but a 'show' Avanti....Of course, nowadays most Avantis ARE 'show' Avantis!!
For any Avanti being driven on a regular basis, the plastic headlamp covers look great, and really are a bit more practical.
That's odd. I would think glass would be more resistant to scratching. Certainly anyone who has has a plexiglass storm window will know it scratches up a lot easier than real glass, though it's much tougher and harder to break. Anyone who wears eyeglasses knows that real glass lenses are heavier, but much more scratch-proof than polycarbonate. Glass is hard and brittle, so it resists scratching very well, but breaks more easily. Any kind of plastic is a bit more flexible, and therefore harder to break, but will scratch up far more readily. This is why those polishing kits for modern, plastic headlight lenses are so common these days, and why they are needed -- the plastic outer lens, hazes over with a web of minute scratches over time -- something that was never a problem with the old glass-lens sealed beam lights of yesteryear.
(BTW, I run plastic lenses on my '63 Avanti, with the original glass covers stored away -- purely a matter of preserving the valuable, nigh-irreplaceable original while using the cheap, readily available substitute.)
-
15 minutes ago, studegary said:
If your 1963 Avanti has not had a Console Cooling Kit installed, I suggest/recommend starting with that. Refer to Studebaker Service Letter F-1964-6, dated 12/5/63. The Console Cooling Kit is part number 1562554. This kit is designed to get the heat out of the transmission tunnel. Also, be sure that any openings, like around the shifter, are well sealed.
I don't know if it has or not; I'll certainly look. Where can you find the letter? I googled it, but the one site that has a list of files for these service letters, the link to open the file doesn't work.
-
I am about to have my 1963 Avanti repainted, and I have obtained an interior kit from Rene Harger at Southeast Studebaker, which I mean to install when I get the newly-repainted car back. I mean to install insulation under the carpet and vinyl, and I have looked at Dynamat of course, but that, and most of the other products I have looked at are more for sound than thermal insulation. I don't care so much about sound; I want to keep the heat out of the passenger compartment, especially from the transmission tunnel. Does anybody have any experience with this, and have a thermal insulation they recommend?


1963 R2 exterior paint color
in 1963-64 Avanti
Posted
I acquired a gold 1963 Avanti about twelve years ago, also in need of total restoration. I am about 99.9% done with it now -- just a few minor details left to square away. Boy has it been a long and arduous journey.
The gold paint the car was wearing was not original, and was darker than the original Avanti gold, which is kind of a champagne gold. I didn't care for it at all. Not only was the paint on my car old and ugly, it was chipping off, and a large amount of bare fiberglass was showing around the radio antenna -- whenever that paint went, it took the previous layers of paint, and the primer with it. I really hope there isn't something in the fiberglass that will migrate to the surface and lift the new coat of paint off one day. Stripping the car (with a razor blade and an air file), I discovered the original color was Avanti gold, but it had been painted white at some point, and then gold again in that incorrect, darker gold color. I took it down to bare fiberglass, which I needed to do anyway to repair a small number of cracks.
All the while I was stripping the paint off, I was seriously torn between Avanti red, and Avanti white. In the end, I decided to go with white, even though I don't generally care for white as an automobile color. But Avanti white is an off-white, sort of an eggshell white, and very close to Ford Wimbledon white. It really has grown on me, and I think the car looks fantastic in that color. Other people seem to agree, since I've been asked by more than one what color that is. I decided on Avanti white in the end because it and black were the only two non-metallic colors Studebaker offered the car in, and black, as others have noted, requires a lot of extra work to make the body perfect, or it will show every wave, ripple, and imperfection in the fiberglass. I decided I wanted a non-metallic color because unlike with metallic paint finishes, you can make invisible spot repairs -- a non-trivial consideration with a car that has that flat, grill-less nose panel, just inviting itself to be chipped by pebbles flung up off the road by the tires of other cars.