


Stan Gundry
-
Posts
30 -
Joined
-
Last visited
Content Type
Profiles
Forums
Events
Posts posted by Stan Gundry
-
-
I just noticed the suggestion of converting to an aluminum driveshaft. After my experience with an aluminum driveshaft on a GMC truck with a 350 ci V-8, I would never do that. The driveshaft corroded, and one day pulling away from a stop sign, it totally broke in two with the driveshaft flopping around underneath the truck. I hate to think what would’ve happened if I’d been driving down the interstate at 65 miles an hour and had that happen. Of course, I have to confess I did use the truck to pull out some for firmly rooted bushes and small saplings. Nevertheless, I would not trust an aluminum driveshaft.
-
I am sorry everyone, I chose the wrong part number in my post a moment ago. Here is the correct part number for the one that gunslinger identified: 25-107849-1
-
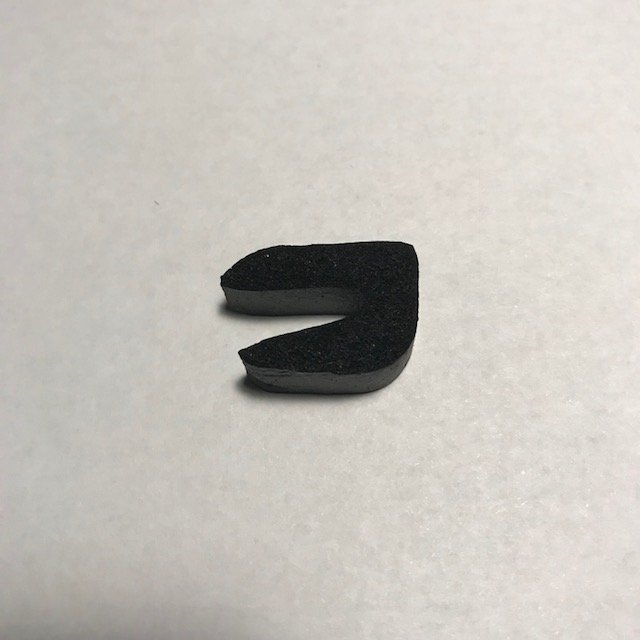
I found the protector flap pictured above
by Gunslinger for sale on EcklersCorvette.com. It was hard to find, so here is the name and the part number: Gas Guard, 25-106419-1.
-
I started this thread, and although it was not obvious when I first examined the visors, it has become evident now that the fawn die is flaking off. I suggest that we share with one another any successful methods of getting the dye to stick. Here are some questions regarding possible solutions:
1) Will roughing up the surface really do the trick?
2) I wonder if the vendor forgot to clean off the powder that may have been used to help release the visor from the mold.
3) Would fawn paint adhere better than dye?
4) Would it work to spray or brush on 3 or 4 coats of a water-based acrylic polymer medium coating available at a good art supply store. Then paint or dye over the acrylic coating? I did this in repairing the original visors years ago, and it created a tough but flexible coating that covered the entire visor. I lightly sanded with 400-500 grit wet/dry sandpaper between coats. This worked quite well with the old visors. I wonder if it would work with these repros?
-
They do not come with the brackets that are inserted on each side. If I remember correctly, I think SI does sell the brackets. I will likely keep these repros in reserve and continue to use the later Avanti II visors because they actually do the job of keeping the sun out of one’s eyes.
-
Earlier this week I received the new repros from SI of the original Avanti sun visors. They look great and more durable than the originals.
-
Speaking of the trunk lid gasket/weatherstrip, what should be its orientation to the trunk lid when glued on. I am in the process of gluing on a new one to replace the one that has been in place for 35 years. See the cross section of the new weatherstrip below. I have always assumed that the rounded lower right corner that you see below in the cross section fits into the similarly rounded corner against which the weatherstrip fits when it is glued onto the lid. this would mean that the open part of the U faces outward all the way around.
However, after looking at the photos in the AOAI's 1963/1964 Studebaker Authenticity Manual, pp J265-268, I am wondering. The photos are not not real clear on this question, but the rounded corner on the lower right of the cross section you see below does not appear to be glued to the rounded inside corner of the lid. Instead it appears to be facing out (see especially the photos on p. J266). The other photos seem to suggest that the U actually faces in toward the center of the lid all the way around, although that is less clear.
How is the weather strip glued to you trunk lid? Does the open part of the U face in or out? Does anyone know for sure what the factory correct way is?
-
Well, I do not want to get into an extended argument about whether or not the exhaust tip shown above is the exact style as originally came with Avantis from the factory. But in 1978, George Krem told me that the type of exhaust type shown above was not original and that the type I described was original. Even though Krem probably knows more about Avantis than all of us on this forum combined, I suppose he could have been wrong, or I could have misunderstood him, or I just do not remember what he said accurately (I admit it was 40 years ago he told me that). But my assertion seems to be supported by the photo on p. D-138 of the 1963/1964 Studebaker Avanti Authenticity Manual. Of course the Authenticity Manual could also be mistaken. I have found a very few things in it I believe to be mistakes, but even so, it is the most accurate and authoritative source of authenticity questions in print. If you are concerned about authenticity and do not have a copy, you should buy one.
-
The caption with the tip shown above seems to suggest it is a factory tip. I do not believe it is. On a factory tip the transition from the larger diameter to the smaller is muc more gradual.
-
Everything written above is good advice. But given the nature of today's gasoline, and given the age of the Carter carb, I think is is likely you will not solve the problem of the engine dying at a stop light when the weather is very hot. In my experience, the sure cure for this problem is to replace the Carter carb, with the Edelbrock knock-off (I useed the 1406 [600 cfm and electric choke]) and then removed the heat riser valve, replacing it with a spacer. Then last of all, totally block off the ports that allow exhaust to go under the carb to heat it up. About two years ago there was are article in Avanti Magazine that showed exactly how that should be done. This approach has worked for me.
-
I have a question related to mounting the wiper motor to the fiber glass cowl on a '63 Stude Avanti--a very simple question that I would not need to ask if I had only taken a photo with my iPhone before removing the motor. I thought I would remember this small detail, but I do not. Here is the question: There are 4 screws that go through the rubber insulators with steel insert in the mounting plate and then through the cowl. There are 4 flat steel washers that I believe go on the top side. But does each of the 4 flat washers go between the screw head and the rubber insulator? Or does each one of the flat washers go on the underside of the mounting plate between the rubber insulator and the fiber glass cowl? If someone could check this out on their Stude Avanti, I would be grateful.
BTW, I just received back my wiper motor from Dave Bass who advertises in Avanti Magazine. He did a beautiful job on the restoration.
-
I am not a specialist on alignment, but my info is that radial tires run best with 0 toe-in, and that is what I have always used on my Avanti. It holds a straight line rather well. The AVANTI WORKSHOP MANUAL calls for 5/16" to 1/4" toe-in.
-
I have a note in my Avanti Parts catalog that says NAPA 630-1008 works as a replacement. I intend to replace my rag joint at some point for safety reasons, but at this point I cannot tell you by experience if this is a good aftermarket replacement. If this part does not have the right specs, I may have other numbers for you to try in my barn. Let me know if you need more candidates. And let us all know if this NAPA number works
Best wishes,
-
I posted this on the SDC Forum and have not received much help. Maybe Someone here can.
Several weeks ago I completed the conversion from the original Prestolite Alternator with external Voltage Regulator to the bolt-in 1988 Toyota Tercel Alternator with internal Voltage Regulator. I followed the instructions for the conversion carefully and even had my local old-timer mechanic confirm that I was wiring it right.
Every thing seemed fine from the get-go. It charged the battery for 3 or 4 minutes after starting and then the needle on the Ammeter settled right in the middle the dial. I have driven it 4 or 5 times and probably put at least 60 miles on the new set up.
It was fine, until today. When I started it up today to take my great grandson for a ride (yes, he appreciates the finer things of life like I do), the Ammeter showed a significant discharge, both with the ignition key on and with the car running, a discharge of about 10 amps if the Ammeter is to be believed. gunning the engine made no difference.
What is the likely problem? A bad Alternator/internal Voltage Regulator (purchased a rebuild from Rock Auto)? A short in my original wiring harness (I did take the precaution of installing a 60 amp fuse in the cable that goes from the Bat. terminal on the Alernator to the + terminal on the Ignition Switch)? Something else?
What tests can I do to find out what the problem is? Right now I am thinking I should have stuck with the old Prestolite, but the new setup seemed to promise more reliability.
-
I recently had experience with the Starter Cut Out Switch (SCOS) with my powershift AT. In fixing that I noticed that this switch is similar to the back-up light swtitch. In fact, I think Studebaker International supplies to same part to replace both. All of this is a long way around to say that I suspect your manual transmission back-up light switch may be similar or interchangeable with the switches I was working with.
The first thing I noticed and address was that the electrical connectors were very dirty and corroded, so I thoroughly cleaned both the mail and the female parts.
But there were more problems, and I did replace my SCOS. But I never throw an old part away unless it is painfully obvious that it cannot be fixed. So I decided to see if there was any chance the old switch could be rescued and I decided to open it up. First I had to tear off what appears to be rubber silicone sealant the covers the terminals. When I did that, the first problem was obvious. One of the wires soldered to the terminals was hanging by only two strands of wire. But still I was convinced there was something wrong with the switch internally, so I pried up the 3 metal tabs that hold the Bakelite top in place, pried out the Bakelite top, being careful not to allow any parts to fly out and get lost as I pried it apart and making notes of how the two internal components were assembled and needed to fo back together. Once inside, everything was a little dirty, but otherwise perfectly normal. I cleaned the parts even though I do not think that was the problem. However the bellcrank on the switch could be moved with only the greatest effort. So I soaked it in a solution of AT fluid and acetone for two weeks, and when that did not make a significant difference, I switched to WD-40, but with no significant improvement. I finally realized that the reason why the bellcrank was frozen up was that there was a buildup of rust between the surface of the bellcrank and small disc between the bellcrank and the SCOS mounting arm (the flat piece of metal attached to the bottom of the SCOS). From that point on it was pretty simple—all I had to do scrape out that rust with thin blades of various sorts. That freed up the movement of the bellcrank and hence of the SCOS. After cleaning everything up, I soldered two new 14 gauge wires to the terminals on the top of the Bakelite cover (the old ones were both brittle with the insulation cracked and coming off), connected them to the male electrical connector, and reassembled the switch. (Actually, the connectors are mixed gender, depending on how you look at them—if you do not get the humor, I apologize.) Then, I covered the Bakelite cover with a protecting layer of silicone rubber cement.
What did I learn from all of this? The starter cut out switch has three week points—the wiring harness connectors are prone to corrosion, the wires are prone to breaking at the point where they are soldered to the terminals in the Bakelite cover to the switch, and rust buildup between the bellcrank arm and the disc attached to the mounting arm can freeze of the switch so it is inoperable. Fix all three of these things and the SCOS will be almost as good as new without disassembling it as I did.
I suspect that what I learned will also apply to your back-up light switch.
-
Yes, the vacuum guage has to be removed from the dash. How hard is it? It has been a number of years since I did it, so I do not remember how hard it was. But you do not have to be a mechanical genius to do it, but it helps to be a bit of a contortionist! Will it harm the guage if you follow my directions? All I can say is that it did not harm my guage. I was careful to not blow compressed air into the nipple that goes into the body of the guage. After the Tri-Flo lubricant had been carefully dripped into the nipplle and allowed to soak for a few days, I blew compressed air across the end of the nipple. That process loosened up whatever was stuck in the guage and had the effect of pulling the Tri-Flo lubricant out, much like an old fashoned atomizer or a cheap Badger spray brush.
-
I have been told that what I did in the same situation does not work in theory; but I am here to tell you that for some reason it worked in practice. Try it because you have nothing to lose. Here is a description of what to do copied and pasted from my book:
A columnist in Turning Wheels once suggested that the way to fix this was to inject a little lacquer thinner into the gauge through the nipple where the rubber vacuum line attaches. The theory was that the thinner would serve as a solvent to dissolve any deposits that might be in there and free of the mechanism to operate freely.
The theory sounded good to me, but I had one concern: If there were any internal rubber parts would the lacquer thinner destroy them? Now, I have never taken a vacuum gauge apart and there may be no internal rubber parts, so my concern might be misplaced.
Nevertheless, I wondered, and I did not want to gamble by taking unnecessary risks with my sluggish but irreplaceable gauge.
So I decided to try something less harsh that might still do the jobTri-Flow Teflon lubricant. It worked perfectly. Here is the procedure I followed. I injected Tri-Flow into the nipple and let it soak overnight. The next morning I shook out the Tri-Flow and filled it again. I went through this sequence several times with the obvious purpose of getting the gunk out.
Then, to free up the mechanism, I directed compressed air at about 50 psi at a right angle over the top of the gauge’s nipple. (Notice I did not say into the nipple, but rather the airflow should be at a right angle to and over the end of the nipple.) By what is called the venturi principle, that created a vacuum in the gauge and caused the internal mechanisms to work back and forth (you learned about the venturi principle in high school physics). I would direct the air across the end of the nipple, and remove it. I did this a number of times. The purpose of this was to further clean and free up the mechanism and to lubricate it.
The result was, and still is, a vacuum gauge that is immediately responsive to the fluctuations of intake manifold vacuum.
-
I checked out the online sources of information about bourdan tubes. Very interesting. I never realized before how vacuum and pressure gauges worked. When I applied my "cure" of TriFlow teflon lubricant, I had no idea of how the vacuum gauge worked. I now understand that there is apparently no way that the lubricant could have reached the mechanical moving parts of the gauge. Nevertheless, allowing the libricant to soak in the tube for several weeks did make a dramatic difference in its responsiveness to changes in vacuum. What accounts for that? Perhaps it was this. The TriFlow lubricant has a solvent base. Perhaps this solvent dissolved deposits in the tube or at the access entrance to the tube. This deposits could have slowed down the tubes responsiveness to changes in pressure. Then when the solvent and the loosened deposits were sucked out of the tube when compressed air was blown over the small opening (the venturi priniciple), the obstructing deposits were removed and the gauge was as responsive as when new.
Just a theory that is trying to account for the dramatic change this procedure made in the functioning of my vacuum gauge.
-
My vacuum pressure gauge was sluggish. What I did to cure it was to drip Teflin Tri-Flow lubricant into it and let it soak for a couple of weeks. I then repeatedly blew compressed air across the opening (not into it, but rather across it to produce the venturi effect).
Ever since it has been very responsive.
-
Best way I've found to exercise the gauge is a MityVac tool. The good ones will provide both vacuum and pressure. Pump it alternately to max vacuum and max pressure readings while watching TV. A couple of dozen full cycles will usually free up the gauge. Of course, watch the gauge on the vac tool and don't exceed the capacity of the S-W gauge.
jack vines
-
It has been a while since I needed to get in there. But if I remember correctly, once the 2 screws are removed, you just carefully pry out the plastic nameplate. Use something like a very thin metal ruler, gradually prying it out from each end.
-
I also have an R-2. For years I had the same kind of stalling problem when it got really hot. Over the course of 15 years or so I tried a number of things such as changing the jet/metering rod combinations, replacing and adjusting the accelerator pump, repairing a leaky float, adjusting float levels, several new carb kits installed, and so on. Nothing solved the problem.
Finally, I installed the Edelbrock 1406 knock-off the the Carter AFB, including the electrical choke. I have never had the problem again. No, I have not had to seal the carburetor for use with the supercharger, though I have a marine style accelerator pump with the seal for shaft ready to install if I start getting leakage there. It is not pure stock, but it improved driveability and I no longer fear the car stalling and not being able to restart at a busy intersection.
-
Good advice on checking out the frame itself. The frame under my car is not in awful shape and could we restored to good condition with a lot of work. But fortunately, I bought an extra frame years ago that is in great shape--only surface rust. So when I do the hog troughs, I will replace the frame also.
gear shifter boot - manual trans
in 1963-64 Avanti
Posted
BillyBob, are you still looking for a round shifter boot for a manual transmission in a 63-64 Avanti? If so, I may have what you need. Send me your email address and I will send you photo of what I have if I can find it. Send your email address to me at Stan.gundry@gmail.com.