


JavierB
-
Posts
112 -
Joined
-
Last visited
Content Type
Profiles
Forums
Events
Posts posted by JavierB
-
-
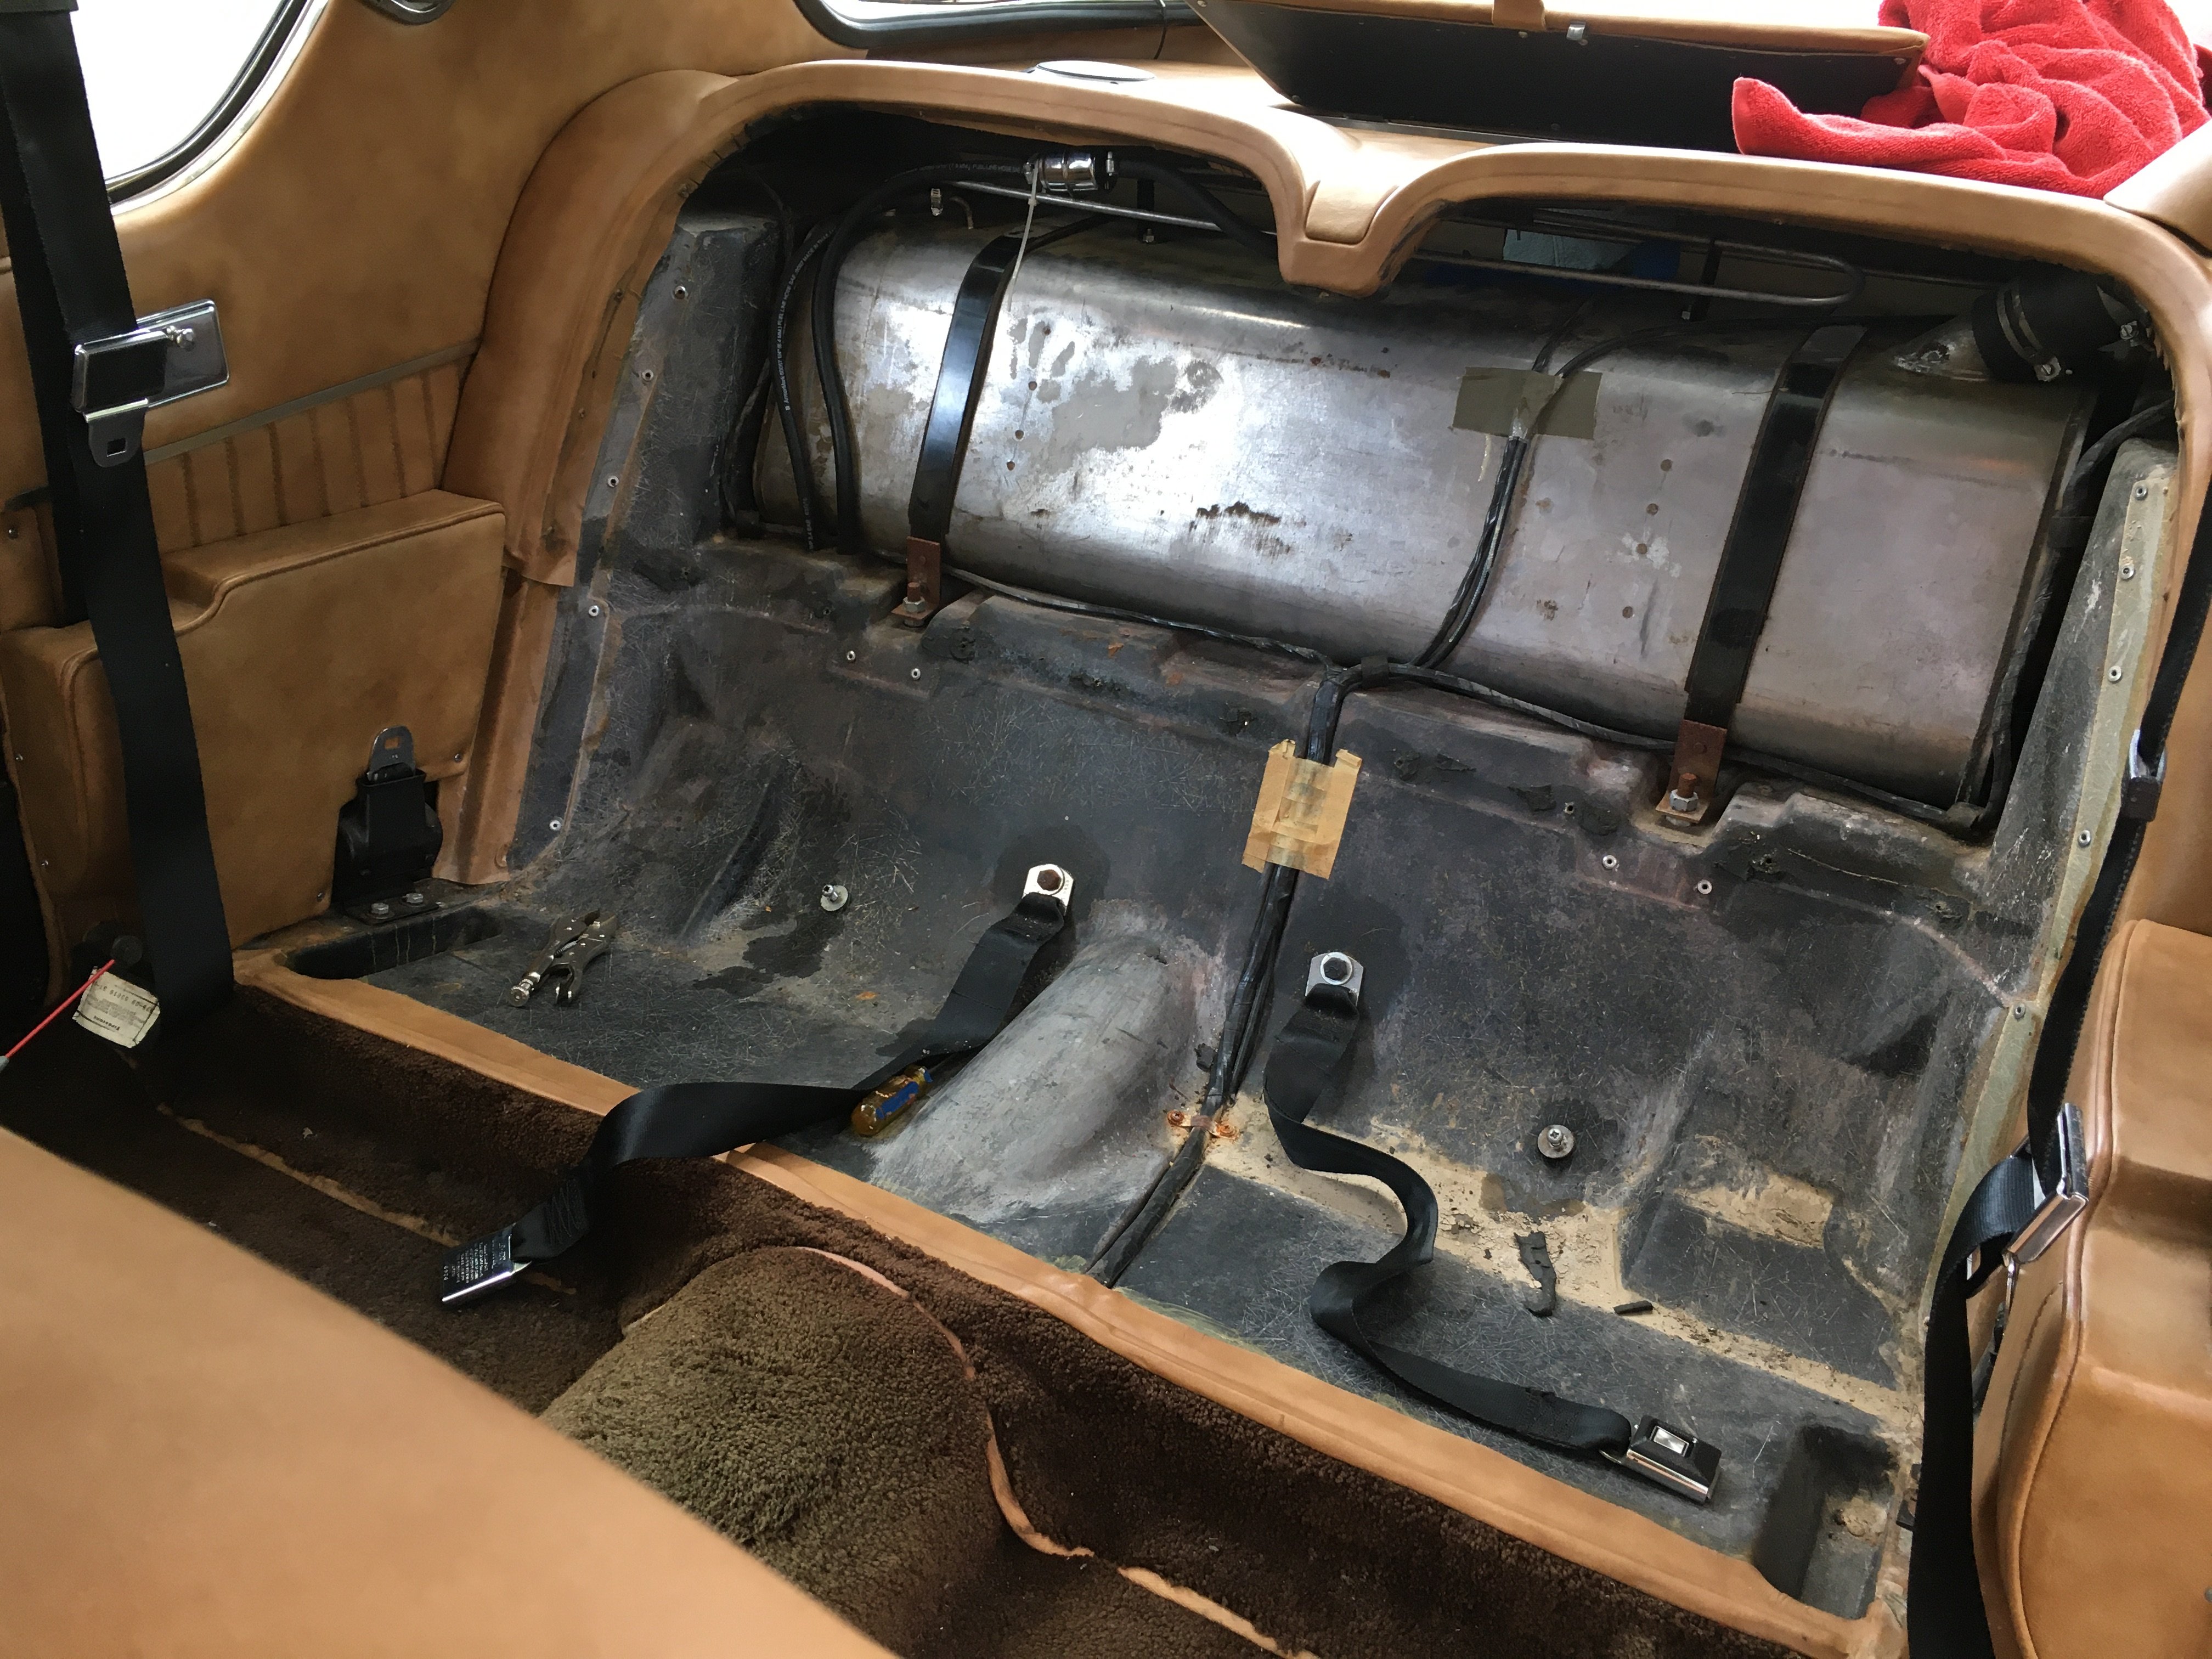
Okay! The rear seat removal was actually EASY. Literally the first thing I've done on this car that was super straightforward and simple! Looks like the previous owner installed new gas lines and brand new filter up top. The condition of the gas sender, covered in rust, makes it no surprise that its not working. 🙂

-
Okay, well, I didnt get any feedback so I went ahead and ordered the one from Avanti Parts.
I'll post if it was a successful install next week!
-
9 hours ago, studegary said:
Yes, it matters. The striker/latch should only hold the door shut, not cause alignment. The door alignment should be correct without a striker/latch being there.
I dont think you get my meaning, or I dont get yours. I know that the door has to *ultimately* align without the striker, but I dont understand why some of you are saying I can't use the striker to correctly SET the alignment? I mean, yes, shims and all that, but the striker helps me get it in perfect position to tighten the bolts, so why is that a bad method? I've tried tape and maybe its just my door or my weatherstrip, but it keeps popping out slightly and falling out of alignment without using the striker. Yes, if i had a helper pushing on the outside it would work, but I don't and the striker seems to fill that need perfectly. I dont mean to be argumentative, I just want to understand why this method isnt valid or doesnt work?
I can get perfect alignment. I can tighten the bolts on this alignment. My issue is that once i open the door, it sags a quarter inch at the latch end. So if that means its hinge pins/bushings, how do I get at those? Or alternately, is it a bad idea to align the door tilting a quarter inch too high so that it sags into the the correct height? (that seems to be just delaying a future repair, but just wondering).
Does anyone anywhere have a diagram or images of what the hinges actually look like and how they are attached and how to get to the pins?
-
On 8/15/2021 at 5:55 AM, Jim78 said:
I haven't replaced mine yet. But, I have seen positive comments about Duque Hoodliner who offers a hood insulator for the Avanti at $115. Their web site has information on the recommended procedures for installation. Removal of the hood is a must, but that's not difficult.
I've seen some good reviews on these as well. I'm probably going to pull the trigger on this in the next week or two and report back on the results. I am dreading the task of removing the old one though.
-
13 minutes ago, Avanti83 said:
By shimming the door, I mean use any combination of wood and cardboard between the door edge and the door opening. Easier to do with the seat out. Just keep adding shim material along the bottom and both sides until the door is positioned centered in the door opening. Then tape it in place to hold it both centered in the opening and aligned with the outside of the car. Then shim and tighten the door hinges.
The hinges can be removed with the door off then take out the bolts holding them to the body.
I understand how the shimming works, I just don't understand how using the striker to help isn't a valid method? does it matter how it gets into the right position so long as it does?
-
Hey guys.
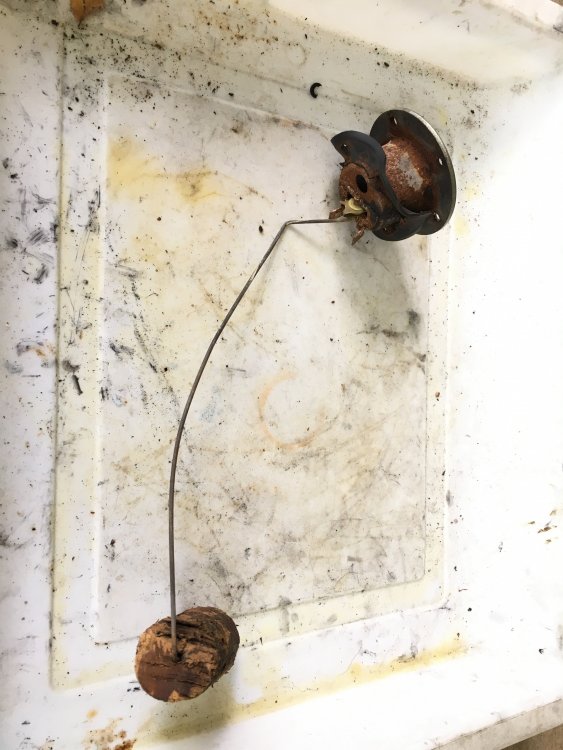
so next up is getting a working fuel gauge. the gauge seems to work fine, or at least it will register full if I short it. So I pulled out the old sender unit and it looks like its been through a few wars, so I'm replacing it for sure.
NOTE: I removed this through the rear access hole in the trunk. BIG MISTAKE. I can't imagine a scenario in which the unit, even if was in perfect condition could be removed without being completely ruined in the twisting, yanking, bending necessary to get it out that way. For the replacement I plan on removing the rear seats. (the instructions in the workshop manual simply say "remove" which is a bit comical. I know for a fact I'm going to be on this board tomorrow asking for help.)
But to the task at hand: I'm buying a new sender unit. any advice? There is one from SI, but is that the same low tech item I just pulled out? There is also a less expensive item from AvantiParts:
https://avantiparts.biz/sender-gas-tank/
and also a unit from Classic Instruments:
https://shop.classicinstruments.com/sn35
Wondering if anyone has any recommendations/advice on any of these or a better alternative? Both the AvantiParts unit and the Classic Instruments use a plastic neoprene float, but I'm not sure about the SI unit. Thanks for any ideas.
-
1 hour ago, studegary said:
Open your door about half way. How much can you move the door up and down (play in the hinge/pin)?
Perhaps I am simplifying this too much. Have you adjusted where the door bolts to the hinge to give you proper alignment without the use of the striker?
Very little play, but enough to get it level with the striker and close nicely if I'm pulling up on it. I mean, it there is at least a quarter inch upward play, which is the amount of the sag.
I'm not sure I understand the striker question. Does it matter if adjust the hinge with only wood shims rather than shims plus striker? The door is perfectly positioned with loose hinge bolts when its on the striker. I have a bitch of a time getting it to stay in position without it (I'm doing this largely on my own, so I dont have anyone to push against the door and keep it stable), so is there a reason that it is in in any way different? My problem isnt getting it set squarely, but rather that it doesnt stay that way.
Related question: with the door bolts loose, the set of three on the top hinge will move fore and aft a little bit, maybe a quarter of an inch, and they move as a set. So does it matter if I tighten them at any particular point in that travel? I dont really understand why there is that degree of play there.
-
4 hours ago, Avanti83 said:
If the door drops 1/4" when opened then there's probably some wear or movement in the hinges. Remember these are long doors and to get 1/4" drop on the striker end only requires a small movement on the hinge end. I'd be sure the bolts mounting the hinge to the body are tight and there is no wear in the hinge pins before I'd readjust the door again.
I like to shim the door into alignment with the door hinge bolts out and the door taped into the position I want. I then add the spacer shims between the hinge and door and then bolt the door hinges into position.
Using the striker assembly for alignment will only cause excessive wear and early replacement.
So how do I check/replace the hinge pin? I mean, unlike most car doors I've seen, the actual hinge is inside the fender, do i have to disassemble the front end to get at it? Sorry if this sounds stupid, but the workshop manual doesnt show anything about the pins and I've found nothing so far in my online search of these hinges.
While you may be correct that using the striker for alignment may cause extra wear, it does give me perfect alignment, so that part isn't the problem, its that the alignment doesnt hold no matter how tight the bolts, so maybe worn bushings or pins is the problem? Are there any illustrations of how replacing these pins is achieved?
-
53 minutes ago, Bill Hanlon said:
I gave up and took it to a respected body shop. Not perfect but much better than I could do.
A fair solution. at some point I'm doing a full paint job and the door situation may wait til then if there is no relatively simple thing i can try.
-
As with about half of my Avanti projects, I'm here again with a question.
My 81 has a passenger door that when closed is spot on. But it sags about a quarter inch when it leaves the striker, making it a slammer door instead of the gentle close i have on the drivers door. I have already loosened and re-tightened the door-side hinge bolts several times and I'm either doing it wrong or I need to do something else. I know that one solution might be to get the striker side of the door a quarter inch higher than the strike plate and then tighten it, but I can figure out how to do that - i've tried, and messed up every other gap in the process and had to redo it all again. any advice? any go-to diagrams or videos that are relevant to these doors?
-
Any advice here on replacing the hood insulation? Mine has a sort of rubber surface with fiberglass behind it, but its all detaching and fiberglass is falling out of the sides everywhere. I can see already that *removing* this will be a shitshow. But before i do I'm looking at replacement options, perhaps that do not involve fiberglass. I see that StudebakerParts.com and SI each have one for "Early Avanti II's" but does that rule out the later ones? Mine is 81, definitely not early. and are these the same fiberglass ones?
Anyway, before I spend another week poking around websites, figured I would ask experts here where they bought theirs and if there were any best/worst. And any advice on removing the existing mess.
Thanks!
-
Also, if I were to want to remove/replace it, where the heck IS it or what does it look like? anyone with a photo or drawing of the thing and/or its whereabouts? My longer term plan is to probably install a remote for the locks, since they are already power locks, and that install will probably include its own alarm anyway.
-
My 81 has, allegedly, a "burglar alarm" according to schematics and the fuse box diagram. Its not referenced in the owners manual and I see nothing anywhere in the car that indicates any such alarm beyond the fuse. So my questions are, before I accidentally trigger this alarm:
1. What triggers the alarm?
2. How is it turned off once triggered?
3. How is it engaged and is there a way to not engage it?
4. Is there any indicator that the alarm is on?So far I havent set it off, but would love to know how to disengage it if I do. Lemme know what you all know about this.
Thanks! The adventure continues....
-
Hopefully Final Antenna Update: It works! New DPDT switch makes it go up and down! Yay! Seems trivial, but required way more days of work than it should have. The drain tube still needs to be attached, but I'm calling this a victory and moving on.
Back to the Quadrajet tomorrow.
-
19 hours ago, Jim78 said:
I don't see the need for a DPDT switch. If one wire (B+) is hot in either position, there is no need to run it through a switch. The other wire (ACC) will be hot in one position, and not the other. So, the simple SPST shown in my sketch should accomplish that. Simple enough to try a bench check before crawling under the dash.
Just to clarify. With the wiring as shown in the sketch, the antenna will extend when the ignition switch is on, or is in the ACC position. It will retract when the ignition switch is turned off. You won't need to use the switch at all, unless you want to retract the antenna while the ignition is on.
If you want to have only manual control of the antenna, the DPDT would accomplish that, and you could use a single B+ source to feed both poles. Of course, that wouldn't automatically retract the antenna when you parked the car.
Yes, I understand, but I do want to have full control of the antenna since eventually I will have some kind of sound system that will have mp3/iphone connectivity, the antenna may not get used all the time. I dont want it popping up and down also when I'm working on the car for the next... well say X number of months. 🙂
Super amusing new development: the wire colors that are at the switch do not match the ones that are at the antenna, meaning that somewhere they are spliced. so my next annoying job is a bunch of continuity tests to match and label the wire ends, because this had to get more stupidly difficult before it could be finished.
-
2 hours ago, Jim78 said:
Check out Bob Johnstone's site. It has a LOT of valuable information. There are two electrical diagrams for the power antenna (10C and 10D). I'm guessing that you have a "three wire" switch paired with a "two wire" antenna. You'll probably need to replace one or the other.
https://studebaker-info.org/Tech/Diagrams/AEC/aec.html
Just as a side note, my '78 has NO antenna, as such. They actually used the rear window moulding as the radio antenna. It is a continuous loop, insulated in the rubber that holds the glass. Not the best of antennas, but it works, and there is no external antenna to worry about ups and downs. I had added a Sirius XM adapter some years ago, and recently dropped that service and added a Bluetooth adapter to my radio. Now I listen to tunes from my phone. No antenna needed.
Also, remember that Google is our friend. There are several links that would be helpful. This one is very straightforward:
https://www.youtube.com/watch?v=HGQOPOGmieQ
Hey there. thanks for the link to Bob's 81 wiring diagrams. I had not found those and SOOOO valuable to update the shop manual wiring!
So the issue, i think, is the reverse-polarity switch, which the new antennae does not utilize and makes the wiring wonky. So I'm going to replace it with a DPDT switch that has only one wire hot on one side and both wires hot on the other. and bypass the switch with the ground wire.
That should be straightforward. I'll report back in a couple of days!
-
Hey it works!
So once it was clear that the ground was the chassis of the antenna, it turns out that you have to make BOTH the red and white wires hot for the antennae to go up, and ONLY the red wire for it to go down. That much works now perfectly.
But on the car, I set it up with both the red & white antenna leads hooked up to both the brown and white leads and the chassis hooked up to the yellow neutral and this worked! Yay! and then I turned the radio on and blew the fuse. 😞 Then blew it again.
So clearly this isnt the way to wire it. The Switch for the antennae has the 3 wires that go to the back, plus two more, black and white, which i guess are the hot and neutral leads. Maybe I just need a different switch here, one that feeds either wire A or both A&B from the hot. right now this switch does some weird polarity shift. why it worked the first few times (without turning the key to the ACC setting) but blew the fuses once we were in ACC I dont know.
-
Related Antenna Question:
Let's say I want to chuck this HIA antenna out and just get a "universal" new one. Can anyone recommend a model that isnt total junk? It seems like theres one chinese made model thats marketed by a dozen companies but that is commonly known to be marginal on its best days. I was considering a Hirschmann maybe? They make some for BMWs and Porsche replacements?
-
8 hours ago, Jim78 said:
Before opening it up, consider the possibility that the new antenna may use case ground as part of the circuit. Ground the motor to your battery "-", and try applying "+" to each of the wires, in turn. If this works, you will need to connect a ground wire to the motor as the body will not supply a ground path.
Hi Jim.
Well that was a good idea, and it did sort of work, or it was a coincidence, i'm not sure. I mean after grounding the chassis of the device, the motor actually ran for a couple of seconds and retracted a small bit of antenna i had manually cranked out after disassembling the thing. but it would only go in one direction ("down") and then stopped working again. Now that its out of the car and inside (i'm using a charger as power source) I can hear that the motor (or something) does hummm when powered. Sometimes after futzing with some parts, i can get the relays to click, but I only got the spool of cable to turn just that once. It was quiet and smooth for those two seconds so the motor and gears seem to work pretty well. This is taking way longer than expected for something that seemed so simple. 😕
-
😕
Update: so the antennae makes a click sound but thats it. One click, like maybe a relay inside, and nothing, no up no down.
I figured out the 3 wires are basically a way to switch the polarity for up and down. Yellow/Brown went one way, Yellow/White was reverse.
but no combination of wiring makes the new one go anywhere. One click is all i get for my trouble. Next is I guess opening it up.
-
59 minutes ago, Gunslinger said:
The third wire is probably for automatic up and down when the radio is powered. With the two wire hookup you won't have that function...just the switch to run the antenna up and down.
Hmm... I dont think mine was ever automatic. I have a switch under the dash to the left of the steering column. I could get it to go up and down somewhat before within limits by using the switch, but nothing ever happened if i turned the radio on or off. I guess I'll try and crane my head under the dash and see if I can tell what wires are at the switch.
-
Hey again.
I have a replacement HIA antenna for the 81. Off of images it seemed like the same thing, but its a little different. Its a little shorter (not an issue I think), and it also has TWO wires (red/white) instead of the THREE (brown, yellow, white) coming out of the original. (apart from the antennae reception connection which is separate.)
Any insight here about wiring these things? thanks!
-
Okay! Thanks to the folks on the FB page, I found them! completely camouflaged by gunk. Now they are open! huzzah!
-
2 hours ago, tanda62 said:
I am curious how you got the trim rings off to paint the needles. I need to clean mine up as well. Thanks, Tom
Following this. my gauges seem to have had some moisture buildup inside so i need to get them open safely.

Fuel Gauge Sender Unit replacement advice
in 1965-83 Avanti
Posted
UPDATE: The sender unit from AvantiParts.biz was a relatively simple install. Its a Stewart-Warner unit, and it comes pre-cut to size from AvantiParts with a gasket and new bolts.
One Word of Caution: Most Avanti tank senders are apparently secured with 10-32 Fine thread bolts. My 1981 is NOT. so I spent most of a morning cursing my poor alignment skills in trying to get wrong threaded bolts into the holes before checking that simple thing. I reused my old bolts and it took just minutes. So I'm not sure what years/numbers may be different, but don't assume, like I did, that the bolts in the kit will work.