Zedman
-
Posts
171 -
Joined
-
Last visited
Content Type
Profiles
Forums
Events
Everything posted by Zedman
-
Hi Peter- I recently Fitted Classic Enterprises Kit under my '81 in Stainless Steel. There is no requirement to cut away any Fibreglass with this set. I used an importer to bring these over with his other freight and saved a heap of money. Call me if you wish.
-
You're working hard on your Avanti and it's great to hear your progress- more power to you , man. 👍
-
Take care under there, mate. I have seen reports of quickjacks failing for one reason or another. Please do organise some jackstands or something else to mitigate a collapse.
-
The Battery Support bracket I took out of my '81 during its body removal was there to support the Fibreglass where the battery sat. It is likened to a piece of 1/8" x 1" mild steel strap iron with a couple of bends in it which was fitted within the shims supporting the front end panels near the Radiator support. In my case it also sat atop the 5MPH bumper Buffers. I swear I had a photo clearly showing this but I'm having strife finding it. In the meantime, I did find somebody else's photo online.... Is this what you're looking for?

-
Thanks for the Info - much appreciated- I'll will eventually go and try this again with infomation behind me.
-
Hi SCPO-PD would you mind sharing how you went about removing the Rear Seat Armrest ?. The Seatbelt Retractor Spool is already removed and I unscrewed as many screws as I could see but the thing won't budge and I don't want to push my luck. The Rear Seat Back is still in place. Am I missing something ?
-
You have a Studebaker Frame. IMHO I'd try as much as practicable to support on the outer Frame Rails at positions as close to the (outboard) Support Mountings (near the wheel arches) as you can. To eliminate damage to the lower 'hat' section plates I always distribute load through a chunk of 2" timber. Don't jack on the Hogtroughs. I hope you can place Jackstands under there for safety.
-
Hi Mark- A proportioning valve should be fitted if you have a Disk / Drum Brake combination- not just because you have a dual MC. My '81 Avanti II has a kelsey-Hayes (original on the car) unit and is located on the left hand side frame rail and down below the Booster/MC. I found out a lot about this valve because it was seized and full of muck, my car having been stored for many years. I posted a thread about it some time ago. Avanti's had these KH units from 1971- 85. A functioning PV would be a good addition, if it's absent. Nostalgic Autos have the K-H valve and a kit of tubes https://www.nostalgicmotorcars.net/store/p18/1971-1985_Avanti_Brake_Combo_Valve_kit%2C_not_Studebaker_Avanti_.html#/ There are lots of tuneable variants available if you prefer and lots cheaper. I hope I'm not telling you to 'suck eggs', but the Proportioning valve ensures the Rear Drums are applied before the front disks start to bite.
-
Hi Stacey- Firstly, I DO repeat- this is for Classic's multi piece kit and is no criticism of their version- I did not want to be cutting and repairing Fibreglass and this kit addresses that issue very nicely. :-0) I've got quite a lot of pictures but they'd need reduction in size before I'd post 'em. To be honest I reckon I dithered about this job far longer than necessary but I wanted the best outcome possible- and it's not completely over, because I'd like more rivets installed and must fit the End Caps. I may still need to plug weld/ screw seams together if adhesive bonding is insufficient. Bear in mind working on my back, being really anal and finding one's way slowed things considerably. Removal of both old HT's (not much left on RH Side!) and scraping old mastic off took about 5 hours. Clearancing for the C channels (grinding fibreglass and rivets out) realistically took 7 hours. Tracing and drilling old rivet heads took 1 hour. Buffing down hazardous sharp edges and spotweld burrs took 1 hour. C channel front tab- bending to fit took 1 hour. Adjusting the fit of the Bulkheads to the Boxes for accuracy's sake took 1 hour. What did take me far longer than necessary was struggling with pulling the seams together with screws- The idea is very sound but made difficult because I failed to appreciate the need to clearance drill the lower lip and was shredding the screwdriver slots in the screws (I was using Galvanised Self drilling posidrive pan head screws, but should have been hex heads IMHO for initial fitup.) This was a terrible waste of time and should have been a far better outcome. I must have wasted at least 6 hours on this alone. Stainless Steel can be tough to drill, too! Marking and drilling new Pop Rivet holes took two hours. Too many trial fitups of Boxes C channels and Bulkhead would have taken at least 4 hours. Drilling and tapping holes for the Rollover Bars Bulkhead took 4 hours (bloody tough material, those screws !). Final fit with two of us on the job, Sika adhesive all over, most pop rivets pulled and a 2"x4" jacked up took about 2 hours. Total time approx 32 hours whilst headscratching- with the benefit of bitter experience.... half that time. All the online blogs are beneficial but you can't tell how deep the puddle is until you stand in it 😉
-
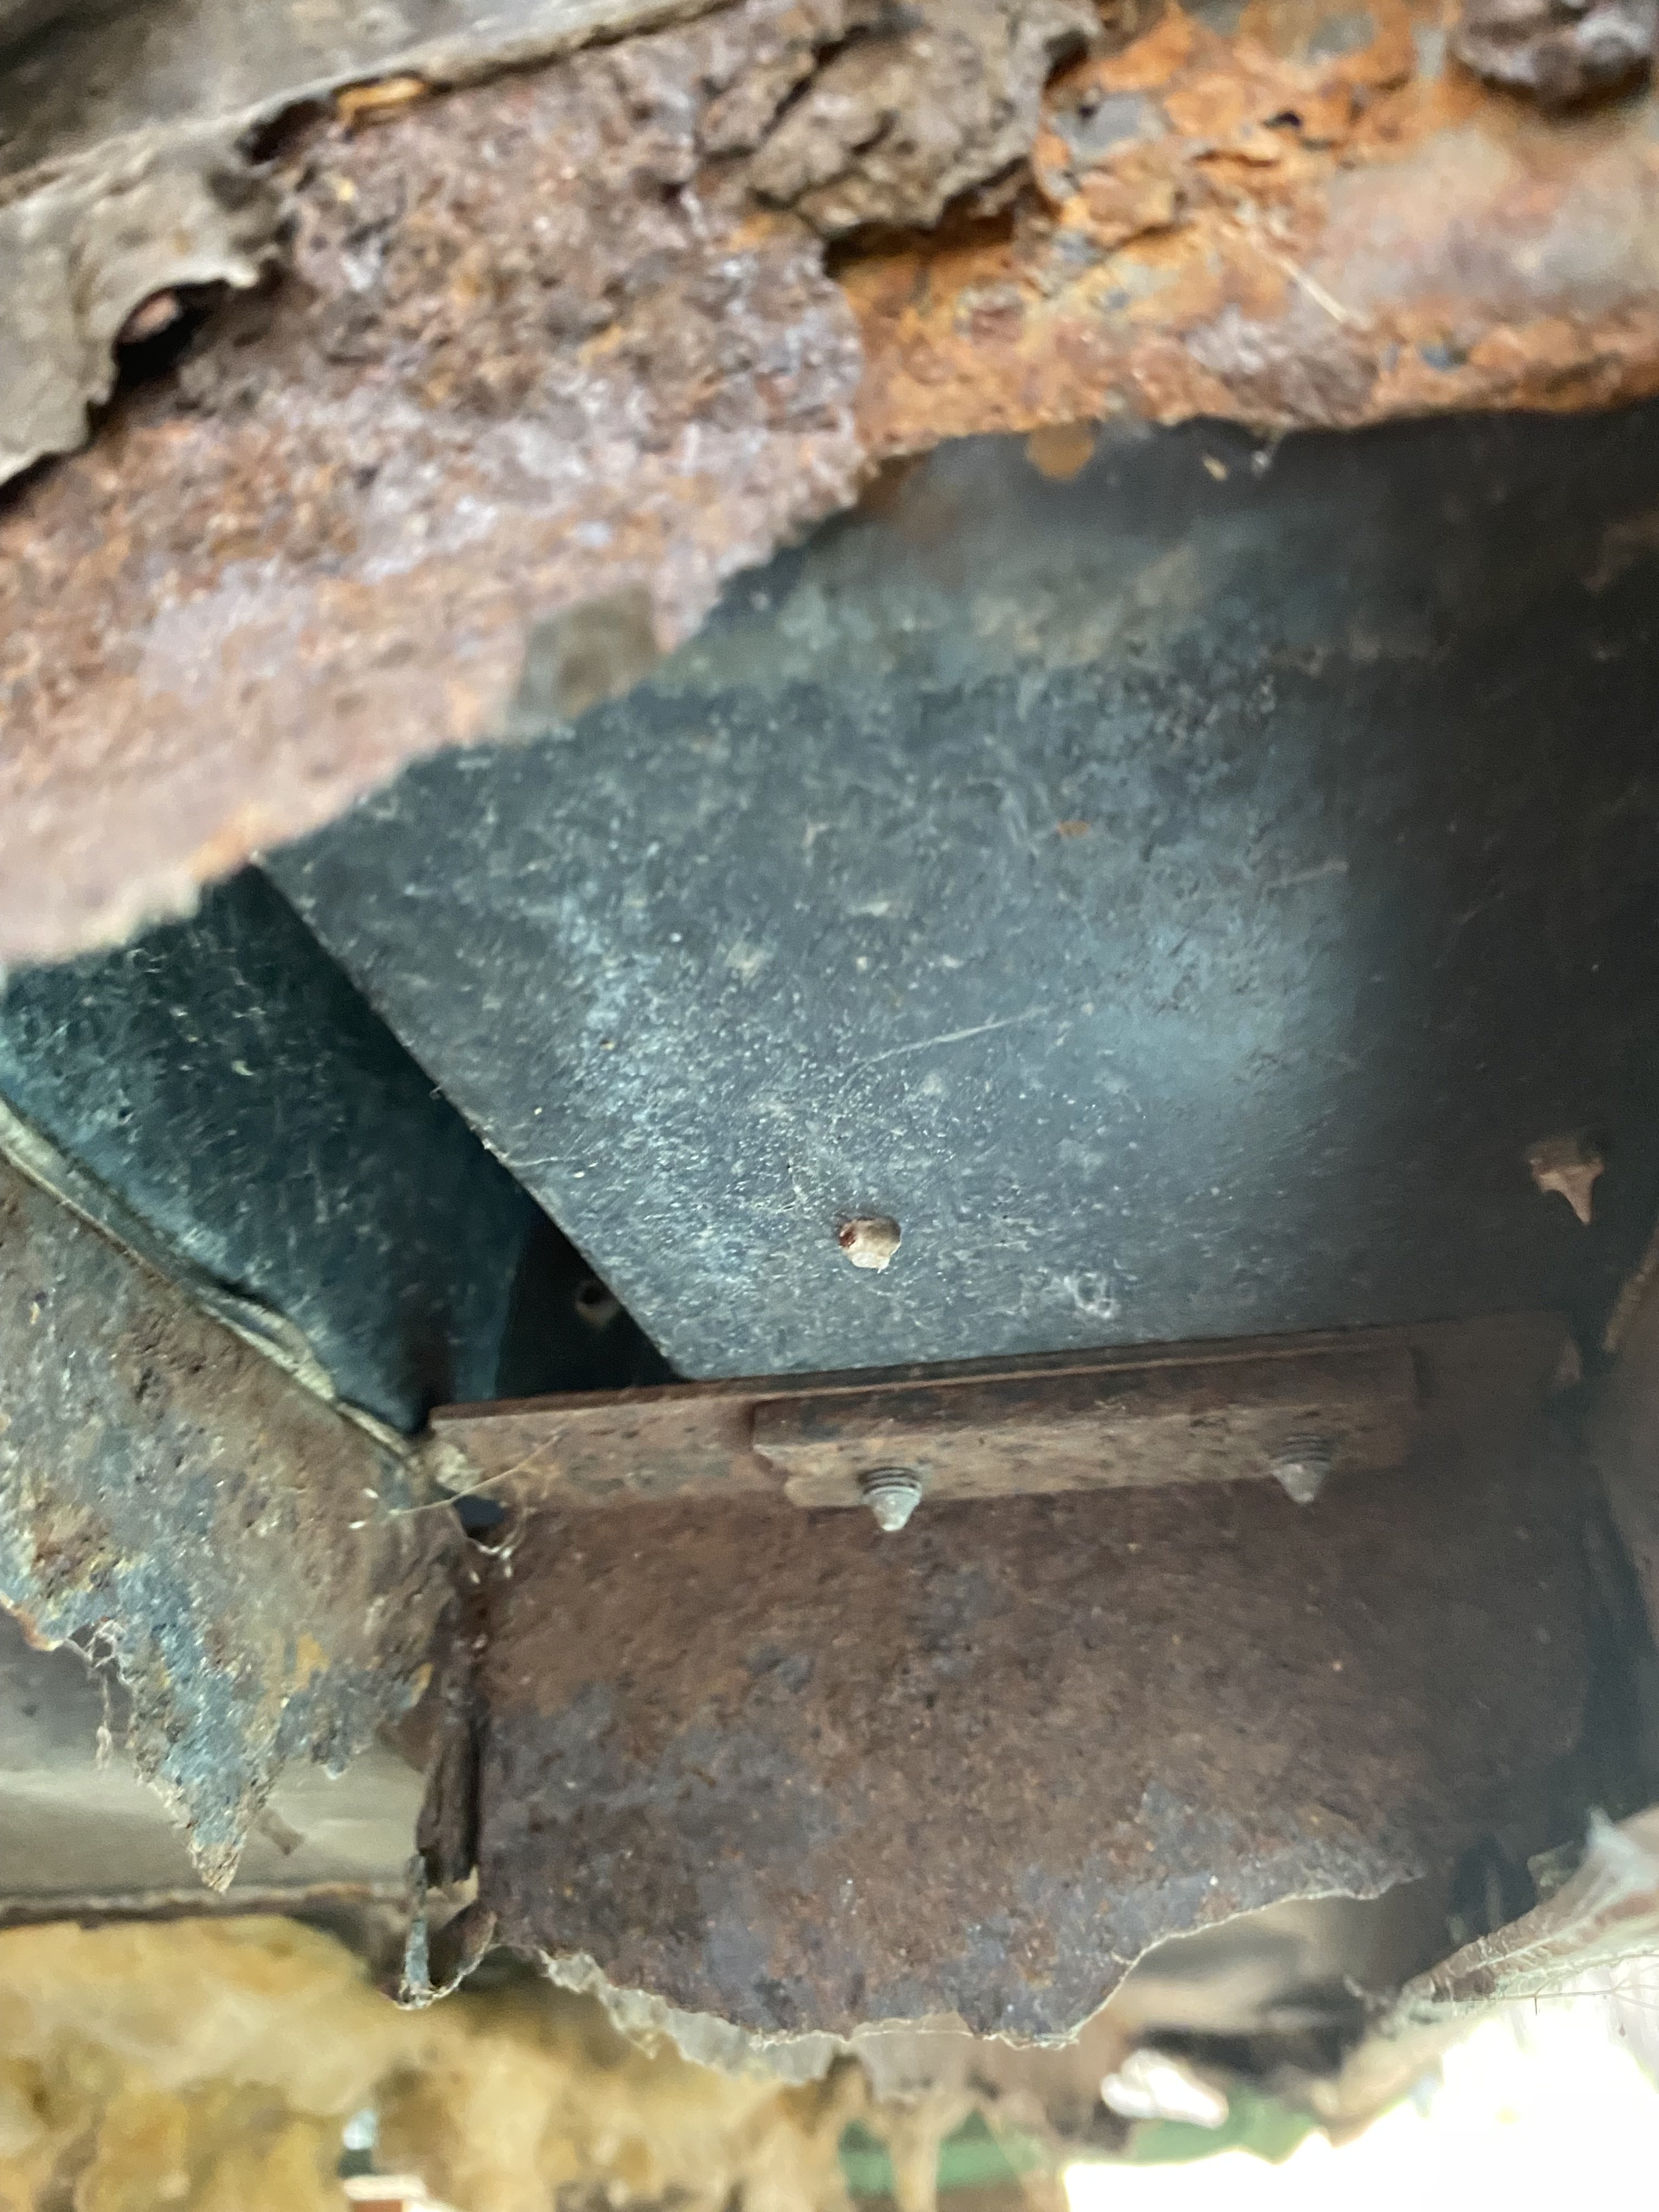
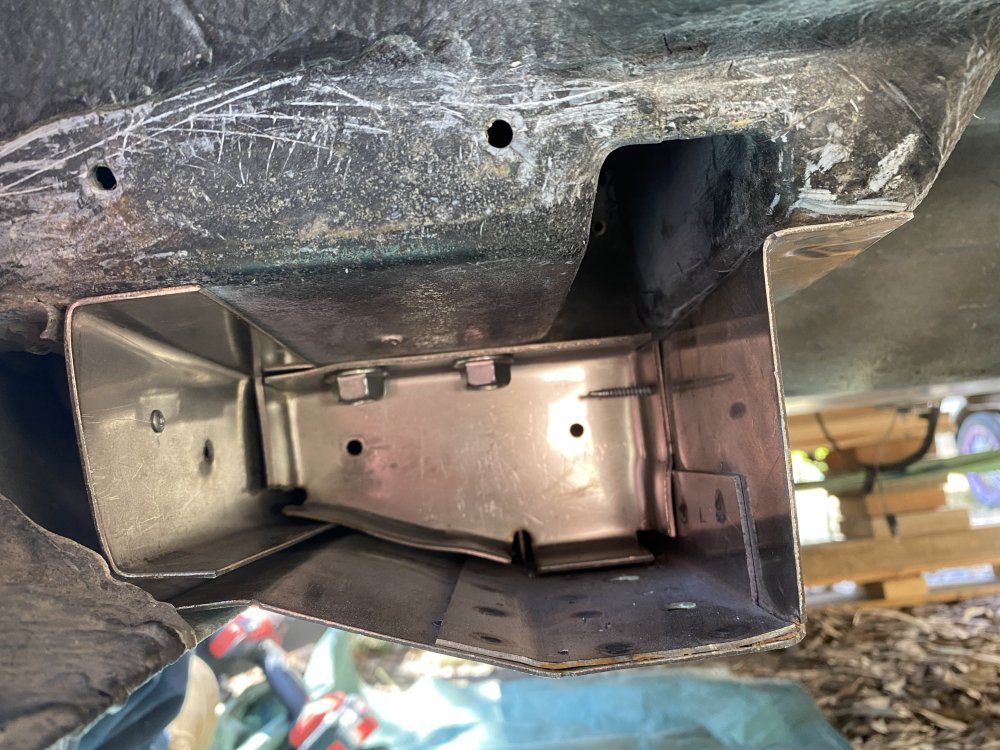
Hi All. I have recently installed New 'Hogtroghs' in my '81 Avanti II. I have some final riveting and End Caps to fit but HT's are 'in'. I thought I would report my experience on this task in case it helps anybody else. I used the kit supplied by 'Classic enterprises'- this is the same two-piece set used in Dick Steinkamp's Blog, of which I utilised as a guideline for my own installation. I chose these because I liked the idea of NOT having to cut out and re build fibreglass sections, as are required with some other kits. I rapidly found out there are lots of impediments to progress that have no mention and were a rude awakening in many instances. My process took months because I am 70 miles away from the job and can only make the trip on sundays- henceforth there was only so much I could do at a time. I did have the luxury of having the body completely removed from the Frame and despite this, the preparation and fit-up is no simple task- it was hard work, especially if you are lying on your back under the body. Classic Enterprises sent my kit in stainless steel despite my specifying 'plain steel' (and charging accordingly !). In retrospect I think it may have been a better outcome after all even though we don't get snow & salt down here. The Troughs are a well made product but myriad spotweld burrs and sharp edges in their fabrication are downright dangerous and should be buffed off before you do anything else. Getting the old boxes off is cutting disc/ grinder work and simple enough, but hidden pop rivets require some tracing before you can drill their heads out, pull everything out and scrape off old mastic. It is impossible to fit the contoured 'C' channel into the sills/rockers until a number of rivet ends are ground off in some locations, as they interfere with a close fit up to the floor and prevents it pushing into place. Lots of fibreglass lumps on the inside of the sills needed grinding out as well as removal of the white filler strips along the sill bottom edge. A row of rivets needs grinding off flush along here as well. I bought an inexpensive Belt File tool and #40 grit belts for this purpose and found it worth every penny due to it's reach. Once this is done, the 'C' Channel fits up without much effort. The tab at the forward edge of the Channel should be bent to better fit the shape of the wheel arch panel- It will need quite some fancy manipulation but it's worth the effort. The Channel is meant to be fitted up against the meagre remains of the outer edge of the original Hogtrough to ensure proper location and riveted or screwed to it. This means that some rivet holes will need to be drilled in advance and a few dummy fitups are required- enough to assure complete lineup of parts when final fitting. In my installation I discarded the silicone sealant sent with the kit and on advice of my 'Body Man' employed Sika Auto Body Adhesive. Overkill?... perhaps- expensive too, but it's used to bond car panels together without rivets and welds. There are a few places where the contour of the replacement parts do not intimately fit the floor so I interposed a strip of PVC sheet to shim the spaces before squeezing rivets there. Any gaps/voids are eliminated with bonding material between them, and stainless steel pop rivets pulled before it sets solid. The lip of the 'Hogtrough' Box needs to be fitted either above or below the corresponding lower lip of the 'C' Channel. Without making this story even longer- I found the corresponding joint contours did not match well on fitup and positioning the HT box lip UNDER the 'C' channel afforded a more intimate fit because it naturally pushed parts together. This meant that I had to drill holes in the HT lip to allow plug welding later. (Worst case, I may insert some self tapping screws along that seam, which may require the removal of a little of the fibreglass along lower sill). In effect, if the adhesive I used there later does its job, I may not need welds or screws at all. To be honest I believe fitting the HT box lip above the 'C' channel lip would have been better, but you will need to pull the parts together with screws. This requires clearance drilling the 'C' channel holes to allow the pull down of the HT lip without the screws fouling. Fitting the 'Bulkhead' under the Rollover Bar base requires some accurate drilling of the 3/8" high tensile bolt studs under the floor. Do try to do this task accurately- otherwise you may end up with an oval hole to tap out which will weaken your thread. Once these are drilled out the reinforcing plate comes off leaving you to re drill the holes 7/16" and tap them 1/2" UNC for the setscrews sent with the kit. Once the Bulkheads can be bolted up, trial fit the HT Box because the Bulkhead needs to be adjusted laterally to ensure the HT Boxes position properly. I had to adjust the shape of the Bulkhead by hammering and grinding a little otherwise the HT Boxes would be out of alignment. This rectified and Bulkheads bolted down, I found I also had to use a self tapping screw through the HT Box wall to pull it against the Bulkhead and line up with my already drilled rivet holes. The final installation required two sets of hands and judicious prying with a screwdriver along the bottom lip, a lot of grunting, but it did go in. To ensure the best possible fit, we placed a 2" x 4" timber under the HT Boxes and pushed it into contact with a pair of jacks. Line up with pre drilled Rivets and Bulkhead screw was established, pulled, and the rest is history- but pre fitting and preparation cannot be overemphasized or taken lightly as the adhesive sets quickly. I'd hate to have to do this job ever again but at least I'm forewarned. If you have access to a hoist for a considerable time, by all means that will speed the job up and make things easier by far- failing that lift your body a high as possible. I don't believe a top quality, accurate job can be achieved in just a weekend by one person and suspect that every car will have it's individual variables. Budget for a far longer time and ask yourself "what if..." .

-
Thanks for the share... 👍
-
A credit to you ! Now go drive it's wheels off ! 😊
-
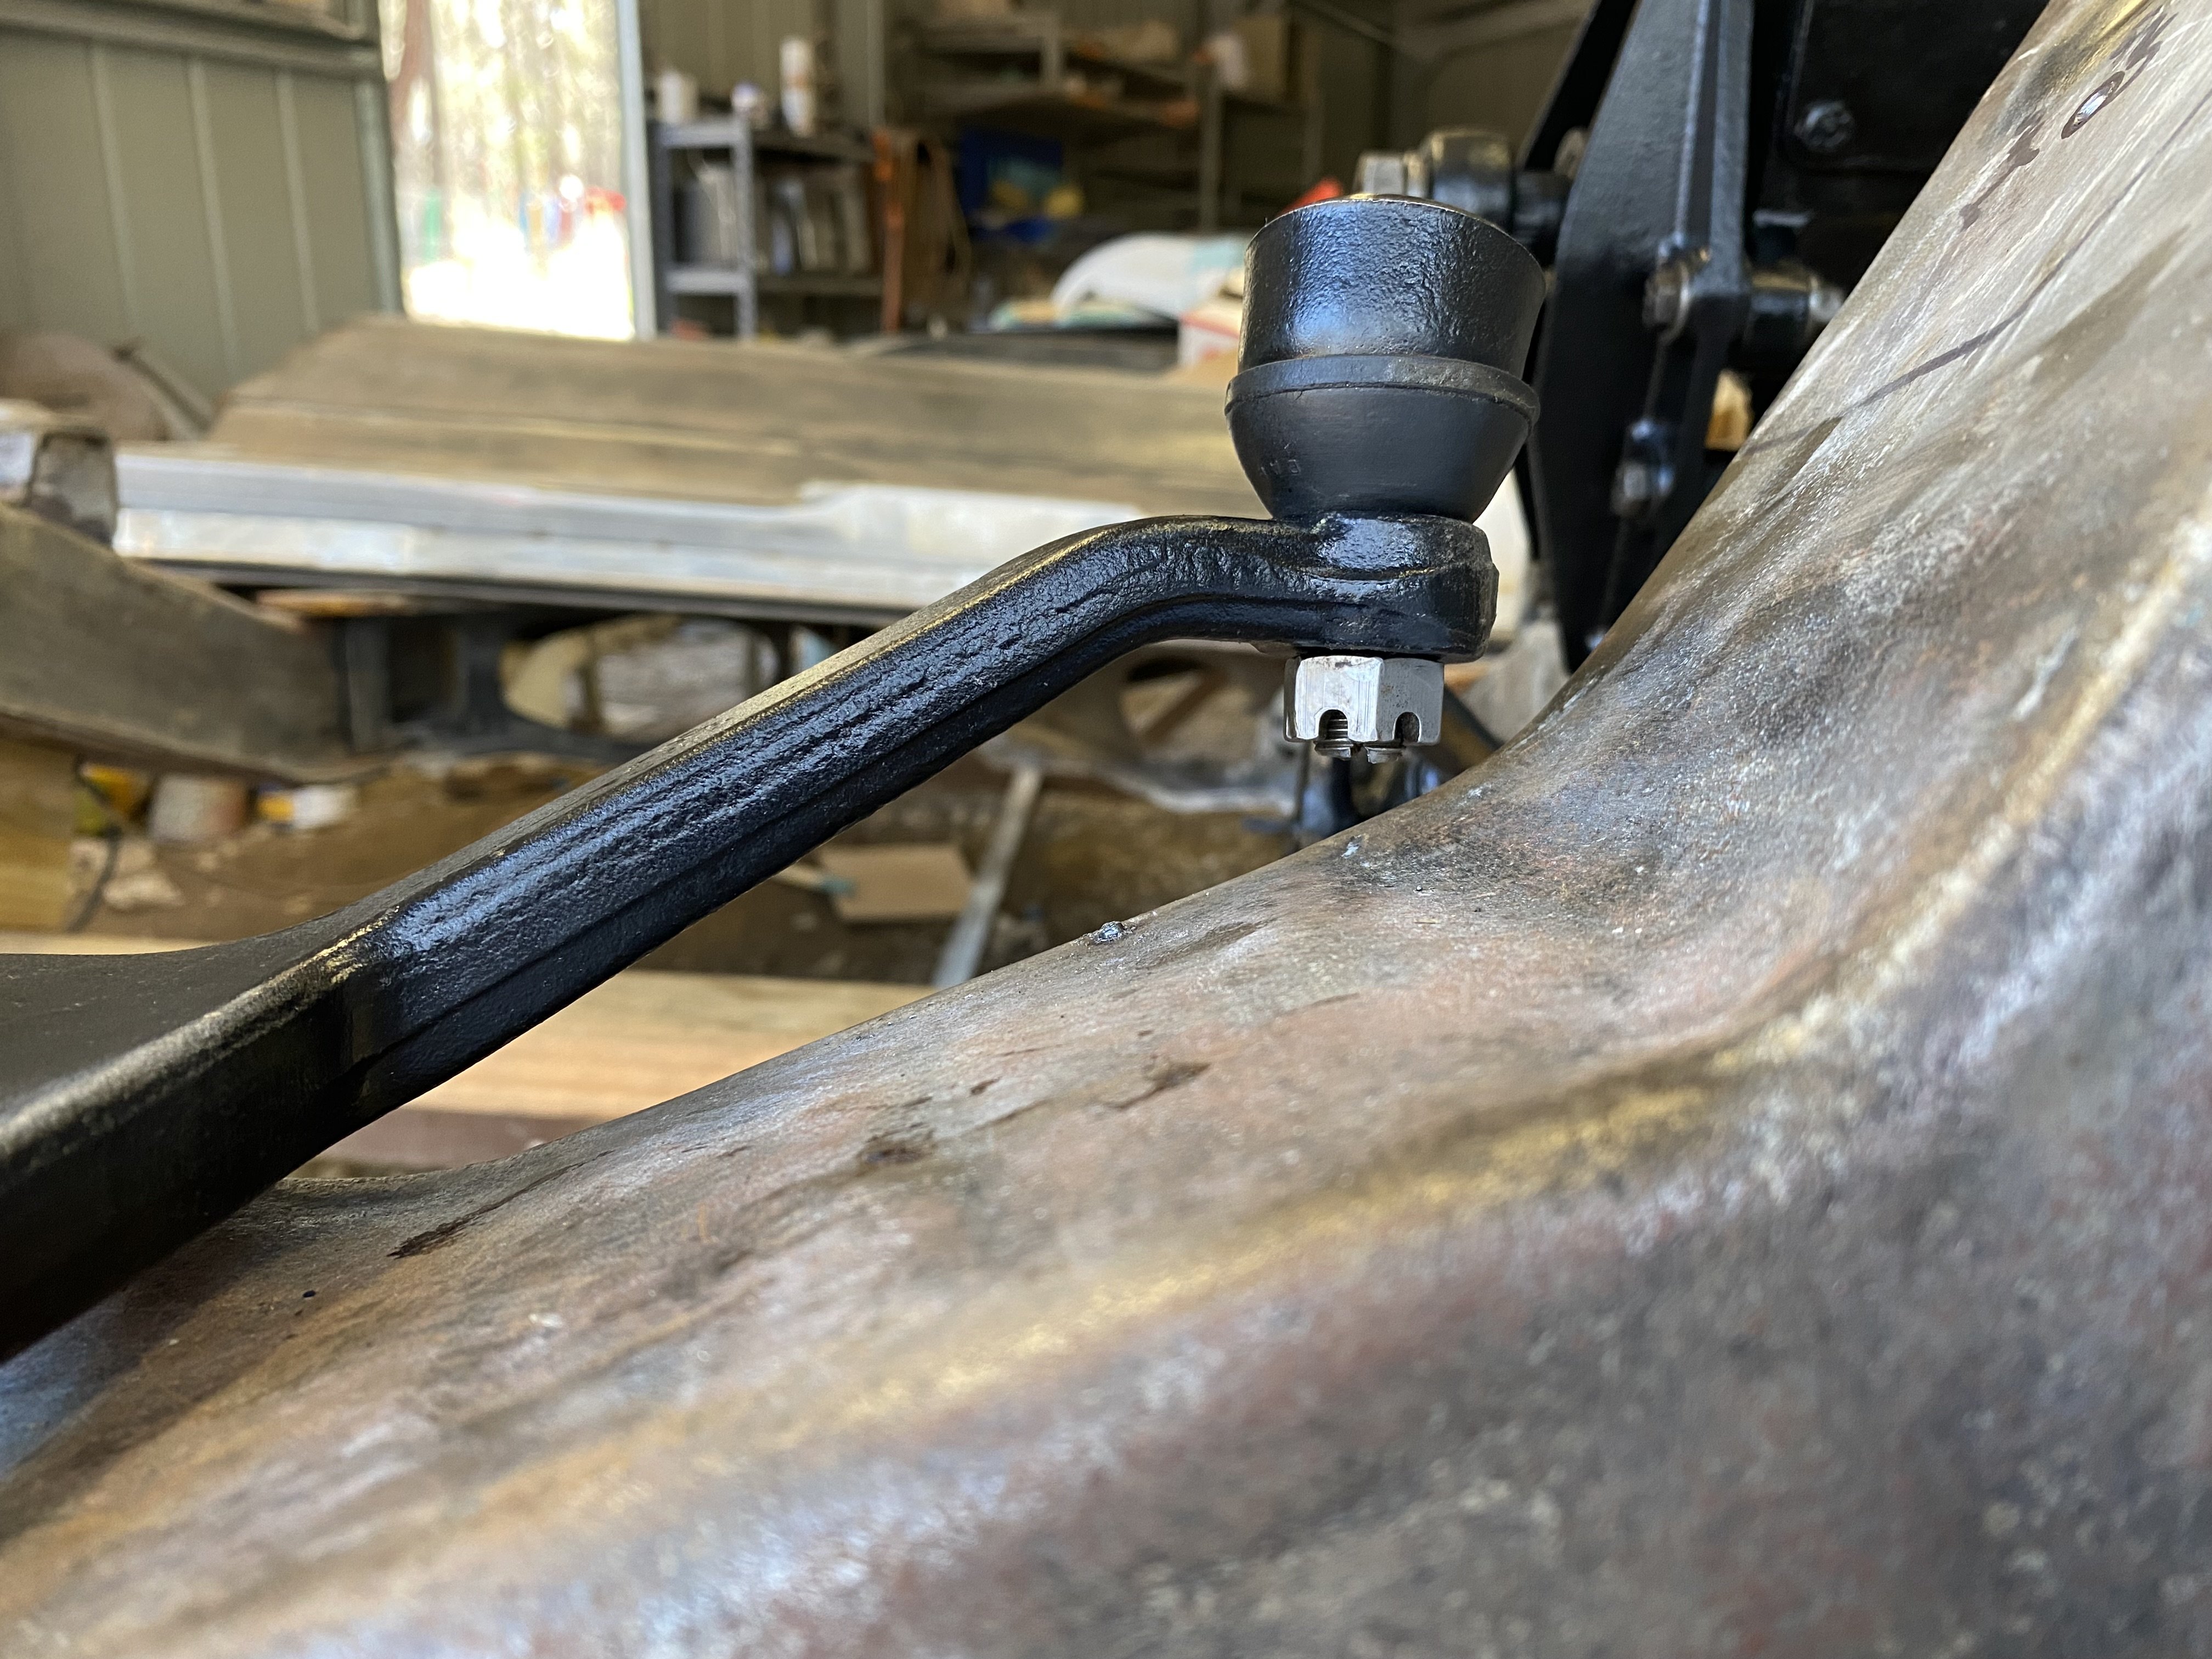
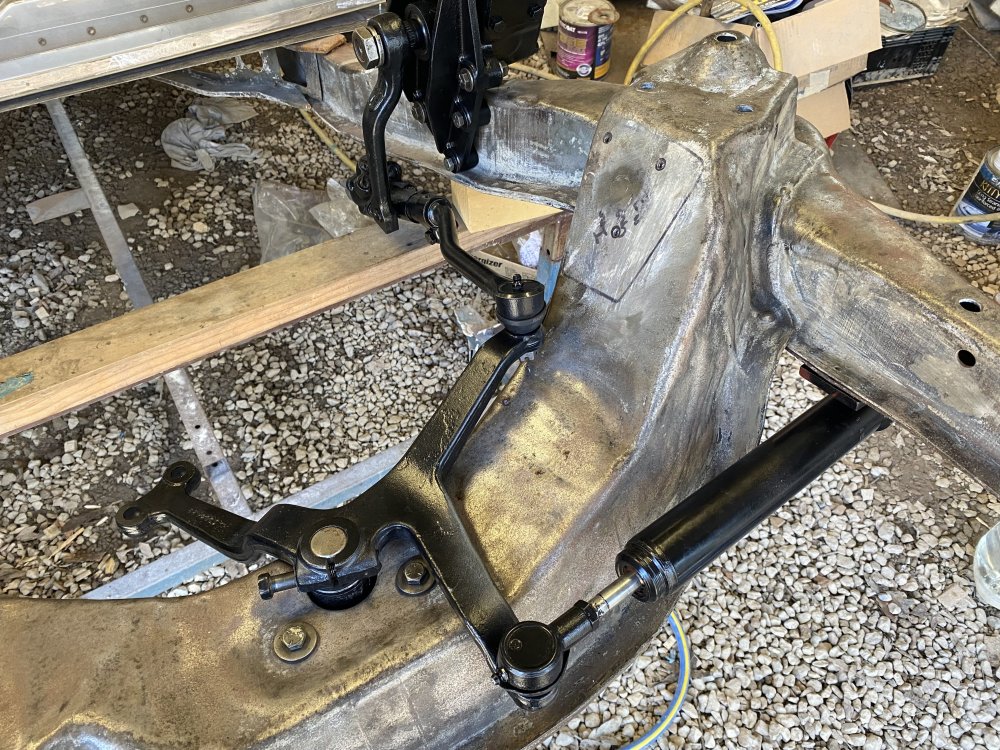
It is many months later..... I have my new Frame ready for paint and the spectre of 'indenting' the inner edge of the Front Crossmember looms. To do it, or not? I assembled the steering components (minus the Tie Rods) and operated the Steering gear to see whether the Drag Link needs clearance or not. To my relief, the castellated nut/Ball Stud of the Drag link and the Shaft itself DO clear the edge of the Crossmember by at least 1/4"- Assembly swung fully forward and aft. This is with all fasteners tightened up, no slop in the Steering Bellcrank. There are no loads on the Frame, admittedly, such as Trans, Motor or Body. Considering the monumental dents perpetrated by the N&A factory- you'd ask why they bothered. I've decided to not reproduce this on the new Frame.

-
Filling the sump with Gasoline is very possible and happened to me. (very next day after an oil change 🥵) Car was parked nose-down in my sloping driveway just to expedite the problem. Diaphragm was fine, but I believe the non return valves were not up to snuff.
-
Hi Folks- I have pulled down my Automatic Transmission completely with a mind to freshen what is actually a 67K mile unit that has languished unused since 1998. Expecting to find O Rings that were hardened and falling to bits, I was somewhat pleased to find all parts, including Bushings in perfect working conditon and kicked myself gently for pulling it all apart in the first place. As part of the learning curve I found that I have a TH350 'C', which means it has a 'Lockup' Torque Converter. I've heard no traffic on this subject on this forum and found myself blindsided when ordering the rebuild kit. I have since obtained a proper valve body gasket kit to suit the 'C'. I was I pretty keen to rid my Avanti II of all Smog/EGR/Distributor/Carburetor/O2 sensor/ECM related gizmos but have since learned the ECM even has some control of the TC Lockup. Now I find my ardour for 'mass removal' cooling somewhat and being put in the too hard basket. However, I do wish to keep the Lockup feature intact. Has anybody got any advice or suggestions appropos this subject, good, bad or indifferent? Whatever happens, though, I am hell-bent on removing the AIR injection system and tubes- UGH!... hate this stuff ! I suspect the EGR controlled Carb as original may not tolerate E10 fuel also...
-
Might be useful... https://www.ebay.com/itm/296017934162?chn=ps&mkevt=1&mkcid=28
-
Yep- that's the original 15/16" bore. Best outcome. 👍 There are lots of Master cylinders that look identical our units and will fit up, but have 1" bores. I'm not quite sure what the upshot of using one of those would be but surely the pedal travel would be far less.
-
All good ....and the correct bore size too! 👍
-
The Steering Bellcrank Bearing is supposed to have a long series grease nipple in the rear facing side- if it's busted no good or not there see if you can get an 90 deg angled one. Might make greasing from above or below easier, perhaps.
-
Thanks for this article, Ronmanfredi. I have a sunroof that I believe may have to come out come out because I've managed to fish some rusted scraps of mild steel out of there. Anything that serves to inform future practice is welcome ! Any chance you could supply the URL for the Rubber strip for perusal ? To be honest I'm hoping somebody out there can supply some advice on peeling back the headlining...
-
I went through this exercise back in January this year. The MC is the same as was used in various Fords from 1967 to 71 eg Fairlaine. Lots of US suppliers are listing it cheaply but show 'No stock'. Important: It has a 15/16" bore and has a restrictor valve fitted in the underslung port for slow bleedback of the rear Brake drums. My solution wasn't so cheap because I ended up having to sleeve the pitted bore and send it out for reconditioning altogether. Hopefully you can find one off the shelf at a reasonable cost otherwise you might have to have it recoed.
-
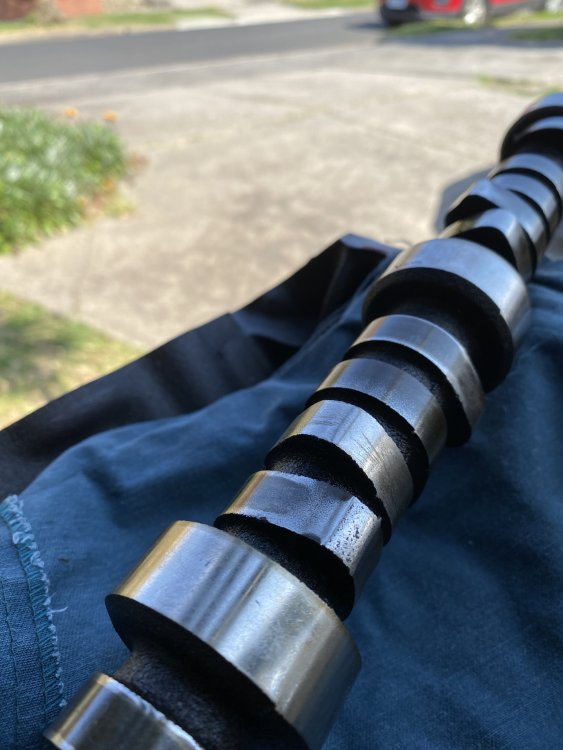
Took a while to get back to this thread, but a photo of the culprit follows ... The engine's reciprocating parts are in spectacularly good condition. measured top ring gap and it's .018". I'm hoping to hone/re-ring, polish crank journals, replace all bearings regardless with new standard sizes. The block and heads will need a heck of a cleanout though-almost clogged. New Camshaft obtained- Comp 12 205 2 which is very conservative 206deg durations on both inlet and exhaust (a bare step up from stock GM). Have new lifters (Crow) and Felpro Gasket kit, Melling double row Timing Kit on the way.
-
Finally got the Camshaft out. A quick look at it revealed about four Cam lobes worn down severely- It's junk. After looking at the number of ruined Lifters, I wonder why more lobes aren't worn. Looking at my options for a replacement and leaning to very 'stock' conservative grinds. The Nylon sprocket and chain will be replaced too.
-
I'm in Australia, Mate- 🙃 (antipodean smiley) O'Reilly's isn't part of our landscape. I'm going to collect one right now one cos I'm getting jack of making everything. You would never know if there were any leaks on this car because my import freighter steam cleaned it to death before shipping across the ditch. I'm replacing and reconditioning everything that has oil or grease on this Avanti anyway.
-
I removed the engine ages ago and am dismantling it for inspection and go from there. I'm likely to overhaul the TH350 trans (nope, no OD) as well. Gotta find/make a suitable puller for the Harmonic Balancer....